

Power locks not locking - the fix


NOTICE: WORK IN PROGRESS, THIS IS ONLY PARTWAY DONE!
Sorry this is taking so long, I intended to finish this up by now but a busted brake line has taken priority over this
For a few months now I've had this issue where hitting lock on the keyfob would set the alarm but not actually lock the doors. Found the same thing happened when hitting the lock button on the door. Sometimes would lock, sometimes wouldn't. Unlock would always work though. I traced it down to a relay in the BCM.
Here is the fix:
Follow these directions how to gain access to and remove the BCM, from https://ls1tech.com/forums/10217921-post47.html
Alright now that you have the BCM out where you can get to it, you can either work on it in the car, or remove it from the car. I opted to remove it from the car. This is easy enough. The big plug has a clip on it that you squeeze and then pull straight off. The other two smaller plugs next to each other have tabs that you have to push in while pulling the plugs out. A flatblade screwdriver works well to push the tabs in.
The relay that operates the locking of the doors is this one in this picture with the arrow pointing to it.

It is all covered in tape because I didn't know where to buy a new relay to solder on the board so I repaired the relay. I cut the top of the housing off the relay at the seam (carefully so as to not damage anything inside) then pulled the guts of the relay out. The only thing that needed done was the contacts needed cleaned up with some sandpaper. Sorry, no pics of the internals, didn't think about it until I had already glued the top back on and put the tape on it to hold it while the glue dried.
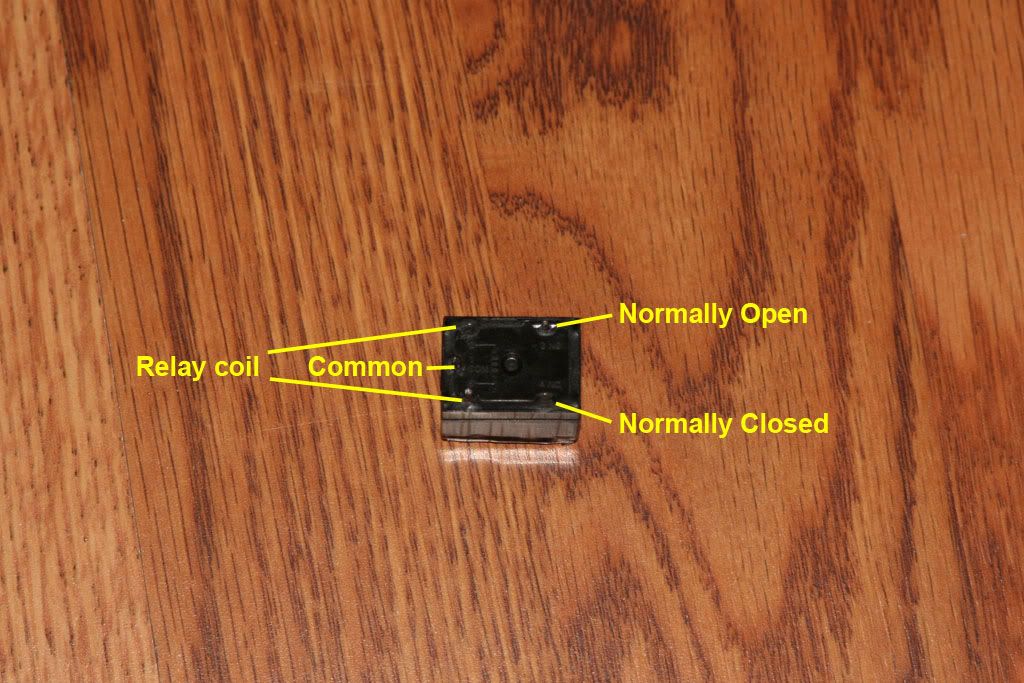
Here is a pic of the relay bottom with the pinout. The relay is an Aromat JSM1E-12V-5-H15 which I couldn't find much info about it from some brief googling.
Solder the new/repaired relay back onto the BCM, remount the BCM, and voila, the locks lock. Sure beats paying a couple hundred bucks for a new BCM over a stupid relay! *NOTE* The power appears to route through TWO relays, exactly how I'm not sure yet, this is the part I still need to trace out. I suspect it routes through the lock relay when activated, through the normally closed part of the unlock relay, to the locks themselves. I thought just this relay was all that was needed at first, but further testing has shown otherwise as I still have locking issues. I will update this with the complete fix!
While you have the BCM out, you may as well go ahead and do the other BCM fix to keep the windows and radio from cutting out even if you don't have a problem yet. I did because I figure while I have the darn thing out, why not do some preventative maintenance? The solder joint on mine wasn't bad but it was starting to crack a little. Here's the link for that:
https://ls1tech.com/forums/stereo-el...lickering.html
Hope this helps some people
Sorry this is taking so long, I intended to finish this up by now but a busted brake line has taken priority over this
For a few months now I've had this issue where hitting lock on the keyfob would set the alarm but not actually lock the doors. Found the same thing happened when hitting the lock button on the door. Sometimes would lock, sometimes wouldn't. Unlock would always work though. I traced it down to a relay in the BCM.
Here is the fix:
Follow these directions how to gain access to and remove the BCM, from https://ls1tech.com/forums/10217921-post47.html
So this post is for anyone like me that had no clue HOW to get to the BCM. All the posts I've read on this site and others either don't mention accessing the BCM or are vague about what needs to be removed to get to it. I finally was able to do it today and took some pictures to help those that want a little picture advice.
Here's the tools I used for the job (not counting the 25w soldering iron I picked up at Home depot):

The easiest way to know what the BCM looks like (plastic holder that encases the BCM that is) is to look at it through the glove compartment. Open the glove box and push on either side near the top of the hinge to let the tabs push inward so the box swings all the way down. You can now easily see the black plastic housing that contains the BCM. I had originally thought I could access it through here but no dice.

Shot of the BCM housing as seen through the glove compartment. It's really frustrating since almost the whole damn thing is staring right at you...

You need to remove this piece that goes along the right side of the base of the door on the inside. Surprising there is nothing holding it to the car where your feet would go, it's simply held in place with 5 screws along the floor that are easy to remove. 4 of the 5 are very easy, the last one required me to move the passenger seat all the way forward so I could get a screwdriver on the screw. If you had a really short (1") 90 degree angle hand phillips head you could also do it this way.

This was the bane of my first 2 attempts at accessing the BCM. This plastic push holder is a bitch to remove. There are 2 of them directly below the glove compartment and they are all that is holding up the plastic cover hiding all the wires and the BCM housing. It wasn't until after I had it out I realized it is simply a friction holder and not a plastic rivet or something that had to be released from above. The easiest way I found was to use the t-top key or some other thick strong piece of metal to use as a wedge while my fingers pulled down. I'm sure now you could just get a pair of pliers or something and just pull. If you look at the push holder there is nothing that can break, so just pull down hard and it will come out.

After lowering the plastic cover you still have one thing to remove to get the BCM out. This thick black plastic tubing holds a bunch of wiring and is blocking the BCM from being pulled out. There are 2 clips that need to be released so you can pull the wiring down and out of the way. The easiest way I found was to use a razor blade to pull up on the tab. It takes a little work but once you figure out how to release it the second one goes very easily.

Here's the tubing pulled down and out of the way.

Finally you have access to the BCM housing. This picture was taking looking straight on from the bottom of the car. There are 2 clips on either side of the housing towards the front of the car. They pry off the back with a bit of force. The left one is easy to get too but the right one is a PITA since part of the dash is somewhat blocking it. The problem is when you pry one side off, then go to do the other, if you don't keep the 1st clip away from the housing it snaps back on when you go to do the 2nd side. What I had to do was pry off the left side, slide my hand in the gap created between the BCM housing and the clips holding it in place, and then pry off the right side. It is not easy, and you'll have to try a couple positions to get that right clip off.

Once the clips are off, you pull the BCM straight down. Again this takes quite a bit of force but don't worry. There are no wires or things to be damaged that you cannot see. Only the wires seen in picture #8 which were at the bottom. Now that you have the BCM out you have 2 choices. You can remove the 3 connectors and solder somewhere else, or like me (since I could not find out how the hell to get the 3 connectors off) just pry open the BCM housing (again I used the razor blade on the 2 little tabs, then it simply opens up like a clam to expose the circuit board).


So that's it. Now you can use the pictures in the original post to finish the job. I looked closely at my board and like the others the bottom solder joint was spidered. Now, I have not soldered since 9th grade electronics class and so was a bit worried but if you work cautiously, it should be easy enough to reheat the joints. I did put a little solder on each joint to help the reheat as the contacts coming up are pretty tall and it's tough to reheat the existing solder without having some liquid solder on the tip of the gun to help the melting.
Once done soldering, turn the car on and make sure it starts. If so, consider it a possible success. It's getting colder now and so I won't really know until it's spring or we get a sudden hot weather spell (as that's when my radio/window issues occur). Then just go in reverse putting the parts back together. First the BCM (this took a long time because it takes a lot of force and the tabs are a PITA, for reference look through the glove compartment to make sure you have it pushed up high enough, I thought I was until I saw there was still another 1/2" or so), then the black tube holding the wires, then the bottom piece with the push screws, and finally the plastic piece along the door.
Hope this helps someone!
Here's the tools I used for the job (not counting the 25w soldering iron I picked up at Home depot):
The easiest way to know what the BCM looks like (plastic holder that encases the BCM that is) is to look at it through the glove compartment. Open the glove box and push on either side near the top of the hinge to let the tabs push inward so the box swings all the way down. You can now easily see the black plastic housing that contains the BCM. I had originally thought I could access it through here but no dice.
Shot of the BCM housing as seen through the glove compartment. It's really frustrating since almost the whole damn thing is staring right at you...
You need to remove this piece that goes along the right side of the base of the door on the inside. Surprising there is nothing holding it to the car where your feet would go, it's simply held in place with 5 screws along the floor that are easy to remove. 4 of the 5 are very easy, the last one required me to move the passenger seat all the way forward so I could get a screwdriver on the screw. If you had a really short (1") 90 degree angle hand phillips head you could also do it this way.
This was the bane of my first 2 attempts at accessing the BCM. This plastic push holder is a bitch to remove. There are 2 of them directly below the glove compartment and they are all that is holding up the plastic cover hiding all the wires and the BCM housing. It wasn't until after I had it out I realized it is simply a friction holder and not a plastic rivet or something that had to be released from above. The easiest way I found was to use the t-top key or some other thick strong piece of metal to use as a wedge while my fingers pulled down. I'm sure now you could just get a pair of pliers or something and just pull. If you look at the push holder there is nothing that can break, so just pull down hard and it will come out.
After lowering the plastic cover you still have one thing to remove to get the BCM out. This thick black plastic tubing holds a bunch of wiring and is blocking the BCM from being pulled out. There are 2 clips that need to be released so you can pull the wiring down and out of the way. The easiest way I found was to use a razor blade to pull up on the tab. It takes a little work but once you figure out how to release it the second one goes very easily.
Here's the tubing pulled down and out of the way.
Finally you have access to the BCM housing. This picture was taking looking straight on from the bottom of the car. There are 2 clips on either side of the housing towards the front of the car. They pry off the back with a bit of force. The left one is easy to get too but the right one is a PITA since part of the dash is somewhat blocking it. The problem is when you pry one side off, then go to do the other, if you don't keep the 1st clip away from the housing it snaps back on when you go to do the 2nd side. What I had to do was pry off the left side, slide my hand in the gap created between the BCM housing and the clips holding it in place, and then pry off the right side. It is not easy, and you'll have to try a couple positions to get that right clip off.
Once the clips are off, you pull the BCM straight down. Again this takes quite a bit of force but don't worry. There are no wires or things to be damaged that you cannot see. Only the wires seen in picture #8 which were at the bottom. Now that you have the BCM out you have 2 choices. You can remove the 3 connectors and solder somewhere else, or like me (since I could not find out how the hell to get the 3 connectors off) just pry open the BCM housing (again I used the razor blade on the 2 little tabs, then it simply opens up like a clam to expose the circuit board).
So that's it. Now you can use the pictures in the original post to finish the job. I looked closely at my board and like the others the bottom solder joint was spidered. Now, I have not soldered since 9th grade electronics class and so was a bit worried but if you work cautiously, it should be easy enough to reheat the joints. I did put a little solder on each joint to help the reheat as the contacts coming up are pretty tall and it's tough to reheat the existing solder without having some liquid solder on the tip of the gun to help the melting.
Once done soldering, turn the car on and make sure it starts. If so, consider it a possible success. It's getting colder now and so I won't really know until it's spring or we get a sudden hot weather spell (as that's when my radio/window issues occur). Then just go in reverse putting the parts back together. First the BCM (this took a long time because it takes a lot of force and the tabs are a PITA, for reference look through the glove compartment to make sure you have it pushed up high enough, I thought I was until I saw there was still another 1/2" or so), then the black tube holding the wires, then the bottom piece with the push screws, and finally the plastic piece along the door.
Hope this helps someone!
The relay that operates the locking of the doors is this one in this picture with the arrow pointing to it.
It is all covered in tape because I didn't know where to buy a new relay to solder on the board so I repaired the relay. I cut the top of the housing off the relay at the seam (carefully so as to not damage anything inside) then pulled the guts of the relay out. The only thing that needed done was the contacts needed cleaned up with some sandpaper. Sorry, no pics of the internals, didn't think about it until I had already glued the top back on and put the tape on it to hold it while the glue dried.
Here is a pic of the relay bottom with the pinout. The relay is an Aromat JSM1E-12V-5-H15 which I couldn't find much info about it from some brief googling.
Solder the new/repaired relay back onto the BCM, remount the BCM, and voila, the locks lock. Sure beats paying a couple hundred bucks for a new BCM over a stupid relay! *NOTE* The power appears to route through TWO relays, exactly how I'm not sure yet, this is the part I still need to trace out. I suspect it routes through the lock relay when activated, through the normally closed part of the unlock relay, to the locks themselves. I thought just this relay was all that was needed at first, but further testing has shown otherwise as I still have locking issues. I will update this with the complete fix!
While you have the BCM out, you may as well go ahead and do the other BCM fix to keep the windows and radio from cutting out even if you don't have a problem yet. I did because I figure while I have the darn thing out, why not do some preventative maintenance? The solder joint on mine wasn't bad but it was starting to crack a little. Here's the link for that:
https://ls1tech.com/forums/stereo-el...lickering.html
Hope this helps some people
Last edited by SparkyJJO; Apr 26, 2012 at 10:30 AM.


