


 May 20, 2016, 02:16 PM
Last edit by: IB Advertising
See related guides and technical advice from our community experts:
- Camaro and Firebird How to Replace Thermostat and Water Pump<br>Step by step instructions for do-it-yourself repairs.

Water Pump Replacement
Cool (no pun), then I'll stick with my stock t-stat.
I was thinking of switching because the Summers here in GA are notoriously hot. As a matter of fact, it's that hot now! But I'd rather not be running too cold, since I need the moisture out moreso.
I've been told that water cools better than antifreeze. If this is so, then I should be able to get by just fine with water for the Summer months, then switching to antifreeze for Winter, right?
Thanks very much for your help.
I'm close to swapping the water pump, but a couple concerns that I had forgotten to ask about before are, 1, whether I need to gasket sealant on both sides of the gasket, or just one, and 2, how much to apply?
When I removed the old pump, it seemed like the gaskets had no sealant on the pump side:
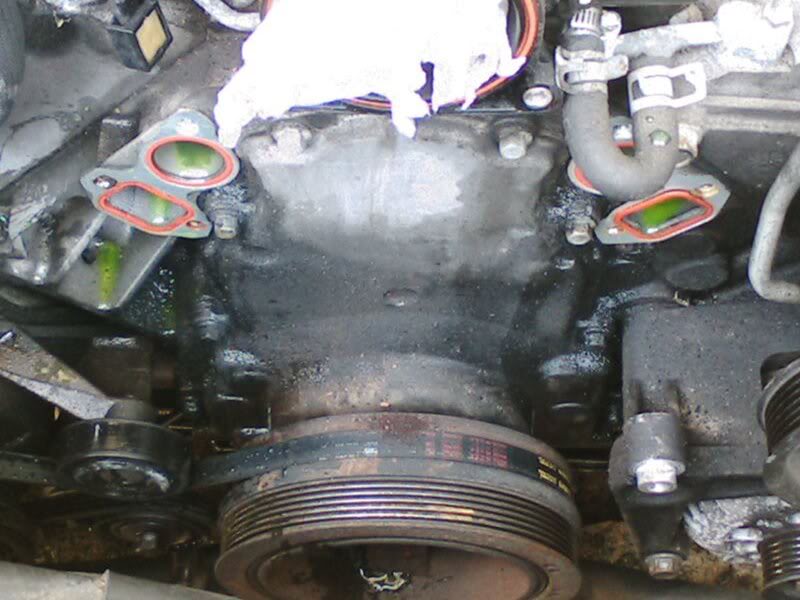
Finally, is it detrimental to have any sealant oozes to the rubber rings and protrudes to where the coolant flows like this:
When I removed the old pump, it seemed like the gaskets had no sealant on the pump side:
Finally, is it detrimental to have any sealant oozes to the rubber rings and protrudes to where the coolant flows like this:

Launching!

Joined: Jan 2005
Posts: 206
Likes: 0
From: Tampa
I switched mine out 2 years ago this September with a new one from Adv Auto. Right after starting the car it ran different and not as smooth. It was very obvious to me at lower rpm. Ended up the the pump pulley was wobbling because the manufacturer did not put it on perfect. Did the entire job again 2 days later and learned my lesson to look over any new parts extremely well before installing.
I hear you.
I did inspect the replacement pump as best I could. I spun the pulley without having any detectable defects (my replacement's a used OEM). Also rinsed it out too to get any residual Dex-Cool out (I'm running green). But as far as doing the job over again, I currently have the new pump temporarily bolted on and am extremely fortunate to not have finished everything last night, because I realized I left a piece of paper towel in one of the gasket holes. So I'll have to remove the pump for that, and while I'm at it, I might as well redo the gasket sealant.
How much sealant are you supposed to use? You don't have to cover the narrow areas surrounding the rubber rings, right? The sealant I have turns rubbery after drying. Are there areas in the coolant channels of the engine block that could snag pieces of rubbery debris?
BTW, I'm having to reuse one of the old gaskets because Autozone had only one left. Are there any special care procedures to preparing a used gasket, or can I just go about it the same way as with the new one?
Do you mean re-use a gasket if the car hasn't had coolant put in it yet, therefore the gasket is still dry? If so, you should be OK, just be careful not to tear it, but if at all possible, I'd try to locate another new one. It's annoying to have to do a job twice, over the cost of a gasket...
Thank you very much for the advice. I definitely agree with you.
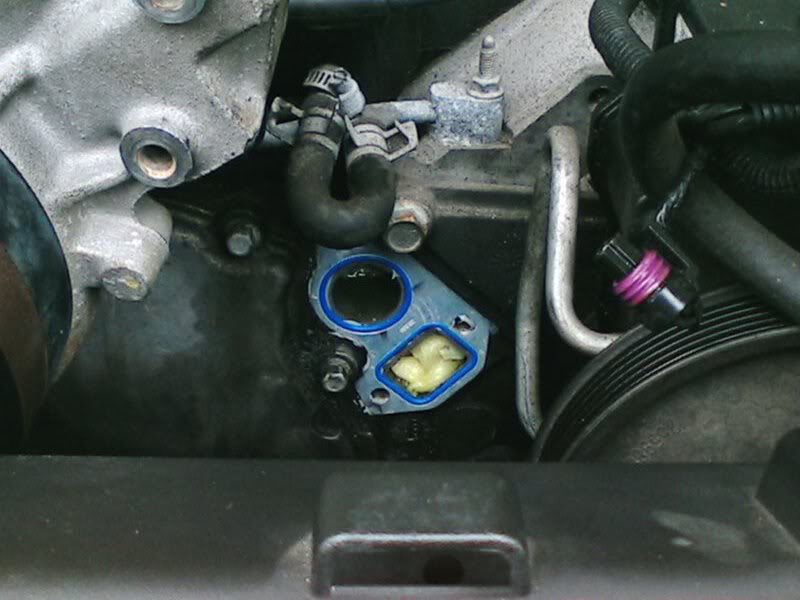
My old gasket that I plan to reuse is the one at the left in the first picture above. As you can see, the gasket on the right already had the rubber ring popping out, so I figured I'd use the new one (with blue rings) for that side. But the square ring on the old/left gasket was also coming loose when I put on the new pump because it knocked the gasket off surface of the block. I just used a thin blade to push it back back into the groove before applying some sealant around the bolt holes and the middle of the gasket.
With this in consideration, I'll definitely try my best to get a new one. Problem is that the home shipping option with these stores takes up to several business days, and I absolutely need the car up and running by Monday. I was actually supposed to have the pump done by last Wednesday. So I have only all of today and early tomorrow to consult the members of LS1 Tech before do-or-die on Sunday afternoon.
How much sealant do you recommend putting, and should it be placed on both sides? When the old gasket came off, it only had dark spots towards the outer edges and hardly any towards the middle, as you can also partially see in the picture--although, I really can't be sure if the dark spots are from the previous sealant...
Thank you very much for the advice. I definitely agree with you.
My old gasket that I plan to reuse is the one at the left in the first picture above. As you can see, the gasket on the right already had the rubber ring popping out, so I figured I'd use the new one (with blue rings) for that side. But the square ring on the old/left gasket was also coming loose when I put on the new pump because it knocked the gasket off surface of the block. I just used a thin blade to push it back back into the groove before applying some sealant around the bolt holes and the middle of the gasket.
With this in consideration, I'll definitely try my best to get a new one. Problem is that the home shipping option with these stores takes up to several business days, and I absolutely need the car up and running by Monday. I was actually supposed to have the pump done by last Wednesday. So I have only all of today and early tomorrow to consult the members of LS1 Tech before do-or-die on Sunday afternoon.
How much sealant do you recommend putting, and should it be placed on both sides? When the old gasket came off, it only had dark spots towards the outer edges and hardly any towards the middle, as you can also partially see in the picture--although, I really can't be sure if the dark spots are from the previous sealant...
OK, I've never had an LS1 apart yet, so I didn't realize that they had the "o-ring" seals, rather than regular flat gaskets. I have many years of experience with vacuum equipment, and most vacuum chambers have o-ring seals all over the place. We didn't use sealer at all, in these applications, we used a "low out gassing" vacuum grease.
In an automotive cooling system application, the outgassing aspect wouldn't be an issue, so possibly a little grease, rubbed into the o-rings, and the bolts torqued carefully to spec, could work for you....
One more thing...do the mounting bolts go into the water jacket, or are they blind holes? If they're blind holes, no problem, just make sure the threads are clean. If they go into the water jacket, as some of the LT1s do, hit them with a dab of thread sealer before you install them.
Good luck!
LS1 Tech Stories
The Best V8 Stories One Small Block at Time

6 Common C5 Corvette Failures and What's Involved In Repairing Them
Pouria Savadkouei
Retro Modern Bandit Pontiac Trans AM Comes With Burt Reynolds' Autograph
Verdad Gallardo
Top 10 Greatest Cadillac V Series Performance Models Ever, Ranked
Pouria Savadkouei
Top 10 Most Powerful Chevy Trucks Ever Made!

Hennessey's New Supercharged Silverado ZR2 Has 700 HP
Verdad Gallardo
Coachbuilt N2A Anteros Is an LS2-Powered C6 Corvette In Italian Clothes
Verdad Gallardo
Awesome K5 Blazer Restomod Comes With C7 Corvette Power
Verdad Gallardo
10 Camaros You Should Never Buy

10 LS Engine Myths That Refuse to Die
Verdad Gallardo Thank you very much for bringing that up!! I was actually curious about it, because it just happens that the two uppermost (uppermost on each side) bolts were completely clean when I took them out, but the rest of the 4 had corrosion/coolant on the threads. Knowing the clarification you've given, I would say those 4 probably go into the water jacket, and I will be sure to use some thread sealer.
I just called Advance Auto Parts and confirmed my gasket in stock, so I'll be heading out there now to pick up the gasket + thread sealer (& vacuum grease if they have it).
Thanks again for your help. I appreciate it greatly, and will report back on my progress.
I just called Advance Auto Parts and confirmed my gasket in stock, so I'll be heading out there now to pick up the gasket + thread sealer (& vacuum grease if they have it).
Thanks again for your help. I appreciate it greatly, and will report back on my progress.
Thank you very much for bringing that up!! I was actually curious about it, because it just happens that the two uppermost (uppermost on each side) bolts were completely clean when I took them out, but the rest of the 4 had corrosion/coolant on the threads. Knowing the clarification you've given, I would say those 4 probably go into the water jacket, and I will be sure to use some thread sealer.
I just called Advance Auto Parts and confirmed my gasket in stock, so I'll be heading out there now to pick up the gasket + thread sealer (& vacuum grease if they have it).
Thanks again for your help. I appreciate it greatly, and will report back on my progress.
I just called Advance Auto Parts and confirmed my gasket in stock, so I'll be heading out there now to pick up the gasket + thread sealer (& vacuum grease if they have it).
Thanks again for your help. I appreciate it greatly, and will report back on my progress.
I'm just checking back, and you've probably left for the store by now...
I guarantee that they'll give you a strange look if you ask for vacuum grease at AAP, as it's a specialty product, used only for vacuum chamber assembly/maintenance. (I retired a few years ago, and coincidentally work part time for AAP...they might give you blank looks anyway...
 ) What I was suggesting was regular grease, if you were forced to use that gasket again...
 Well, I managed to pick up 2 new Felpro gaskets and thread sealer from Advance yesterday, but when I asked them about sealing the gaskets, they told me that I didn't need to use anything for these kind that have rubber rings because they "self-mate." I got pretty confused when I heard this because the tutorial from LS1 How To explicitely states "RTV silicone gasket sealant" as one of the necessary supplies. Additionally, I was also told that my thermostat gasket required no sealant, so I spent some time getting the dried sealant I applied yesterday off. So all things considered, I guess it's ultimately an option for the owner. For me, I definitely prefer extra security for preventing annoying leaks.
Last night, I removed the water pump and peeled off both gaskets. They were stuck on pretty good. If it weren't for the fact that I had spots without sealant, I probably wouldn't have been able to peel them off because I was getting no where with a small knife blade. I put waaay too much, but did not really exceed the recommended 1/8" on the back of the Permatex package. So, this time, I'll be using small amounts here and there, and try my best not to overlap onto the rubber rings, as its thickness made it clear to me that it could potentially cause problems instead.
Also, I took off the old thermostat and popped out the spring, and to my surprise, there were a few soft, black rubbery pellet pieces stuck in the holes of the t-stat. They were fully solid rubber-like, though soft... (I bolted the old t-stat because I had sealant on the new one when I shouldn't.) Best I can speculate is that it's from a plasticizing reaction from the Dex-Cool I ran previously. This effect is commonly reported with Dex-Cool, hence the nickname, "Death-Cool." I only had the wide nose plier to pop the spring out of the t-stat housing. Is the t-stat delicate? Is it likely I could've been damaged by the impact shocks from the spring? The main drive pulley won't get damaged if I let the water pump sit on there, right?
I'm gonna finish everything up later this afternoon and post up any additional relevant info.
Thanks again for the guidance and recommendations.
Last edited by Crimsonnaire; May 15, 2011 at 05:22 AM.
Well, I got the new pump on with everything back together, and it's running smoothly. However, something that I didn't expect is a leak is coming from the passenger side of the pump, right below the gasket. Truth be told, I didn't use any gasket sealant because I decided it would've been much more difficult for me (worked alone), plus that these gaskets are supposed to not require any sealant anyway. I did use thread sealant for the 4 bolts that had corrosion. It would be easy for me to assume that it's coming from that particular gasket, but I really can't be sure whether it's the gasket or one of the bolts. I'm quite sure I torqued all the bolts to 22 lbs/ft, but I'll check to eliminate that possibility before going further. I took extra care doing everything, and I'm definitely not looking forward to going through that again... at least not so soon.
Here is the old pump:
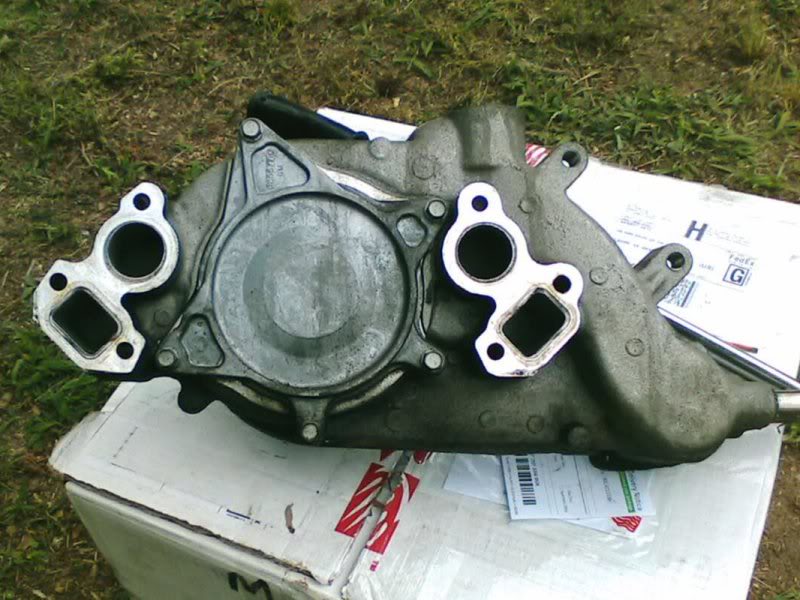
And replacement pump:

Although it looks bad, the dark layer around the holes of the replacement pump is actually smooth and nonprotrusive, so I decided not to bother scraping that off.
One peculiar detail I noticed is that the leak would be consistent (drip...drip...drip) when the engine is cooled off a bit, but not when it's hot... When I saw this, I reasoned that perhaps one or more bolts weren't tight enough, and the expansion/contraction between surfaces was opening and closing a gap. For now, my only question is whether or not these gaskets can still be misaligned with all bolts through the bolt holes of the gasket?
Here is the old pump:
And replacement pump:
Although it looks bad, the dark layer around the holes of the replacement pump is actually smooth and nonprotrusive, so I decided not to bother scraping that off.
One peculiar detail I noticed is that the leak would be consistent (drip...drip...drip) when the engine is cooled off a bit, but not when it's hot... When I saw this, I reasoned that perhaps one or more bolts weren't tight enough, and the expansion/contraction between surfaces was opening and closing a gap. For now, my only question is whether or not these gaskets can still be misaligned with all bolts through the bolt holes of the gasket?


I did this last month with a new pump from Advance. I used NOTHING other than the supplied gaskets, and the supplied O-Ring with the T-Stat. No leaks, no drips 2k miles later.....
I did have to flush the **** out of it though with a waterhose. I noticed a lot of machining shavings and casting flash left over from the factory. Definately didnt want those to plug a water galley or anything. Just food for thought.
I did have to flush the **** out of it though with a waterhose. I noticed a lot of machining shavings and casting flash left over from the factory. Definately didnt want those to plug a water galley or anything. Just food for thought.
Launching!
Joined: Jan 2005
Posts: 206
Likes: 0
From: Tampa
I don't understand what that dark surface is on the new pump where the gaskets go? I don't remember mine being like that.
I don't trust any gaskets. Anything I do that is not a 'simple' job I use red rtv. I put a small thin line of rtv around each gasket area AND each bolt hole.
In my reply earlier I posted that my water pump was not balanced and I had to do it a second time. I did the rtv each time. The cleanup wasn't that bad in between.
Thank you all very much for your replies.
SJsingle1,
As soon as I read "Vaseline," I thought of the skin cream. That wouldn't be what you're referring, would it?
Dr Whigham,
When you did the flush, you had the pump off, right? If so, then I'm afraid I missed my opportunity. Is there any cleaning additive that can be mixed into the coolan/water for the purpose of a cleaning job prior to refilling the radiator with clean coolant?
Schnell,
I found it curious as well. Upon close inspection, I looked like a corrosive reaction which took place on the aluminum surface itself, because it was rather difficult to crape off with a hard edge from a Swiss army knife. When small portions were scraped off, it was not flakey at all, and the only fresh silver surface exposed was to the exact contour of the scraped area. My speculation is that it's a chemical reaction either with the previous Dex-Cool it ran or from the previous gasket sealant.
Something I've been wanting know more about is the purpose of the number of passes vs torque amount. The recommended procedure is a first pass to 11 lbs/ft, and then a second pass to 22 lbs/ft, but what difference would it make it if you torque it to 22 lbs/ft in the first pass--or for that matter, 22 lbs spread out in multiple passes as long as you don't exceed that mark? Would it hurt anything if, after you've done the recommended torquing procedure and want to double check the torque, you loosen the bolt slightly with the torque wrench and retorque it until it's back to 22 lbs on the dial?
Right, the pump was off. I checked it out at the counter before I walked out to ensure my T-Stat would fit. That's when I saw all the casting flash and debris.
It's metal shards, so I know of no way to get them out other than maybe a magnet at the drain petcock? Probably not a bad idea anyways, now that I think about it......
It's metal shards, so I know of no way to get them out other than maybe a magnet at the drain petcock? Probably not a bad idea anyways, now that I think about it......
Last edited by dr_whigham; May 23, 2011 at 08:24 PM.