


How to make your own LS1 coil relocation brackets???
Thread Starter
TECH Enthusiast
iTrader: (6)
Joined: Aug 2008
Posts: 592
Likes: 0
From: Alvin, TX/HOUSTON,TX
I know this has been brought up thousands of times , I have seen a couple pics , but I haven't seen someone say how to make them. Like what u need in order for them to work. Where to get the wires. I seen dopefedz post of pics of his set up and looks clean as hell , but I think he don't have a/c in that thing .... I really don't want to spend 200+ bucks on something that looks so easy to do just need a push in the right direction. Thanks in advance .
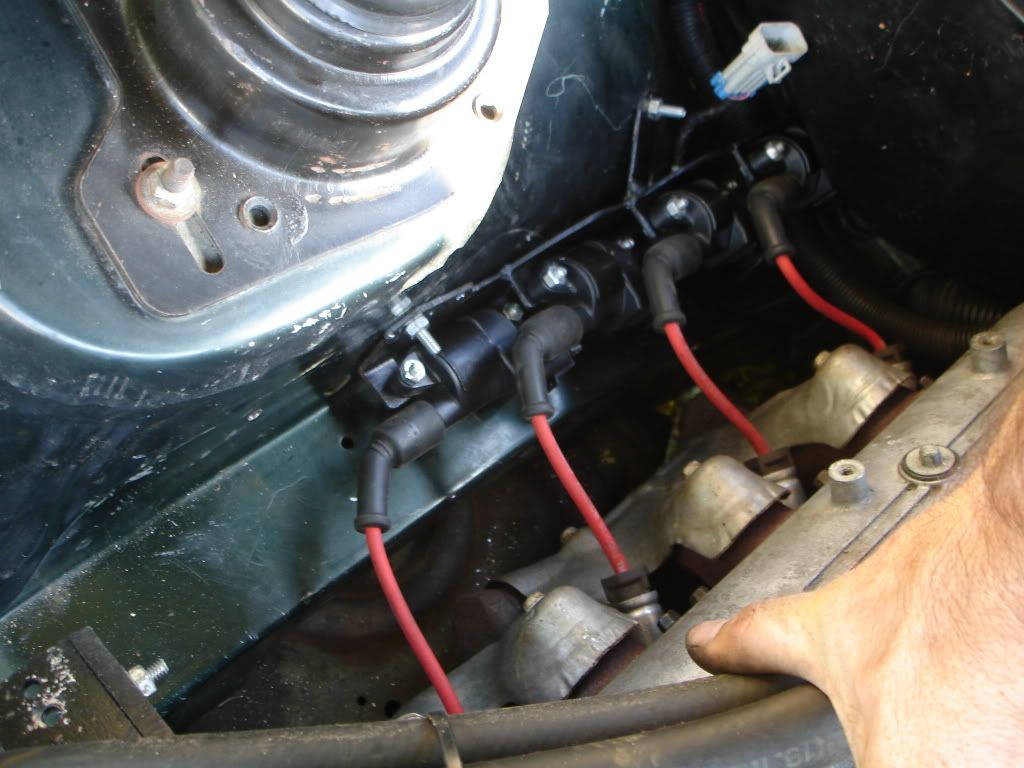
You can go to any hardware store and get about every thing you need to do this, Its been a while since i done mine, I got a piece of 1/8" all thread and aluminum tubing with a 3/16" I.D. or hole and then take your coils off the bracket and stack them , Cut the 1/8" all thread to the desired length and then cut the tubing to space the coils apart were they don't touch each other, There is hole in the coils for the all tread to go threw, then put a 1/8" nut and lock washer to tie it all together, Then i took a piece of 1/8" aluminum and made a plate and drilled two hole in it to bolt the coils to it with the all thread that i used to tie the coil together. That was the easy part was making the brackets, the bitch was shorting the coil harness by cutting and soldering to wires together and heat shrinking , You will have more time in the harness than the coil brackets 10 to 1 .. Sorry i dont have any pics and wish i could explain it better, but hope this will give you a idea how to do it and maybe some one else will help you on here
Trending Topics
LS1 Tech Stories
The Best V8 Stories One Small Block at Time

6 Common C5 Corvette Failures and What's Involved In Repairing Them
Pouria Savadkouei
Retro Modern Bandit Pontiac Trans AM Comes With Burt Reynolds' Autograph
Verdad Gallardo
Top 10 Greatest Cadillac V Series Performance Models Ever, Ranked
Pouria Savadkouei
Top 10 Most Powerful Chevy Trucks Ever Made!

Hennessey's New Supercharged Silverado ZR2 Has 700 HP
Verdad Gallardo
Coachbuilt N2A Anteros Is an LS2-Powered C6 Corvette In Italian Clothes
Verdad Gallardo
Awesome K5 Blazer Restomod Comes With C7 Corvette Power
Verdad Gallardo
10 Camaros You Should Never Buy

10 LS Engine Myths That Refuse to Die
Verdad Gallardo The way that i done my harness was to remove the harness from the bracket and connect all the coils to the harness plugs, and mark each one to its number cylinder , like #1 cylinder with #1 coil and so on, because the harness plugs are unique to the cylinder it fires on. Then strip the tape that covering all the wires and then separate each set of wire to each coil , they are color coded, Do one coil at a time , Do this after you have the coil mounted to the bracket that you made, to get the correct length, Now get you a soldering knife or gun and heat shrink tubing . Cut each wire to your desired length and solder the wires back together and dont forget to put the heat shrink on first, After the wire is soldered together take a heat gun or lighter and shrink the tubing to the wire, then complete the rest of the coil plug, There's one coil .After you complete one set (4) coils retape the harness and your done with that side. This is not hard just time consuming
Last edited by Randy WS6; Mar 10, 2011 at 12:06 PM.

Thread Starter
TECH Enthusiast
iTrader: (6)
Joined: Aug 2008
Posts: 592
Likes: 0
From: Alvin, TX/HOUSTON,TX
Randy did u buy that kit? Or made it urself ? .... yeah I know that works cause u have it under the cowl . But look atthere set up is right next to the headers or what ever ... the a/c lines run there in the 4th gens ... was wondering what kind of plug wires did u use....
The wire are a MSD 8.5 universal (cut to fit) went to summit racing and ordered the Optic spark ends for the coils , I believe there the same as the LT1 with the distributor on the front of the crank shaft

hey to threadjack a little, can anyone tell me, when relocating the coils do they need to be grounded? meaning does the bracket they get bolted into act as a ground? I'm in the middle of a custom LS1 project and was wondering if I could simply bolt them onto some 3/8" Acrilic plate I have sitting around. but wasn't sure if that'd invite trouble.


Thanks, Ive tried to clean it up some but its hard to do, I guess people will notice all the hoses and lines were there braided and all the colored fittings ,I have around 500.00 in hoses and fittings under the hood . Sense i took the pic, Ive removed all the AC and heater hoses and rewired under the hood. Getting ready to pull it, to put my new LS3 431cid in.