

Went to junkyard to scope out my first LSx details
 04-02-2017 | 06:24 PM
#61

Joined: Mar 2003
Posts: 10,232
Likes: 1,524
From: The City of Fountains
Sikky rep thinks it is an oil pump issue. my question is, if the pump is bad, wasn't the engine run in the original vehicle with a bad pump also? That sounds terrible.
From sikky:
"Yes so we have seen junk yard engines that came out of running cars get swapped in and have same low oil pressure issue. We assumed just like you that there was no way it could be the pump because supposedly it was running prior. After tearing everything apart we found the pump was the problem. This same thing has happened several times over the many years we have been doing these swaps. 10+ years to be exact. If you checked all the obvious stuff and it all checks out than this is likely your issue. " -Sikky rep
I suppose the only thing to do is buy an oil pump and have it handy.
update: i bought an oil pump and a new balancer bolt (sigh).
My next question is, will I be able to re-use the existing timing cover gasket materials?
Biggest regret is, I really, really, really sealed up that oil pan. I mean, I really sealed it up. I really did. Its going to really suck pulling it back off. maniacal laughters ensue....
plans as of now:
remove engine/trans. Cut trans tunnel so the 4l80e can be at 0* just like the IRS differential. Weld plate to the under-side of the car for a new trans-mount bracket location. Change oil pump in engine. step 3: profit
If the mods dont mind I want to keep this thread going since technically I am still in external engine diagnostics/procedures. Or else I can split everything up (trans work / computer work) into other threads. If I dont get any response I will just assume nobody cares and do whatever I can to make the info easy to consolidate.
Andrew
04-02-2017 | 09:49 PM
#62

 04-06-2017 | 11:42 PM
#63
It is done. I pulled engine, made the new trans mount for 0* "pinion angle" (trans and diff at 0*, driveshaft has a slight downway angle), pulled *cough ripped apart the front of the motor and oil pan, spend about 3 hours with a razor cleaning the surfaces of everything like new again, installed the new primed oil pump, sealed the motor up tight again, installed a new front main seal (figured why not) a new balancer bolt (funny pic is coming for that one I think), and reinstalled the engine in the car. I am now back to where I was almost 2 weeks ago (sigh). So here is the funny (or if you want, terrible) part. I think the oil pump in the motor was good, better than good it looks cherry as you could possibly imagine. I got pics of course but wait a day. So I think the OEM pump was fine, I was just too much of a scaredy cat to actually crank the motor enough to see pressure. This time around, with the confidence of a brand new pump in the engine, I let it go and go a bit, and finally my gauge started to move. With the gauge reading POST oil filter pressure, I saw 38PSI while cranking. Pretty happy about that. So in a day or two it should start, but look forward to some pictures of course of all this stuff I just merrily rattled out.
Sorry I am having issues with photobucket. None of my pics are showing up anymore, and two of my albums completely dissipated. The photobucket staff already said they "couldnt recover them" even though they still show up in this thread. And now I cant upload anything. So I suppose I need a new image hosting site. Will try to sort that out sometime this week.
Sorry I am having issues with photobucket. None of my pics are showing up anymore, and two of my albums completely dissipated. The photobucket staff already said they "couldnt recover them" even though they still show up in this thread. And now I cant upload anything. So I suppose I need a new image hosting site. Will try to sort that out sometime this week.
Last edited by kingtal0n; 04-07-2017 at 08:34 AM.
04-09-2017 | 11:06 PM
#64
Started it today 
I prime the fuel system a couple times, no clue what the fuel pressure was, just out of the box regulator setting. I could hear the fuel pump load so I knew there was something. The operating system base cal and fuel injector data is for the truck 5.3L engine with flex fuel injectors (probably 40lb or 50lb), however, I have LS-1 injectors in the motor now instead (no clue what size those are), so there is all kinds of wackery with the gasoline at this point and anything could happen. I did the best first guesses I could in the HP tuners (weeks ago in my room) so I didn't even bring my laptop out there, I just plugged in the computer and turned the key (HERE GOES!) fingers crossed
Well apparently everything was close enough, because it Fired right up and tried to idle on me!
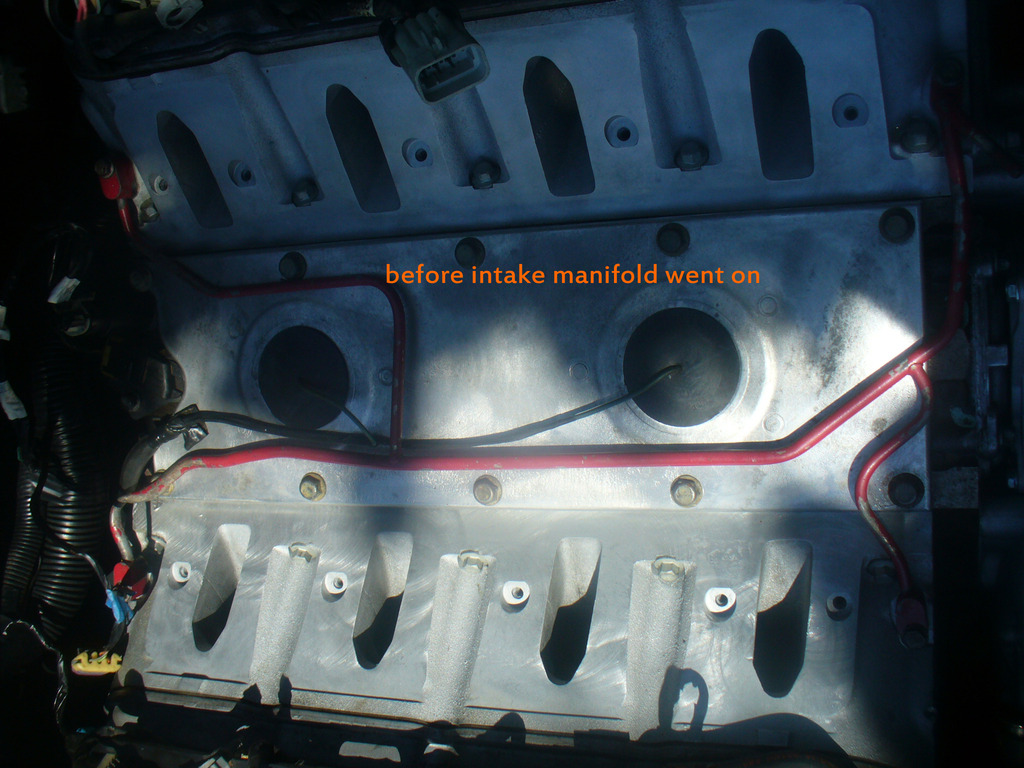
I got the pressure test done as well, video taped it, but there was wind and I am not sure the audio came out well yet (have to review the video). The used, original LS1 intake gaskets looked flat and useless, however they sealed up nicely. The only leaking object was the PCV valve, which I knew about because I blew into it earlier in the month and found it leaking slightly already. I put my finger over that and the intake air path held air for a looooong time so its sealed up really well. I put a little into the crankcase as well and it is also well isolated and sealed up. So this motor has a clean bill, very well sealed up, great compression, and it didn't make any unexpected noises while running. About to continue onto phase 2 which is exhaust plumbing. I wont post any transmission or turbo stuff in this thread (its not really a build thread, more of a please help me with my first LS motor thread) but I will make a link from here to there when the time comes. Ill post a couple more pics of the engine where it sits but that is pretty much it for the "external engine" stuff I think!
Thanks to everyone (and special thanks to JOE) who helped this along.

I prime the fuel system a couple times, no clue what the fuel pressure was, just out of the box regulator setting. I could hear the fuel pump load so I knew there was something. The operating system base cal and fuel injector data is for the truck 5.3L engine with flex fuel injectors (probably 40lb or 50lb), however, I have LS-1 injectors in the motor now instead (no clue what size those are), so there is all kinds of wackery with the gasoline at this point and anything could happen. I did the best first guesses I could in the HP tuners (weeks ago in my room) so I didn't even bring my laptop out there, I just plugged in the computer and turned the key (HERE GOES!) fingers crossed
Well apparently everything was close enough,
because it Fired right up and tried to idle on me! I got the pressure test done as well, video taped it, but there was wind and I am not sure the audio came out well yet (have to review the video). The used, original LS1 intake gaskets looked flat and useless, however they sealed up nicely. The only leaking object was the PCV valve, which I knew about because I blew into it earlier in the month and found it leaking slightly already. I put my finger over that and the intake air path held air for a looooong time so its sealed up really well. I put a little into the crankcase as well and it is also well isolated and sealed up. So this motor has a clean bill, very well sealed up, great compression, and it didn't make any unexpected noises while running. About to continue onto phase 2 which is exhaust plumbing. I wont post any transmission or turbo stuff in this thread (its not really a build thread, more of a please help me with my first LS motor thread) but I will make a link from here to there when the time comes. Ill post a couple more pics of the engine where it sits but that is pretty much it for the "external engine" stuff I think!
Thanks to everyone (and special thanks to JOE) who helped this along.
04-10-2017 | 12:09 AM
#65
so on to the pics,
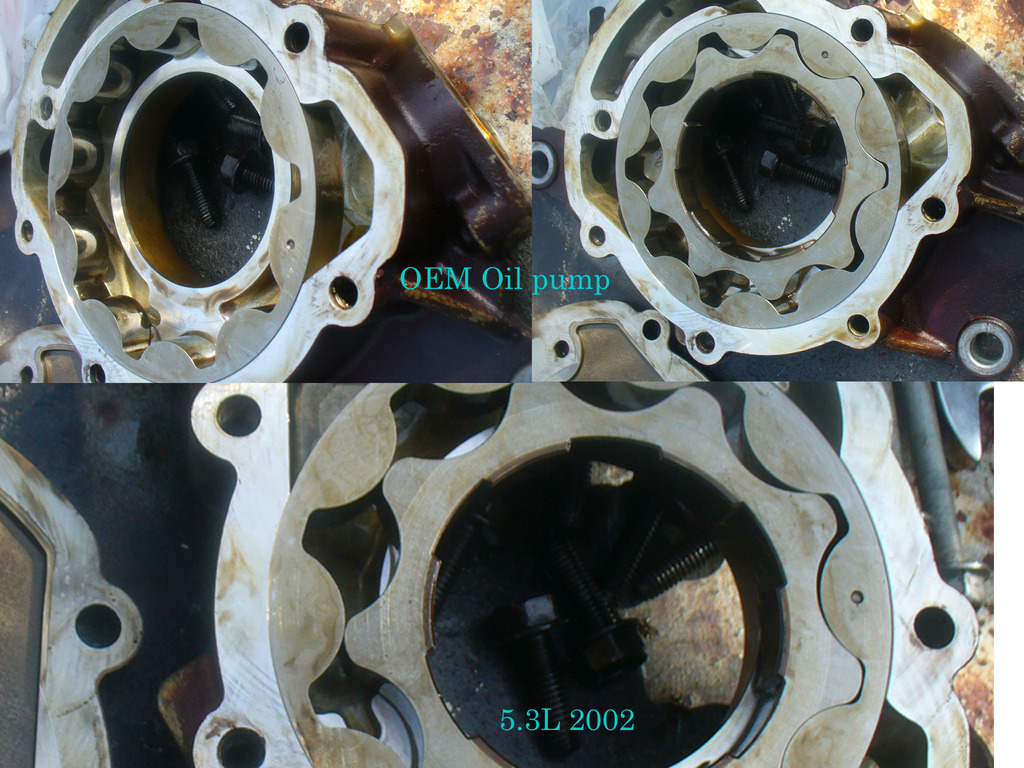
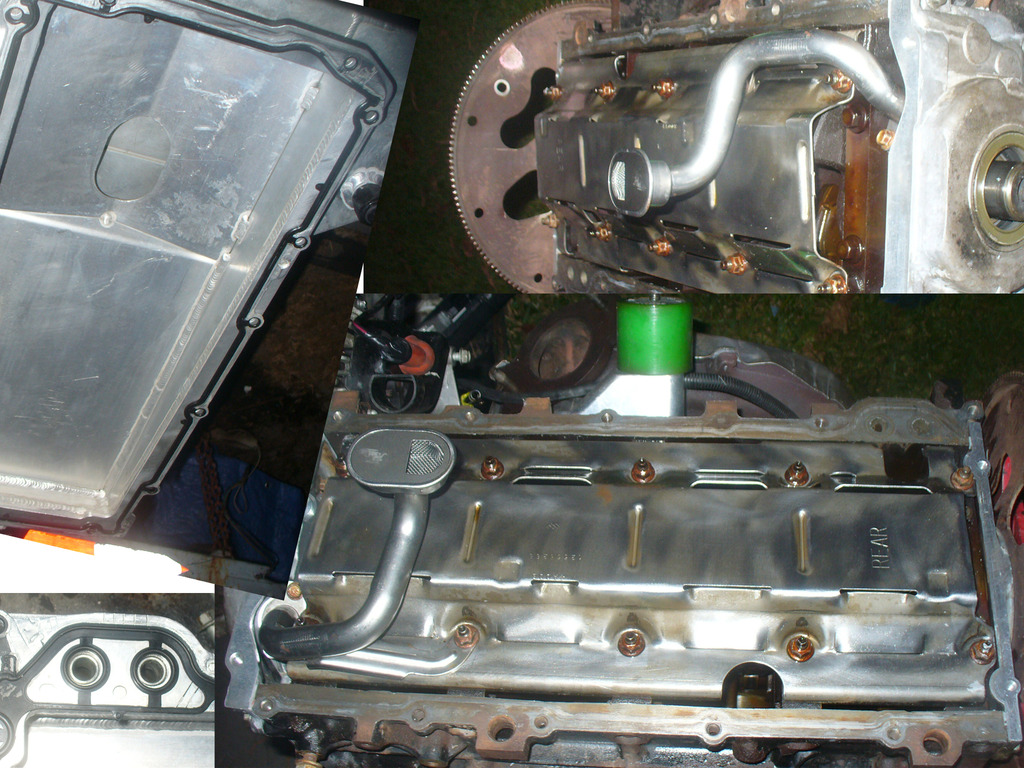
Here is the OEM oil pump from the 5.3L I am using. It looks brand new inside! To me anyways. I am pretty sure I changed out a perfectly good oil pump.
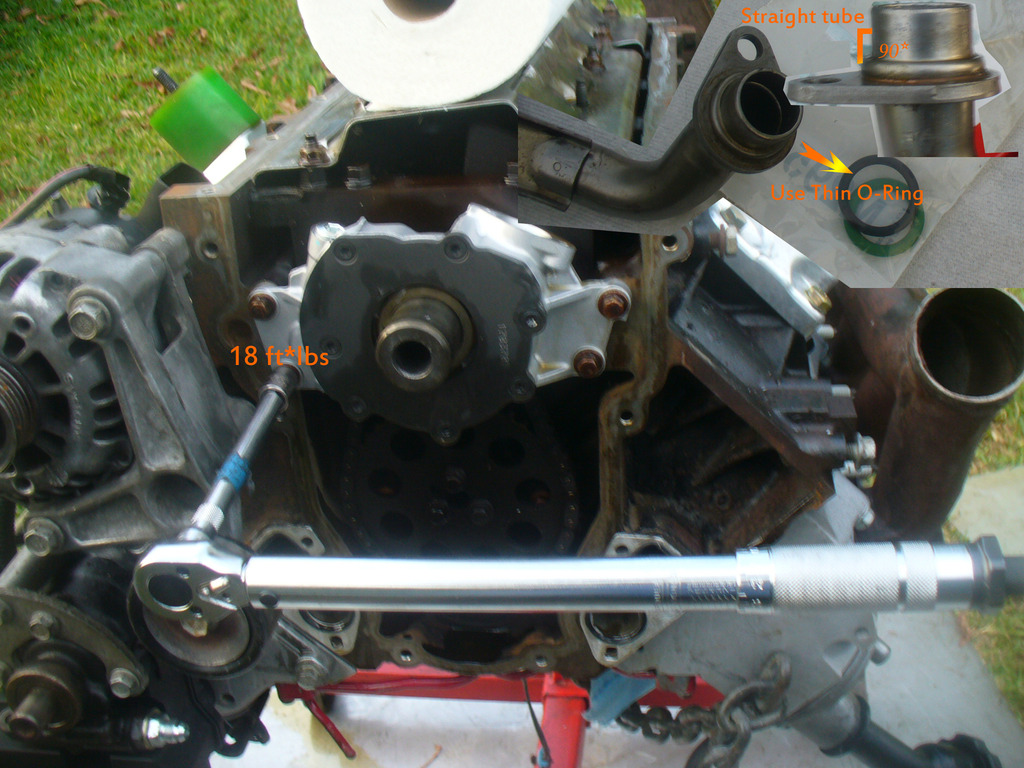
Here is the new one going on. Make sure to use a torque wrench always!
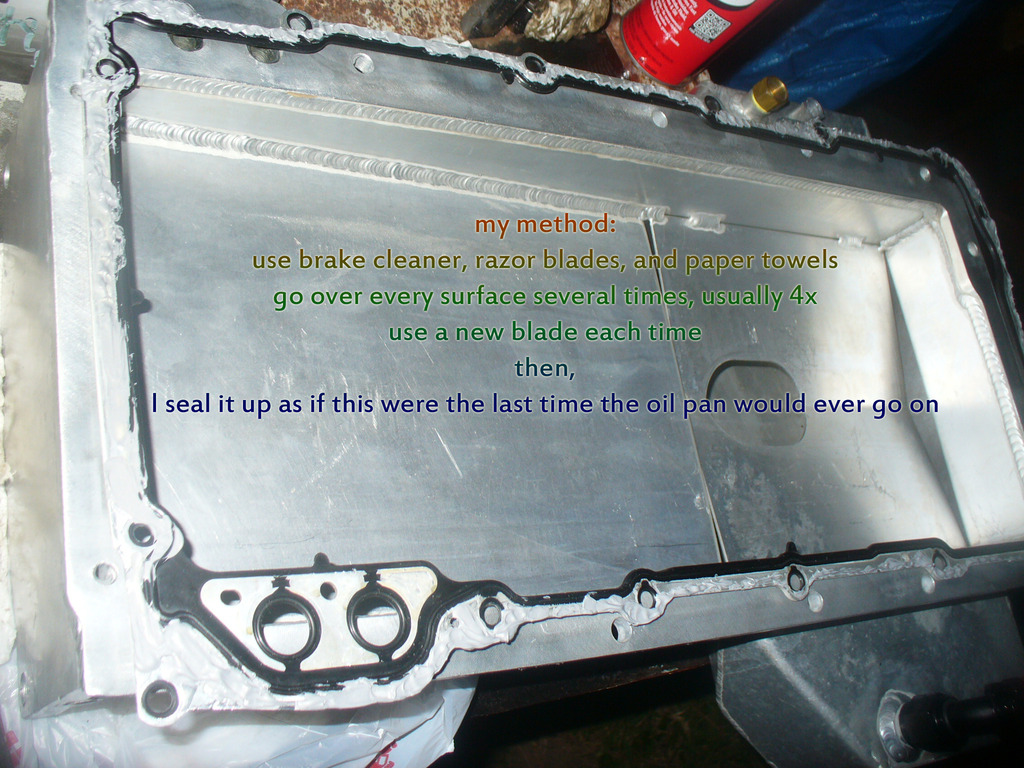
The oil pan, how I sealed it up. Silicone on BOTH sides, all the way around, but not a THICK line, just a little to help it seal up nice. If all the surfaces are brake-clean clean, razor blade and brake clean again clean, and then again and again, then it will stick down very well. Evidenced by the massive amount of work I had to do to remove it since this was the second time (went back into the change the oil pump on a whim)! It was nicely adhered to the engine, to everything really, and the line was clean and smooth and nothing was shooting out of the edges.
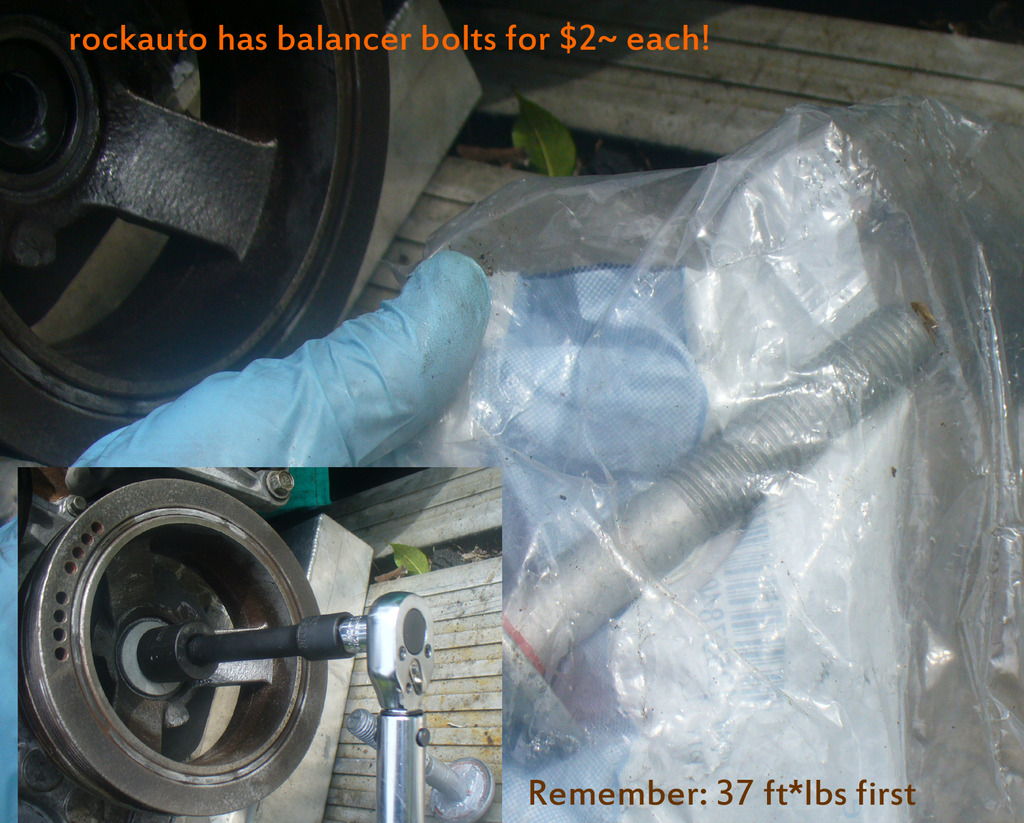
A trip down memory lane. Rockauto has these for like $2 each! I grabbed a couple more.
Couple of "moving along" progress pics. I don't post many of these (because its not really a build thread) but it still helps to see progress so you get a feel for whats been done to that point, and what I was emphasizing. You can see the thin line of silicone still on the engine block surface; I had not cleaned it up at that point yet. You should be able to see that it does not protrude annoyingly in either direction, it does not take much, just use a very thin line.

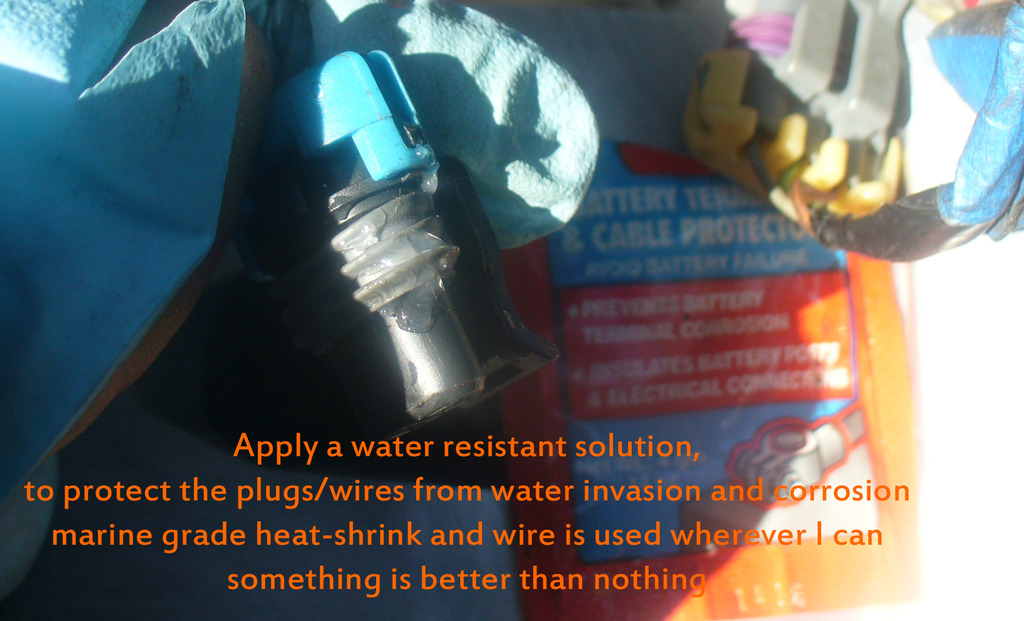
A reminder to seal the wiring clips away from water
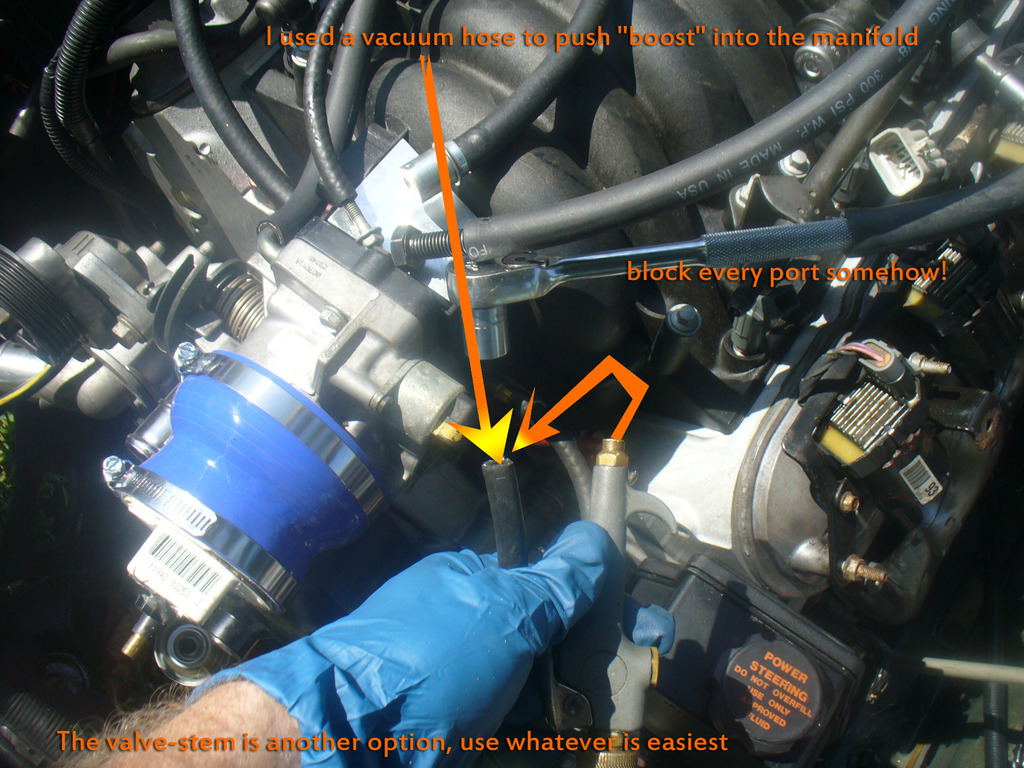
And on to the pressure testing, here is the setup, block every access port leading from the intake manifold
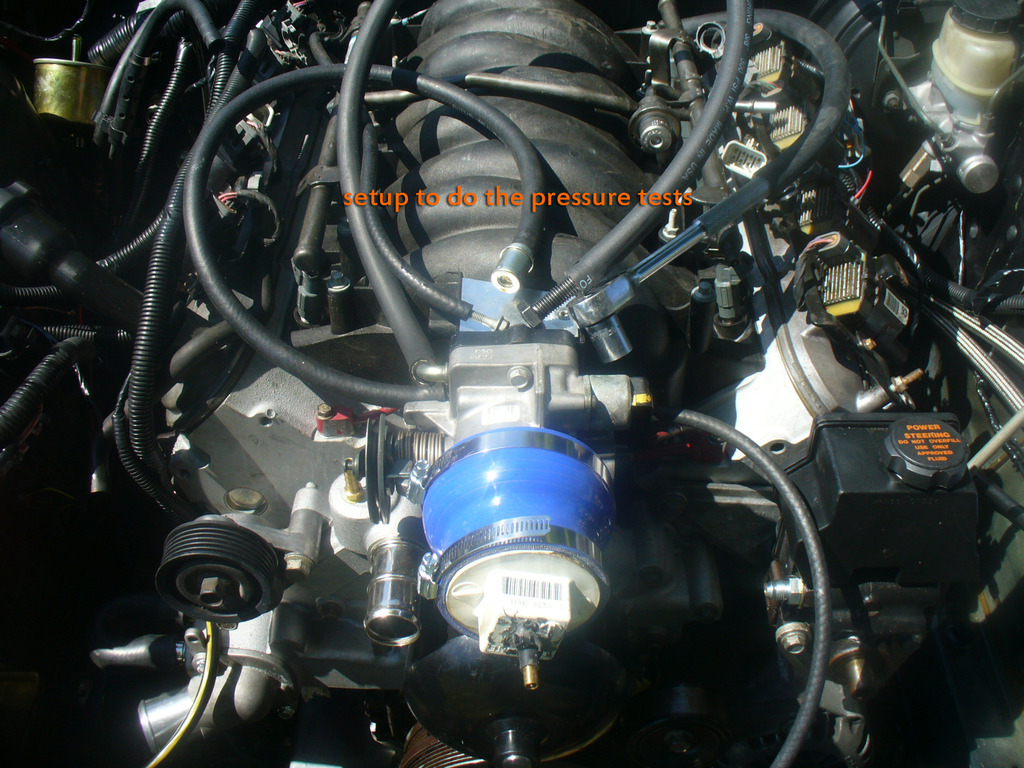
Then use air compressor to build "boost pressure" and find leaks.
Will post more detailed video at some point. Need to find a lower radiator hose, any suggestions? So far I have had "1999 C1500" suggested. And somebody else mentioned a stock camaro lower hose might work.
Also, is this the proper fitting to convert the OEM fuel rail into -6an? (RUSSEL: 640853) I'd prefer to just goto a barb fitting, if you know of one, though. My max pressure will be around 53psi if I decide to actually try 15psi of boost pressure, as my base will be 38psi~ so barb is acceptable, fuel system will be very simple.
For custom fabrication turbo cars, the exhaust plumbing takes precedence over everything else. I won't plumb fuel, trans, or complete/cover any wiring until the exhaust system is in place. Everything stays "open and accessible" just in case there is an issue to diagnose. Right now was just a test run of the engine to make sure it sounded right and that the ECU failed the maf and seemed to work normally within HPtuner ( I was worried the ECU would be one of those "bad ones" that doesn't proper fail the maf, luckily it seemed to do just fine ). You can think of everything in the bay as a temporary measure to test the engine before moving forward (just in case it had to come back out). The last thing we want to do is install everything and realize the motor is bad or has some kind of internal issue where it needs to be removed again, so the bare minimum is established in the bay for the engine to fire as quickly as possible before moving on to actually "investing" effort into the setup. It took twice as long as expected to get to this point (which is actually what I really did expect because that is pretty typical to "double" time when dealing in mechanics) although it is still very important to set a goal, expectation, budget, and establish a routine for completion. I feel that: "make a solid plan and don't get sidetracked" is an important lesson in actually completing the goal, even if it wasn't as quickly or perfectly as you planned.
Here is the OEM oil pump from the 5.3L I am using. It looks brand new inside! To me anyways. I am pretty sure I changed out a perfectly good oil pump.

Here is the new one going on. Make sure to use a torque wrench always!

The oil pan, how I sealed it up. Silicone on BOTH sides, all the way around, but not a THICK line, just a little to help it seal up nice. If all the surfaces are brake-clean clean, razor blade and brake clean again clean, and then again and again, then it will stick down very well. Evidenced by the massive amount of work I had to do to remove it since this was the second time (went back into the change the oil pump on a whim)! It was nicely adhered to the engine, to everything really, and the line was clean and smooth and nothing was shooting out of the edges.

A trip down memory lane. Rockauto has these for like $2 each! I grabbed a couple more.

Couple of "moving along" progress pics. I don't post many of these (because its not really a build thread) but it still helps to see progress so you get a feel for whats been done to that point, and what I was emphasizing. You can see the thin line of silicone still on the engine block surface; I had not cleaned it up at that point yet. You should be able to see that it does not protrude annoyingly in either direction, it does not take much, just use a very thin line.


A reminder to seal the wiring clips away from water

And on to the pressure testing, here is the setup, block every access port leading from the intake manifold

Then use air compressor to build "boost pressure" and find leaks.

Will post more detailed video at some point. Need to find a lower radiator hose, any suggestions? So far I have had "1999 C1500" suggested. And somebody else mentioned a stock camaro lower hose might work.
Also, is this the proper fitting to convert the OEM fuel rail into -6an? (RUSSEL: 640853) I'd prefer to just goto a barb fitting, if you know of one, though. My max pressure will be around 53psi if I decide to actually try 15psi of boost pressure, as my base will be 38psi~ so barb is acceptable, fuel system will be very simple.
For custom fabrication turbo cars, the exhaust plumbing takes precedence over everything else. I won't plumb fuel, trans, or complete/cover any wiring until the exhaust system is in place. Everything stays "open and accessible" just in case there is an issue to diagnose. Right now was just a test run of the engine to make sure it sounded right and that the ECU failed the maf and seemed to work normally within HPtuner ( I was worried the ECU would be one of those "bad ones" that doesn't proper fail the maf, luckily it seemed to do just fine ). You can think of everything in the bay as a temporary measure to test the engine before moving forward (just in case it had to come back out). The last thing we want to do is install everything and realize the motor is bad or has some kind of internal issue where it needs to be removed again, so the bare minimum is established in the bay for the engine to fire as quickly as possible before moving on to actually "investing" effort into the setup. It took twice as long as expected to get to this point (which is actually what I really did expect because that is pretty typical to "double" time when dealing in mechanics) although it is still very important to set a goal, expectation, budget, and establish a routine for completion. I feel that: "make a solid plan and don't get sidetracked" is an important lesson in actually completing the goal, even if it wasn't as quickly or perfectly as you planned.
Last edited by kingtal0n; 04-10-2017 at 01:34 AM.
09-08-2017 | 03:01 PM
#66
The hurricane is coming and might wreck the car. So I figured I should at least put up a video of driving it around some for historical records ;D
this is just some random video I captured on the way home from getting water and food for the hurricane.
note reference:
2k rpm in fourth is 50mph
using 87 octane only
2-3psi max boost pressure
approx 1800miles on the swap
plugs look great, #7 looks identical to #3 etc...
rev limiter set around 3800rpm~
still using stock fuel pump (< 180 horsepower)
hot pipe is 2.5" cold pipe is 3", no 90* bends and no bent couplers
using heavy "bar and plate" intercooler
no muffler yet (still enjoying the noise)
this is just a test engine (JY $400 longblock) to see what I can get away with....
So the engine is barely working as of yet. Only thing "wrong" with it is the rear main seal leaks when I put synthetic oil in it (sigh) because I didn't change the $15 rear main seal for some reason.... dot dot dot
09-08-2017 | 11:01 PM
#67
 09-11-2017 | 07:13 PM
#68
Joined: Mar 2003
Posts: 10,232
Likes: 1,524
From: The City of Fountains
The hurricane is coming and might wreck the car. So I figured I should at least put up a video of driving it around some for historical records ;D
this is just some random video I captured on the way home from getting water and food for the hurricane.
note reference:
2k rpm in fourth is 50mph
using 87 octane only
2-3psi max boost pressure
approx 1800miles on the swap
plugs look great, #7 looks identical to #3 etc...
rev limiter set around 3800rpm~
still using stock fuel pump (< 180 horsepower)
hot pipe is 2.5" cold pipe is 3", no 90* bends and no bent couplers
using heavy "bar and plate" intercooler
no muffler yet (still enjoying the noise)
this is just a test engine (JY $400 longblock) to see what I can get away with....
So the engine is barely working as of yet. Only thing "wrong" with it is the rear main seal leaks when I put synthetic oil in it (sigh) because I didn't change the $15 rear main seal for some reason.... dot dot dot
this is just some random video I captured on the way home from getting water and food for the hurricane.
note reference:
2k rpm in fourth is 50mph
using 87 octane only
2-3psi max boost pressure
approx 1800miles on the swap
plugs look great, #7 looks identical to #3 etc...
rev limiter set around 3800rpm~
still using stock fuel pump (< 180 horsepower)
hot pipe is 2.5" cold pipe is 3", no 90* bends and no bent couplers
using heavy "bar and plate" intercooler
no muffler yet (still enjoying the noise)
this is just a test engine (JY $400 longblock) to see what I can get away with....
So the engine is barely working as of yet. Only thing "wrong" with it is the rear main seal leaks when I put synthetic oil in it (sigh) because I didn't change the $15 rear main seal for some reason.... dot dot dot
You're using the BW PN 13009097008?
Andrew
09-18-2017 | 02:25 PM
#70
Yesterday I had my full of noisy V8 engine. Today I had the exhaust finished (minus a cutout still... but) and now she is deathly silent. A 3" resonator and a 3" turbo muffler (whatever they had at the exhaust place today) went on, and now I can actually hear the engine rise, the turbo spool, and the sound of the tires spinning quietly (its weird but I guess they have been spinning without me hearing them before, as there was no squeeling noise, they just sort of slip) it explains why the tread has been disappearing quickly even though I thought I was driving it nice before. Also I am very happy to listen closely to the engine and hear... not a damn thing.
The car just got... commutable!
The car just got... commutable!
09-19-2017 | 05:07 PM
#72
Well the car is only about 40% complete, so "spool time character" is still up in the air.
I don't have a boost gauge in the car. I just use the scanner. So I could post a data-log of the "spool" however I am only using approx 3.5psi of boost pressure at the moment (stock LS1 injector duty is 95% around 5000rpm so.... )
I have an enormous laundry list of changes to make in the coming weeks.
-change rear gearing again (Its going to wind up 3.5 or 3.7, probably 3.7)
-rear main seal (so I can use synthetic oil)
-possibly bad trans-pump or converter bearing to deal with (an odd bearing noise I heard today in neutral, intermittent, still diagnosing)
-heat shields and blankets for the engine bay and trans tunnel, rivnuts and insulation city
-bypass valve and IAT still needed
-needs a real intake tube (currently has a mickey mouse 3" filter probably 300 horsepower capable)
-fuel line relocation would be nice
-hood may wind up with some kind of vent, still deciding how to deal with engine bay airflow
-fuse box relocation to the trunk or rear area with mini-wire tuck
-needs a rear engine turbo oil feed (currently using a post-filter fitting which is too far to look clean)
-needs A/C before summer comes back
Once I get the engine bay sorted and have everything properly bracketed etc... and have solved all issues, it will be ready to dyno at max power with OEM injectors (using a real fuel pump). Whatever oem injectors make thats what it will make (maybe 350 to the wheel? Should take 5~psi of boost I guess) And then I will focus on the A/C system and finalize that.
THEN I will come back to the engine, 80lb/hr injectors, methanol or water finale, and 400-500rwhp shall be mine.
09-19-2017 | 06:17 PM
#73
log picture, tentatively testing this new hosting site as a potential candidate for more pics

like it says I just arbitrarily reduced shift pressure as an experiment and the wheelspin got better. It still spins them in a 5k shift but now the car stays going straight at least. I am worried about reducing it too far because of potential wear and tear issues with the clutches, so instead I will probably enable the torque reduction schemes again and let the computer pull timing for shifts to make it safe to drive with high power. There is also a way to flip a switch and change shifting schemes as well(different shift maps in the computer), so it may be that set one way my switch commands the tire fire and makes the car look too powerful to drive...
... a quiet, stock looking 240sx with its intercooler neatly tucked and painted black out of sight with a stock replacement looking muffler obviously automatic driving slow with windows up a/c and tint
 09-21-2017 | 11:32 AM
#76
TECH Senior Member
Joined: Apr 2002
Posts: 6,077
Likes: 12
From: So.Cal.
Also, I believe it's not necessary to put silicone/rtv on the oil pan gasket (other than at the 4 corners where the front/rear covers meet the oil pan).
( and I'm told silicone gives off gases which contaminate the O2 sensors )
( and I'm told silicone gives off gases which contaminate the O2 sensors )
10-15-2017 | 11:54 AM
#77
It was throwing a code 1860 intermittently and the converter would stop locking up. Then recently it completely stopped locking at all, So I figured I would change the TCC solenoid. This did not resolve the issue. Since lockup is an essential feature for me (The vehicle feels crippled without it since all I do is long distance driving) I am working on this next.
There is a sort of "bearing noise" coming from the inspection plate area. I put a video here:
https://ls1tech.com/forums/automatic...eel-noise.html
Everything runs fine, shifts fine, just those two issues to resolve next before moving on.
Also for fun, attached a short exhaust clip. The in-car noise level will drop dramatically once I fully insulate (basically cover the engine/trans with insulation). At idle its about as loud as the fans from the driver area.
10-15-2017 | 07:07 PM
#79
I noticed the holes in the flywheel for the bolts are much larger than the bolts. It makes me feel like I have the wrong flywheel for this application, or used the wrong bolt holes. Which is why it cracked maybe?
It may have been doing this for months, and I just didn't hear it because there was no muffler.
11-21-2017 | 02:17 AM
#80
If it was N/A I wouldn't have, but the forced induction application means I am using silicone everywhere I can. Need to get the crankcase sealed up real good, it will help the pcv system work properly if it is airtight everywhere else. The pro is the increased sealing but the con is the extra 3-4 hours needed to clean the gasket for re-use and the surface prep each time. If I take the pan off a fourth time, I will surely use a new gasket instead, it would cut 2-3 hours out of the process. So it depends on if I have the time to scrape silicone, or not, that alters the 3 hour window, and if not, I can simply use a new gasket. Scraping the block is easy, that only takes 5 minutes. So I hope you can see why I choose to use the silicone, in addition to glorious gasket. Don't use much (I still use too much) You won't find any in my strainer

Covert, silicone strainer op thread secrets
Last edited by kingtal0n; 11-21-2017 at 02:25 AM.