


Bumpstop Mod: my first try at writing an install
Thread Starter
12 Second Club
Joined: Sep 2002
Posts: 597
Likes: 0
From: Tampa
This "free" mod will will take the Throttle body blade to 90*, which will result in greater flow and better response than the stock setting,
which is well below 90*.
Tools needed:
*A DREMEL for grinding
*Multimeter
You will be grinding down the bumpstop on the throttle body. This will allow the throttle cable to pull back the blade inside the TB to a full 90*.
It's best to use a voltmeter and monitor the voltage reading from the Throttle Position Sensor. A reading of 4.71 volts is a perfect 90*
and it is critical that you do not grind any further. If you do, your blade will open more than 90* and you will set an SES light. I stopped at
4.69 volts to be on the safe side.
Locate the Throttle Position Sensor (green arrow)
You will be monitoring the BLUE wire (red arrow)
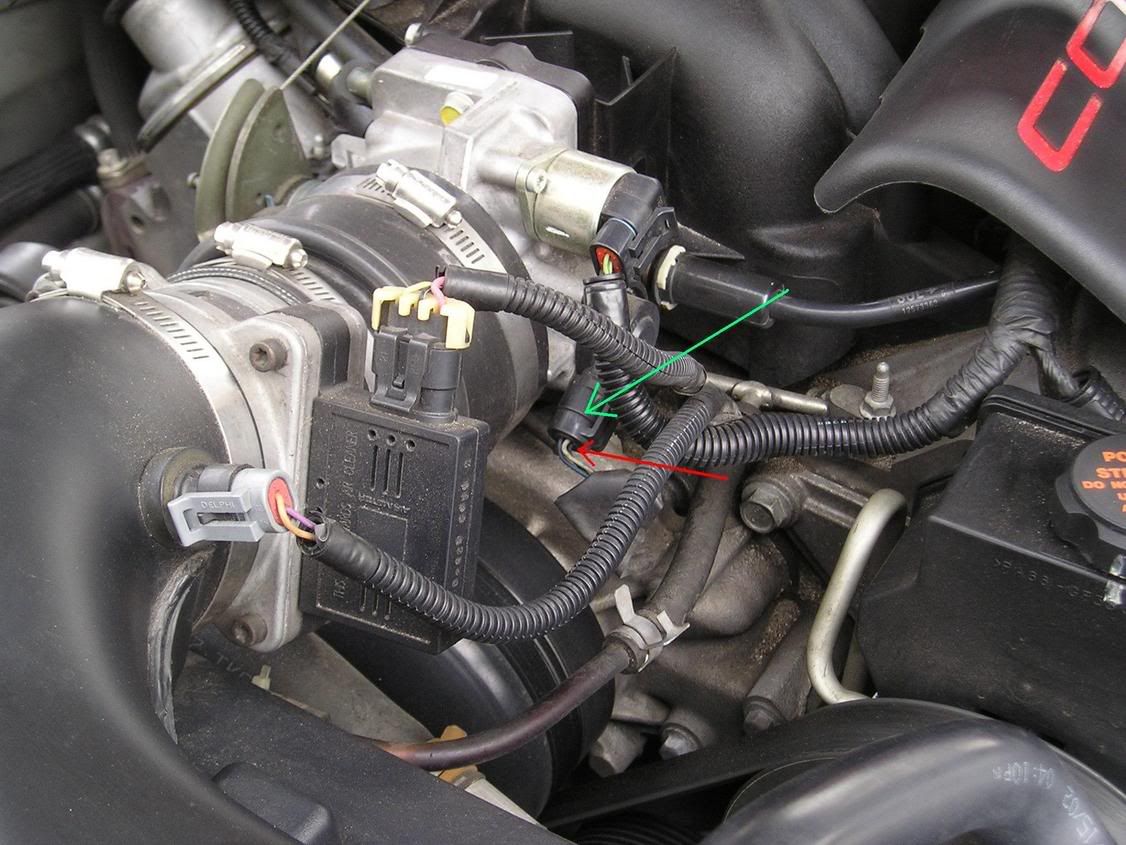
With the key in the ignition, turned on, but not started (engine NOT running) locate the blue wire. If the probe on your voltmeter is thin enough,
you can just jab it into the back of the plug, at the blue wire, and then ground your voltmeter on the chassis somewhere. Otherwise, you can use
a small sized wire (stripped on each end) and jab it into the back of the plug, at the BLUE wire, and then just use your alligator clip from your voltmeter to get a reading. At the idle position, your reading will be about .85 volts.


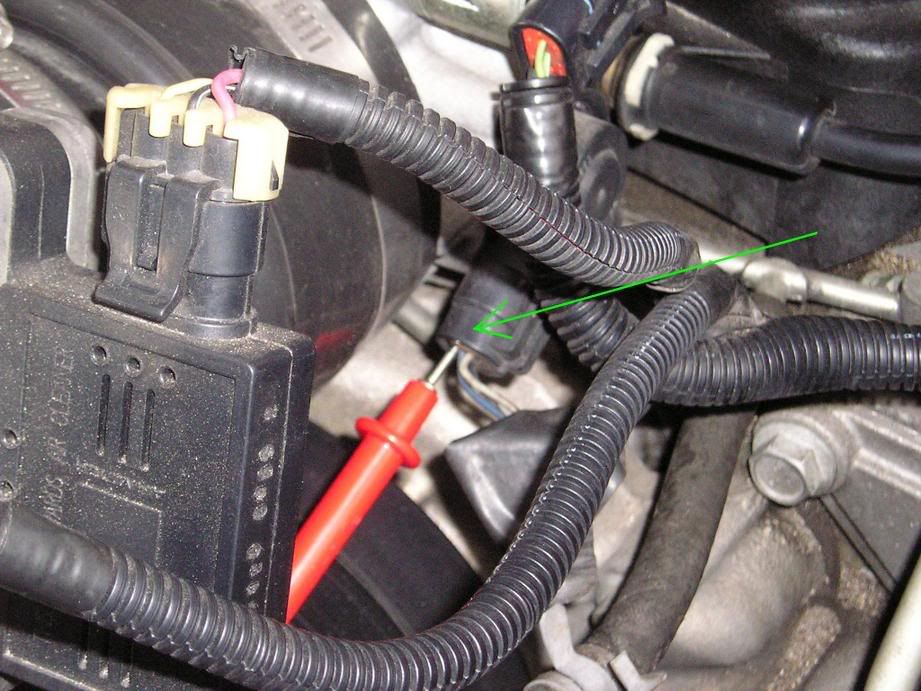
here's a close up:

Now you can start grinding. I used a dremel, but whatever you want to use is up to you. I've even heard of guys using a file to grind it down
(that sounds like WAY too much work). The Dremel is perfect because it is small and you can move it around to different angles.
This is the actual bumpstop.

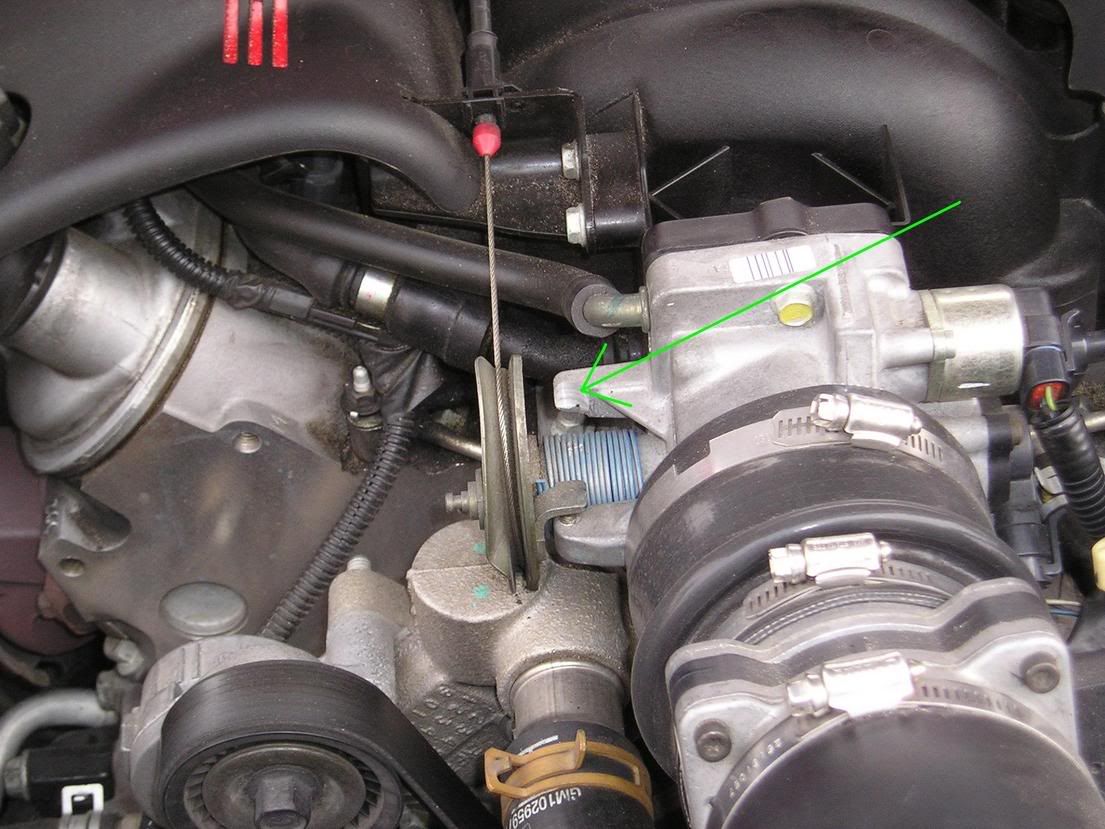
You can see where mine has already been ground down.
Again, it's critical that you do not go beyond 4.71 volts, so grind a little down, and check the voltage by pulling back the throttle blade until it
stops on the bumpstop.

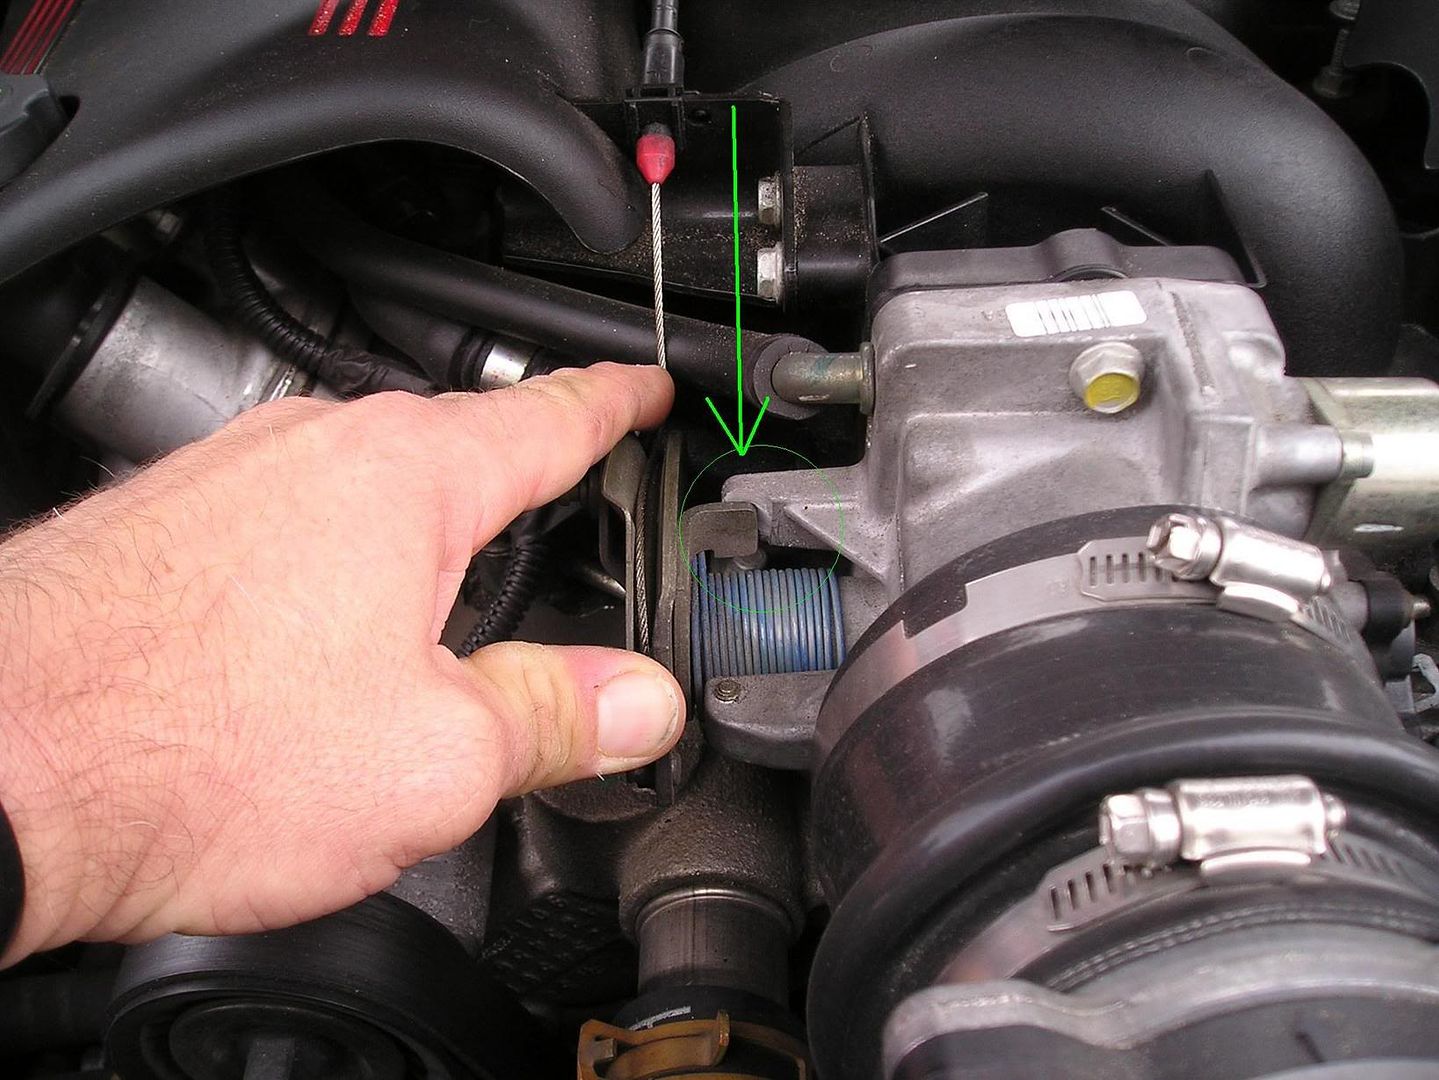
Do this as many times as it takes (grind some, then check it....grind some, then check it) until you get to where you want to be. I stopped when I
got a reading of 4.69 volts. That's about as close to 90* as you can get , and still be on the safe side. Be careful that your grinding wheel doesn't
hit the spring (like I did on mine) I just barely hit it, and it left a mark, so it wouldn't take much to cut that spring. Then it will no longer be free mod.
That's it. I definately felt an improvement from the SOTP meter, along with response, and I'm sure you will too.
(Thanks to Ed F. for helping me with this)
Disclaimer: I assume no responsibility if you break something. Do this at your own risk. If you still don't know what your doing,
then find someone who does.
which is well below 90*.
Tools needed:
*A DREMEL for grinding
*Multimeter
You will be grinding down the bumpstop on the throttle body. This will allow the throttle cable to pull back the blade inside the TB to a full 90*.
It's best to use a voltmeter and monitor the voltage reading from the Throttle Position Sensor. A reading of 4.71 volts is a perfect 90*
and it is critical that you do not grind any further. If you do, your blade will open more than 90* and you will set an SES light. I stopped at
4.69 volts to be on the safe side.
Locate the Throttle Position Sensor (green arrow)
You will be monitoring the BLUE wire (red arrow)
With the key in the ignition, turned on, but not started (engine NOT running) locate the blue wire. If the probe on your voltmeter is thin enough,
you can just jab it into the back of the plug, at the blue wire, and then ground your voltmeter on the chassis somewhere. Otherwise, you can use
a small sized wire (stripped on each end) and jab it into the back of the plug, at the BLUE wire, and then just use your alligator clip from your voltmeter to get a reading. At the idle position, your reading will be about .85 volts.
here's a close up:
Now you can start grinding. I used a dremel, but whatever you want to use is up to you. I've even heard of guys using a file to grind it down
(that sounds like WAY too much work). The Dremel is perfect because it is small and you can move it around to different angles.
This is the actual bumpstop.
You can see where mine has already been ground down.
Again, it's critical that you do not go beyond 4.71 volts, so grind a little down, and check the voltage by pulling back the throttle blade until it
stops on the bumpstop.
Do this as many times as it takes (grind some, then check it....grind some, then check it) until you get to where you want to be. I stopped when I
got a reading of 4.69 volts. That's about as close to 90* as you can get , and still be on the safe side. Be careful that your grinding wheel doesn't
hit the spring (like I did on mine) I just barely hit it, and it left a mark, so it wouldn't take much to cut that spring. Then it will no longer be free mod.
That's it. I definately felt an improvement from the SOTP meter, along with response, and I'm sure you will too.
(Thanks to Ed F. for helping me with this)
Disclaimer: I assume no responsibility if you break something. Do this at your own risk. If you still don't know what your doing,
then find someone who does.
Last edited by Pewterpower; Nov 10, 2007 at 09:21 AM.
TECH Apprentice
Joined: Dec 2004
Posts: 356
Likes: 0
OK, just finished. Stock it was at only 4.18 volts WOT!!! I ground it down to 4.65 volts to be conservative. Only thing is, the gas peddle only lets you go up to 4.48 volts with it all the way to the floor (Yes I even moved the floor mats). So I guess I can't even set the SES light even if I ground the stop all the way off. Oh well. Im gonna go drive it and see how it feels.
Last edited by fa18007; Dec 10, 2005 at 06:46 PM.
Trending Topics
LS1 Tech Stories
The Best V8 Stories One Small Block at Time

Topdon ONE vs. Artidiag 800 BT2: Which is the Diagnostic Tablet For You?
Pouria Savadkouei
Gas Monkey Built a 6-Wheel Ferrari Testarossa With a Corvette LT4 Engine
Verdad Gallardo
7 Most Reliable High-Performance Engines GM Has Ever Built
Verdad Gallardo
Amazing '71 Camaro Restomod Is Modern Muscle Car Under the Skin
Verdad Gallardo
6 Common C5 Corvette Failures and What's Involved In Repairing Them
Pouria Savadkouei
Retro Modern Bandit Pontiac Trans AM Comes With Burt Reynolds' Autograph
Verdad Gallardo
Top 10 Greatest Cadillac V Series Performance Models Ever, Ranked
Pouria Savadkouei
Top 10 Most Powerful Chevy Trucks Ever Made!

Hennessey's New Supercharged Silverado ZR2 Has 700 HP
Verdad GallardoTECH Apprentice
Joined: Dec 2004
Posts: 356
Likes: 0
Well, i just got back from a test drive after the mod... Wow. Didnt add crazy horsepower, but definatly feel a difference. I did a 5mph-60mph burnout and something new...It kicked sideways punching it at 35 mph. And I have an A4 with 2.73s and good toyos. Well worth it mod.

TECH Addict
Joined: Nov 2001
Posts: 2,003
Likes: 0
From: Live Oak, FL - in the woods where the creatures lurk.
There is no particular voltage that will yield a fully
open TB. For example, when I did mine the WOT
voltage was 4.36 stock, when I got the butterfly
to 90* the voltage was 4.60.
If I remember correctly, a code sets when the
voltage hits 4.75, at least on the 2000 models.
open TB. For example, when I did mine the WOT
voltage was 4.36 stock, when I got the butterfly
to 90* the voltage was 4.60.
If I remember correctly, a code sets when the
voltage hits 4.75, at least on the 2000 models.

On The Tree
Joined: Jan 2004
Posts: 144
Likes: 0
Just going to throw this out there.
Shouldn't some reference to the actual Throttle blade be made? Great write up btw. If my sensor is showing 95% throttle opening and my blades are WOT, shouldn't I then look for modifying the actual sensor itself instead of the blade opening?
Shouldn't some reference to the actual Throttle blade be made? Great write up btw. If my sensor is showing 95% throttle opening and my blades are WOT, shouldn't I then look for modifying the actual sensor itself instead of the blade opening?
Thread Starter
12 Second Club
Joined: Sep 2002
Posts: 597
Likes: 0
From: Tampa
Your blade will only open as far as your throttle cable will allow it to. From everything I read, the sensor reads 4.71 at 90* which is why I monitor the sensor, and not try to measure the blade itself.

On The Tree
Joined: Jan 2004
Posts: 144
Likes: 0
Originally Posted by Pewterpowre
Your blade will only open as far as your throttle cable will allow it to. From everything I read, the sensor reads 4.71 at 90* which is why I monitor the sensor, and not try to measure the blade itself.
Cool, just wanted to throw it out there though. Personally, I would rather (and this is only my point of view) position the blade so WOT was infact WOT, then attack the sensor via the slot method. But I am also going to look into your method write up. BTW, nice write up!
Originally Posted by Magnet
where do you get the miltimeter thing...can ya rent it from autozone??
they are only 15-30 bux to buy and good to have around
If you go to far its a easy fix just grind the bumpstop down and drill a hole in it. Tap it and put a small bolt through the hole then you can adjust the bolt in or out. Till you get the right voltage.... 