


Home 241 head Porting
Thread Starter
Joined: Jan 2008
Posts: 597
Likes: 9
From: Tequesta, FL
So after tons of research and finding mixed reviews of head porting I decided to tackle doing some home porting on a set of 241's.
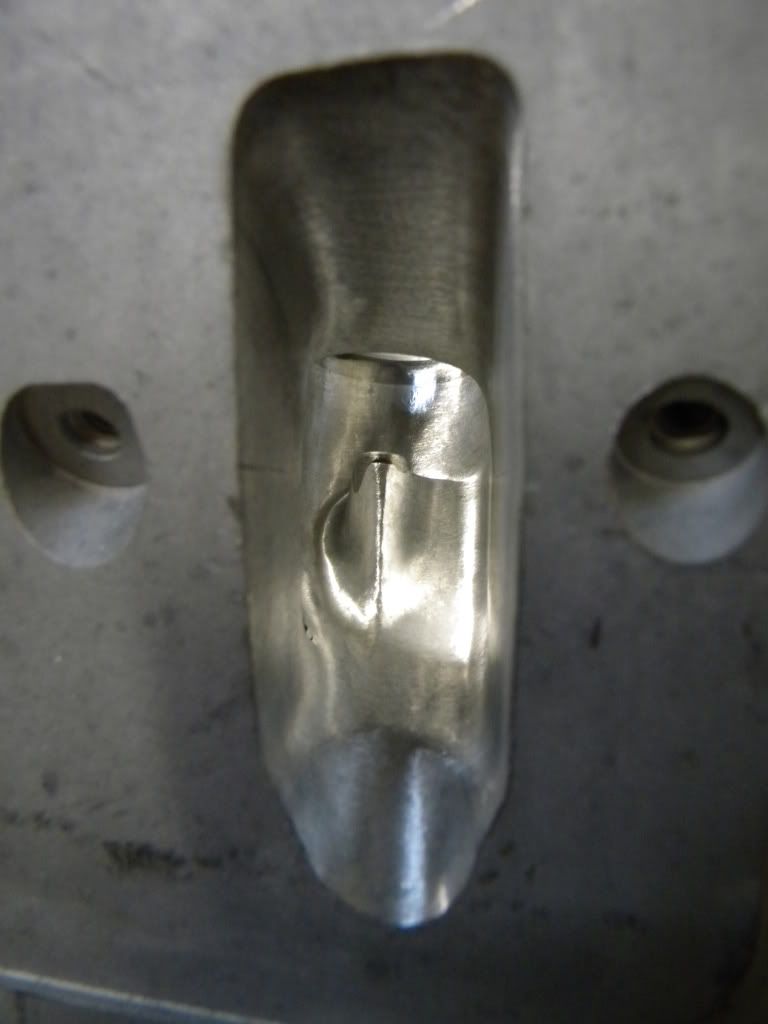
I used a mini die grinder and a mix of ferrous/non ferrous carbide bits. Then finshed with Sanding rolls 40/80 on the intake. 40/80/120/scotch brite on the exhaust. On the intake I removed the rocker arm boss, blended around the valve stem and took out maybe 20% of the ramp. Also blended the seats to the bowl and smoothed out the short side radius. I did not remove any material from the floor.
I had one intake and one exhaust flow'd at the machine shop since I didnt want to pay the 150 bucks they wanted to flow all of them.
I did not have them flow one of my stock ports to compare but I found some stock flow numbers and since they vary so much I've posted the highest and lowest I'd found. My numbers are with an ls6 intake and no exhaust pipe. The numbers I found for stock flow were with an ls6 intake but with an exhaust pipe.
(lowest stock)
int ex
.100" 61 52
.200" 120 99
.300" 174 129
.400" 212 154
.500" 220 164
.600" 231 171
(highest stock)
int ex(w/pipe)
.100" 62 55
.200" 136 101
.300" 186 135
.400" 223 160
.500" 236 171
.600" 242 179
(my heads)
int ex(w/o pipe)
.100" 65 56
.200" 136 102
.300" 198 134
.400" 236 164
.500" 259 174
.600" 272 179
you be the judge.
I'm happy with the gains
Last edited by Mart00SS; Dec 28, 2017 at 03:14 PM.
Thread Starter
Joined: Jan 2008
Posts: 597
Likes: 9
From: Tequesta, FL
Carbide bits for porting.
Plus I bought a porting kit with sanding rolls and skotchbrite wheel attachments for the mini die grinder.
You seem to have made a considerable gain in flow numbers, particularly if you didn't take much material out. I commend you on your boldness to tackle such an intimidating DIY project. 
Also, how many hours did this take?
Also, how many hours did this take?
Thread Starter
Joined: Jan 2008
Posts: 597
Likes: 9
From: Tequesta, FL
I started to lose track after 20 hrs but a rough estimate, I would say about 35 hrs. Thats not including the 6hrs of practice I did on some spare junk heads before tackling these.
Trending Topics
Congratulations on tackling your 241's. They should pick up some power for you. What is your intake throat %? What is your bowl width? Did it have a valve job on it? I do think you'd be safe to open the bowl a bit more and widen the short side but you aren't stalling.. I just wonder what the fps is over that short turn. I'm working on a set of 853's (same port) and got 280's out of it so far with the stock valve job but I'm at 228 cc's. Did you have your runners cc'd? They look like they stayed pretty small.
LS1 Tech Stories
The Best V8 Stories One Small Block at Time

6 Common C5 Corvette Failures and What's Involved In Repairing Them
Pouria Savadkouei
Retro Modern Bandit Pontiac Trans AM Comes With Burt Reynolds' Autograph
Verdad Gallardo
Top 10 Greatest Cadillac V Series Performance Models Ever, Ranked
Pouria Savadkouei
Top 10 Most Powerful Chevy Trucks Ever Made!

Hennessey's New Supercharged Silverado ZR2 Has 700 HP
Verdad Gallardo
Coachbuilt N2A Anteros Is an LS2-Powered C6 Corvette In Italian Clothes
Verdad Gallardo
Awesome K5 Blazer Restomod Comes With C7 Corvette Power
Verdad Gallardo
10 Camaros You Should Never Buy

10 LS Engine Myths That Refuse to Die
Verdad Gallardo Thread Starter
Joined: Jan 2008
Posts: 597
Likes: 9
From: Tequesta, FL
Congratulations on tackling your 241's. They should pick up some power for you. What is your intake throat %? What is your bowl width? Did it have a valve job on it? I do think you'd be safe to open the bowl a bit more and widen the short side but you aren't stalling.. I just wonder what the fps is over that short turn. I'm working on a set of 853's (same port) and got 280's out of it so far with the stock valve job but I'm at 228 cc's. Did you have your runners cc'd? They look like they stayed pretty small.
That sharp angle is nothing to worry about. Air won't flow there, that's where the injector sits. This is a good example of K.I.S.S. and you should get some nice benefits from your work. 


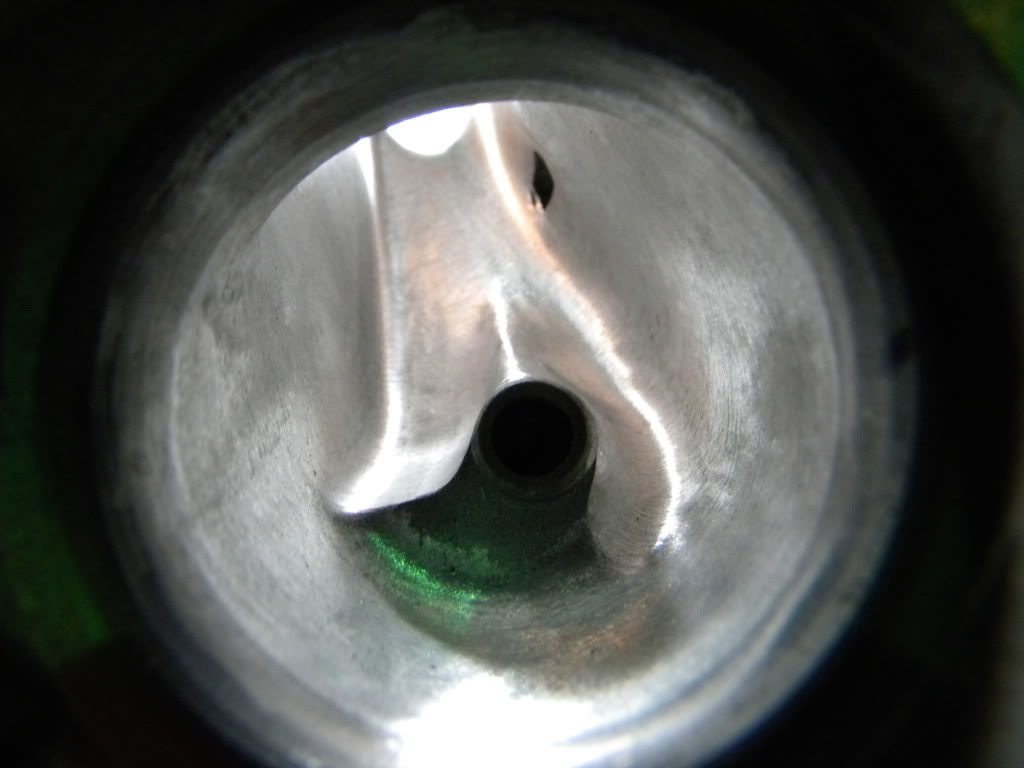
Debatable. There are people on both sides of that issue. I would be inclined NOT to do it on a 853/241 as that area of the bowl is very thin when that is removed and it's right under the spring pocket. I have personally hit easy 280's in an 853 casting with the swirl dam remaining in place. You can run less timing with that in place as well.
Thread Starter
Joined: Jan 2008
Posts: 597
Likes: 9
From: Tequesta, FL
Yea I was on the Fence about really attacking the Swirl ramp. Some said yes some said no, with this being my frist set, I decided to leave it in and was pretty happy with the results. Maybe next time I'll attack it a bit more, maybe take about 50% of it out or so.
Every one has there own opnion. But If you look at every set of over the counter head including a stage 1 heads there blended in that area to maximize flow.
Thread Starter
Joined: Jan 2008
Posts: 597
Likes: 9
From: Tequesta, FL
These are Jantzer Heads and what I was modeling after. I have also seen some that slightly remove the ramp. Its just the way I decided to go.