

My LQ4 engine swap / build thread...witness the debacle
 03-03-2011, 03:01 PM
#61
I believe it is the engine block coolant heater. If the block does not have this it will have a plug in its place. I found it in the service manual. http://www.pleasurecraft.com/manuals/L510016.pdf
Same paint as the intake. I think it's actually labelled as a "wheel paint" on the can, but I got it at Advance Auto Parts. Metallic charcoal gray. I can get you the exact name of it if you need.
 03-04-2011, 07:33 PM
#62
Teching In

Join Date: Dec 2008
Location: Kansas City, MO
Posts: 45
Likes: 0
Received 0 Likes
on
0 Posts
awesome thread!! im doing the exact same thing in my white 02 ss. i have the motor pulled already and just got done painting the engine bay today im doing the intake tomorrow as well yours looks AWESOME!!! your detailing looks like its turning out very nice. figured id share some tips... if your going to keep your A/C on your car i sanded my lines and accumulater down with 2000 grit and used some aluminum polish and polished them up quit nicely.
keep up the good post im following this one for sure!!
keep up the good post im following this one for sure!!
03-04-2011, 08:08 PM
#63
awesome thread!! im doing the exact same thing in my white 02 ss. i have the motor pulled already and just got done painting the engine bay today im doing the intake tomorrow as well yours looks AWESOME!!! your detailing looks like its turning out very nice. figured id share some tips... if your going to keep your A/C on your car i sanded my lines and accumulater down with 2000 grit and used some aluminum polish and polished them up quit nicely.
keep up the good post im following this one for sure!!
keep up the good post im following this one for sure!!
I got the front wheels removed, and pulled both wheelwell liners out this evening. I tried to drill my hole in the passenger side wheelwell to route the wires through, but my holesaw wouldn't even begin to go through that metal, so I'll have to go to Home Depot tomorrow and buy something a little more stout.
I hated to waste the entire evening, so I went ahead and re-routed the battery ground wires, and cleaned the wheelwell liners and wheelwells themselves. I also went ahead and disconnected all the wires to be hidden on the passenger side, so everything is ready to go once I get the hole drilled.
 03-05-2011, 08:20 AM
#66
I would like to see it, if I hadnt spent so much on my Ford 9" project I would have mine tore down doing a head and cam swap.
I am getting ready to be pulling a LT1 out of a 96 SS. We are going to be pulling it from the top. TPIS sells a plate that bolts to the top of the intake, we were told the engine would come out the top with the intake and heads still on the motor and that we only need to remove the left valve cover. We would also have to remove the exhaust manifolds. Once the engine is out of the motor mounts and tranny we were told to spin it 90 degrees and it would come right out. We shall see....
http://www.tpis.com/parts/view/67
Last edited by 96lt4c4; 03-05-2011 at 08:30 AM.
 03-05-2011, 01:59 PM
#69
No. Lifters only have 40k miles or so on them, so I'm going to re-use them. Plus, I've heard that LS7 lifters may need a different pushrod length, and I've already paid for custom pushrods per Pat G's specs, so I don't want to have to recheck and buy new ones.
03-05-2011, 08:55 PM
#71
I'm long overdue for new pics, so here we go. I finished the wire mod and got the engine bay completely cleaned and ready for the new motor tonight, so good progress made. I bought some new plastic rivets from Advance to replace all the ones I f'd up when I pulled the wheel well liners out, and let me tell you that even though they say "GM/Chrysler" on them, they fit like straight ***. Anyways.
Pics of the freshly cleaned liners...

Clean bay with wire mod

Passenger side. I polished up the A/C lines which really sharpened things up...

Driver's side. Still need to find a new home for that one small ground wire.

Side shot of the passenger side. I'm pleased with how clean everything came out.

One last one of the driver's side...

I was really blessed to have bought this car that was always garaged, and litterally driven by an older lady for almost its entire existence. I was amazed at how well everything came clean. The interior on this car is also in phenomenal shape...it's perfect except for the infamous door panel crack on the driver's side.
Tomorrow is the initial clean up on the new shortblock, and then on to the cam swap.
03-06-2011, 06:56 AM
#72
TECH Resident
Join Date: Feb 2002
Location: Roseville, Ca.
Posts: 843
Likes: 0
Received 0 Likes
on
0 Posts

I would seriously consider some Comp OE lifters or the like. Pretty cheap insurance. You are going to all of this trouble and slapping used critcal components in? Not a bash... just a suggestion.
03-06-2011, 09:58 AM
#74
Thank you sir!
On the lifters, and more specifically, presoaking...I know you're supposed to soak the lifters, pushrods, and rockers before reinstalling them. Does it matter if I won't be firing the motor for a while, though? I would think if I soaked all the components now but didn't fire the engine for another week or so that all the oil would just bleed out. Thoughts?
03-06-2011, 10:04 AM
#75
TECH Resident
Join Date: Feb 2002
Location: Roseville, Ca.
Posts: 843
Likes: 0
Received 0 Likes
on
0 Posts
On the lifters, and more specifically, presoaking...I know you're supposed to soak the lifters, pushrods, and rockers before reinstalling them. Does it matter if I won't be firing the motor for a while, though? I would think if I soaked all the components now but didn't fire the engine for another week or so that all the oil would just bleed out. Thoughts?
03-06-2011, 03:47 PM
#76
Alright I took a break to upload these pictures and hopefully get some input from you guys as to how everything looks. Got the shortblock all cleaned up, pulled the lifter trays and lifters, and then removed the timing cover, and pulled the cam out.
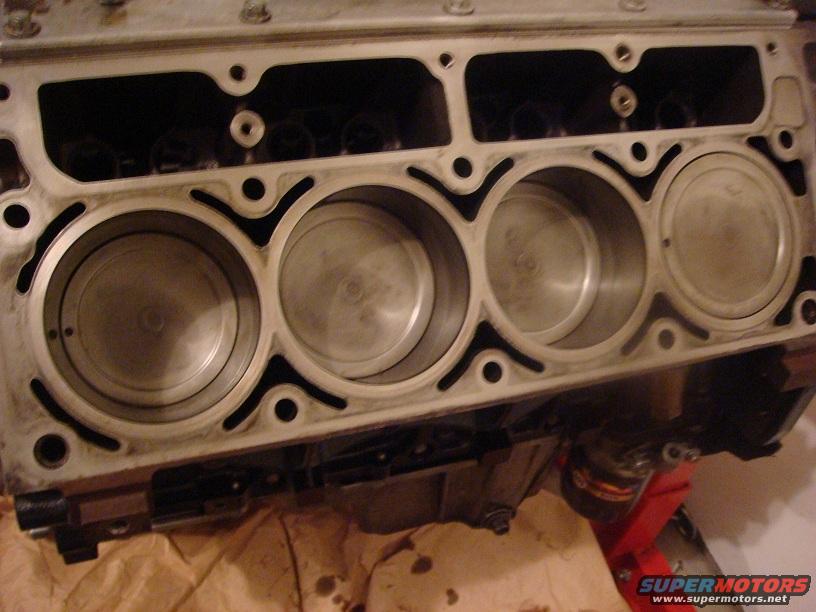
Here's the semi-clean shortblock. It'll be painted as soon as I finish the cam swap and clean/mask the block surface for the heads.


I pulled a random lifter and started snapping pics of it. Curious to get your opinions on wear, condition, etc...
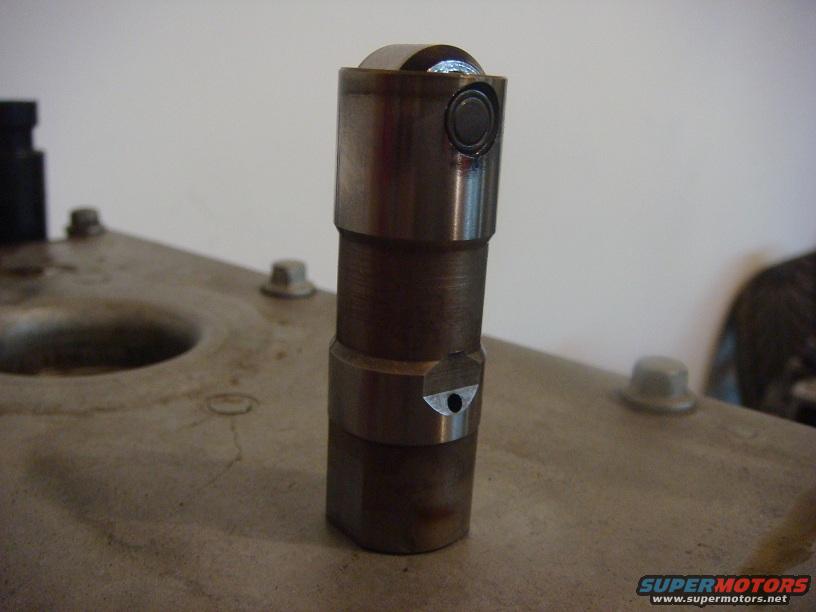


I thought the lifters looked to be in very good shape, with little to no wear on the tips. I'm no expert, though, so give me your thoughts.
Here's a pic with the timing cover removed. I was told this motor had a TSP ported oil pump and a LS2 timing chain...any way to tell? Any thoughts on condition of the shown parts? The timing chain had a little slack in it, but from what I've read, it's in the normal range.

Here's the cam that just came out...Torquer V2 on a 113. Give me your thoughts on the condition of the cam, and maybe how much it should be worth...it's going up for sale today.


Here's the semi-clean shortblock. It'll be painted as soon as I finish the cam swap and clean/mask the block surface for the heads.
I pulled a random lifter and started snapping pics of it. Curious to get your opinions on wear, condition, etc...
I thought the lifters looked to be in very good shape, with little to no wear on the tips. I'm no expert, though, so give me your thoughts.
Here's a pic with the timing cover removed. I was told this motor had a TSP ported oil pump and a LS2 timing chain...any way to tell? Any thoughts on condition of the shown parts? The timing chain had a little slack in it, but from what I've read, it's in the normal range.
Here's the cam that just came out...Torquer V2 on a 113. Give me your thoughts on the condition of the cam, and maybe how much it should be worth...it's going up for sale today.
03-06-2011, 06:13 PM
#77
I spent about an hour cleaning one side of the block surface where the head mates up. There's still quite a bit of discoloration, but all of the gasket material and carbon on the pistons is gone. I used a non-metallic scotchbrite pad and some generic stripper/cleaner.
Hopefully that's going to be clean enough, because I don't think I can do any more than that. I can run my finger over the entire surface and not feel anything except complete smoothness.
Tomorrow I'll do the other side, mask, and try to get the block painted.
Hopefully that's going to be clean enough, because I don't think I can do any more than that. I can run my finger over the entire surface and not feel anything except complete smoothness.
Tomorrow I'll do the other side, mask, and try to get the block painted.
03-07-2011, 08:29 PM
#78
I felt confident enough in the timing chain that I went ahead and installed the cam and got everything buttoned back up last night. If you can believe it, I got the gears lined up dot to dot on the very first try. I was so paranoid I had it off I must have turned it over 10 times to make sure they were lining up just perfect...
Tonight I got the other side of the block/head surface cleaned. For whatever reason it went a lot smoother than the side I did yesterday...seemed a lot less gunked up on the pistons. Anyways...
I got finished in good time, so I was able to finish with the final cleaning of the block, mask off all the critical areas, and start painting it. I've got about three coats of silver on it now and it's looking great. I'll post up pics tomorrow when it's finished.
I guess after this, it's about down to the nut-cutting. I think I'll go ahead and put the motor mounts in the clamshells and then mount them on the block, and then I'll be ready to take the shortblock off the engine stand, mount the flywheel, and start on the clutch install. Still need to clean the hell out of the trans and bell before I mate everything up, too.
03-08-2011, 09:29 AM
#79

What chemical stripper did you use to help with your cleanup? I have been looking for a good one for years and have never found one worth a darn since Permatex (I THINK that was the one I used to use) quit making theirs. Whatever brand it was, that was some good stuff.
Check the wear on the lifter roller and your old camshaft. If there is no abnormal wear, there is no reason to not to use them again. Just remember though...you don't know how many miles are REALLY on them. What I would be more worried about is can they handle your new spring pressures without bleeding down. They might have internal wear that you can't see. I wouldn't be worried about using them on stock springs. Also, has your oil pump been shimmed or use a high pressure spring? Normally, I hate to see high pressure mods, but when you go to stiff valve springs, that can help keep the lifters from collapsing under the extra pressure.
Check the wear on the lifter roller and your old camshaft. If there is no abnormal wear, there is no reason to not to use them again. Just remember though...you don't know how many miles are REALLY on them. What I would be more worried about is can they handle your new spring pressures without bleeding down. They might have internal wear that you can't see. I wouldn't be worried about using them on stock springs. Also, has your oil pump been shimmed or use a high pressure spring? Normally, I hate to see high pressure mods, but when you go to stiff valve springs, that can help keep the lifters from collapsing under the extra pressure.
03-08-2011, 01:20 PM
#80
Not sure on the oil pump...all I know is that it is a TSP ported LS6 pump...
I bought new LS7 lifters and lifter trays today. I PM'd Pat G to get his advice, and he said I'd be good to go with the LS7s, so I decided to suck it up and buy new stuff. I even bought a new oil pan gasket, out of sheer paranoia
I bought new LS7 lifters and lifter trays today. I PM'd Pat G to get his advice, and he said I'd be good to go with the LS7s, so I decided to suck it up and buy new stuff. I even bought a new oil pan gasket, out of sheer paranoia