
My LQ4 engine swap / build thread...witness the debacle
 03-08-2011, 08:35 PM
#81
Tonight I finished painting the motor. I think it turned out pretty good, and should look great with all the other newly painted parts on it...

I also went ahead and cleaned the hell out of the trans. That thing was disgusting.

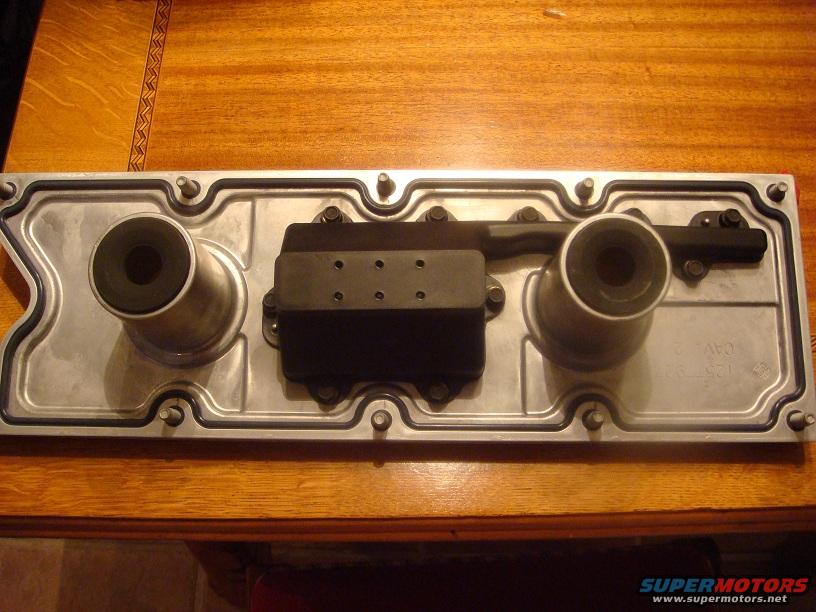
And finally, my new-style LS6 valley cover arrived today. This thing should help de-clutter the engine bay nicely.
I also went ahead and cleaned the hell out of the trans. That thing was disgusting.
And finally, my new-style LS6 valley cover arrived today. This thing should help de-clutter the engine bay nicely.
 03-09-2011, 12:48 PM
#82
TECH Regular
iTrader: (3)
Join Date: Jul 2005
Location: So. CAli
Posts: 419
Likes: 0
Received 0 Likes
on
0 Posts

I'm looking into this, although there seems to be mixed opinions. I see your point, though.
Thank you sir!
On the lifters, and more specifically, presoaking...I know you're supposed to soak the lifters, pushrods, and rockers before reinstalling them. Does it matter if I won't be firing the motor for a while, though? I would think if I soaked all the components now but didn't fire the engine for another week or so that all the oil would just bleed out. Thoughts?
And make sure to pour oil into the oil pick up before closing up the oil pan. and to prime an LS, fill the filter with oil, fill the oil pan to the full mark on the dipstick, disconnect fuel and spark and crank the engine 4x 10 sec. with 1-2 min. between sessions
Been there done all of that here
https://ls1tech.com/forums/generatio...-swap-top.html
03-12-2011, 09:45 AM
#83
Sorry there haven't been any updates lately. It's been kind of a rough week.
I got to do a little work on the motor last night. Pulled off the LS1 valley cover and knock sensors (which looked almost brand new), and put the new LS6 valley cover on. I think the LS6 valley cover should really help de-clutter the engine bay.

Then I got to work on the installing the new Prothane motor mounts in the clamshells. I don't know what kind of luck I have with these things, but they went right in, and the install was surprisingly easy. The red mounts look good in the charcoal clamshells, and I thought it looked sharp on the silver motor.

I also cleaned up the starter and alternator, although I think I'm going to go back for another pass at them...they still look grungy. The A/C compressor came really clean, though, and the power steering pump and bracket look good as well.
I'm still waiting on the new lifters and trays to arrive, and when they do, it will finally be time for reassembly. Once I get the new lifters and trays installed, I'll be able to get some clay, check PTV, and if all is good then bolt the heads down and get ready to do the clutch.
I got to do a little work on the motor last night. Pulled off the LS1 valley cover and knock sensors (which looked almost brand new), and put the new LS6 valley cover on. I think the LS6 valley cover should really help de-clutter the engine bay.
Then I got to work on the installing the new Prothane motor mounts in the clamshells. I don't know what kind of luck I have with these things, but they went right in, and the install was surprisingly easy. The red mounts look good in the charcoal clamshells, and I thought it looked sharp on the silver motor.
I also cleaned up the starter and alternator, although I think I'm going to go back for another pass at them...they still look grungy. The A/C compressor came really clean, though, and the power steering pump and bracket look good as well.
I'm still waiting on the new lifters and trays to arrive, and when they do, it will finally be time for reassembly. Once I get the new lifters and trays installed, I'll be able to get some clay, check PTV, and if all is good then bolt the heads down and get ready to do the clutch.
03-12-2011, 09:51 AM
#84
I know this doesn't really apply to the build, but I'd like to take a second to mention something important to me.
This week I lost a friend and brother in law enforcement...Deputy US Marshal John Perry. John was shot in the head and killed serving a warrant on a fugitive in St Louis, MO. I worked with John several years ago when we worked in Washington, DC together. John was a good man, and a good cop. Today I'll be going to his funeral, and it makes things like LQ4s and EPS camshafts seem trivial.
I know opinions on law enforcement in general are a volatile subject, and I don't want to start an argument on that here. Please know that John died doing his best to protect you and your families from people who could care less about you, your spouses, your children, your friends, or your families.
God bless you John Perry. You will be missed.
03-13-2011, 09:21 AM
#87

I STRONGLY disagree with that. It's never good to crank a new dry motor...even if your intentions are good to prelube it. (dry motor means one without oil pressure) You would be MUCH better off firing it immediately than cranking it. Especially if you are dealing with new rings, bearings, etc. (I know you aren't...but this is for future reference as well) If you want to prelube, they make specific tools for that. I highly recommend them.
03-13-2011, 09:26 AM
#88
I know opinions on law enforcement in general are a volatile subject, and I don't want to start an argument on that here. Please know that John died doing his best to protect you and your families from people who could care less about you, your spouses, your children, your friends, or your families.
God bless you John Perry. You will be missed.
03-14-2011, 10:14 AM
#90
Thanks everyone. It was a tough weekend, and I'm glad to have an extra day off today so I can go out to the garage, turn the stereo on, and clear my head for a while. I think that's part of why I love cars so much in the first place...it's like therapy.
UPS screwed up my delivery on the lifters/trays/oil pan gasket and sent it to the wrong zip code, so I won't have those parts until tomorrow. I'm going to finish cleaning everything up, double check my head surfaces for cleanliness as well, and hopefully get to checking my PTV today. I also need to pull the oil pan back off, and clean that surface as well for the new gasket.
UPS screwed up my delivery on the lifters/trays/oil pan gasket and sent it to the wrong zip code, so I won't have those parts until tomorrow. I'm going to finish cleaning everything up, double check my head surfaces for cleanliness as well, and hopefully get to checking my PTV today. I also need to pull the oil pan back off, and clean that surface as well for the new gasket.
 03-17-2011, 08:11 PM
#92
Alright guys, I'm finally getting back on track. I spent yesterday checking, double-checking, and rechecking piston-to-valve clearance, and I'm finally ready to press on. Plus a minor snafu with UPS that sent my lifters, trays, and oil pan gasket to Louisiana instead of Kentucky held me up as well.
I got the oil pan gasket surface cleaned and prepped, cleaned the block side of the oil pan surface, and reinstalled the oil pan with the new gasket tonight. Unloaded the lifters, pushrods, and rockers into a couple quarts of oil to sit overnight as well. Tomorrow I'll mount the heads, torque the rockers down, and finally get this thing off the engine stand. Then I can put the new flywheel on and clutch in, mate the trans and bell back up to the motor, and get this freaking thing back in the car.
Steve Williams (Frost) is going to send me a base tune via HPTuners and help me street tune the car until I can get it on the dyno. Hopefully not to much longer now, because its starting to get nice here.
03-17-2011, 08:29 PM
#93
Alright guys, I'm finally getting back on track. I spent yesterday checking, double-checking, and rechecking piston-to-valve clearance, and I'm finally ready to press on. Plus a minor snafu with UPS that sent my lifters, trays, and oil pan gasket to Louisiana instead of Kentucky held me up as well.
I got the oil pan gasket surface cleaned and prepped, cleaned the block side of the oil pan surface, and reinstalled the oil pan with the new gasket tonight. Unloaded the lifters, pushrods, and rockers into a couple quarts of oil to sit overnight as well. Tomorrow I'll mount the heads, torque the rockers down, and finally get this thing off the engine stand. Then I can put the new flywheel on and clutch in, mate the trans and bell back up to the motor, and get this freaking thing back in the car.
Steve Williams (Frost) is going to send me a base tune via HPTuners and help me street tune the car until I can get it on the dyno. Hopefully not to much longer now, because its starting to get nice here.
I got the oil pan gasket surface cleaned and prepped, cleaned the block side of the oil pan surface, and reinstalled the oil pan with the new gasket tonight. Unloaded the lifters, pushrods, and rockers into a couple quarts of oil to sit overnight as well. Tomorrow I'll mount the heads, torque the rockers down, and finally get this thing off the engine stand. Then I can put the new flywheel on and clutch in, mate the trans and bell back up to the motor, and get this freaking thing back in the car.
Steve Williams (Frost) is going to send me a base tune via HPTuners and help me street tune the car until I can get it on the dyno. Hopefully not to much longer now, because its starting to get nice here.
Bad *** day today, 75 and sunny.
03-21-2011, 02:52 PM
#95
I can see the light at the end of the tunnel...
Saturday I went to get the heads bolted on, and hit another minor snag. I had everything all ready to go...block surface cleaned one last time, head surface cleaned one last time, head gasket in place, head on the mounting dowels...I lube up a couple of my ARP head bolts and drop them into the first two bolt holes, and THUNK. Bottomed out. I'm like WTH...try the bolt in another hole...bottoms out. Long story short, I bought the wrong freaking head bolts. I bought the ones for a 2004 and newer LS motor, and I needed the 98-03 bolts that are three different sizes. So I sat on my *** for about 5 minutes, cursed a lot, and finally said screw it, I'll install the heads in the car. I couldn't let the head bolts stop the progress.
So I pull the engine down off the stand, and mounted the new flywheel and Monster Level 3 clutch. took me a couple times to get the clutch disc lined up right using that cheap plastic alignment tool, but I finally got it centered and everything on there. Installed my new Tick speedbleeder on the slave, and mounted the trans. Called it a night after that.
Sunday comes, and it's time to drop the engine and trans back in from the top. I had to move things up and down, adjust side to side, and generally take my time, but I got it in there myself without much problem. I installed the drivers side motor mount pedestal only so I could have plenty of room to get the trans and bellhousing in before moving the engine over to line up the motor mount. Initially my plan was to try to line up the driver's side mount first and then do the passenger (I had read that it was easier to do this way), but when I installed the passenger side pedestal after the bellhousing was clear, it looked like it was going to line up perfect so I did it first instead. A little up and down on the front of the motor, and a little up and down on the jack supporting the trans, and both motor mount bolts slid right in. I was shocked.
I crawled underneath and started hooking the wiring up on the drivers side of the trans so I could go ahead and get the torque arm bolted back in place. I got all the brackets into place, got the two long bolts in and the torque arm in its bushing, and finally got stuck on the top bolt of the torque arm clamshell (the one closest to the floorpan). I don't know what my problem is, but I absolutely cannot get that little bastard to start threading. I spent longer trying to get that bolt in than I did getting the engine settled on the mount pedestals and bolted into place. I decided that was enough for the day and called it quits.
Tonight I'll take another crack at that top bolt. I was probably just tired and hopefully it will go in without much issue. Then I can install the new trans mount and crossmember, torque everything down, and try to get the driveshaft in and all the other wiring harness connectors plugged in under the car.
I took more pics along the way, but my camera battery died, so I should have some more up tonight.
03-24-2011, 05:15 PM
#98
Alright I've got a lot of updates and have made a lot of progress. My internet went down for the last two days so I haven't been able to update this thread at all, so here's the pics of the progress, as promised..
Was waiting on new head bolts, so started the clutch install. New flywheel...

Monster Level 3. That plastic alignment tool sucks ***, so I suggest using the input shaft of a junker if you can get your hands on one.

Here's the Prothane trans mount...

And the engine/trans has found its way back home...

Head bolts arrived, and I was able to get the heads torqued down last night.

Had to take a day off work today since my internet crashed and my new riding lawn mower was being delivered, so I got good time to work on the car today.
Got the pushrods and rockers installed and torqued to spec, and the valvecovers on...

Went back inside and installed the fuel rails and injectors onto the manifold...

I had been working on installing the accessories on the front of the motor, so now was a good time to toss the balancer in the oven to get it heated up and ready to install. I was under the impression that this would help, but it really didn't. I heated it at 250 degrees for an hour, and it slid like 1/4 inch on and stopped. LOL

All the accessories back on. Also put the vent tubes in, and knock sensor wiring harness connected, so it's ready for the manifold now.

Booyah

I'm really getting close now...getting excited. I've got to stop and get all new fluids, plugs, and some new header bolts tomorrow. Once I get the headers installed, I'll do the plugs and then the coil brackets/coils and plug wires, and get the rest of the wiring harness run. Then onto the radiator, fans, and bleed the clutch.
03-25-2011, 03:51 AM
#99
Launching!
iTrader: (6)
Join Date: Jul 2008
Location: Chicagoland Area
Posts: 233
Likes: 0
Received 0 Likes
on
0 Posts
I got a question for you, Im doing the exact same swap, minus the sweet heads/cam package, oil pump, injectors, and ls6 intake (ls1). I'm too broke for all the fancy stuff and just need my car back for the summer season. So back to the original reason I was posting here..........
1. Where did you get your engine leveler from, because I don't want to put in in the bottom, taking it out was a pain and damaged my radiator support enough.
2. My LQ4 engine also came with that linkage that goes from 1 head to the other in the from and blocked off the back 2. I took the one from my old engine that linked all those spots together and put it on instead. Was I wrong??? Ill get pictures if you want them.
3. Thanks for your awesome write up, its actually helping me along with mine and showing me an easier way of doing everything. Is it worth cleaning the pistons, I cleaned everything else and painted the block already
Im just about to make a thread on my build....that I started back in September
03-25-2011, 06:48 AM
#100
I got a question for you, Im doing the exact same swap, minus the sweet heads/cam package, oil pump, injectors, and ls6 intake (ls1). I'm too broke for all the fancy stuff and just need my car back for the summer season. So back to the original reason I was posting here..........
1. Where did you get your engine leveler from, because I don't want to put in in the bottom, taking it out was a pain and damaged my radiator support enough.
2. My LQ4 engine also came with that linkage that goes from 1 head to the other in the from and blocked off the back 2. I took the one from my old engine that linked all those spots together and put it on instead. Was I wrong??? Ill get pictures if you want them.
3. Thanks for your awesome write up, its actually helping me along with mine and showing me an easier way of doing everything. Is it worth cleaning the pistons, I cleaned everything else and painted the block already
Im just about to make a thread on my build....that I started back in September
1. Where did you get your engine leveler from, because I don't want to put in in the bottom, taking it out was a pain and damaged my radiator support enough.
2. My LQ4 engine also came with that linkage that goes from 1 head to the other in the from and blocked off the back 2. I took the one from my old engine that linked all those spots together and put it on instead. Was I wrong??? Ill get pictures if you want them.
3. Thanks for your awesome write up, its actually helping me along with mine and showing me an easier way of doing everything. Is it worth cleaning the pistons, I cleaned everything else and painted the block already
Im just about to make a thread on my build....that I started back in September
2. I'm not sure if one way is better than the other, to be honest. I swapped over the parts from the LS1 that was previously in the car which had the back two blocked off and the front two linked together...
3. I think its worth it to clean the pistons while you are in there. Getting years worth of carbon build up off the surface of the pistons can only help, and it actually comes off pretty easy if you get some strong cleaner.
Good luck with your build. If I can help you out at all, please let me know.