
So I flycut my pistons.....

 05-24-2011, 12:56 AM
#24
TECH Fanatic
iTrader: (8)

Join Date: Nov 2009
Location: phx the cactus patch
Posts: 1,095
Likes: 0
Received 13 Likes
on
13 Posts

Ok , 2 complete revolutions is plenty but When You feel resistance , turn engine really slowly so You don't hydrolock or Play-dough lock and gall those rod bearings or even bend a rod although really small chance of that . Also the pistons do end up like .015" or maybe .020" above the block deck so You will need some sort of old gasket or something between head and block . Good luck
05-24-2011, 12:52 PM
#25
Happen to breeze thru this thread....
A couple of things come to mind.
The first and likely most important "critique" is why only use a 2.050 valve??
That only leaves you .025 radial clearance per side (in a perfect world) assuming thats exactly how big your notch is. Ideally you should have used a valve at least .100 larger than the actual valve diameter you plan on using....now you have a little more room for error (a minimum of .050 radial clearance).
Also, if you did this while the piston was at TDC its probably not in the exact right location.....an intake valve is usually closest to the piston ten degree's after TDC and ten degrees before TDC on the exhaust side. It's amazing that no matter what cam you seem to install, the 10 before and 10 after rule is usually right on give or take a few crank degrees.
With the fact you may not have nailed the ideal location of the pocket and have so little radial clearance to play with (keeping in mind the pistons move around a little (rock) under actual operating conditions) I would be concerned you still may experience valve to piston contact with the notches you just created.
I also would never use 36 grit paper to do this job....its simply too aggressive. Better to take a little more time with 60 or 80 grit leaving a much nicer (smoother) finish.
Also, a .100 deep relief might be (and probably is) deeper than you may have needed for adequate P to V clearance. The more piston material you leave the better of course so you have a stronger piston when the smoke clears.
Anyway, I do commend you for taking the initiative to go out there and do this so dont take this response as nothing more than constructive criticism which I assume is what you were looking for in the first place. I see alot of guys winging it and running big cams without notching which is totally playing with fire, but you were looking for input and I had a minute or two to share, not to mention felt what I had to say might benefit others thinking about tackling it themselves as well.
Good luck with the rest of the build....and do NOT try to smooth edges with 36 grit paper (thats like using small rocks to smooth your pistons)....I would be using wet/dry 180 or 220 with WD40 as a cutting lubricant while your working. I would also try to smooth out the actual notches you created with the 36 grit paper with the same finer wet/dry paper I mentioned above.
-Tony
Last edited by Tony Mamo @ AFR; 05-24-2011 at 01:22 PM.
05-24-2011, 05:13 PM
#26

^^by doing the flycutting at TDC he is actually giving himself even more radial clearance than if it were to be preformed at 10* before or 10* after...think of the valve in relationship to the piston...if it is in the hole some the radial cut will be less when it goes to TDC since the valve is dropped down farther and more towards the center of the piston...I can draw this up to make it more clear if need be...TDC is where you want to cut for maximum radial clearance...
I agree use 400 grit sandpaper to smooth everything out...36 grit is way to rough...
for reference I use te Lindy cutter and have done a couple cars as deep as .120 without any problems so far...n/a motors no spray...yet...lol
also for reference my Lindy is over sized .060...valve is 2.04 and cutter measures 2.10...30 thous radial clearance...even after pulling the heads with carbon build up the was no scraping of any kind in the flycuts...
Chris
05-24-2011, 05:31 PM
#27
TECH Junkie
iTrader: (2)

Join Date: Jan 2006
Location: Fort Wayne, IN
Posts: 3,776
Likes: 0
Received 0 Likes
on
0 Posts
Ok cool. With that size intake valve and only being milled in the .020 range or so, you should be ok radial clearance wise. If you had a 2.02+ valve and milled in the .030+ range, then radial will be a BIG issue from my experience.
05-24-2011, 05:55 PM
#28
^^by doing the flycutting at TDC he is actually giving himself even more radial clearance than if it were to be preformed at 10* before or 10* after...think of the valve in relationship to the piston...if it is in the hole some the radial cut will be less when it goes to TDC since the valve is dropped down farther and more towards the center of the piston...I can draw this up to make it more clear if need be...TDC is where you want to cut for maximum radial clearance...
I agree use 400 grit sandpaper to smooth everything out...36 grit is way to rough...
for reference I use te Lindy cutter and have done a couple cars as deep as .120 without any problems so far...n/a motors no spray...yet...lol
also for reference my Lindy is over sized .060...valve is 2.04 and cutter measures 2.10...30 thous radial clearance...even after pulling the heads with carbon build up the was no scraping of any kind in the flycuts...
Chris
I agree use 400 grit sandpaper to smooth everything out...36 grit is way to rough...
for reference I use te Lindy cutter and have done a couple cars as deep as .120 without any problems so far...n/a motors no spray...yet...lol
also for reference my Lindy is over sized .060...valve is 2.04 and cutter measures 2.10...30 thous radial clearance...even after pulling the heads with carbon build up the was no scraping of any kind in the flycuts...
Chris
Thats a good point about the relief at TDC....it would help with a little extra clearance provided at the tightest point but whether I was using a Lindy cutter or the sandpaper stuck to a valve budget route, I would personally opt for a larger relief.
Radial clearance of 025 - .030 is snug and there is no downside to going a little larger....only upsides. Most piston manufacturer's will cut reliefs at least .100 larger than the intended diameter of the typical installed valve to give .050 radial clearance and allow for an oversize valve from the end user.
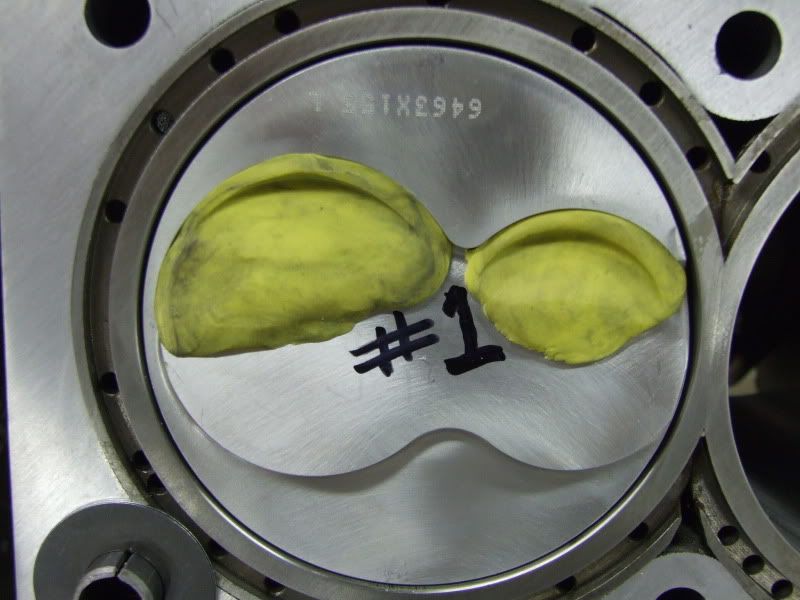
OP.....use valvespring shims to simulate your head gasket thickness (they conveniently fit right over your cylinder head dowels) and then you just need two more in the top two corners you can place there before snugging the head on the block. This way you can clay the valve reliefs you cut to see how well everything worked out (see exactly what your radial clearance looks like) and find out what you have for vertical P to V clearance as well.
This is what the radial clearance looks like on an engine I fire on the dyno this Thursday.....its ALOT more than .025 a side I assure you!
Also note the spring shims used to simulate the head gasket thickness.
Cheers,
Tony
 05-24-2011, 07:29 PM
#29
want a better idea if it is going to kiss ? clay the piston . only thing done by hand each piston might be off a slight amount . so maybe take the one oyu did the least amount of time on .
in case anyone wants to know about claying .
you can have a head on if you want we just need to check one to check piston to valve .
so remove the pushrods if one of the heads is still on . the other head has to be off .
anyway , go to wally world .
buy some play-doo .
place not too thick but a hamburger patty (not mega size) on a single piston .
re-assemble with gasket included . just like it is going back together .
make sure you torque the head to specs .
now all you got to do is remember which cylinder you put the play-doo on and assemble the intake and exhaust rockers for that particular cylinder with pushrods and dont forget the rocker rail .
put the car in neutral and rotate the crank at least one full turn .
take the head back off and look at your doo. if it is cut through that is a no go .
remove and measure . try using a burger flipper thing or putty knife very slow .
when measuring i was always told to give about .100 on both the int. and exh. side (technically .080 on exhaust but i dont gamble on hard work unless it is really worth it , so play safe ).
so anything above should be good to go .
good information, except one thing...DO NOT USE PLAY-DO
play-do has elasticity and will give you false readings. meaning it will show MORE clearance than you really have.
also, you do not need to put the head gasket on, or even add all the bolts or TQ to spec.
just 4 bolts around the cylinder you are claying will be enough, and hand tighten them. i say this because installing and removing a cylinder head, especially aluminum, too many times can warp it. if you do not use a gasket, once the head surface meets the block surface, torquing it down will not pull it any further. if you use a gasket, you have to crush it, rendering your gasket useless.
re cap...use regular modeling clay not play-do, do not use a gasket and do not waste time installing all the bolts and torquing.
05-26-2011, 08:19 PM
#31
good catch ! hence the word "clay" .
if it can be found the correct kind that is , get it . i know all clays absorb to some degree .
there are just so many groups though .
the kaolin group absorbs bacteria , toxins used as a base mineral in health and food groups .
Illite group named for the great state of Illinois , most green some are yellow . basically a marine form .
smectite group is the expandable form which makes it popular in industry since it can absorb unlike any other form of clay . contains montmorillonite which does what was said which makes it popular and easy to find .
then there are the chlorite group the vermiculite group , the Mixed-layer group (has the five above in it)
last is the lath-form .
anyway they all contain oxygen silicone and potassium to be short but have other stuff .
plasticine clay is used in art since it does not dry out and crack as easy . polymer clay is more synthetic used from pvc to nylon .
you can make some homemade play dough with salt , water and cornstarch in a process . something for the kids .
it goes on and on . totally understand we are not trying to mess up anybody's engine or things of that nature . nothing but respect from here .
for me , play doo is about all that can be found in the woods around where i live so we sometimes have to improvise .
that said we have had success with some close calls . though no guts no glory , the numbers add up then pull the trigger . thats the way i see it .
my original note to the op
op you are in really good hands with this conglomerate of tech .
if you just could combine the experience and knowledge just like an online think tank tackling problems using science , physics , mathematics and so on .
big ups to everyone on here ! those i dont know very well and those i have got to know like tony and chris who are well respected in the community .tony is a busy dude , so it is really cool to see him contribute . hopefully everyone has got the same goal that is to help , educate and try to not grenade any engines .
by the way tony , that pic looks a lot like what we use around here right down to the color man . great minds think a like in a small world type stuff .
apologies for the clay rant , no means to be a smarty .
05-27-2011, 10:23 AM
#32
TECH Enthusiast
Thread Starter
iTrader: (15)

Join Date: Oct 2010
Posts: 624
Likes: 0
Received 0 Likes
on
0 Posts
I agree snake! Lots of good info in this thread. On a side note, I took everyone advice and used some sand paper by hand to clean up the cuts. It really smoothed out the reliefs and got rid of potential hot spots.
05-28-2011, 12:31 AM
#34
Staging Lane
Join Date: Jul 2008
Location: north judson indiana
Posts: 73
Likes: 0
Received 0 Likes
on
0 Posts
So im doing something similar,lq4 notched pistons cam in the 235 duration range and stock size valves.Would it work to use a 2.10 intake valve for that side and a 2.00 intake valve to cut the exhaust side and how far are you guys going on depth.Also i will have a set of 241s cut to 58cc on this motor.Any idea of compression with stock lq4 head gasket?Sorry for the hijack.
05-28-2011, 12:41 AM
#35
TECH Enthusiast
Thread Starter
iTrader: (15)
Join Date: Oct 2010
Posts: 624
Likes: 0
Received 0 Likes
on
0 Posts
So im doing something similar,lq4 notched pistons cam in the 235 duration range and stock size valves.Would it work to use a 2.10 intake valve for that side and a 2.00 intake valve to cut the exhaust side and how far are you guys going on depth.Also i will have a set of 241s cut to 58cc on this motor.Any idea of compression with stock lq4 head gasket?Sorry for the hijack.
What size valve do you plan on running? I would account for future head and valve changes as well when choosing a valve to cut with so you only do it once.
When I used the 2.05 to cut, I didnt need to remove the valve seat. Some prefer to remove the seat and you might have to with a 2.10 but I could be wrong depending what head you use to cut.