


My 347ci build
Hey Chuck,
Just a thought here as I am no expert, just giving what I think is experience. It looks like you are making your measurements with the valve springs (and not checkers) installed. In my opinion this is good.
In my experience when measuring installed preload directly the hardest part is to determine the zero lash point. The two biggest sources of error in my experience were getting the pushrod exactly where it needs to be in the lifter plunger cup and depressing that plunger when wiggling to determine the zero point. What I ended up doing was prefilling the lifters by repeatedly heating and cooling them in oil on the stove, rotating them every once in awhile. I used a thermometer to keep the oil <220 ish. As you well know this will push the air out on the heating step and then draw oil in on the cooling step. This makes our sweet Johnsons rock hard. Er, you do have Johnson lifters too, right?
Second I just put a dab of oil in each lifter cup, that seemed like it may have helped the pushrod to find home. I'd try and wiggle the puhrod into place as I neared the zero lash point as well. With the rock hard lifter and the rock hard valve sping the zero points were repeatable within a few thou for me.
So YMMV and I may be forgetting something, but hopefully that was helpful.
The way I was thinking, valve springs >>>> lifter plunger springs, so I wanted to try it without filling em up so I don't have to wait for the oil to bleed out and get my reading, but I'll definitely try the dab of oil to help it find home.
Btw - I'm assuming you filled the lifters with oil prior to install?
Hoping for some forward progress this weekend guys. I'm starting to question whether or not I really need to be as **** about this, but I'm enjoying the challenge of trying to be as precise as I can (I'm sick, I know). I'll summarize this whole process into a single post of what I've learned from this whole measuring process once I have the results I'm looking for. I imagine it's kind of hard to follow at this point without going back a few pages.
Last edited by ckpitt55; Dec 7, 2013 at 06:14 AM.
Hey Chuck,
Just a thought here as I am no expert, just giving what I think is experience. It looks like you are making your measurements with the valve springs (and not checkers) installed. In my opinion this is good.
In my experience when measuring installed preload directly the hardest part is to determine the zero lash point. The two biggest sources of error in my experience were getting the pushrod exactly where it needs to be in the lifter plunger cup and depressing that plunger when wiggling to determine the zero point. What I ended up doing was prefilling the lifters by repeatedly heating and cooling them in oil on the stove, rotating them every once in awhile. I used a thermometer to keep the oil <220 ish. As you well know this will push the air out on the heating step and then draw oil in on the cooling step. This makes our sweet Johnsons rock hard. Er, you do have Johnson lifters too, right?
Second I just put a dab of oil in each lifter cup, that seemed like it may have helped the pushrod to find home. I'd try and wiggle the puhrod into place as I neared the zero lash point as well. With the rock hard lifter and the rock hard valve sping the zero points were repeatable within a few thou for me.
So YMMV and I may be forgetting something, but hopefully that was helpful.
Just a thought here as I am no expert, just giving what I think is experience. It looks like you are making your measurements with the valve springs (and not checkers) installed. In my opinion this is good.
In my experience when measuring installed preload directly the hardest part is to determine the zero lash point. The two biggest sources of error in my experience were getting the pushrod exactly where it needs to be in the lifter plunger cup and depressing that plunger when wiggling to determine the zero point. What I ended up doing was prefilling the lifters by repeatedly heating and cooling them in oil on the stove, rotating them every once in awhile. I used a thermometer to keep the oil <220 ish. As you well know this will push the air out on the heating step and then draw oil in on the cooling step. This makes our sweet Johnsons rock hard. Er, you do have Johnson lifters too, right?
Second I just put a dab of oil in each lifter cup, that seemed like it may have helped the pushrod to find home. I'd try and wiggle the puhrod into place as I neared the zero lash point as well. With the rock hard lifter and the rock hard valve sping the zero points were repeatable within a few thou for me.
So YMMV and I may be forgetting something, but hopefully that was helpful.
And Chuck, I am sure you are a little frustrated about it but keep pluggin man, you'll get there. Look how far you've gotten so far. Seems to me that this may be as tedious as setting up the bottom end clearances,etc
 . Could be wrong though, Ill find out myself in a few months
Yes I did fill them with oil before final install. Not sure it matters, theyre still noisy on startup.
"Waiting" for leakdown is a red herring IMO. I believe we're talking about rates of 100 thou in 30 to 60 seconds with ?50? lbs of pressure, there is an industry standard, maybe Randy can chime in. You just need to tighten slow and careful and you wont even notice the 10ish seconds it takes to bleed to your preload.
"Waiting" for leakdown is a red herring IMO. I believe we're talking about rates of 100 thou in 30 to 60 seconds with ?50? lbs of pressure, there is an industry standard, maybe Randy can chime in. You just need to tighten slow and careful and you wont even notice the 10ish seconds it takes to bleed to your preload.
Hey Chuck, one other thing. Are you doing two pushrods at once? The only way I could get anything repeatable with the YTs was to have pushrods for each rocker in the pair. Otherwise it twists as you mention above. You could also remove the rocker from the valve you're not measuring. Tony has led me to believe its just the snap ring. The bearings are pressed into the arms.
Hey Chuck, one other thing. Are you doing two pushrods at once? The only way I could get anything repeatable with the YTs was to have pushrods for each rocker in the pair. Otherwise it twists as you mention above. You could also remove the rocker from the valve you're not measuring. Tony has led me to believe its just the snap ring. The bearings are pressed into the arms.
So I think I finally got somewhere with this..
First off let me say that getting accurate and repeatable numbers was extremely time consuming. I learned that the bulk of my error was in my fixturing and in my hands. What I mean by that is if you don't tighten them down exactly the same way each time or if you let the rocker pair twist you will get different numbers.
If you're doing this at home, save yourself some trouble and pick up one of these from harbor freight for $13. It allows you to manipulate the indicator any way you want and really dial it in to being in alignment (or close) to pushrod travel.

Here's how I'm fixtured up.

Checking the intake valves on the passenger side again, here's my expected preloads based on the difference between my zero lash length for each valve and my test length of 7.700".
Cyl 2: Expected: .035

Cyl 4: Expected: .030

Cyl 6: Expected: .040

Cyl 8: Expected: .022

Close enough. Repeated measurements show that I'm within +/- 0.001", which is the same tolerance that the pushrods are supposed to be manufactured to. About as good as I could hope to achieve at home in my basement I think.
So this was kind of a really long, roundabout way of making sure my measurements give me the preload I'm expecting when the real pushrods are installed in the engine. Impossibly tedious and often made me hate life while trying to figure it out, but it was a necessary step (imo) given that I macgyver'd a means of measuring the gauge length of the pushrod checker directly. Now all I've got to do is order the proper lengths from Trend and hope they cut them to the right length!
If anyone has any specific questions on any of the setup or anything ask away, I'm happy to answer.
First off let me say that getting accurate and repeatable numbers was extremely time consuming. I learned that the bulk of my error was in my fixturing and in my hands. What I mean by that is if you don't tighten them down exactly the same way each time or if you let the rocker pair twist you will get different numbers.
If you're doing this at home, save yourself some trouble and pick up one of these from harbor freight for $13. It allows you to manipulate the indicator any way you want and really dial it in to being in alignment (or close) to pushrod travel.
Here's how I'm fixtured up.
Checking the intake valves on the passenger side again, here's my expected preloads based on the difference between my zero lash length for each valve and my test length of 7.700".
Cyl 2: Expected: .035
Cyl 4: Expected: .030
Cyl 6: Expected: .040
Cyl 8: Expected: .022
Close enough. Repeated measurements show that I'm within +/- 0.001", which is the same tolerance that the pushrods are supposed to be manufactured to. About as good as I could hope to achieve at home in my basement I think.
So this was kind of a really long, roundabout way of making sure my measurements give me the preload I'm expecting when the real pushrods are installed in the engine. Impossibly tedious and often made me hate life while trying to figure it out, but it was a necessary step (imo) given that I macgyver'd a means of measuring the gauge length of the pushrod checker directly. Now all I've got to do is order the proper lengths from Trend and hope they cut them to the right length!
If anyone has any specific questions on any of the setup or anything ask away, I'm happy to answer.
Last edited by ckpitt55; Dec 13, 2013 at 07:53 AM.
LS1 Tech Stories
The Best V8 Stories One Small Block at Time

Gas Monkey Built a 6-Wheel Ferrari Testarossa With a Corvette LT4 Engine
Verdad Gallardo
7 Most Reliable High-Performance Engines GM Has Ever Built
Verdad Gallardo
Amazing '71 Camaro Restomod Is Modern Muscle Car Under the Skin
Verdad Gallardo
6 Common C5 Corvette Failures and What's Involved In Repairing Them
Pouria Savadkouei
Retro Modern Bandit Pontiac Trans AM Comes With Burt Reynolds' Autograph
Verdad Gallardo
Top 10 Greatest Cadillac V Series Performance Models Ever, Ranked
Pouria Savadkouei
Top 10 Most Powerful Chevy Trucks Ever Made!

Hennessey's New Supercharged Silverado ZR2 Has 700 HP
Verdad Gallardo
Coachbuilt N2A Anteros Is an LS2-Powered C6 Corvette In Italian Clothes
Verdad Gallardo Just added a Harbor Freight fixture & Fowler digital indicator to my tool list.. I could see now how it would be a pain in the *** to do this with a regular dial indicator. Anyways looking good man. I guess you could say you got over the next hurdle now lol. In for the next update. Take care man


On The Tree
Joined: Feb 2010
Posts: 119
Likes: 1
hey man just read your thread from cover to cover, very impressed to say the least. it gives me hope that when im in a "more" stable financial situation i can take the time and effort to build something as beautiful and nice as you are. the amount of information in here is unbelievable! even just the simple stuff that gets easily swept under the rug you cover it all!
Got all my pushrods in around christmas time, since then have been working on all the small finish work to wrap the engine up. I decided to powdercoat my valve covers / timing cover / oil pan for durability as opposed to paint, so that still needs done. Also need to make a throttle cable bracket, plumb coolant crossovers, clean up my accessories, and get my wiring harness cleaned up. Also need to build headers but that will wait until the engine is in the car. I'll probably start a thread in the conversion section once I start the swap.
Anyway, figured I'd share my measurements

Looking at the "theoretical preload" column, I was able to hit my .025 - .030 target pretty consistently. Some small adjustments needed but I'll be able to bring in the outliers by adjusting my rocker shims slightly.
That being said, I've starting looking into catch cans. There's a lot out there, can anyone recommend a good one?
Anyway, figured I'd share my measurements
Looking at the "theoretical preload" column, I was able to hit my .025 - .030 target pretty consistently. Some small adjustments needed but I'll be able to bring in the outliers by adjusting my rocker shims slightly.
That being said, I've starting looking into catch cans. There's a lot out there, can anyone recommend a good one?
Last edited by ckpitt55; Jan 12, 2014 at 09:02 PM.

thanks for the rec, I'll look into it.
I've been working on a coolant crossover setup for the engine - opted to piece together my own kit so that I'm sure it works with a fast 102, similar to the one nitrous outlet sells. Hopefully I'll have some pics to share this weekend.
I've been working on a coolant crossover setup for the engine - opted to piece together my own kit so that I'm sure it works with a fast 102, similar to the one nitrous outlet sells. Hopefully I'll have some pics to share this weekend.
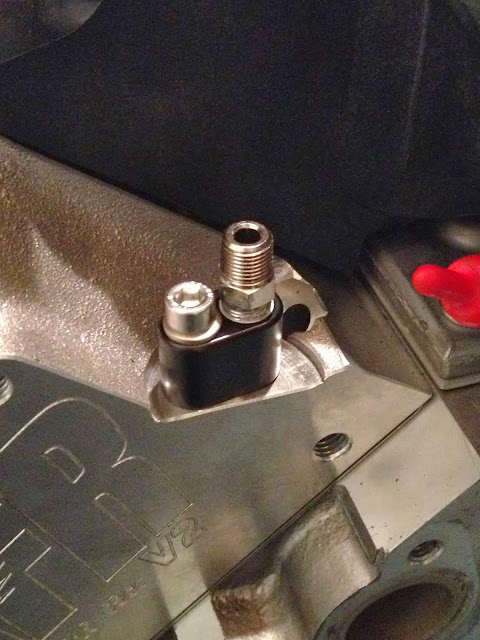
I'm using the wegner adapter blocks you can get for ~$5 a piece and 1/8 npt to -4an adapters in various orientations.
Tight here at front driver's port
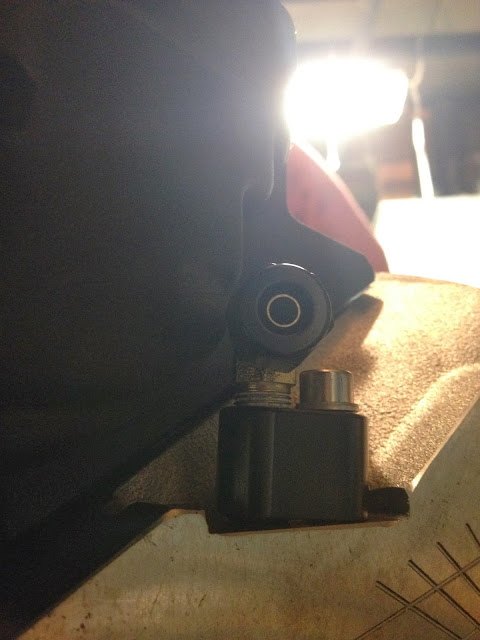
And here at rear passenger's port
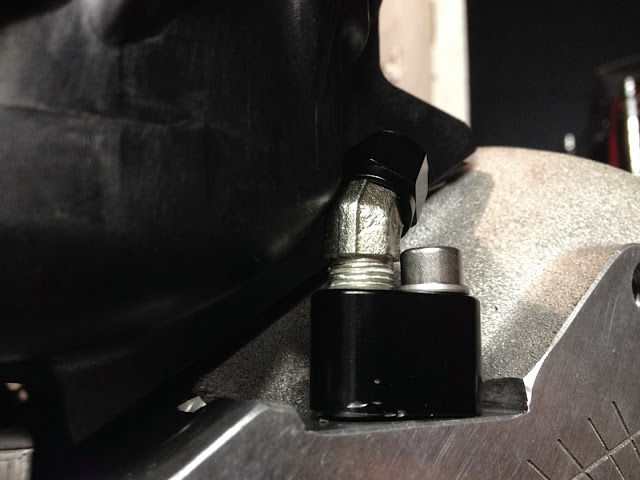
I cured those problems by cutting some threads off the adapter fittings to reduce the overall height and shaving the corners of the intake some with a bearing knife.
The manifold to tie them all together will be here at the front passenger port.
I opted to do all the lines in 1/4" stainless hardline, trying to keep everything as clean as possible and avoid ratnesting everything with hoses. Waiting on bending and flaring tools but I've been playing with the routing using coat hangers for mock up.


Hopefully more to come this weekend.
Wow, thats really neat man. I dont know how you did it but you got that coat hanger straight as hell where it runs along the passenger side there...damn. This is looking awesome man. When you are finished with this build you should feel like this

Keep up the good work brother.
Keep up the good work brother.

