When you click on links to various merchants on this site and make a purchase, this can result in this site earning a commission. Affiliate programs and affiliations include, but are not limited to, the eBay Partner Network.
The sleeves that come in the dampener piece are taken out as the first step, they're not used. Can't be installed at all if they're left in. They're only used for dampeners that bolt directly to the block.
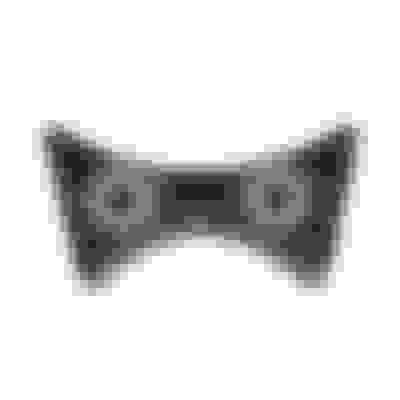
For what it's worth, here's the pic from trick flow, it shows the bolts through the front with the fat side on the left and the skinny side on the right. Opposite of how you have it.
The sleeves that come in the dampener piece are taken out as the first step, they're not used. Can't be installed at all if they're left in. They're only used for dampeners that bolt directly to the block.
YES EXACTLY I know that, you're not reading what I'm saying thoroughly.... I'm aware it comes with the sleeves.. But with them they are made for a block that is already drilled and it would have gone on with the flats of those sleeves against the block and that would have put the fat side to the left. So they make the bracket to simulate the block and you pull the sleeves and put the damper on the bracket the same direction as if it went onto a block that was drilled.
Look at the trick flow pic with the flats of the washers showing. This is the rear of the damper. this is not the front side. this is directly from their website. so if you flip it over the fat side is on the left not the right
Last edited by 00pooterSS; 09-24-2019 at 09:15 PM.
There's no way an item drilled with only 2 equal size holes can't be flipped. It would have to have unequal size holes or a pattern/offset holes drilled with more than 2 holes.
They way you are supposed to be using that is to use the 2 washers that come with the kit and two short bolts. Take out the sleeves and get rid of the 2 long bolts. Put in the washers and put in the short bolts.
Last edited by 00pooterSS; 09-24-2019 at 05:19 PM.
When I said washers I meant those sleeves you just put in that pic. So sleeves... Sorry about that. Also you are right you do not use them with the black dampener, they are for use with a tan colored dampener. I found the instructions a minute ago and it showed that you put those sleeves in the front side of the dampener if it is tan, and don't use them at all if it's black.
Flip the dampener block over like we talked about. Push it all the way down. Put bolts in it.
The bolts don't bottom out/tighten up against the dampener in this situation. They actually bottom out on the posts.
The original way the dampener was setup with the long sleeves..... the bolts tightened on the sleeves not on the dampener.
You can't tighten a bolt tight into plastic without a sleeve or a pin or it can crack, break, or bust through the plastic. Same reason a lot of plastic intake manifolds have sleeves pressed into them. Here you have the pins acting as sleeves. Tighten the bolts against the pins.
If your pins seem way too long it may be because you may have squished the dampener by mounting it backwards. I saw they are like $12. So either slap it on and run it or order another one and put the new one on the right way.
Last edited by 00pooterSS; 09-24-2019 at 10:04 PM.
You can't tighten a bolt tight into plastic without a sleeve or a pin or it can crack, break, or bust through the plastic. Same reason a lot of plastic intake manifolds have sleeves pressed into them. Here you have the pins acting as sleeves. Tighten the bolts against the pins.
If your pins seem way too long it may be because you may have squished the dampener by mounting it backwards. I saw they are like $12. So either slap it on and run it or order another one and put the new one on the right way.
The way I had it installed, the top of the posts were about flush with the dampener surface, so no squishing possible. As for which way TF said was the right way, I don't have my copy of the instructions any more, but I think they were ambiguous. I'm now thinking of flipping it but putting washers between the dampener and the bracket, to make it tight when bolted down.
Don't do that. Just flip it over and put the bolts in it.
If it fits loose something is wrong get a new one, but you still do NOT tighten bolts up against it. The bolts are only there to keep it from coming off. That is the bolts only purpose in this application is to keep the dampener in place, again not to tighten up against it.
It fits tight on the posts to keep it from moving up down left or right. The bolts in it keep it from moving forward and falling off.
If you feel like something isn't right order another block and put it on the right direction and only put the two bolts in like the instructions state. If a tan one comes put the spacers in the front of the block where the two bolts are. If it's black use no spacers.
Thanks for posting the directions.
I couldn't find washers thin enough to be spacers in back of the dampener. Anyway I agree better not to have any pressure on the dampener from the bolts, but I also don't like it rattling around on the posts, even though it's just a small amount. So, I may just use some non-hardening RTV under the bolt flanges, then tighten them, that will make it pretty solid.
Going back to your pictures, those recesses in the front of the dampener (when it's facing the right way) are fairly deep. If you put the spacers in those holes do they sit flush with the front of the dampener or do they stick out some?
In the pic I posted I don't see how you could use them though because the bolts in that guys pic are recessed into the holes of the dampener so I imagine the spacers would stick out too far to be used.. besides the fact it says they don't work on the black one lol.
You could find a washer at the hardware store that fits in the outer part of the hole on the dampener and then drill out the washer to go around the posts and use that as a little spacer. I wish I was there to see the rattling and see if it's worth even worrying about.
Update: here's the dampener flipped from the way I originally had it. Used some Ultra Black RTV between the dampener and the bracket, which fixed the slight looseness of the fit on the bracket posts. In the pic the chain is pulled tight on the right side, it runs just a hair above the dampener, so fit is perfect.


 09-24-2019, 05:06 PM