NA 'street' LS2 403 build - "From Crate to Dyno"


 01-04-2010, 08:59 PM
#22
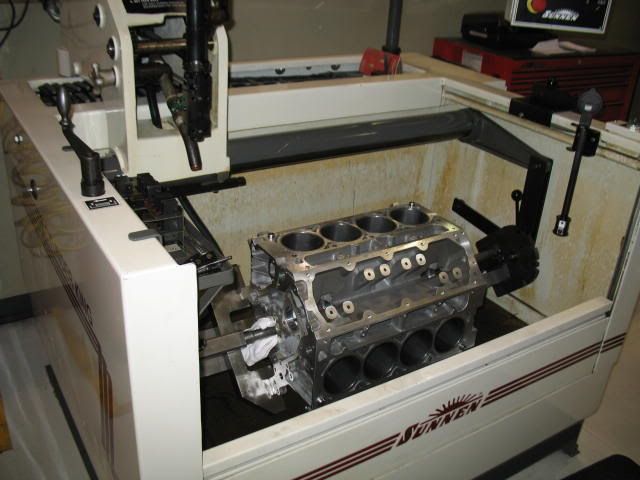
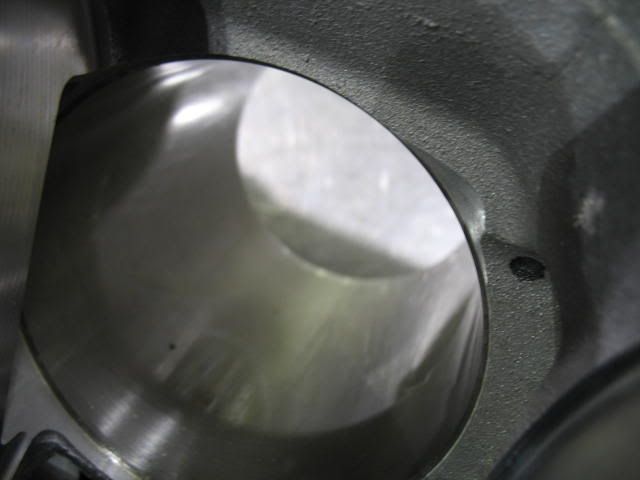
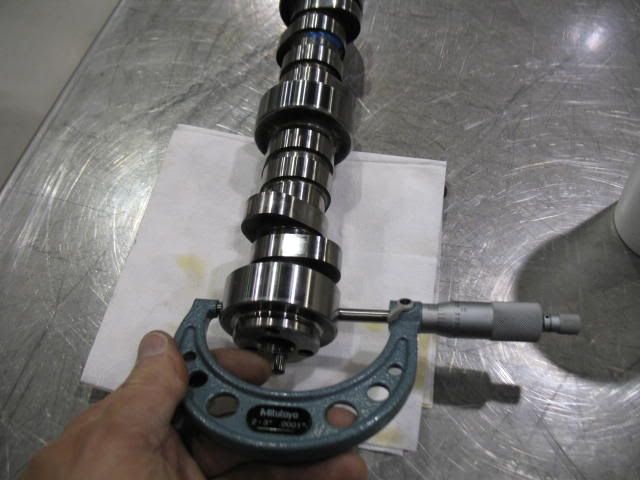
After line honing I proceeded to prep the cylinder walls. The FINISH size was going to be 4.0058"-4.0059" based on what the Diamond pistons measured .700" down 90* from the pin centerline out of the box. This will give me very close to .0053"-.0054" piston to wall clearance.
Even though the pistons have offset pins, I don't want it to rattle when its really cold so I am staying conservative here.
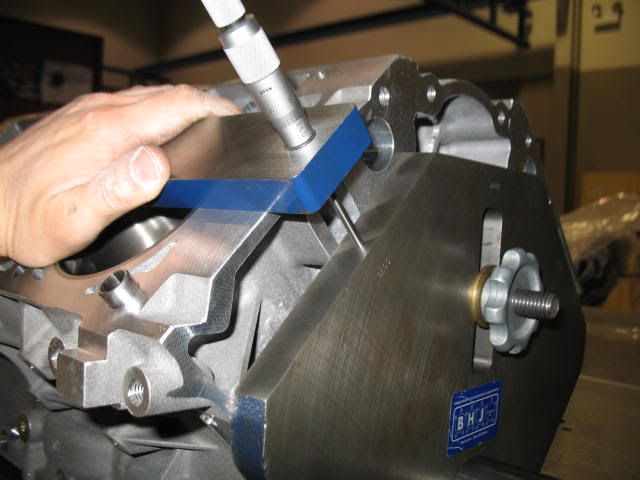
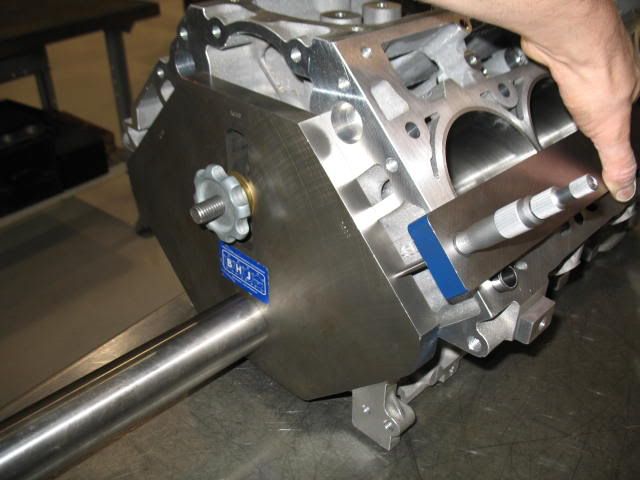
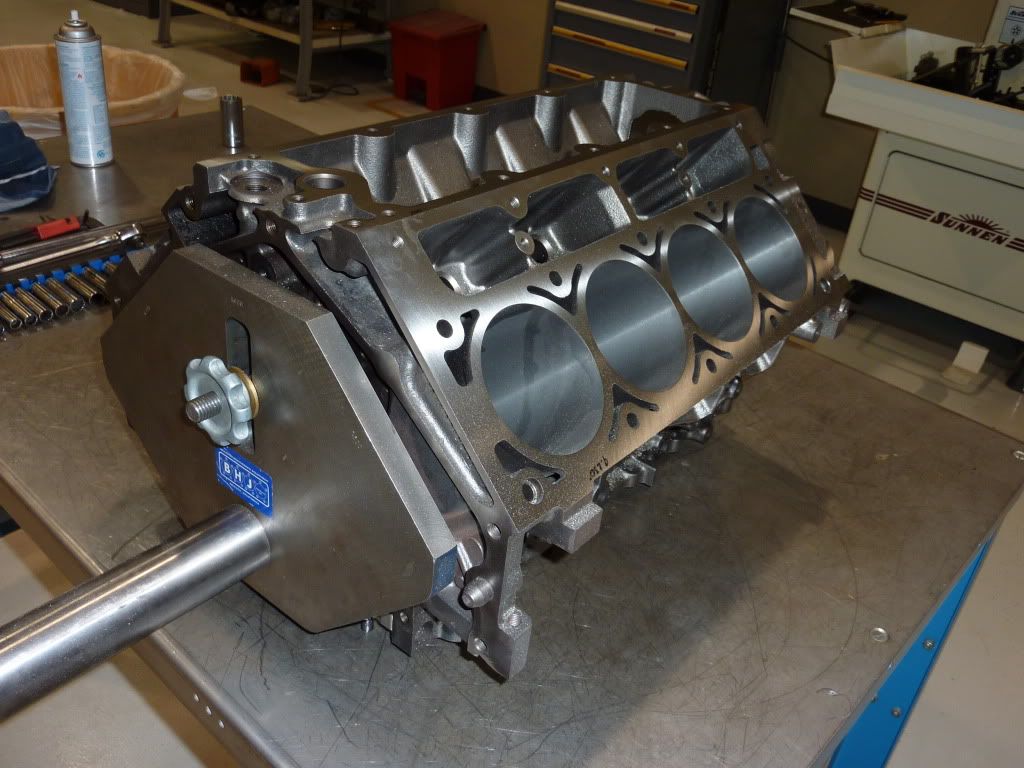
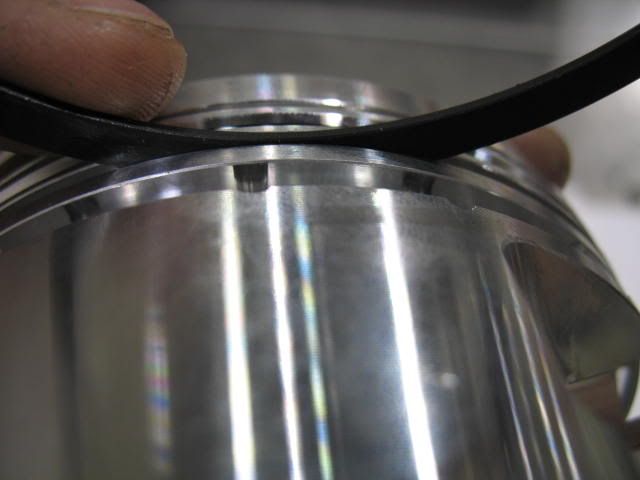
I used a BHJ LS2 torque plate with the Felpro 1162 MLS gasket I will be using on the final assembly and installed the ARP studs torquing them to 80ft. lbs with oil , without this plate the cylinder walls can be as much as .002" out-of-round when bolting the heads on.
The last LS1 I did the bores were straight and round within .00015" top to bottom and after removing the plate there were changes in the bore size by as much as .0022", mostly up top and in the middle.
I am planning to use Hellfire rings, opposed to steel rings. I probably will spray the engine a small amount down the road (up to 150HP), so no real need for them, but they have served me well on past builds. Cylinder wall prep finish will be planned accordlingly.

Even though the pistons have offset pins, I don't want it to rattle when its really cold so I am staying conservative here.
I used a BHJ LS2 torque plate with the Felpro 1162 MLS gasket I will be using on the final assembly and installed the ARP studs torquing them to 80ft. lbs with oil , without this plate the cylinder walls can be as much as .002" out-of-round when bolting the heads on.
The last LS1 I did the bores were straight and round within .00015" top to bottom and after removing the plate there were changes in the bore size by as much as .0022", mostly up top and in the middle.
I am planning to use Hellfire rings, opposed to steel rings. I probably will spray the engine a small amount down the road (up to 150HP), so no real need for them, but they have served me well on past builds. Cylinder wall prep finish will be planned accordlingly.
Last edited by helicoil; 01-07-2010 at 10:24 PM.
01-05-2010, 06:00 AM
#23
Man I'm jealous. I wish there was someone like you around my way that I could work with to build a new motor. After reading info like you posted, I'm not comfortable buying a pre-built shortblock.
Thanks for posting your experiences and images, keep it up.
Thanks for posting your experiences and images, keep it up.
 01-07-2010, 10:21 PM
#25
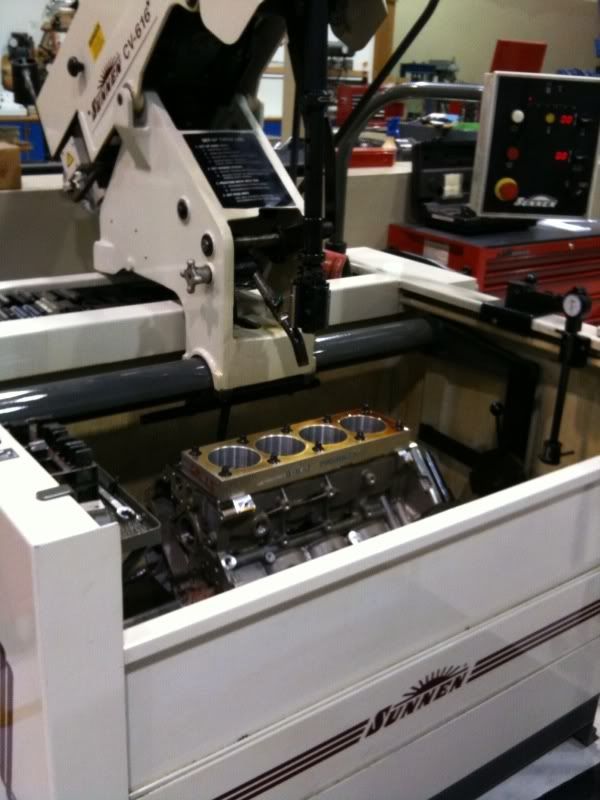
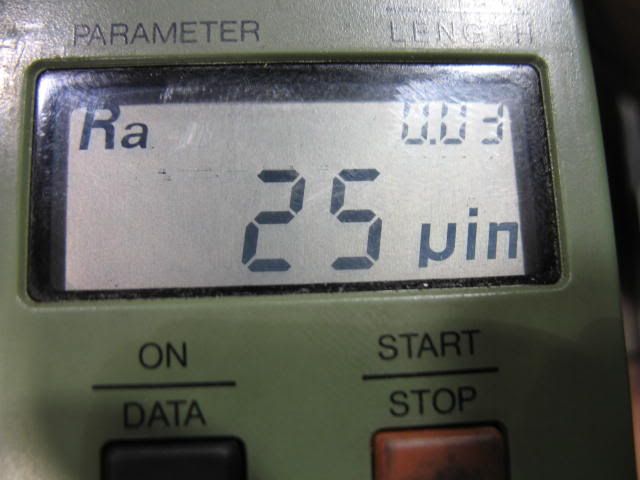
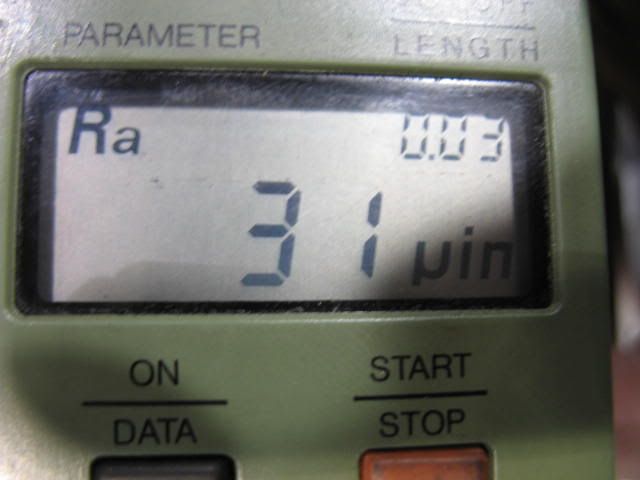
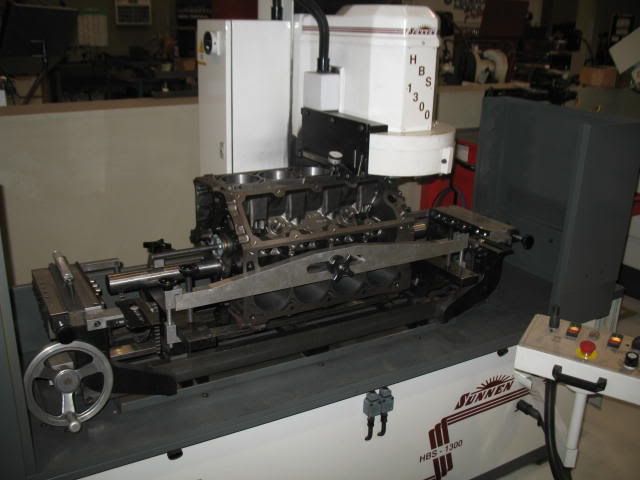
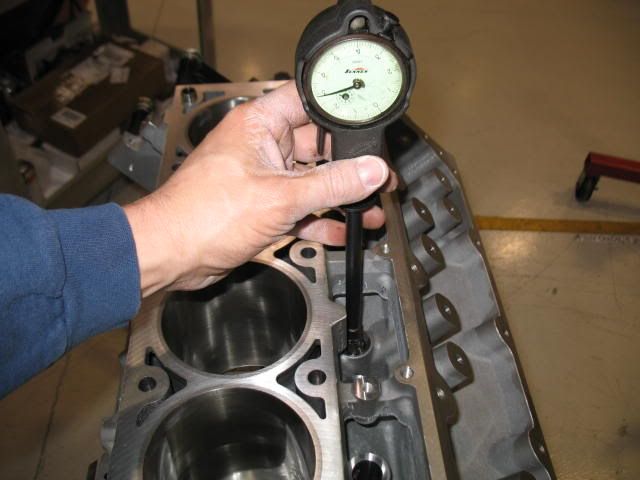
Got a little more done this evening. After honing the cylinders I checked the deck height and surface finish to decide if I wanted to surface mill the block before proceeding. The deck finish appeared 'rougher' than the profilometer showed. It averaged in high 20's for an Ra number. Plenty smooth for MLS gaskets
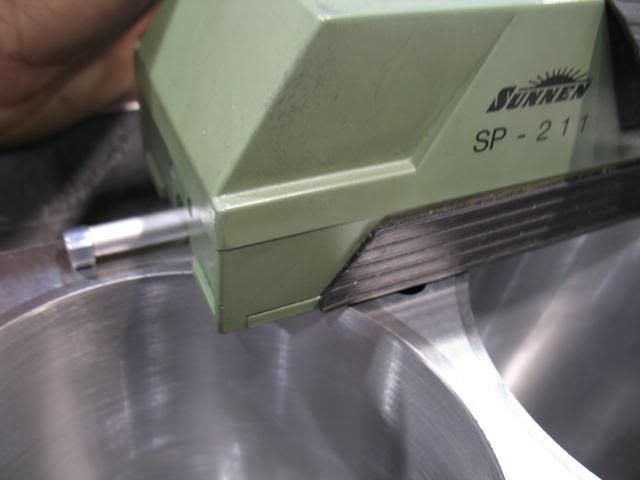
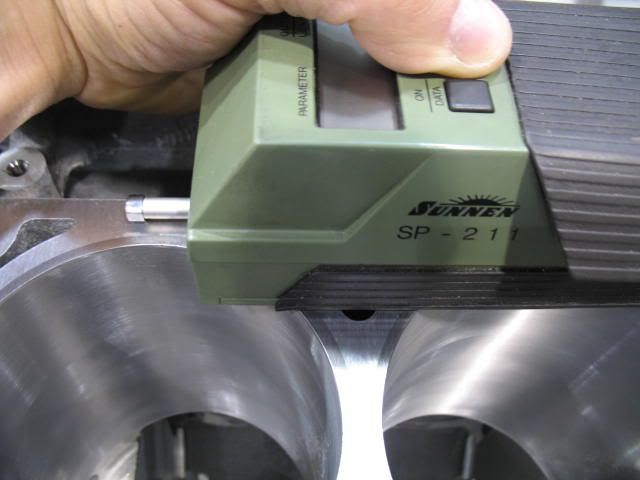
I used a BHJ deck squaring fixture to take a good deck measurement and found the block deck could have been better as far as squareness was concerned. After taking 5-6 deck height measurements I found the block deck on Bank 1 to be 9.2365" (plug side) and 9.238" (valley side), not too bad really, and Bank 2 to be 9.234" (plug side) and 9.238" (valley side), could be better....
With a 4.0" crank and a 6.125" length rod (center to center) and the 1.125" CD of my Diamond pistons this will put my piston about .013" (average) out of the block. I am not sure what the future will hold for this block after I am done with it in my Camaro, but maybe another build of forced induction down the road. I really like the ERL Superdeck stuff and this may be a candidate, so I am going to leave the deck where it is, especially with this 1.125" CD piston. If I had a 1.120" CD I would probably square it up to 9.234" on BOTH sides. For this street deal I am not going to sweat it.
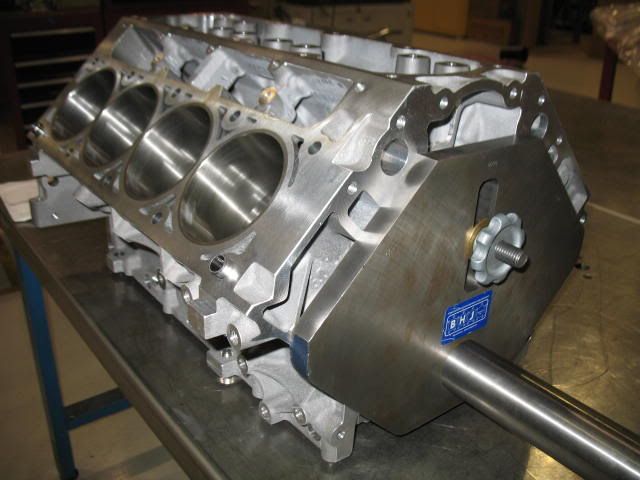
The BHJ tooling using a precision machined round bar (measuring .0005" end to end over 42") which goes through the mains and uses a plate affixed to the cam tunnel to register it on the block and the bar. The plate is CNC machined with a perfectly square edge to the main tunnel to represent a measuring point for the surface mill's indicator for set up of the machine/mill. This allows you to machine the block's deck parallel to the main tunnel/plate and take measurements for set-up to square it side to side.
It is alot of manual set-up in a non CNC surface mill, but a step that is often necessary on production or even aftermarket blocks - as they are never square out of the box.
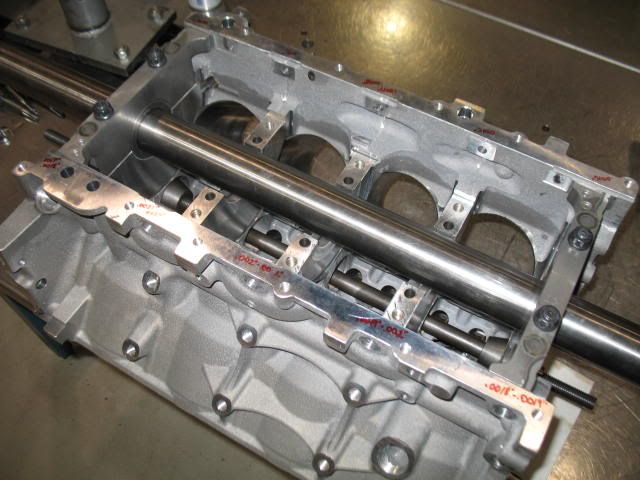

If I would have needed to surface the block deck this would have been how it was done. This is a LQ4 iron block that finished up at a perfect 9.230" side to side. With a Poly Crystalline Diamond (PCD) tool bit in this rotary broach I cold get the Ra down on this block to about 12 Ra. To put in perspective glass is abut 2-3Ra.
I used a BHJ deck squaring fixture to take a good deck measurement and found the block deck could have been better as far as squareness was concerned. After taking 5-6 deck height measurements I found the block deck on Bank 1 to be 9.2365" (plug side) and 9.238" (valley side), not too bad really, and Bank 2 to be 9.234" (plug side) and 9.238" (valley side), could be better....
With a 4.0" crank and a 6.125" length rod (center to center) and the 1.125" CD of my Diamond pistons this will put my piston about .013" (average) out of the block. I am not sure what the future will hold for this block after I am done with it in my Camaro, but maybe another build of forced induction down the road. I really like the ERL Superdeck stuff and this may be a candidate, so I am going to leave the deck where it is, especially with this 1.125" CD piston. If I had a 1.120" CD I would probably square it up to 9.234" on BOTH sides. For this street deal I am not going to sweat it.
The BHJ tooling using a precision machined round bar (measuring .0005" end to end over 42") which goes through the mains and uses a plate affixed to the cam tunnel to register it on the block and the bar. The plate is CNC machined with a perfectly square edge to the main tunnel to represent a measuring point for the surface mill's indicator for set up of the machine/mill. This allows you to machine the block's deck parallel to the main tunnel/plate and take measurements for set-up to square it side to side.
It is alot of manual set-up in a non CNC surface mill, but a step that is often necessary on production or even aftermarket blocks - as they are never square out of the box.
If I would have needed to surface the block deck this would have been how it was done. This is a LQ4 iron block that finished up at a perfect 9.230" side to side. With a Poly Crystalline Diamond (PCD) tool bit in this rotary broach I cold get the Ra down on this block to about 12 Ra. To put in perspective glass is abut 2-3Ra.
01-07-2010, 11:44 PM
#26
TECH Resident

After line honing I proceeded to prep the cylinder walls. The FINISH size was going to be 4.0058"-4.0059" based on what the Diamond pistons measured .700" down 90* from the pin centerline out of the box. This will give me very close to .0053"-.0054" piston to wall clearance.
Even though the pistons have offset pins, I don't want it to rattle when its really cold so I am staying conservative here.
I used a BHJ LS2 torque plate with the Felpro 1162 MLS gasket I will be using on the final assembly and installed the ARP studs torquing them to 80ft. lbs with oil , without this plate the cylinder walls can be as much as .002" out-of-round when bolting the heads on.
The last LS1 I did the bores were straight and round within .00015" top to bottom and after removing the plate there were changes in the bore size by as much as .0022", mostly up top and in the middle.
I am planning to use Hellfire rings, opposed to steel rings. I probably will spray the engine a small amount down the road (up to 150HP), so no real need for them, but they have served me well on past builds. Cylinder wall prep finish will be planned accordlingly.
 Shows what is needed to do things right.
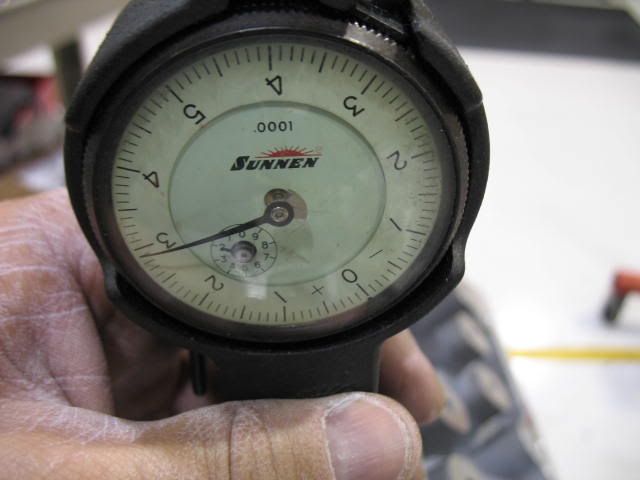
Is that an Ra of 11 on the finished bore? With or without plateau finishing?
And what # hone did you finish with to get that?
Diamond tip for the deck finish is tough to beat. Leaves a dry tungsten bit way behind
 .
. 
 Thanks again for sharing
01-09-2010, 11:17 AM
Thanks again for sharing
01-09-2010, 11:17 AM
#31
Thanks all, I'll keep it going then. Working on it some more today.
They are definitely expensive. Cool.
Thanks. What is needed to do things right in my mind, is just taking the time and not blowing through the job.
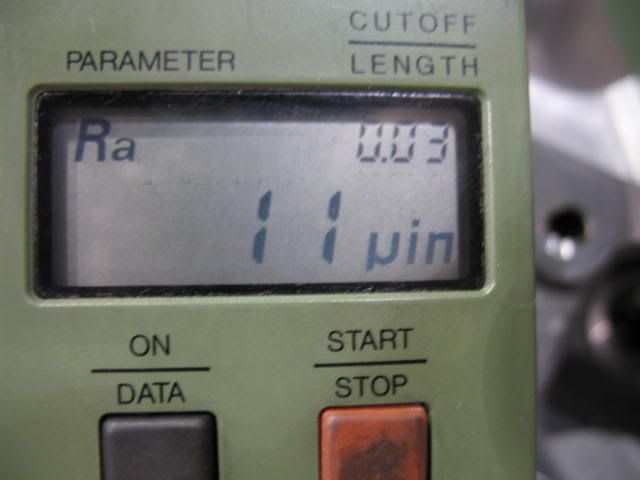
Yes, that is an 11 Ra on the finished honed cylinders. They averaged between 10-13 Ra. That is pretty typical of a JHU818 Sunnen stone (400 grit), it only gets a few swipes of that to plateau the wall. Pretty common 'race engine' finish. I did not use a 320 grit 'plateau' brush on these cylinders, although that works well too.
Yep, Diamond is nice! I will normally use a CBN on everything but really nice stuff (afermarket heads, aluminum race blocks, etc.)
Very nice coverage of the machine work you are doing on this engine! Shows what is needed to do things right.
Is that an Ra of 11 on the finished bore? With or without plateau finishing?
And what # hone did you finish with to get that?
Diamond tip for the deck finish is tough to beat. Leaves a dry tungsten bit way behind.
Shows what is needed to do things right.Is that an Ra of 11 on the finished bore? With or without plateau finishing?
And what # hone did you finish with to get that?
Diamond tip for the deck finish is tough to beat. Leaves a dry tungsten bit way behind
.Yes, that is an 11 Ra on the finished honed cylinders. They averaged between 10-13 Ra. That is pretty typical of a JHU818 Sunnen stone (400 grit), it only gets a few swipes of that to plateau the wall. Pretty common 'race engine' finish. I did not use a 320 grit 'plateau' brush on these cylinders, although that works well too.
Yep, Diamond is nice! I will normally use a CBN on everything but really nice stuff (afermarket heads, aluminum race blocks, etc.)
01-09-2010, 11:25 AM
#33
10 Second Club
iTrader: (18)
Join Date: Oct 2006
Location: Imperial MO.
Posts: 582
Likes: 0
Received 0 Likes
on
0 Posts

Tim, did you sell the blower motor? And will this build be ready when the track opens this spring? I wish I had the means and knowledge to do something like this myself. Looks like it's coming along nicely. Rob.
01-09-2010, 11:40 AM
#34
Yes it has been sold, along with the Procharger stuff. It will be leaving tomorrow actually, just finished re-assembling it from an inspection for the NEW owner. It was in very nice shape, learned alot from that one! I'll have the pewter car going again by the spring and will be racing the NEW car as well. Thanks.
01-09-2010, 06:09 PM
#36
TECH Resident
Yes, that is an 11 Ra on the finished honed cylinders. They averaged between 10-13 Ra. That is pretty typical of a JHU818 Sunnen stone (400 grit), it only gets a few swipes of that to plateau the wall. Pretty common 'race engine' finish. I did not use a 320 grit 'plateau' brush on these cylinders, although that works well too.
01-09-2010, 09:26 PM
#37
The factory service information talks about using a 240 grit stone to 'deglaze' a cylinder to put back into service (re-ring). Of course, this is not a race/performance engine prep.
In my research on building these engines I have gotten alot of input from alot of knowledgeable people, ie Sunnen Equipment, different race engine builders, ring engineers, etc. They all recommend a slightly different approach. What I seem to be doing works well.
01-09-2010, 11:00 PM
#38
Got some more done today.
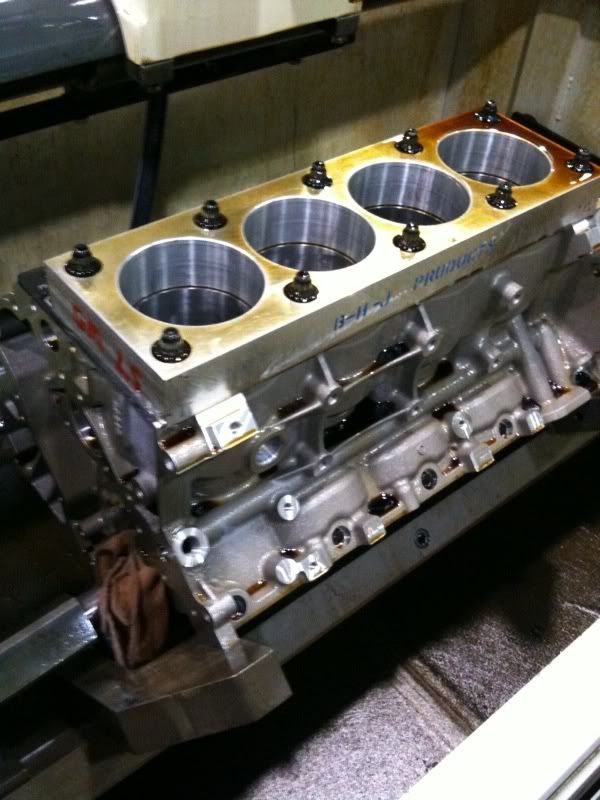
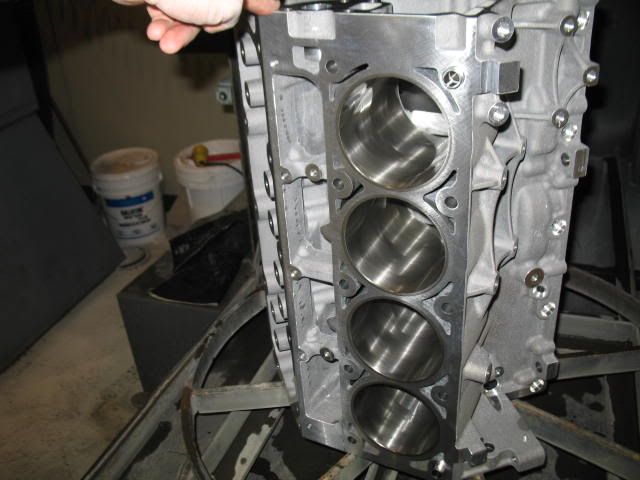
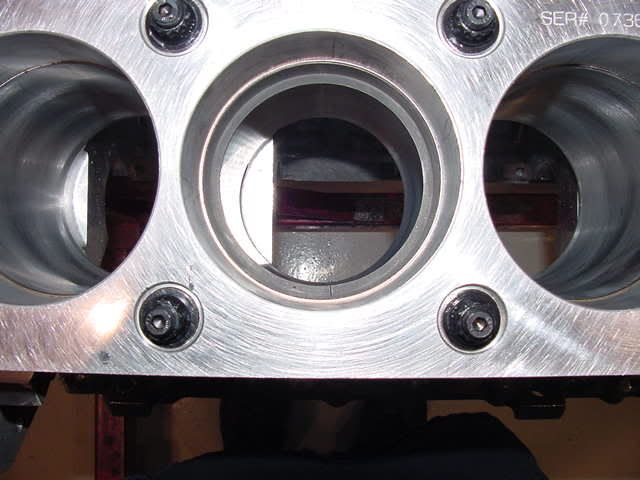
I finished up the block. I started by grinding the necessary con rod clearance into the bottom of the cylinders, this didn't take anytime, it was minimal grinding.
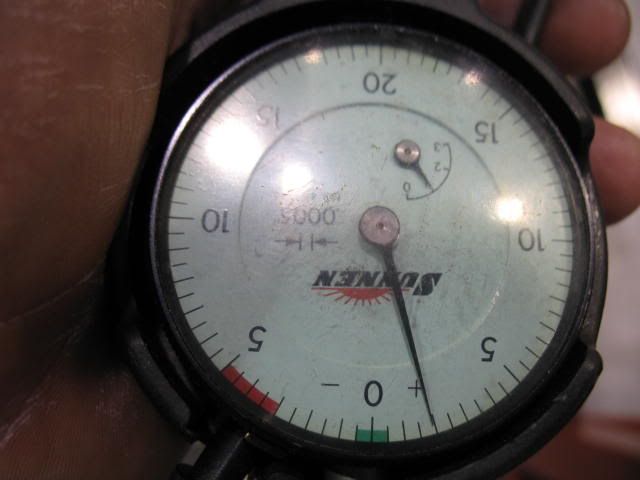
After the grinding I wanted to check the lifter bores and record their sizes. I set the mic to .8425". They measured between .8447" and .8449". I will measure the lifter bodies when I get them here to determine the lifter bore clearance from these recorded numbers. I am hoping to end up with .0015" -.002" clearance and I am thinking it is going to be closer to .002", maybe a little over. I am banking on it being within this range (I didn't have the lifters here with me today), so I am going to go ahead and give the block the final wash.
I have a set of Comp OE replacements and some LS7 lifters to pick from. I am even considering buying set of Morels, but that might push me over my budget. I'll have to give that some more thought.
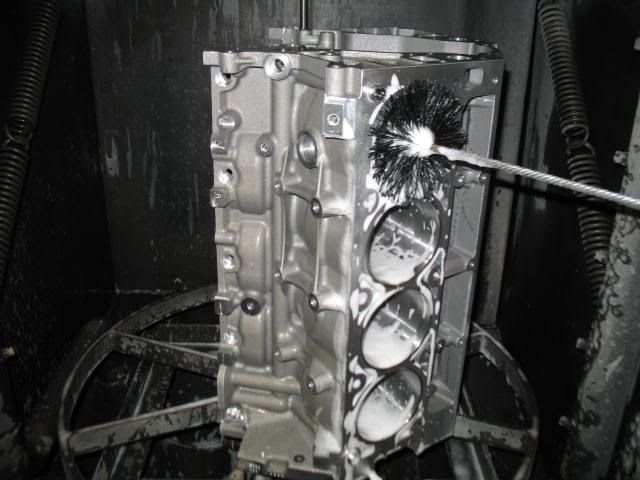
I used Dawn dish soap and scrubbed the **** out of the cylinders, oil galleys, and lifter bores and put the block in the spray wash for 30 minute cycle.
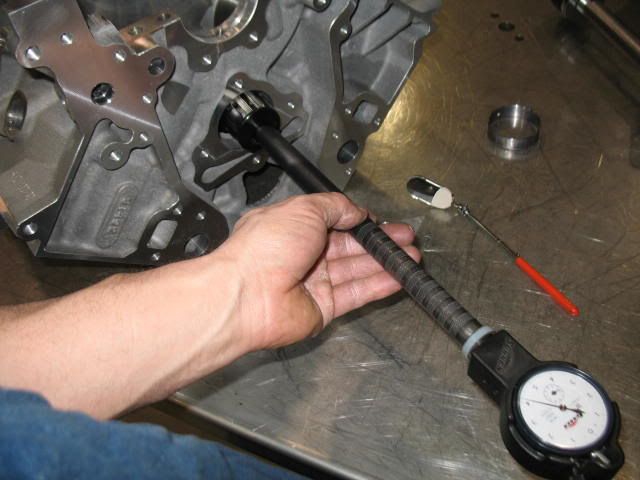
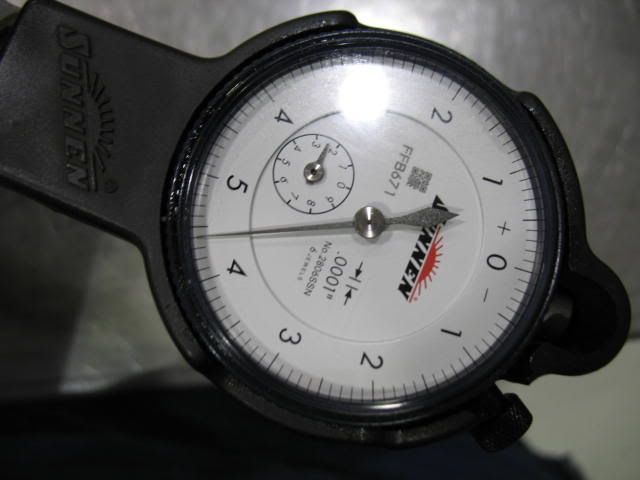
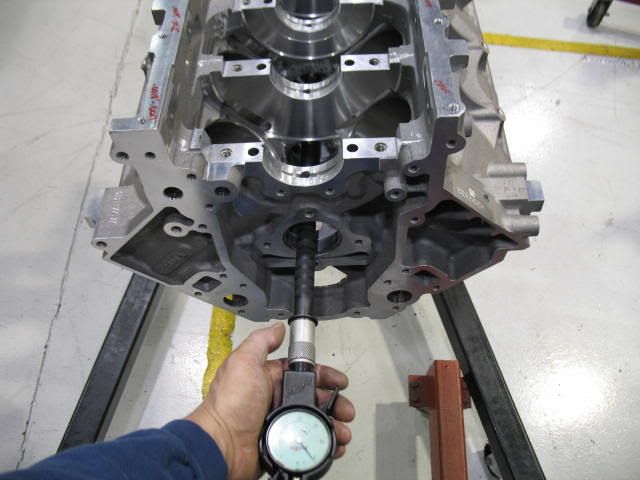
Once the block was clean I blew it off with the air gun and oiled the cylinders up with motor oil and carried it (literally, these blocks are light) to the table to measure the cam bearing bores after it cooled off. There are 3 different size cam bearing bores and cam bearings in set of 5. On an aluminum block like this .004"-.005" press is good and that is what I saw. I set the gauge up 3 different times off of each of the 3 different sized cam bearing O.D's and took the measurements of the block.
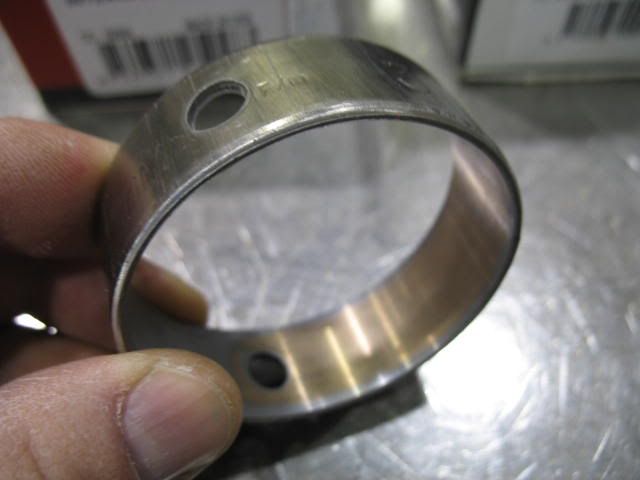
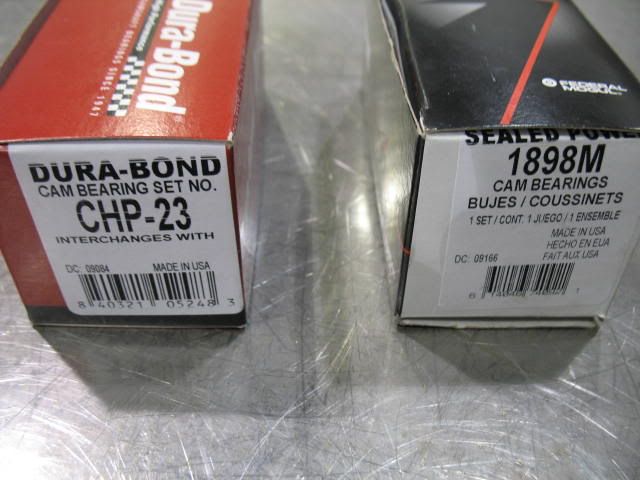
The cam bearings I took out of the block were F/M GM bearings and were quite a bit wider than the two replacement sets I had to choose from. They also had a much larger oil hole .320" vs. the replacement .145" diameter hole. The replacement bearings from DuraBond (CHP-23 Hi-Perf) and the 1898M (std. replacement, although Aluminum) Sealed Power bearings were both about an 1/8" narrower in overall width than the OE also.
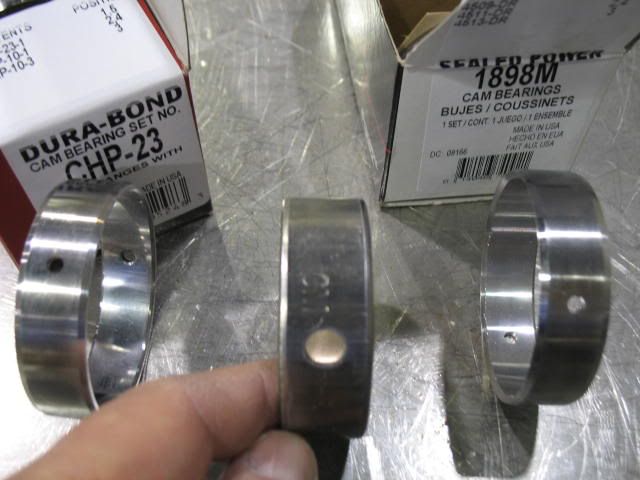
I went with the Durabond bearings on this one. Once installed, I measured the cam journals on the Vindicator Comp Cam and got 2.1658" on all 5 journals and set the dial bore gauge up to this dimension and measured all 5 bearing i.d.'s. I got between .002" - .0025" for oil clearance on the cam bearings. That is good for a 2.1658" diameter shaft, about .001" per inch of diameter is a good rule of thumb for oil clearances. You may be thinking why all the measuring....in the end I will look at all the oil clearances and decide if I need an HV oil pump in this engine. If there are some loose clearances some where that would be a good choice. So far things are looking really good.
The only thing I was a little uneasy about was the size of the oil holes in the aftermarket cam bearings. The block has a pretty good size oil passage, as did the OE bearing in the block.
I finished up the block. I started by grinding the necessary con rod clearance into the bottom of the cylinders, this didn't take anytime, it was minimal grinding.
After the grinding I wanted to check the lifter bores and record their sizes. I set the mic to .8425". They measured between .8447" and .8449". I will measure the lifter bodies when I get them here to determine the lifter bore clearance from these recorded numbers. I am hoping to end up with .0015" -.002" clearance and I am thinking it is going to be closer to .002", maybe a little over. I am banking on it being within this range (I didn't have the lifters here with me today), so I am going to go ahead and give the block the final wash.
I have a set of Comp OE replacements and some LS7 lifters to pick from. I am even considering buying set of Morels, but that might push me over my budget. I'll have to give that some more thought.
I used Dawn dish soap and scrubbed the **** out of the cylinders, oil galleys, and lifter bores and put the block in the spray wash for 30 minute cycle.
Once the block was clean I blew it off with the air gun and oiled the cylinders up with motor oil and carried it (literally, these blocks are light) to the table to measure the cam bearing bores after it cooled off. There are 3 different size cam bearing bores and cam bearings in set of 5. On an aluminum block like this .004"-.005" press is good and that is what I saw. I set the gauge up 3 different times off of each of the 3 different sized cam bearing O.D's and took the measurements of the block.
The cam bearings I took out of the block were F/M GM bearings and were quite a bit wider than the two replacement sets I had to choose from. They also had a much larger oil hole .320" vs. the replacement .145" diameter hole. The replacement bearings from DuraBond (CHP-23 Hi-Perf) and the 1898M (std. replacement, although Aluminum) Sealed Power bearings were both about an 1/8" narrower in overall width than the OE also.
I went with the Durabond bearings on this one. Once installed, I measured the cam journals on the Vindicator Comp Cam and got 2.1658" on all 5 journals and set the dial bore gauge up to this dimension and measured all 5 bearing i.d.'s. I got between .002" - .0025" for oil clearance on the cam bearings. That is good for a 2.1658" diameter shaft, about .001" per inch of diameter is a good rule of thumb for oil clearances. You may be thinking why all the measuring....in the end I will look at all the oil clearances and decide if I need an HV oil pump in this engine. If there are some loose clearances some where that would be a good choice. So far things are looking really good.
The only thing I was a little uneasy about was the size of the oil holes in the aftermarket cam bearings. The block has a pretty good size oil passage, as did the OE bearing in the block.
01-09-2010, 11:16 PM
#39
In preparation to start the balancing process I wanted to go ahead and get my piston rings filed to the finish bore size. It isn't much weight difference (filed vs. un-filed) but I thought I would file them before weighing them.
On these aluminum LS engines I find it good practice to install the torque plate to stress the cylinders (just like during honing) when I file the rings to the bores. To me it only makes sense, why hone the cylinder with a plate and then not fit the rings with the plate on? I'll admit it is kind of a pain in the *** (threading in all the ARP studs and all) but I'm **** if you haven't figured that out by now. Besides it doesn't hurt to 'run in' the NEW ARP fasteners several times before the final install and torque.
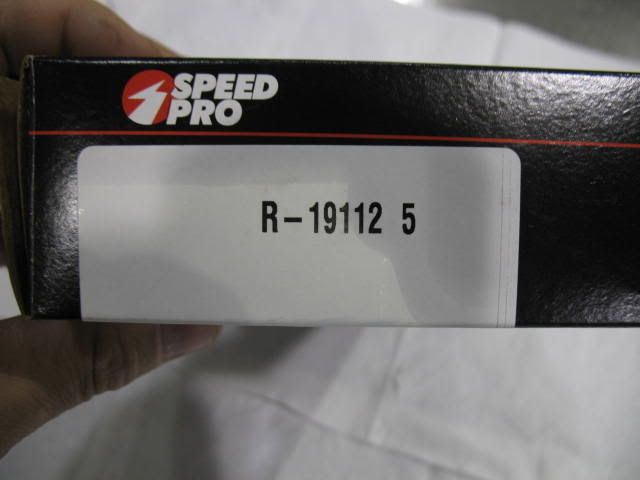
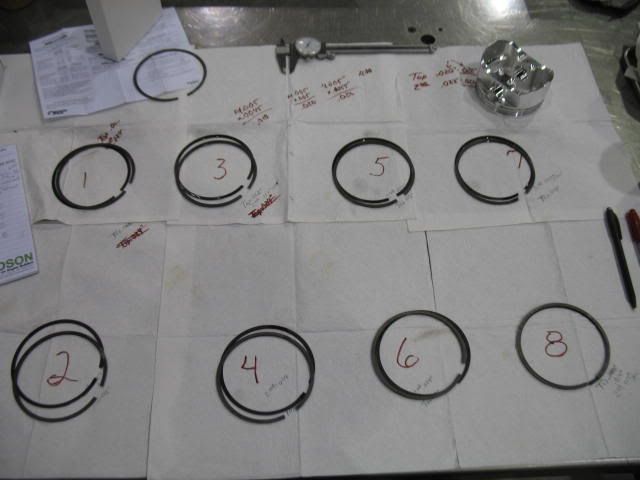
I am using the Speed Pro Hellfire rings, p/n R19112 5 and noticed during a trial fit on the Diamond pistons that the second piston ring has too much radial wall (width) and stands above the piston. Not good! This is something I ran into on my Procharged 403 build too, it isn't that uncommon building race engines, especially with all the different piston manufacturers doing their own thing. Knowing this was the case here, I had ordered some 'open stock' second rings from Speed Pro with the correct radial wall, which was .160" wide.


With plans on this engine to spray a small amount of N20, probably 150 HP, I set my ring end gaps up at .022" TOP and .024" Second. After filing the tops and seconds and checking the oil end rails for gap I weighed the rings and recorded the number. I then taped the rings together for assembly time, marking them for which cylinders they fit.
On these aluminum LS engines I find it good practice to install the torque plate to stress the cylinders (just like during honing) when I file the rings to the bores. To me it only makes sense, why hone the cylinder with a plate and then not fit the rings with the plate on? I'll admit it is kind of a pain in the *** (threading in all the ARP studs and all) but I'm **** if you haven't figured that out by now.
Besides it doesn't hurt to 'run in' the NEW ARP fasteners several times before the final install and torque.I am using the Speed Pro Hellfire rings, p/n R19112 5 and noticed during a trial fit on the Diamond pistons that the second piston ring has too much radial wall (width) and stands above the piston. Not good! This is something I ran into on my Procharged 403 build too, it isn't that uncommon building race engines, especially with all the different piston manufacturers doing their own thing. Knowing this was the case here, I had ordered some 'open stock' second rings from Speed Pro with the correct radial wall, which was .160" wide.
With plans on this engine to spray a small amount of N20, probably 150 HP, I set my ring end gaps up at .022" TOP and .024" Second. After filing the tops and seconds and checking the oil end rails for gap I weighed the rings and recorded the number. I then taped the rings together for assembly time, marking them for which cylinders they fit.
01-09-2010, 11:31 PM
#40
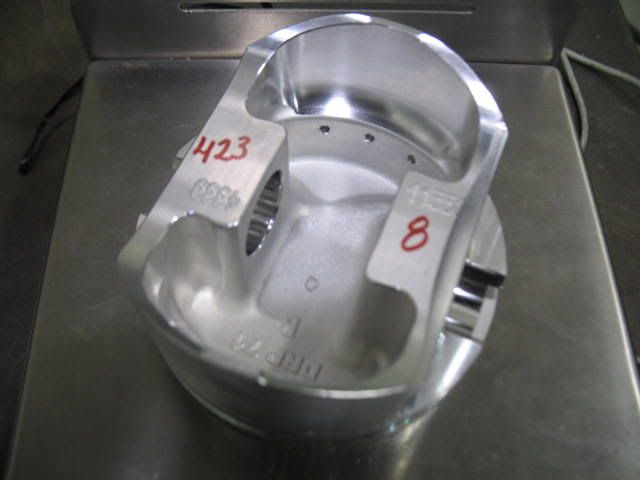
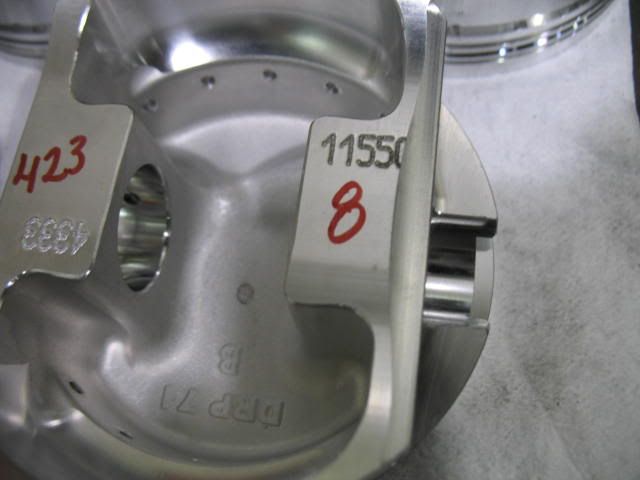
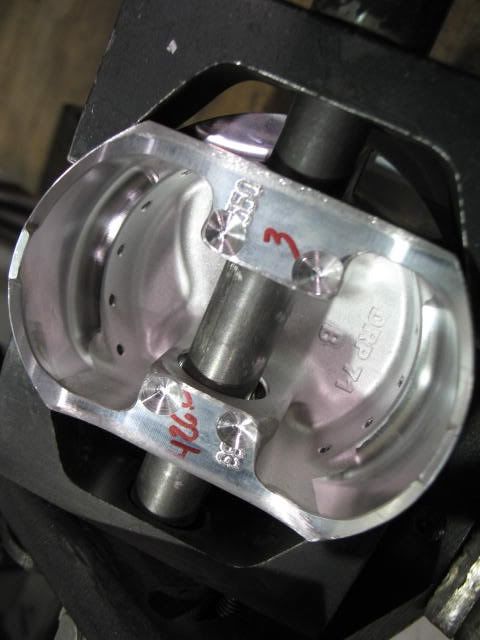
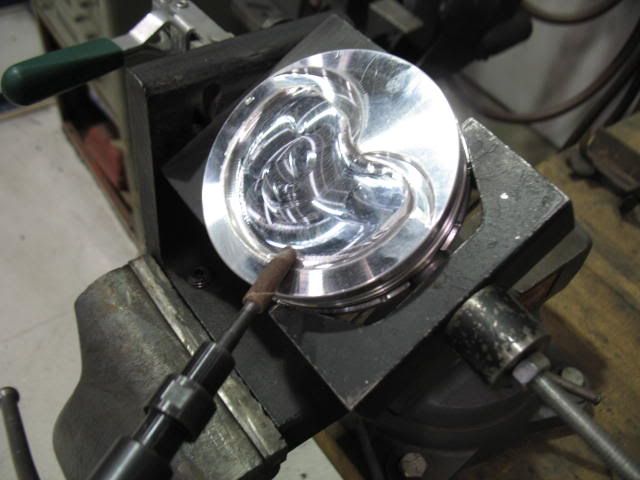
Next up was to work on the Diamond pistons. One reason I like Wisecos over the Diamonds is from what I have seen the Wisecos (shelf sets) are closer in weights. The #8 piston on the Diamonds, which is clearanced for the reluctor on the crank, is always a few grams lighter. The last set of Wisecos I used the pistons were all profiled the same. Getting a few grams out of an already light piston can be a real PITA sometimes. Of course all the others have to be heavier than this one, sometimes by a fair amount.
While balancing the pistons, I also went ahead and spent a little time deburring the top sides (valve pockets and eyebrows) just to get rid of any potential hot spots in the combustion chamber.
I ended up with the pistons weighing in at 424 grams, except for #8 which was a little over 423. I had some as heavy as 427 grams.