
Installing the crank hub

 09-18-2009, 11:08 PM
#22
TECH Fanatic
iTrader: (3)
Join Date: Sep 2004
Location: Clear lake TX (From LaPorte)
Posts: 1,417
Likes: 0
Received 0 Likes
on
0 Posts

I will admit to trying to tap on my aftermarket keyed hub in the past. The problem that i encountered when putting it on, is that it was slightly out of spec compared to my compstar crank. Nothing I did whether I heated it up or tried pressing it on (with threaded rod + washers) would work.
I would up having to put on a metal lath and having it turned some at a buddies. It now barely goes on with a custom tool that my friends dad made me.
He machined me a peice of solid billet metal that inserts into the hub and protrudes outward past the lip. Inside the center of the billet piece is a hole that you put threaded rod into so you can press on with a nut/washer. I found that this worked better because it kept the hub much more centered than just pressing with washer alone. When you have close tolerances like what I was dealing with, you can gall the metal very easily.
Also make sure your keys are seated correctly.
To those making your own tool, you dont have to have grade 8 threaded rod. I know because I just used the lower grade stuff, and it really took a punishing with no damage. You will know if it is going on right because you can feel the little pops the hub will make as your tightening.
BTW guys what keyed hubs are you running out of curiosity?
09-19-2009, 02:37 AM
#23

I will admit to trying to tap on my aftermarket keyed hub in the past. The problem that i encountered when putting it on, is that it was slightly out of spec compared to my compstar crank. Nothing I did whether I heated it up or tried pressing it on (with threaded rod + washers) would work.
I would up having to put on a metal lath and having it turned some at a buddies. It now barely goes on with a custom tool that my friends dad made me.
He machined me a peice of solid billet metal that inserts into the hub and protrudes outward past the lip. Inside the center of the billet piece is a hole that you put threaded rod into so you can press on with a nut/washer. I found that this worked better because it kept the hub much more centered than just pressing with washer alone. When you have close tolerances like what I was dealing with, you can gall the metal very easily.
Also make sure your keys are seated correctly.
To those making your own tool, you dont have to have grade 8 threaded rod. I know because I just used the lower grade stuff, and it really took a punishing with no damage. You will know if it is going on right because you can feel the little pops the hub will make as your tightening.
BTW guys what keyed hubs are you running out of curiosity?
I would up having to put on a metal lath and having it turned some at a buddies. It now barely goes on with a custom tool that my friends dad made me.
He machined me a peice of solid billet metal that inserts into the hub and protrudes outward past the lip. Inside the center of the billet piece is a hole that you put threaded rod into so you can press on with a nut/washer. I found that this worked better because it kept the hub much more centered than just pressing with washer alone. When you have close tolerances like what I was dealing with, you can gall the metal very easily.
Also make sure your keys are seated correctly.
To those making your own tool, you dont have to have grade 8 threaded rod. I know because I just used the lower grade stuff, and it really took a punishing with no damage. You will know if it is going on right because you can feel the little pops the hub will make as your tightening.
BTW guys what keyed hubs are you running out of curiosity?
09-19-2009, 07:04 AM
#25

I have a "first generation" Fluidampr. Also, I understand that Golen Engine Service will broach a keyway in an OE damper hub. I was going to have them do mine, as I switched between the OE hub and Fluidampr a couple of times, while I chased a vibration issue and later, an oil leak.


 09-19-2009, 10:56 PM
#34
Staging Lane
Join Date: Jun 2004
Location: Homer Glen, IL
Posts: 69
Likes: 0
Received 0 Likes
on
0 Posts
This seems like it might work, might order one and see if it will work as I need to reinstall my hub this week...
http://www.summitracing.com/parts/SU...|7%2f16-20+in.
http://www.summitracing.com/parts/SU...|7%2f16-20+in.
 09-20-2009, 02:58 PM
#36
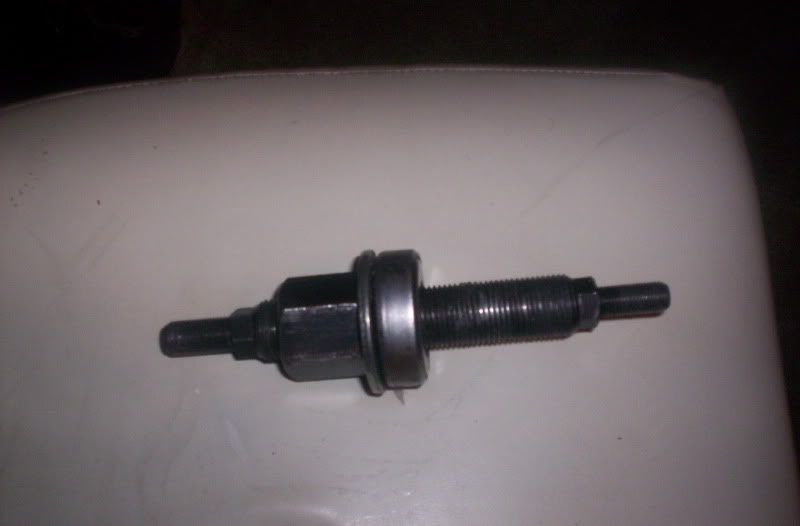
It's done and installed. I bought a high grade threaded rod, bearing from a universal harmonic installer tool, high grade nut. Put some grease on the thread and the hub went on there smooth.
Jakejr, from the look of that pic, I think the front 7/16" of that tool is still too short unless the hub is already started and pretty close proximity to the crank snout.
Jakejr, from the look of that pic, I think the front 7/16" of that tool is still too short unless the hub is already started and pretty close proximity to the crank snout.
09-21-2009, 09:17 AM
#38
Teching In

Join Date: Apr 2008
Posts: 39
Likes: 0
Received 0 Likes
on
0 Posts
The "poor boy's crank hub installer"
Get a 7-8" piece of 7/16 fine threaded rod stock (I believe it's 7/16-20). On one end, put 2 hex nuts, and tighten them together really tight. This is the end you hold steady with a hex wrench.
Thread another hex nut about 3" up from the other end of the rod. Then add 5-6 oiled-up flat washers, because the crank hub is deep. Put a little "never-seize on the end of the crank to help the hub to slip on, and a dab of RTV into the hub's groove, to help prevent oil leakage.
Gently center the hub on the crank. Then thread the rod into the crank. Go in about 1/2". Use two hex wrenches, one to hold the end that's double nutted, and the other to turn the nut that's with the flat washers. Keep threading the second nut down, pushing the hub in place, until it tightens up. Remove the threaded rod and install the crank bolt. Torque the bolt to 65 ft./lbs.
Relax and have a beer..........
