


 I look forward to putting mine in.
LPP Header Install
Thread Starter
10 Second Club
iTrader: (8)
Joined: Feb 2006
Posts: 980
Likes: 0
From: Round Rock, TX
REPOST FROM LTXTECH.COM
http://ltxtech.com/forums/showthread...Header-Install
==============================
I received my new LPP headers yesterday and decided to go ahead and put them on last night. It seems like a lot of people want to know what they look like and how they fit, so I decided to make a post and share my results with everyone. I must say that upon first sight, these headers look awesome. The welds on the primaries and collectors are very nice and the finish like a mirror. The welds inside the primaries where they connect to the flange were ground and smoothed out also. For the most part, these headers were very, very easy to install. I'm sure having a tubular k-member helps, but I've also got a Canton oil pan which takes up quite a bit more space than a stock pan. I also have an A/C delete plate, so that makes the passenger side easy too. To install the driver side, you will have to remove the steering coupler. I would recommend removing the oil filter for some extra room and also the coolant temp sensor from the head so you don't break it.
As far as fitment issues are concerned, I only have two very minor issues with these headers. (1) The #8 primary is touching the frame rail. I'm hoping that since the motor has been out of the mounts and the k-member was recently dropped that I may get some space back after the car comes off the jack stands and a load is put back on the k-member and suspension and the engine settles in the mounts. (2) The #3 primary shrouds the oil filter location making it impossible to install a filter straight up from the bottom. You will have to install the oil filter by going from the side between a gap in the primaries. The other problem with this is that a deep oil filter won't fit that way as well (which is what I use).
So issues aside, here are some pics. Click on any to see a larger version.
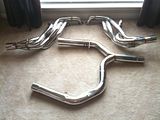
1. Headers and y-pipe: The y-pipe comes in two pieces. There are also 3 clamps and set of gaskets included.
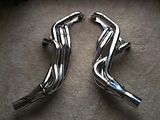
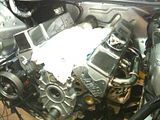
2. Headers only
3. Driver side. Plenty of room for the steering coupler
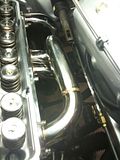
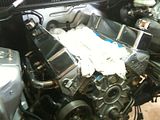
4. Driver side
5. Driver side
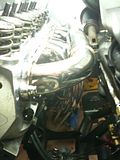
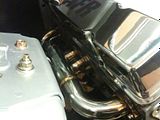
6. Passenger side
7. Passenger side close-up
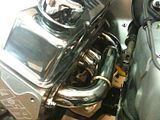
8. Driver side close-up
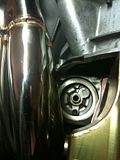
9. Here you can see how the primary shrouds the oil filter location. A stock replacement filter will fit if you install it from the side instead of the bottom.
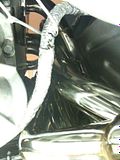
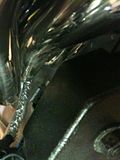
10. This shows the #8 primary touching the frame rail.
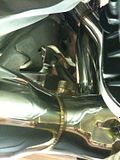
11. Although the O2 sensor bung is pointed up, there's plenty of room for the sensor here.
12. Plenty of room on the driver side between the primaries and k-member.
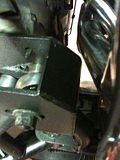
13. Plenty of room on the passenger side between the primaries and k-member.
http://ltxtech.com/forums/showthread...Header-Install
==============================
I received my new LPP headers yesterday and decided to go ahead and put them on last night. It seems like a lot of people want to know what they look like and how they fit, so I decided to make a post and share my results with everyone. I must say that upon first sight, these headers look awesome. The welds on the primaries and collectors are very nice and the finish like a mirror. The welds inside the primaries where they connect to the flange were ground and smoothed out also. For the most part, these headers were very, very easy to install. I'm sure having a tubular k-member helps, but I've also got a Canton oil pan which takes up quite a bit more space than a stock pan. I also have an A/C delete plate, so that makes the passenger side easy too. To install the driver side, you will have to remove the steering coupler. I would recommend removing the oil filter for some extra room and also the coolant temp sensor from the head so you don't break it.
As far as fitment issues are concerned, I only have two very minor issues with these headers. (1) The #8 primary is touching the frame rail. I'm hoping that since the motor has been out of the mounts and the k-member was recently dropped that I may get some space back after the car comes off the jack stands and a load is put back on the k-member and suspension and the engine settles in the mounts. (2) The #3 primary shrouds the oil filter location making it impossible to install a filter straight up from the bottom. You will have to install the oil filter by going from the side between a gap in the primaries. The other problem with this is that a deep oil filter won't fit that way as well (which is what I use).
So issues aside, here are some pics. Click on any to see a larger version.
1. Headers and y-pipe: The y-pipe comes in two pieces. There are also 3 clamps and set of gaskets included.

2. Headers only

3. Driver side. Plenty of room for the steering coupler

4. Driver side

5. Driver side

6. Passenger side

7. Passenger side close-up

8. Driver side close-up

9. Here you can see how the primary shrouds the oil filter location. A stock replacement filter will fit if you install it from the side instead of the bottom.

10. This shows the #8 primary touching the frame rail.

11. Although the O2 sensor bung is pointed up, there's plenty of room for the sensor here.

12. Plenty of room on the driver side between the primaries and k-member.

13. Plenty of room on the passenger side between the primaries and k-member.

Last edited by Formula383; Jan 21, 2010 at 08:08 AM.
You can clearly see they redesigned the #1 primary. It is more swept inward toward the motor making more room at the steering coupler. That eliminates probably the biggest fitment issue compared the version 1 headers.
#8 is still hitting the frame rail huh?. If that is the case then they must not have addressed that problematic primary. I had to dent in the frame rail with a BFH to make adequate clearance. Not a biggie but you should not have to do that.
I also had a problem on my version 1 headers with the passenger header collector banging the K-member. Had to do some clearancing on the k-member with the grinder. Has this been improved?
TECH Fanatic
Joined: Feb 2006
Posts: 1,025
Likes: 1
From: CT/NJ
Interesting. Those look and fit astoundingly like my fleabay headers, just with a bit more angle on the first turn of the #1 primary (the way they should be made). Get that steering shaft back in and snap a couple more pics. Is your column shifted over at all from the stock position?
Mine cleared the passenger side frame easily with saggy 112k mile motor mounts but hit the stock K member on the drivers side in return.
Mine cleared the passenger side frame easily with saggy 112k mile motor mounts but hit the stock K member on the drivers side in return.
Thread Starter
10 Second Club
iTrader: (8)
Joined: Feb 2006
Posts: 980
Likes: 0
From: Round Rock, TX
You can clearly see they redesigned the #1 primary. It is more swept inward toward the motor making more room at the steering coupler. That eliminates probably the biggest fitment issue compared the version 1 headers.
#8 is still hitting the frame rail huh?. If that is the case then they must not have addressed that problematic primary. I had to dent in the frame rail with a BFH to make adequate clearance. Not a biggie but you should not have to do that.
I also had a problem on my version 1 headers with the passenger header collector banging the K-member. Had to do some clearancing on the k-member with the grinder. Has this been improved?
#8 is still hitting the frame rail huh?. If that is the case then they must not have addressed that problematic primary. I had to dent in the frame rail with a BFH to make adequate clearance. Not a biggie but you should not have to do that.
I also had a problem on my version 1 headers with the passenger header collector banging the K-member. Had to do some clearancing on the k-member with the grinder. Has this been improved?
Thread Starter
10 Second Club
iTrader: (8)
Joined: Feb 2006
Posts: 980
Likes: 0
From: Round Rock, TX
Interesting. Those look and fit astoundingly like my fleabay headers, just with a bit more angle on the first turn of the #1 primary (the way they should be made). Get that steering shaft back in and snap a couple more pics. Is your column shifted over at all from the stock position?
Mine cleared the passenger side frame easily with saggy 112k mile motor mounts but hit the stock K member on the drivers side in return.
Mine cleared the passenger side frame easily with saggy 112k mile motor mounts but hit the stock K member on the drivers side in return.
Trending Topics
LS1 Tech Stories
The Best V8 Stories One Small Block at Time

Topdon ONE vs. Artidiag 800 BT2: Which is the Diagnostic Tablet For You?
Pouria Savadkouei
Gas Monkey Built a 6-Wheel Ferrari Testarossa With a Corvette LT4 Engine
Verdad Gallardo
7 Most Reliable High-Performance Engines GM Has Ever Built
Verdad Gallardo
Amazing '71 Camaro Restomod Is Modern Muscle Car Under the Skin
Verdad Gallardo
6 Common C5 Corvette Failures and What's Involved In Repairing Them
Pouria Savadkouei
Retro Modern Bandit Pontiac Trans AM Comes With Burt Reynolds' Autograph
Verdad Gallardo
Top 10 Greatest Cadillac V Series Performance Models Ever, Ranked
Pouria Savadkouei
Top 10 Most Powerful Chevy Trucks Ever Made!

Hennessey's New Supercharged Silverado ZR2 Has 700 HP
Verdad Gallardo
Thread Starter
10 Second Club
iTrader: (8)
Joined: Feb 2006
Posts: 980
Likes: 0
From: Round Rock, TX

Thread Starter
10 Second Club
iTrader: (8)
Joined: Feb 2006
Posts: 980
Likes: 0
From: Round Rock, TX
 I can't wait to get this new setup done!!

The number one issue everyone had was with the steering shaft clearance.
That was our number one priority to fix and then we made some other adjustments that people had told us they had issues with. We are sorry but not every header will fit the same way on every car We have tried our best to get our headers to fit the best they possibly can.
That was our number one priority to fix and then we made some other adjustments that people had told us they had issues with. We are sorry but not every header will fit the same way on every car
We have tried our best to get our headers to fit the best they possibly can. 
It was that way with the version 1 headers too. Also the Kooks IIRC. Just the way it is with those big primaries.
I had to go back to the OEM size filter and I still have a shelf full of tall K&N's doing nothing.
I had to go back to the OEM size filter and I still have a shelf full of tall K&N's doing nothing.
Thread Starter
10 Second Club
iTrader: (8)
Joined: Feb 2006
Posts: 980
Likes: 0
From: Round Rock, TX
The number one issue everyone had was with the steering shaft clearance.
That was our number one priority to fix and then we made some other adjustments that people had told us they had issues with. We are sorry but not every header will fit the same way on every car We have tried our best to get our headers to fit the best they possibly can.
That was our number one priority to fix and then we made some other adjustments that people had told us they had issues with. We are sorry but not every header will fit the same way on every car
We have tried our best to get our headers to fit the best they possibly can.
Thread Starter
10 Second Club
iTrader: (8)
Joined: Feb 2006
Posts: 980
Likes: 0
From: Round Rock, TX