
The story of my 94 Z

 04-07-2013 | 09:29 PM
#82
TECH Addict
iTrader: (6)
Joined: Jul 2007
Posts: 2,857
Likes: 3
From: Ringoes/Flemington, New Jersey
I live in a bad town for lowered cars, but the strano spring/koni setup I got is perfect. You just have to be careful, the car felt SO MUCH better after i installed that setup... I would not drive a stock ride height fbody ever again 
04-07-2013 | 09:37 PM
#83


 04-13-2013 | 01:34 PM
#86
I give you a lot of props for the patience to restore a car like that.
I'll spend all day putting together an engine but don't have the patience to work on interiors and underbody like that. I'd rather take the easy way out - gut it, hit it with some rust inhibiting primer, and just call it "weight reduction" instead of me being lazy .
.
I'll spend all day putting together an engine but don't have the patience to work on interiors and underbody like that. I'd rather take the easy way out - gut it, hit it with some rust inhibiting primer, and just call it "weight reduction" instead of me being lazy
.
04-13-2013 | 10:54 PM
#87
I give you a lot of props for the patience to restore a car like that.
I'll spend all day putting together an engine but don't have the patience to work on interiors and underbody like that. I'd rather take the easy way out - gut it, hit it with some rust inhibiting primer, and just call it "weight reduction" instead of me being lazy.
I'll spend all day putting together an engine but don't have the patience to work on interiors and underbody like that. I'd rather take the easy way out - gut it, hit it with some rust inhibiting primer, and just call it "weight reduction" instead of me being lazy
. 04-14-2013 | 12:51 AM
#88
Haha, thanks guys. Today I washed the car and put my speakers back in. By comparing my speaker harness with the one I pulled out of a 5 speaker car at the junkyard, I think it won't be too difficult to splice the 5 speaker harness into my existing one.
Pro tip: The 3 speaker bose cars have only one amp located in the sub box (which powers the sub), and have 5 pin wiring connector coming out of the box. The 5 speaker bose cars have 2 amps located in the sub box. One powers the sub, the other powers the sail panel speakers, and have 2 wiring connectors coming out of the box. One is a 9 pin, and the other a 2 pin (additional power/ground). I always assumed they were the same *shrug*.
Figured I'd throw that out there since there doesn't seem to be a whole lot of information on the 93-96 camaro bose systems..
I also installed my hotchkis sway bars tonight. The install didn't go quite as smoothly as I thought it would, but overall it wasn't too bad. I twisted one of the stock endlinks in half, and the other side I had to cut off. Then there was a bracket on the front driver's side that does who knows what.. It was in the way when I was trying to get the stock bar off, then I had to cut a notch in it so it would clear the beefier hotchkis mounts.. Oh well. I have to say though, the bars seem to make a huge difference. I didn't get into any twisty roads, but I made a few sharp jogs on a country road to test 'em out. The steering feels much snappier and precise than with the stock bars.
I also ordered some more PS ensolite from Raamaudio, and the autotrix passenger window hotwire kit & 4 locking lug nuts from the ws6store today.
04-14-2013 | 01:35 PM
#90
I wired the relay into the spoiler harness so I wouldn't have to cut up the harness in my car, and so if I should ever sell the spoiler, the next Z28 owner won't have to worry about the ABS light!
You can find a wiring diagram on shbox.com.
What you will need:
- Wire strippers
- An additional length of wire (I used less than 8")
- 2 spade clips
- Heat shrink (or electrical tape)
- Soldering iron if you want to solder it (always a good idea, however I did not solder this time)
- Automotive relay (I used the one in the fuse box under the hood for the air pump since I have removed it)
Directions:
- First remove the trim on the underside of the rear hatch.
- Pull out the excess wiring to the spoiler so you know how much you have to work with.
- Cut the spoiler harness in the desired location and strip enough insulation off each end of the wires so that you can twist them back together. (pic)
- Cut your extra length of wire in half and strip the insulation off both ends.
- Attach the spade connectors to one end of each of your extra wires. (pic)
- Now slide a length of heat shrink on both wires of the spoiler harness hanging out of the car. (pic)
- Reconnect the part of the spoiler harness that you cut off.
- Now connect your extra wire with the spade clip on it to this same location, making a 'T' with the wires. (pic)
- Slide the heat shrink over your newly made connection, and apply heat to shrink it closed.
- Do the same for the other wire.
- Optional, but I wrapped my relay with some foam padding so it's not clunking around when I go over bumps. I have also seen someone tape the relay to the recessed area just to the right of the hole, and it was not in the way when replacing the interior plastics.
- Now attach the spade clip from the red wire in the harness to the spot on the relay labeled 86.
- Attach the spade clip from the black wire in the harness to the spot on the relay labeled 85.
- Reconnect the spoiler harness to the car harness.
- Start your car and make sure the ABS light is off.
- Tuck the relay and additional wiring back up into the spoiler (pic)
- Reinstall your hatch trim and you're done!


 04-15-2013 | 09:49 AM
#91
OP -
The spots where you cut and patched sheet metal, did you perform this from the interior of the car? I have some severe spots on all four of my floor boards that have been sanded and coated, as you saw in my thread. I actually called YearOne to check if they sold new floor boards for the 98-02 F-Body yet. Of course my luck is they do not...
I'm wanting to retain a factory look from the undercarriage, but obviously chassis integrity is the most important aspect of my restoration. Can you make any suggestions?? We're going to pull the carpet this week and check the inside for rust.
04-15-2013 | 02:14 PM
#92
OP -
The spots where you cut and patched sheet metal, did you perform this from the interior of the car? I have some severe spots on all four of my floor boards that have been sanded and coated, as you saw in my thread. I actually called YearOne to check if they sold new floor boards for the 98-02 F-Body yet. Of course my luck is they do not...
I'm wanting to retain a factory look from the undercarriage, but obviously chassis integrity is the most important aspect of my restoration. Can you make any suggestions?? We're going to pull the carpet this week and check the inside for rust.
The spots where you cut and patched sheet metal, did you perform this from the interior of the car? I have some severe spots on all four of my floor boards that have been sanded and coated, as you saw in my thread. I actually called YearOne to check if they sold new floor boards for the 98-02 F-Body yet. Of course my luck is they do not...
I'm wanting to retain a factory look from the undercarriage, but obviously chassis integrity is the most important aspect of my restoration. Can you make any suggestions?? We're going to pull the carpet this week and check the inside for rust.
I essentially have the same patch on both sides of the car. It was rusted completely through on the passengers side, and the metal on the driver's side was extremely thin, so they both needed cut and patched. The first and second pics show the trouble spot; right where the frame rail ties into the floor pan. In this area the metal is overlapping, as shown pretty well in the 2nd pic. We cut out a large enough area of the floor pan so we had some good metal to work with. Then cut off the rusty portion of the 'tab' on the bottom of the car. You can see its shape pretty well in the underbody pictures. Now that all the rust was removed, cut out a piece of new sheet metal to match the shape of the tab on the bottom. Weld you're new tab from the bottom of the car. Repeat for the floor pan patch, except this one is welded from inside the car. Then we made a few button welds from inside the car to connect the new tab to the new piece of floor pan. Next from the bottom of the car, weld the perimeter of the tab to the floor patch to close up lap that was created, and add more support. Then I covered the whole area on the bottom of the car with brush on seam sealer, and painted over it. It came out pretty good IMO. Looking at the last picture, I think the only way to tell that it was patched (other than the seam sealer over it) would be the weld since I didn't spend too much time grinding them down. The shape of the patches were pretty spot on.
Aside from a little ~1.5"x1.5" patch in the passengers rear seat well, those were the only 2 spots in my floor boards that were bad.. The rear wheel wells are what needed the most attention, and all the welding on them was done on the exterior of the car.
Hope this helped!


 04-19-2013 | 01:00 PM
#95
Ok, I dug around in my photobucket to find some pics at various stages of my floor pan patches..
I essentially have the same patch on both sides of the car. It was rusted completely through on the passengers side, and the metal on the driver's side was extremely thin, so they both needed cut and patched. The first and second pics show the trouble spot; right where the frame rail ties into the floor pan. In this area the metal is overlapping, as shown pretty well in the 2nd pic. We cut out a large enough area of the floor pan so we had some good metal to work with. Then cut off the rusty portion of the 'tab' on the bottom of the car. You can see its shape pretty well in the underbody pictures. Now that all the rust was removed, cut out a piece of new sheet metal to match the shape of the tab on the bottom. Weld you're new tab from the bottom of the car. Repeat for the floor pan patch, except this one is welded from inside the car. Then we made a few button welds from inside the car to connect the new tab to the new piece of floor pan. Next from the bottom of the car, weld the perimeter of the tab to the floor patch to close up lap that was created, and add more support. Then I covered the whole area on the bottom of the car with brush on seam sealer, and painted over it. It came out pretty good IMO. Looking at the last picture, I think the only way to tell that it was patched (other than the seam sealer over it) would be the weld since I didn't spend too much time grinding them down. The shape of the patches were pretty spot on.
Aside from a little ~1.5"x1.5" patch in the passengers rear seat well, those were the only 2 spots in my floor boards that were bad.. The rear wheel wells are what needed the most attention, and all the welding on them was done on the exterior of the car.
Hope this helped!
I'll be ripping out my interior shortly and performing the same work to the areas needed. Definitely a huge PITA, but well worth it in the end. Nice restoration sir!
On another note, what did you paint the unercarriage with?
04-19-2013 | 02:21 PM
#96
3M seam sealer (brush on & caulk tube)
Rustoleum primer (spray can)
Rust Bullet (silver paint - brush on)
Rustoleum semigloss black (brush on & spray can)
04-20-2013 | 12:47 PM
#99

Holy Crap! I don't know how I missed this thread! Looks great! The undercarriage and interior transformation looks great! The paint turned out sweet too! How much did you pay to get it sprayed? I'm assuming you reassembled it too? Looks fantastic, keep up the good work.
If I have one suggestion, please please lower it At the very least cut the stock springs. Some guys are against it and others that have done it love it.
If I have one suggestion, please please lower it
At the very least cut the stock springs. Some guys are against it and others that have done it love it.
04-20-2013 | 10:56 PM
#100
Thanks guys. I'm pretty proud of how it's came out thus far. The paint job cost me $2500 (materials & labor - ppg paint). And I did all of the disassembly and reassembly.
Not much new to report this time. I got some more ensolite so I'm hoping to get the rest of that laid down throughout the week. Then HOPEFULLY I'll have the interior put back together by the end of next weekend. Once the inside is done, I'll see how it sits and decide if I want to get lowering springs or not, before I get a spring compressor to put on my front bilsteins.
I wired up the autotrix 'window fix kit' today for my passenger side window. I can't say for sure if it made the window go up and down any faster.. It is however the same speed as my driver's side window, which I think this driver's side was a little faster before hand. Oh well, it certainly didn't hurt anything, and maybe I won't ever have to replace a window motor again... The install went pretty smoothly, and I think it turned out pretty clean. Here's a shot of the engine bay connections. It'd hardly be noticeable if it wasn't for that inline fuse holder.
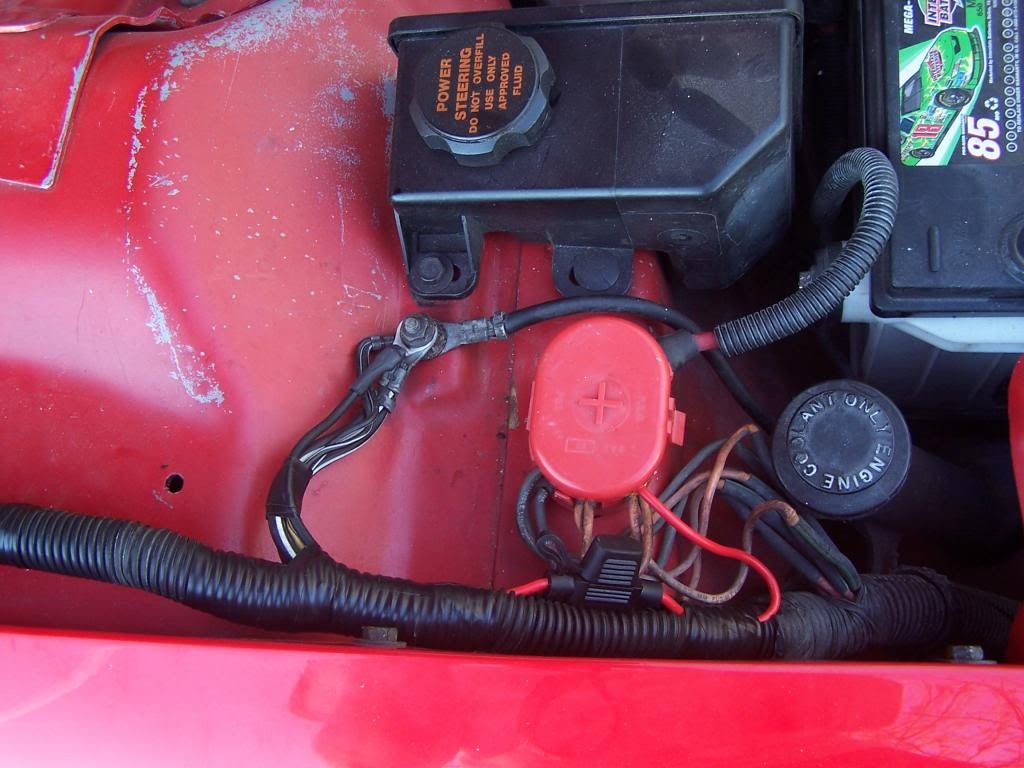
Engine bay will be getting a little love before I'm done too..
Not much new to report this time. I got some more ensolite so I'm hoping to get the rest of that laid down throughout the week. Then HOPEFULLY I'll have the interior put back together by the end of next weekend. Once the inside is done, I'll see how it sits and decide if I want to get lowering springs or not, before I get a spring compressor to put on my front bilsteins.
I wired up the autotrix 'window fix kit' today for my passenger side window. I can't say for sure if it made the window go up and down any faster.. It is however the same speed as my driver's side window, which I think this driver's side was a little faster before hand. Oh well, it certainly didn't hurt anything, and maybe I won't ever have to replace a window motor again...
The install went pretty smoothly, and I think it turned out pretty clean. Here's a shot of the engine bay connections. It'd hardly be noticeable if it wasn't for that inline fuse holder.
Engine bay will be getting a little love before I'm done too..