
F1a procharger belt
 12-10-2013, 01:22 PM
#1
Teching In
Thread Starter
Join Date: Dec 2013
Posts: 20
Likes: 0
Received 0 Likes
on
0 Posts
I Have a f1a procharger on the 1994 camaro. How tight should the procharger belt be. The belt is so tight right now that I have to remove the crank pulley if I want to remove the belt. I did not build the car. So I have no reference point on how tight it should be. With this have any negative effects of the procharger or crank bearing's?Thanks in advance.
 12-10-2013, 01:58 PM
#2

Ideally someone with more experience RE: belt tightness for SC will advise....but it is my understanding if they are VERY tight, especially when cold, that is not good.
I do know of one guy with a built LT1 with a SC broke the nose of his forged crank off running a belt to tight at the track. It was sliping so he tightened it...next run...boom
Check with Procharger on this for the F1a.
I do know of one guy with a built LT1 with a SC broke the nose of his forged crank off running a belt to tight at the track. It was sliping so he tightened it...next run...boom
Check with Procharger on this for the F1a.
12-10-2013, 03:46 PM
#3
TECH Apprentice
Join Date: Feb 2005
Posts: 384
Likes: 0
Received 0 Likes
on
0 Posts

Is this a brand new belt?
Personally, I didn't use the 12-rib belt that came with my D1sc -- it was too tight as well. I went out and bought two 6-ribs that were slightly longer. That's all I've ever run.
As already stated, too much tension can cause problems, but it'll end up being pretty tight when tensioned properly. I'd have to dig out my manual, but I believe the instructions say to tighten enough so that you can barely "twist" the belt more than a fraction of an inch (iirc, 1/4"~3/8" or something) in either direction. Kinda subjective.
FYI -- the factory Procharger tensioner sucks *****. I upgraded mine with one I researched from Autozone, but it took some creativity and machining (I think some companies charge $500 to do this, I did it for $47). Also upgraded the tensioner's bearings -- factory ones were barely adequate. I can elaborate if you wish.
12-10-2013, 04:37 PM
#4
assuming OP has a tensioner installed...there should be enough motion in it to remove belt. If belt is so tight tensioner is maxed out to its full extent...sounds like belt is to small
12-10-2013, 04:42 PM
#5

The belt sounds too small if you have to remove a pulley to take off the belt. Someone may have had slipping issues and tried a smaller belt to avoid this. Use the right belt and make sure the pullies are aligned perfectly. I have been running the belt that came with my kit and have zero issues. Regarding belt tightness, it should be pretty tight but you should be able to flex it maybe an 1/8" by hand. Are you running a larger crank hub? If not, you should be.
12-10-2013, 05:13 PM
#6
Teching In
Thread Starter
Join Date: Dec 2013
Posts: 20
Likes: 0
Received 0 Likes
on
0 Posts
Is this a brand new belt? Personally, I didn't use the 12-rib belt that came with my D1sc -- it was too tight as well. I went out and bought two 6-ribs that were slightly longer. That's all I've ever run. As already stated, too much tension can cause problems, but it'll end up being pretty tight when tensioned properly. I'd have to dig out my manual, but I believe the instructions say to tighten enough so that you can barely "twist" the belt more than a fraction of an inch (iirc, 1/4"~3/8" or something) in either direction. Kinda subjective. FYI -- the factory Procharger tensioner sucks *****. I upgraded mine with one I researched from Autozone, but it took some creativity and machining (I think some companies charge $500 to do this, I did it for $47). Also upgraded the tensioner's bearings -- factory ones were barely adequate. I can elaborate if you wish.
12-10-2013, 08:06 PM
#7
TECH Apprentice
Join Date: Feb 2005
Posts: 384
Likes: 0
Received 0 Likes
on
0 Posts
I could write a few novels here. I'll try to keep it short.
My crank pulley is 7.65" -- I'd venture that's what you have as well.
Because I can. 6-rib belts are considerably cheaper, and available everywhere in almost any length. Convenient. I know at least a few other guys who do this as well. Might even help prevent thrown belts if the bracket flexes too much, as two belts would be more flexible laterally than a single belt.
12-rib belts are hard to find, and can be ridiculously expensive. I think Procharger wanted like $90 last I checked. I think you can get them from NAPA for about half the price of ordering direct from Procharger.
My crank pulley is 7.65" -- I'd venture that's what you have as well.
Because I can.
6-rib belts are considerably cheaper, and available everywhere in almost any length. Convenient. I know at least a few other guys who do this as well. Might even help prevent thrown belts if the bracket flexes too much, as two belts would be more flexible laterally than a single belt.12-rib belts are hard to find, and can be ridiculously expensive. I think Procharger wanted like $90 last I checked. I think you can get them from NAPA for about half the price of ordering direct from Procharger.
Trending Topics
12-10-2013, 08:06 PM
#8
TECH Apprentice
Join Date: Feb 2005
Posts: 384
Likes: 0
Received 0 Likes
on
0 Posts
After sorting through hundreds of tensioners online at Autozone, I decided on a Duralast 305202 tensioner. It has about 60� of spring-loaded travel in a single direction. The procharger arm has about 30� of tension in either direction from a center unloaded position (which I think allows the arm to be used in multiple applications = universal application, but poorer functionality). If you saw how much these belts flex at WOT, you'd realize why more travel is better.
Photo #1: Side-by-Side (Procharger Left, Duralast 305202 Right)
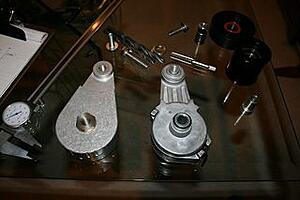
Photo #2: Pulley Mounting Surfaces (Procharger Left, Duralast 305202 Right)
Pretty obvious that the Duralast requires machining of the pulley mounting surface to make it match the height of the Procharger arm.
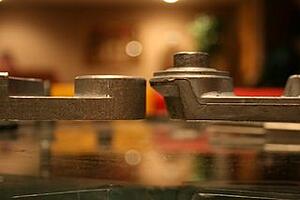
Photo #3: Blue arrow shows where I clearanced the new Duralast arm to sit within the stock Procharger bracket's circular tensioner arm location.
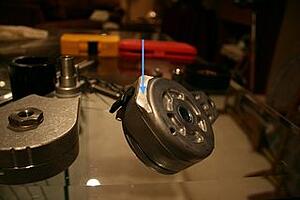
Photo #4: Back side of both tensioners (Duralast left, Procharger Right).
Note the locations of the screw holes -- I put a triangle around the bolt hole used by the Procharger arm. I had to drill and tap a hole to match on the Duralast. Also, I don't have a photo of it, but I had to enlarge the little half-moon cutout on the supercharger mounting bracket -- that was the trickiest part, but it allows me to retain the Procharger's tensioning mechanism, which works great.
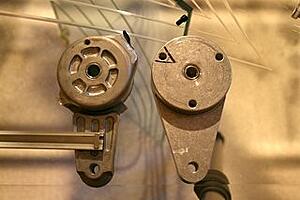
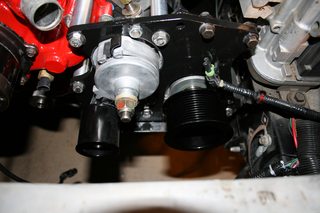
Photo #5/#6: Don't really have a good photo, but this is what the final thing looks like when all aforementioned issues are modified. Not something I'd recommend doing unless you are mechanically skilled, but it works well:

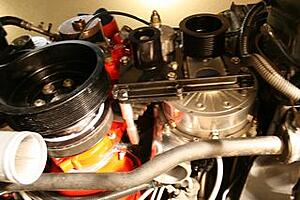
Photo #1: Side-by-Side (Procharger Left, Duralast 305202 Right)

Photo #2: Pulley Mounting Surfaces (Procharger Left, Duralast 305202 Right)
Pretty obvious that the Duralast requires machining of the pulley mounting surface to make it match the height of the Procharger arm.

Photo #3: Blue arrow shows where I clearanced the new Duralast arm to sit within the stock Procharger bracket's circular tensioner arm location.

Photo #4: Back side of both tensioners (Duralast left, Procharger Right).
Note the locations of the screw holes -- I put a triangle around the bolt hole used by the Procharger arm. I had to drill and tap a hole to match on the Duralast. Also, I don't have a photo of it, but I had to enlarge the little half-moon cutout on the supercharger mounting bracket -- that was the trickiest part, but it allows me to retain the Procharger's tensioning mechanism, which works great.

Photo #5/#6: Don't really have a good photo, but this is what the final thing looks like when all aforementioned issues are modified. Not something I'd recommend doing unless you are mechanically skilled, but it works well:
 12-10-2013, 08:36 PM
#9
TECH Apprentice
Join Date: Feb 2005
Posts: 384
Likes: 0
Received 0 Likes
on
0 Posts
I originally typed out a whole bunch of things here, but I really need to get going, and I'm trying to work on not being so OCD with posts. This is already bad enough -- I need to stay off of here.
12-11-2013, 10:18 AM
#10
Teching In
Thread Starter
Join Date: Dec 2013
Posts: 20
Likes: 0
Received 0 Likes
on
0 Posts
I'd have to know all of the details of your car in order to make specific recommendations, but I have a ton of ideas, because I did the same with my car -- tried to make it as bulletproof as I can. I originally typed out a whole bunch of things here, but I really need to get going, and I'm trying to work on not being so OCD with posts. This is already bad enough -- I need to stay off of here.
My camaro has a 383 built by ellwein enginesz
- forged calies crank
-h forged connection rods
-Ross custom pistons
-Advanced induction ported 215cc trick flow lt1 heads
-Ported lt1 Intake
-jesel shaft rockers
-Ai billet hyd roller camshaft
Chassis
-umi tubular suspension
-umi sub frame connectors
-umi transmeber
- the rest is stock
Drivetrain
-moiser 12bolt rear end with 3:73 gears and eaton posi
-local sorced drive shft good tell 1000hp
-4l60e built to 650 hp by local builder.