When you click on links to various merchants on this site and make a purchase, this can result in this site earning a commission. Affiliate programs and affiliations include, but are not limited to, the eBay Partner Network.
Pics Inside! Head Gasket Repair, Cam and Bolt-Ons!
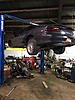
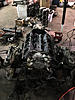
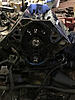
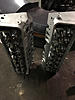
Hey everyone! I posted last fall asking for opinions on making some upgrades to my engine while I had it apart to replace the head gaskets. I spent a lot of time researching, and here's what I've come up with. My budget is about $2500 overall. We dropped the cradle, and all work will be performed by me with some help from a friend who is allowing me to use his lift. Engine is currently stock with 113k on the clock. 1994 PPM Z28 M6.
Here's the parts list. Let me know what you think:
Comp Cams 1418-16 1.6 RRs
Howard's Cams 98215 valve springs (purchased)
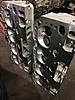
Heads milled, valves resealed, 3-angle valve job
LT4 Hot Cam
Sealed power complete gasket kit
Cloyes timing chain 9-131
Energy suspension poly motor mounts
Speed engineering LT headers
Pacesetter y-pipe
Catalytic converter (to pass visual)
Hooker Super Comp cat-back
1le intake elbow
K&N intake (already purchased)
MGW shifter (already purchased)
AC delete
ARP head bolts
Koni shocks (F&R, already purchased)
Umi adjustable panhard and LCA (purchased)
LCA relocation brackets
Throttle body air foil (purchased)
Stainless brake lines (purchased)
Spindles and calipers from 98-02 (purchased)
My goal is a strong performer on the street with an emphasis on reliability. The hot cam is right in the sweet spot for my application, and I'm mostly convinced that I don't want to step up to 7/16" studs for the RR. If I ever decide to go with a bigger cam, it will be when I have significantly more funds with which I can work.
I have seen some fitment issues on the Speed Engineering headers--has anyone not had to take a hammer to them?
I've received so much knowledge from this community, I'm hopeful that I can give a little something back! I'm really excited to start reassembly in the next few weeks!
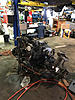
Pictures of the progress so far:
Last edited by CaptainArbitrage; 05-31-2017 at 08:23 AM.
You will probably catch some slack about the Hot Cam, but when I had it back in the day, my car 95Z A4 with bolt ons, LT4 Hot Cam Kit and a stall ran mid 12's all day long..
I'm not going to lie, I flip-flopped between the hot cam and the CC503. I think that I actually want less power than what the 503 would put down. I've owned this car since last May and only put about 500 miles on it because it's needed so much work. Needless to say, I'm eager to have it running. And even though not everyone with the hot cam runs mid 12s, the fact that some people do is proof enough that it's exactly where I want to be!
As far as the heads go, I'm not sure how much they are milling them! They're an incredibly reputable shop in the area and my friend who has a lot of experience with the LTx platform told me to trust them--so I am! I'll be sure to get a list-out of what they actually did when I get the heads back.
Degree that Hotcam in at a 106 deg ICL, as opposed to the "drop-in" 109 ICL, and you'll have a much better overall powerband, not having to rev the snot out of it to get the performance. With the advanced ICL, all the issues people talk about with the lack of Hotcam low end performance completely go away.
Run the .026" head gaskets, regardless of how much the heads are milled.
New pictures added below! Ready to start building it back up!
I'm adding the Mr. Gasket .026" head gaskets to my shopping cart. Picked up a brand new Hot Cam and the matching GMPP rockers for $210 shipped. 0 miles, very excited! Thanks for the advice on how to degree it, Bowtienut!
Heads are ready--I'll be picking those up this week.
I need to pick up lifters. I've read stock replacements are good. Any insights?
I'm having a tough time with the header decision. I could go XS Power or Speed Engineering. I reached out to Speed Engineering to see what y-pipe they recommend, but I didn't receive a response. The XS Power kit comes with a y-pipe, but I've read some mixed reviews and I'm not clear on how the LLP/XS Power saga unfolded. I could also go with Phab on eBay. Stainless headers and y-pipe (like the XS Power). Does anyone have recent buying experience with ANY of those headers who can comment? I've read through the threads that I can find about a thousand times, but they're all outdated.
Looking like a nice little build up, I'll second the question on header and y pipe fitment. Looking for the same info and read the same threads that have become outdated at this point. I'm actually doing a similar build but swapping in a carbed gen 1 roller SBC with the hot cam and a set of Vortec heads in my 95. Hopefully not to derail your thread any but do y'all think I should a run a similar head gasket thickness to your .026 on my set up?
I'm actually doing a similar build but swapping in a carbed gen 1 roller SBC with the hot cam and a set of Vortec heads in my 95. Hopefully not to derail your thread any but do y'all think I should a run a similar head gasket thickness to your .026 on my set up?
Use a Fel-Pro steel shim gasket with copper spray. Either .015 or .020 depending on how far the piston is below deck to keep quench around .040.
Use a Fel-Pro steel shim gasket with copper spray. Either .015 or .020 depending on how far the piston is below deck to keep quench around .040.
Get the quench as tight as you can; down to low .030X's is fine as long as that number is on the tightest cylinder. Use a .015" shim gasket for sure on an undecked block. I've put together two otherwise identical Vortecs, one with .026" gaskets, the other with .015" gaskets, and there's a noticeable difference in the snappiness of the motors, in favor of the .015". Detonation resistance is definitely better.
Use a Fel-Pro steel shim gasket with copper spray. Either .015 or .020 depending on how far the piston is below deck to keep quench around .040.
Originally Posted by bowtienut
Get the quench as tight as you can; down to low .030X's is fine as long as that number is on the tightest cylinder. Use a .015" shim gasket for sure on an undecked block. I've put together two otherwise identical Vortecs, one with .026" gaskets, the other with .015" gaskets, and there's a noticeable difference in the snappiness of the motors, in favor of the .015". Detonation resistance is definitely better.
Went with XS-Power headers and y-pipe. Picked them up privately. They seem to be nice!
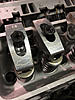
Hotcam had some surface rust but was otherwise in perfect shape. It had been installed but never run. Rocker arms had never been installed.
Hotcam installed--did not degree it in. It did not seem like a straightforward process so I just went dot-to-dot.
New Melling lifters from Skip White installed. They were about $50 cheaper than the closest competitor even with shipping figured in.
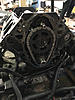
Timing cover replaced after removing gasket and residue. New GM timing chain installed.
Slid opti back on.
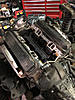
Installed .026" Mr. Gasket head gaskets.
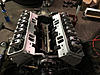
Installed heads--my shop did an AMAZING job cleaning them up. Milled .015", valve job and angle job completed. The guy who worked on them said they had been warped a bit from the overheating. Followed the torque sequence.
Installed 1.6 rr from the Hotcam kit and adjusted the valves.
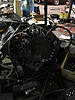
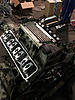
Laid down intake gasket and RTV, bolted on intake manifold.
And that's how it sits right now! Damper is just on there for valve adjustment purposes--the hub is damaged and needs to be replaced.
There's still a ton of work to do, but I'm feeling good about it! I'm thinking of going with a Solomon 1-week tune once the car is on the road to try and get it as dialed in as possible. Anyone have experience with this?
I can't believe how many parts I ended up ordering. I've kept a detailed list that I'll post at the end. So far, over 35 parts ordered...
Looking good! It's always those un-foreseen parts that add up and kick builds to side. Everyone remembers the cam and lifters etc, but the seals, and shop supplies, etc that add up on the side can take a toll.
Looking good! It's always those un-foreseen parts that add up and kick builds to side. Everyone remembers the cam and lifters etc, but the seals, and shop supplies, etc that add up on the side can take a toll.
Thank you! Surprisingly, I thought of most of the seals and things, but what got me was the "Well, I'm already down here," effect. Cam and lifters were unexpected. Also OTVC wire kit. Then upper control arms, a-arms, engine mounts, rag joint eliminator, shocks for front and back, panhard, lower control arms, relocation brackets, tune, LS1 brakes and lines, damper hub, damper hub bolt... Those were the things that are catching up with me. All that I can say is I'm thankful for the ability to buy used!
I couldn't agree with you more! Dave did a great job! I almost with that I had taken my whole engine to him for a cleaning and assembly! I'm super impressed and can't wait to put them to work!
So, I have a lot of updates since June! I'll go step by step!
Installed Umi adjustable LCAs, panhard bar, and BMR LCA relocation brackets (bolt-in).
Returning to the front suspension, I replaced the lower control arms and upper control arms. Tossed in a set of lightly used Koni STR.T with stock springs (I have no interest in lowering this car).
After that, I was chatting with Jason about my progress and the Hot Cam. He asked me how I had shortened the dowel on the end of the cam. I said that I hadn't, but that the engine had been able to turn so that I could set the valve lash. I was nervous, so I decided to pull the timing cover.
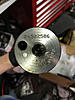
As it turned out, the dowel had actually snapped off and was rattling around with the timing gear. I tried to pull out the dowel using a magnet, but it was too far down so I had to take the engine off the mounts and drop the oil pan (again).
I got the dowel out and cleaned up the rough edge on the cam where the dowel had sheared. It looks like it had done a little bit of a number on the timing cover before it snapped, so I hit the rough spot to smooth it down. Cleaned the timing cover with parts cleaner and reinstalled with a new gasket.
I'll tell you what: putting the new water pump drive seal sucks, and I still don't think that I did it right. But I ran with it because I was in a bit of a time crunch. Installed bypassed throttle body with air foil purchased from Jason. Reinstalled optispark and new crank hub from Jegs because I butchered the original. I also put a woodruff key on the crank snout. Hub pusher tool supplied by Ray Hinton. Made installation a breeze.
My buddy John was over working with us one day and decided he wanted to clean up my intake for me. I think it looks pretty great now for just a stocker!
Crank pulley, accessory bracket and water pump installed.
Accessories (including AC Delete pulley), over the valve cover (OTVC) wire kit installed. I really like this kit--all of the wire lengths are perfect!
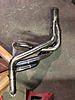
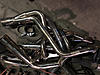
XS Power headers installed. Ready to go back into the car!
Right back where it belongs! Ended up going back to my stock coil. The MSD one wouldn't fire for one reason or another. I also installed an MGW shifter before we put the engine back in. I love that shifter--nice and notchy!
Rear suspension again, but this time with the addition of the Hooker Super Competition cat-back. It's connected to the headers by an XS power y-pipe and a Magnafow high flow cat.
Installed new O2 sensors and connected all of the connectors. Installed a new radiator (old one blew when the head gasket went) and a used K&N FPIK that I picked up. The filter goes into the bumper--thats a nice touch.
I got a tune from Moe Horsepower and reinstalled the computer. We got it running and it sounded great (I'll upload the sound clip soon). Some valve train clicking, but that's an issue for another update...
Car back on it's own weight after installing LS1 brakes with steel braided lines. Salad shooters that I took off another car I purchased this summer (I love the look of these cars stock). I later had brand new tires installed.
Running outside and breathing fresh air for the first time in over a year.
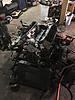
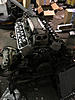
And here's how the engine looks now!
I want to thank everyone that had a hand in this! There are still a few issues that I'm ironing out (I'll update this thread when I have more time and everything resolved) and I'm far from finished working on it. I'm happy to have the car back in my driveway, though. It needs a good cleaning inside and out (especially the engine bay). I'll get that going in the spring probably.
Edit: Other parts installed that I didn't mention (I'll add to this list as I remember)
Rag joint eliminator (also had to unbolt and reboot steering column in interior to make clearance for headers)
1LE intake elbow
EGR block off for back go intake
New battery
Rear Koni STR.T shocks
Installed LT1 wheel bearing hubs in LS1 spindles (LT1 hubs were in really good shape, bolted right in)
New spark plugs
New motor mounts (not sure I mentioned those)
O2 sensor extender (passenger side only)
We had to heat and bend the long tubes a bit to clear the k-member, we may need to do more of this once I drive the car a bit more
Last edited by CaptainArbitrage; 11-10-2017 at 11:42 AM.
 05-30-2017, 03:41 PM