

crackle sound when using nitrous
 07-09-2008, 12:07 PM
#21


I guess next you can try flowing the noids and see if you still hear the noise. I don't really see much detonation from this computer screen. If you cut the threads off you can see the "line" at the bottom of the plug. Thats what I usually tune my ars off of. I'll pm you a link with some good plug info.
Thanks
Dave
 07-09-2008, 02:59 PM
#22
On The Tree

Join Date: Nov 2007
Posts: 104
Likes: 0
Received 0 Likes
on
0 Posts

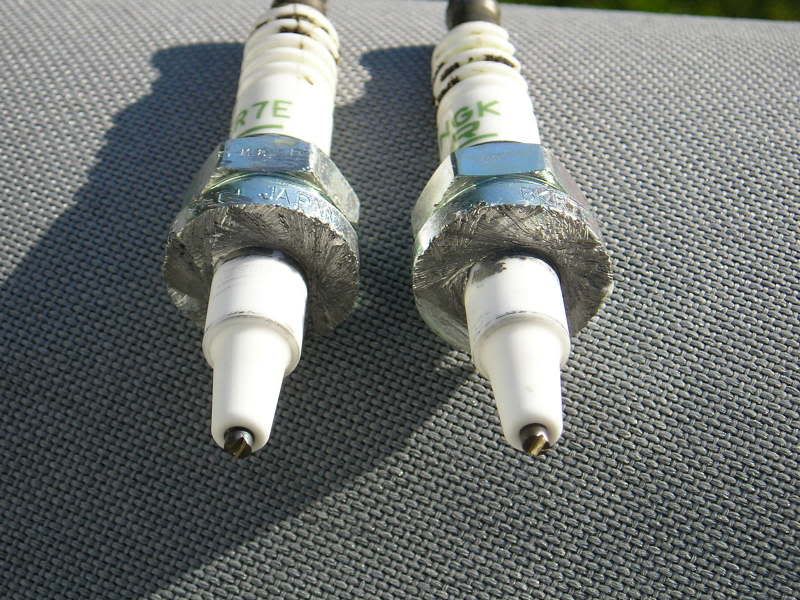
Spark Plug Reading Tips
Other than installing thermo-coupler sensors in the combustion chambers the only real way that you know what is happening inside your engine is to read the spark plugs. Both the fuel mixture and the ignition timing result in coloring of the spark plug’s porcelain and ground strap. The trick is to how to get the correct coloring without going into detonation and destroying the engine or by going too rich and raising the ring lands.
Spark plugs can only be correctly read if the car has been shut down immediately at the end of a run without driving it back to the pits. Get off the track and coast to a place you are safely out of the way and either read the plug there or change one or two with some you have in your pocket so you can read these uncontaminated plugs when back to the pits. Or you should tow the car back to the pits. It may take a couple of runs to get see the sparkplug color.
Reading For Air Fuel Mixture
The porcelain around the plug’s center electrode can be divided into three areas for reading. The area that is closest to the tip is affected by the idle and transition circuits carburetor circuits and is of no real concern to a racer. If this area is gray then you drove the car back to the pits and you cannot correctly read the plugs. The middle area is only colored when you drive down the road at around a steady 30-40 mph and is normally affected by the primary circuit jetting with the power valve closed and this is really of no concern to the racer. The area you are interested in is that third that is all the way up inside the plug where the sun don't shine. This area is colored when all is wide open under full power because the combustion chamber heat totally cleans off the other two areas. It will take a special plug reading flashlight with the magnifying glass to view it correctly. Plugs cannot be correctly read by just quickly looking at them with the naked eye. You see people doing it all the time because they do not know how to read plugs.
Normally aspirated cars should have a light gray or tan hydrocarbon ring or as some call it a "fuel ring" all the way up inside around the third area closest to the point where the porcelain is attached to the metal jacket of the plug. The actual color may depend on type of fuel you use. This fuel ring should appear like a light shadow. Most VP C-15, C-16 or C23+ fuels will show as a light gray when correct. This fuel ring starts to color on the porcelain side that is below the ground strap and works its way around either side of the center electrode until it completely joins. Sometimes it may take two or three runs to see a good coloring. Note: New engines or engines that pump a little oil may show a thin oily line way down inside on the porcelain where the porcelain meets the metal wall of the plug. This oil line has nothing to do with the air/fuel mixture but may be confused with the fuel ring you are looking for.If you are having a hard time figuring out if what you are reading is correct or because you are not sure if the plug heat range is correct then tow the car back to the pits and drop the headers and look inside the pipes. If they are black then you are too rich, if they are light gray or white then you are too lean. The pipes should be a medium to dark gray or tan color.
Normally the white area of the porcelain has a chalky appearance. If you see the porcelain take on a shine then it is time to change the plugs because the glass that is in the porcelain has been melted and has glazed the surface. If the car has been running rich (due to lots of idling or incorrect fuel mixture) then it is possible to glaze the plugs and short them out during a run because of the sudden heating of the plug with the soot on the porcelain. This glazing appears to be a glossy coating on the porcelain with a splotches of color of greenish yellow or brown. These two different glazings will cause the plug to short out and misfire and raise ring lands or make a popping through the exhaust when going down the track.
Reading For Ignition Timing
Ignition timing is directly responsible for the heat in the combustion chamber and therefore the color of the plug’s ground strap and the color of the first few threads on the outside of the plug. The ignition timing can be checked by looking at the color of the plug’s ground strap and the position of the "blue line" on the strap. The blue line really indicates the point at which the strap has reached annealing temperature of the metal. To help to understand this think of a bar of steel (ground strap) on a table that is being super heated with a acetylene torch at one of the tip ends. As the end heats up and the heat starts moving down the bar you will see a blue line across the bar at some point down the bar away from tip with the torch. This blue line reflects the temperature that is the annealing point of the metal. As the temperature increases the blue line moves further down the bar away from the torch. Similarly, the blue line moves down the spark plug ground strap as you put more heat in the engine.
If you are using a gold colored ground strap like with an NGK spark plug then not enough timing will show the ground strap as still gold or going light gray maybe with a few bubbles on it after a run. As you advance the ignition and put heat in the engine the plug ground strap will turn darker gray as well as the metal at the end of the threaded area. As the metal turns medium to dark gray you should start looking for the blue line (band) around the ground strap. Ideally, you want this blue line to be just below where the ground strap makes the sharp bend and above the weld. If you advance the ignition too far the blue will disappear off the strap and the strap will pick up rainbow colors (blues and greens). The next step beyond that is to start melting the strap from the tip end and detonation. When you are close to the correct timing then only change the timing by one degree at a time. If you ignition system has the capability of adjusting the timing of each cylinder independently (ICT) then you can use that feature to have the blue line in the same position on all the plugs. First, adjust the basic timing to get as many of the plugs to have the blue line just at the sharp bend in the strap. Now adjust the ICT to move the blue line to the same point on the remaining plugs. Once all the plugs read the same you can advance the ignition a little at a time to put the blue line just above the weld on the strap or whatever point gives you the best performance.
Other Things To Look For
The round flat circular area of the plug at the end the threads should be dark gray or flat black and should not be sooty. If it is sooty then it can mean that your plug has not been tightened enough and you are sucking and blowing fuel and air past the threads of the plug.
Detonation shows up on the plugs as spotting on the porcelain. There are two different types of spotting seen. One type appears as just black spots and the other appears as little bright spots like diamonds. The black spots (look like pepper sprinkled on the plug) indicate a little too much heat on the plug which causes detonation by having the heated plug fire off the mixture prior to the spark firing. This creates two flame fronts that collide and can cause great amounts of damage. If you see black spots on the porcelain and you know the tune-up is correct then you may need a colder plug. If you are not sure then increase the carburetor jet size slightly, take out some timing, or go to a colder plug. If you hold the plug in the sun and you see what appears to be small diamonds on the porcelain then your detonation is severe enough to be blowing off the aluminum from your piston and you need to add fuel and/or take out timing now.
Spark Plug Heat Range
If you keep on adding timing until your finish MPH falls off but you still have no color on the plug’s ground strap but the porcelain has good color then your plug is too cold.
If you have lots of color on the ground strap but the porcelain is clean and white then the plug heat range is too hot. The heat from the plug is cleaning of the fuel ring from the porcelain.
07-09-2008, 02:59 PM
#23
On The Tree
Join Date: Nov 2007
Posts: 104
Likes: 0
Received 0 Likes
on
0 Posts
ALSO
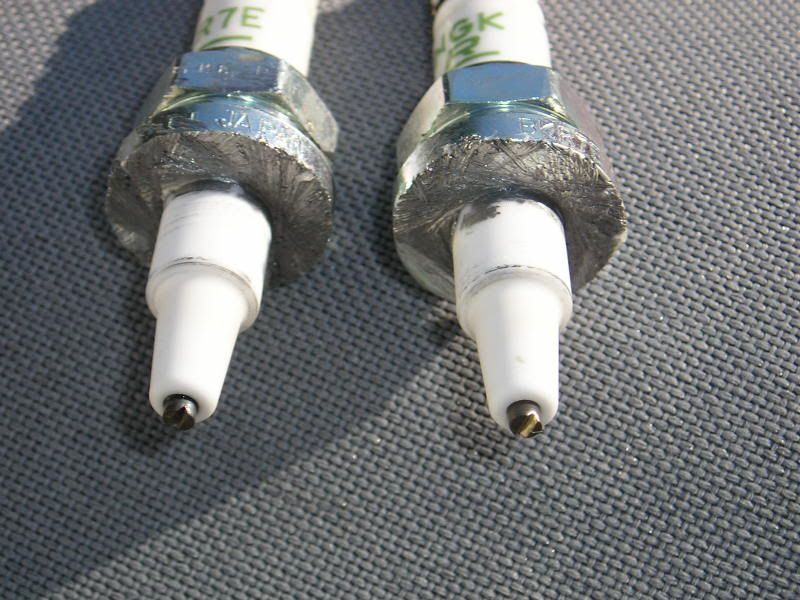
Reading Spark Plugs
by Meaux Racing Heads
* This is only valid if you shut-off the engine after the finish line then tow the car back to the pits where you remove the plugs for reading !!
* Or if you are on the dyno
* VALID ONLY for full load acceleration or steady state dyno tests
Plugs are best viewed with a 10x power illuminated magnifying glass.
* The "Ground Strap" = Heat Range
* The "Plug's Base Ring" = Jetting
* The "Porcelain" = signs of preignition/detonation
Heat Range
Heat Range = Ground Strap, the ground strap indicates the heat-range of the spark plug. If the "color" of the ground strap "changes" too close to the ground strap's end, (which is above the center electrode), then the heat-range is "too cold", meaning that the strap is loosing heat too quickly to the base ring, and is not able to burn off deposits until near its end.
If the "color" of the strap changes near where it is welded/attached to the base ring (last thread ring), then it means that the plug heat-range is "too hot", because heat is not being transferred/cooled from the strap to the base ring quickly enough !!!! The strap might begin to act like a "glow-plug", eventually causing preignition and/or detonation later on.
Proper heat-range is when the "color" is at the halfway point on the strap, neither too cold or too hot.
(Color = meaning the evidence of heat/or lack of heat by the appearance dark vs lightened color of metal)

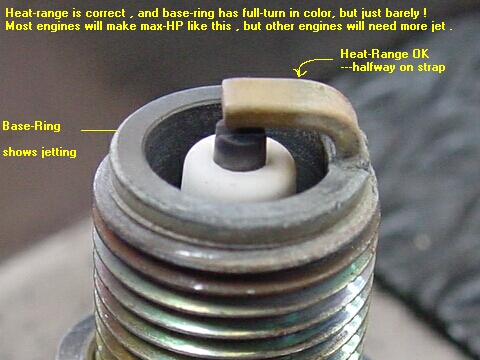
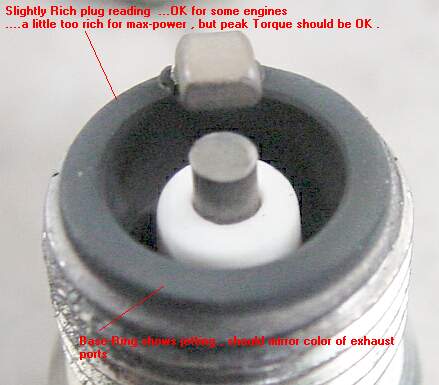
Jetting
Jetting = the air/fuel mixture ratio shows up on the base ring (the last thread ring, it has the strap welded to it). You want a full turn of light soot color on the base ring!!! If you want to tune for max. power, then you want 3/4 to 7/8ths of a full turn of light soot color to show up on the base ring, but this is on ragged-edge of being too lean, but will make the most HP on most engines.
To be safe, leave it at a full turn of light soot color. If the base ring has a full turn of color, but there are "spots" of heavy buildup of "dry soot" on top of color, then jetting is too rich .
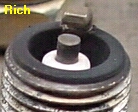
* If the base ring has a full turn of color with some spots of heavy dry soot, then jetting is too rich, REGARDLESS, if the porcelain is "BONE-WHITE", jetting is still TOO RICH !!!
* Do not look at the porcelain to read jetting !!!
Preignition/Detonation
Porcelain = the porcelain shows up preignition/detonation, it will not accurately reveal jetting/air/fuel ratios. To look for the first/beginning signs of detonation, search the white porcelain for tiny black specks or shiny specks of aluminum that have fused to the porcelain. When detonation occurs, part of the air/fuel mixture explodes instead of burning, the explosion is heard as a "metallic knock", this audible knock is the result of a sound shock-wave, this shock wave travels back and forth across the clearance volume "disrupting" the cooler boundary layer gases that cover the entire clearance volume area. This disruption allows "more" heat to be transferred into parts, especially, domes/piston tops,...along with the very rapid rise in pressure like a hammer blow, pistons can get torched with melted sides and holes !!! With the early signs of detonation, the shock-wave will also rattle rings causing the tiny amounts of oil that now gets by rings, to be fused to the white porcelain as tiny black specks, also fused as specks are soot that was clinging to clearance volume surfaces in the relatively "still-air" of the boundary layer. One step beyond the black specks, will be tiny specks/***** of aluminum coming off the pistons that will be fused to white porcelain,....the next step to be reached is occasional pieces of the porcelain being broken-off as detonation gets worse, ETC. Soon after that are holes, blown head gaskets, broken connecting rods, ETC.
* Additional signs of beginning detonation are piston rings. By comparing ring's "free-diameter" to "out-of-box" free-diameters of new unused rings will reveals beginnings of detonation before much harm is caused !!! This is a result of the above previous explanation about heat being transferred more readily because the of the relatively insulating/cooler boundary layer being disrupted by the shock-wave. A piston ring is a simple spring, when a spring is overheated it will loose tension.
* Center Electrode = the very tiny sharply defined porcelain -"ditch" that encircles the center electrode, will also show up early signs of preignition/detonation and the wrong heat-range. Look for signs of the ditch beginning to be filled up with melted porcelain, you will need a 5x or 10x magnifying glass.
Remember when reading plugs...
* The "Ground-Strap" = Heat Range
* The "Plug's Base-Ring" = Jetting
* The "Porcelain" = signs of preignition/detonation
http://www.dragstuff.com/techarticle...-pictures.html this link here has some really nice example pictures of what you should be looking for also.
Reading Spark Plugs
by Meaux Racing Heads
* This is only valid if you shut-off the engine after the finish line then tow the car back to the pits where you remove the plugs for reading !!
* Or if you are on the dyno
* VALID ONLY for full load acceleration or steady state dyno tests
Plugs are best viewed with a 10x power illuminated magnifying glass.
* The "Ground Strap" = Heat Range
* The "Plug's Base Ring" = Jetting
* The "Porcelain" = signs of preignition/detonation
Heat Range
Heat Range = Ground Strap, the ground strap indicates the heat-range of the spark plug. If the "color" of the ground strap "changes" too close to the ground strap's end, (which is above the center electrode), then the heat-range is "too cold", meaning that the strap is loosing heat too quickly to the base ring, and is not able to burn off deposits until near its end.
If the "color" of the strap changes near where it is welded/attached to the base ring (last thread ring), then it means that the plug heat-range is "too hot", because heat is not being transferred/cooled from the strap to the base ring quickly enough !!!! The strap might begin to act like a "glow-plug", eventually causing preignition and/or detonation later on.
Proper heat-range is when the "color" is at the halfway point on the strap, neither too cold or too hot.
(Color = meaning the evidence of heat/or lack of heat by the appearance dark vs lightened color of metal)
Jetting
Jetting = the air/fuel mixture ratio shows up on the base ring (the last thread ring, it has the strap welded to it). You want a full turn of light soot color on the base ring!!! If you want to tune for max. power, then you want 3/4 to 7/8ths of a full turn of light soot color to show up on the base ring, but this is on ragged-edge of being too lean, but will make the most HP on most engines.
To be safe, leave it at a full turn of light soot color. If the base ring has a full turn of color, but there are "spots" of heavy buildup of "dry soot" on top of color, then jetting is too rich .
* If the base ring has a full turn of color with some spots of heavy dry soot, then jetting is too rich, REGARDLESS, if the porcelain is "BONE-WHITE", jetting is still TOO RICH !!!
* Do not look at the porcelain to read jetting !!!
Preignition/Detonation
Porcelain = the porcelain shows up preignition/detonation, it will not accurately reveal jetting/air/fuel ratios. To look for the first/beginning signs of detonation, search the white porcelain for tiny black specks or shiny specks of aluminum that have fused to the porcelain. When detonation occurs, part of the air/fuel mixture explodes instead of burning, the explosion is heard as a "metallic knock", this audible knock is the result of a sound shock-wave, this shock wave travels back and forth across the clearance volume "disrupting" the cooler boundary layer gases that cover the entire clearance volume area. This disruption allows "more" heat to be transferred into parts, especially, domes/piston tops,...along with the very rapid rise in pressure like a hammer blow, pistons can get torched with melted sides and holes !!! With the early signs of detonation, the shock-wave will also rattle rings causing the tiny amounts of oil that now gets by rings, to be fused to the white porcelain as tiny black specks, also fused as specks are soot that was clinging to clearance volume surfaces in the relatively "still-air" of the boundary layer. One step beyond the black specks, will be tiny specks/***** of aluminum coming off the pistons that will be fused to white porcelain,....the next step to be reached is occasional pieces of the porcelain being broken-off as detonation gets worse, ETC. Soon after that are holes, blown head gaskets, broken connecting rods, ETC.
* Additional signs of beginning detonation are piston rings. By comparing ring's "free-diameter" to "out-of-box" free-diameters of new unused rings will reveals beginnings of detonation before much harm is caused !!! This is a result of the above previous explanation about heat being transferred more readily because the of the relatively insulating/cooler boundary layer being disrupted by the shock-wave. A piston ring is a simple spring, when a spring is overheated it will loose tension.
* Center Electrode = the very tiny sharply defined porcelain -"ditch" that encircles the center electrode, will also show up early signs of preignition/detonation and the wrong heat-range. Look for signs of the ditch beginning to be filled up with melted porcelain, you will need a 5x or 10x magnifying glass.
Remember when reading plugs...
* The "Ground-Strap" = Heat Range
* The "Plug's Base-Ring" = Jetting
* The "Porcelain" = signs of preignition/detonation
http://www.dragstuff.com/techarticle...-pictures.html this link here has some really nice example pictures of what you should be looking for also.
 07-09-2008, 05:23 PM
#26
On The Tree
Join Date: Nov 2007
Posts: 104
Likes: 0
Received 0 Likes
on
0 Posts
I got all that and lots more in my log books. I have lots of stuff I wrote/took pictures of too. One of these days I will type it all out and scan them into the computer. I hope to someday transfer my logs to my laptop so I can easily share my track experiance with others. In any event, them write ups are great reads.
07-09-2008, 06:42 PM
#27
Staging Lane
Thread Starter

Join Date: Jan 2007
Posts: 62
Likes: 0
Received 0 Likes
on
0 Posts
Ill try to get those pics with the threads cut off today. Just got home from work... cut the grass and planted a tree. Busy day
Last edited by lak8; 07-09-2008 at 07:16 PM.
07-09-2008, 06:51 PM
#28
On The Tree
Join Date: Nov 2007
Posts: 104
Likes: 0
Received 0 Likes
on
0 Posts
geting off topic here... why would you paint a tree? I am really curious on this one lol.
Get the pics up and we will look them over. Also make sure you read whats been posted as you look at your plugs.
Get the pics up and we will look them over. Also make sure you read whats been posted as you look at your plugs.
 07-10-2008, 03:18 AM
#30
On The Tree
Join Date: Nov 2007
Posts: 104
Likes: 0
Received 0 Likes
on
0 Posts
I read your reply here and thought "Plant, tree, why would he paint it?" haha. Then I read your edit and it all made sense hah!
As for the plugs you DO look lean, so you probably are getting some detonation. Are you sure you do not have your jets mixed up? I am rather suprised I do not see more "pepper" on the porcelin. Now that we KNOW you are lean, time to figure out why.
Has your computer ever been tuned? What nitrous and fuel jets are you running? Do you know where your fuel pressure is at all? Timing at WOT, anything that can help us problem solve?
07-10-2008, 05:07 PM
#31
Staging Lane
Thread Starter
Join Date: Jan 2007
Posts: 62
Likes: 0
Received 0 Likes
on
0 Posts
I do have a fuel pressure gauge on the fuel rail. Its around 35psi at idle from what i remember, altho ill'd have to check. The jets should be the NX ratings for a 35shot. I have the NX manual that came with my kit some place and thats what i went from for jet rating. The ecu (computer) is stock atm. Timing is also stock.
07-10-2008, 05:09 PM
#32
Staging Lane
Thread Starter
Join Date: Jan 2007
Posts: 62
Likes: 0
Received 0 Likes
on
0 Posts
I think im going to change the fuel jet one step or maybe even two spets up and try that out. The problem sure seems its running lean so adding fuel would be my guess. Just how much i dont know
07-10-2008, 06:09 PM
#33
On The Tree
Join Date: Nov 2007
Posts: 104
Likes: 0
Received 0 Likes
on
0 Posts
try a jet or two higher and plug chop again. I would also check both the nitrous and the fuel jet again and make sure you have the right ones in as is. Got any pics of your install? ASide from a problem over looked or your jets being off I don't really see why such a small shot is is making your car so lean.
07-11-2008, 04:48 PM
#35
Staging Lane
Thread Starter
Join Date: Jan 2007
Posts: 62
Likes: 0
Received 0 Likes
on
0 Posts
Heh, ... it might surprise some of you that i own a acura integra and posting in a gm domestic forum, but i found you people in the nitrous oxide section of this board to be very helpful with what im after. Alot of you are really quite muture and knowledgeable in you postings (unlike a famus well known honda board :p that i wont name). Great board i must say  With that being said i also bought alot of my nitrous stuff from a few members here as well. (purge, dynotune digital gauge/opener/bottle heater/window switch) My NX wet kit was bought new on ebay
I actually dont have any pictures of my nitrous install or recent pictures of my car for that matter, but here's one a quickly snapped from spring.

Btw: I swapped in a prelude engine jdm h22 into my integra so its not really stock here to say.
With that being said i also bought alot of my nitrous stuff from a few members here as well. (purge, dynotune digital gauge/opener/bottle heater/window switch) My NX wet kit was bought new on ebayI actually dont have any pictures of my nitrous install or recent pictures of my car for that matter, but here's one a quickly snapped from spring.
Btw: I swapped in a prelude engine jdm h22 into my integra so its not really stock here to say.
07-12-2008, 05:45 AM
#37
On The Tree
Join Date: Nov 2007
Posts: 104
Likes: 0
Received 0 Likes
on
0 Posts
I personally do not know any of the jetting for a shot that small, but I am sure someone with more knowledge will chime in if that is wrong. Perhaps you are running out of fuel pump? I'm not sure what mods you have done to your car and what your fuel pump can handle but that could possibly be a problem. I know you said you did an engine swap so that + the juice could be maxing the pump, and under load dropping pressure to make you go lean. What kind of air intake sensors does that thing have? Is it mass air?
07-12-2008, 07:33 PM
#38
Staging Lane
Thread Starter
Join Date: Jan 2007
Posts: 62
Likes: 0
Received 0 Likes
on
0 Posts
The IAT is on the intake manifold. Opposite side from the throttle body on my engine. Im not sure what you mean by kind, but as far as i know. It tells your ecu the air temperature which then bases the a/f ratio by making slight fuel adjustments for varying temperatures. I kinda see what your getting at and am interested if this would have anything to do with it.
Well its been raining all yesterday and today still so i can't really do much. (cars never seen much rain heh) Today I did however change out the fuel jet from the 18 to a 20. The 18 was super small, Almost like a very small pin hole in size. Were as the 20 was fairly bigger compared to the bairly noticeable 18 hehe. I have a 22 and 24 as well. (note: the 20 and 22 seem close to hole size)
Well its been raining all yesterday and today still so i can't really do much. (cars never seen much rain heh) Today I did however change out the fuel jet from the 18 to a 20. The 18 was super small, Almost like a very small pin hole in size. Were as the 20 was fairly bigger compared to the bairly noticeable 18 hehe. I have a 22 and 24 as well. (note: the 20 and 22 seem close to hole size)
07-14-2008, 07:44 AM
#40
508 Stroker,
Yes I have a couple other spark plug right ups as well. That seems to be about the best there currently is. I am in the process of collecting a bunch of info and pictures to do a better right up that I think will explain things alittle better.
Dave
Yes I have a couple other spark plug right ups as well. That seems to be about the best there currently is. I am in the process of collecting a bunch of info and pictures to do a better right up that I think will explain things alittle better.
Dave