
How I spent my day painting without rattlecans
 10-31-2008 | 01:21 PM
#1
Thread Starter
TECH Regular
iTrader: (21)
Joined: Jan 2007
Posts: 497
Likes: 0
From: Long Island, NY
I performed this work a few months ago and thought I'd share it with you guys.
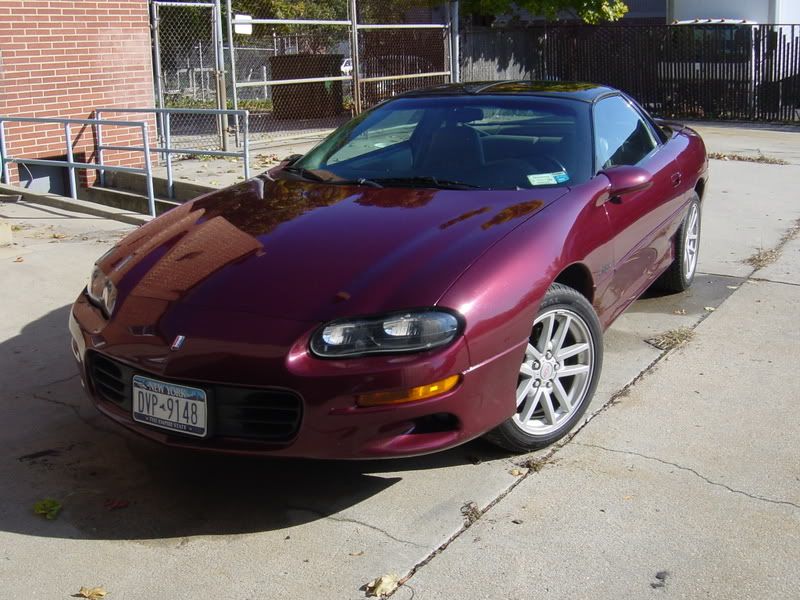
Well to start off, my Camaro had been repainted at some point in its life. For whatever reason, JUST the hood finish failed. All fenders, body panels, hatch, etc are solid. The hood has been progressively getting worse to the point that water would creep under the clearcoat in spots every time it rained. Here's what it looked like before starting anything:


Here it all starts. $250 at the body supply store buys me:
1 gal of primer w/ 1 gal of reducer (it was cheaper than buying a quart of the exotic stuff) I'll be putting this primer to use somewhere else soon.
1 pt of PPG Deltron basecoat
1 qt of PPG Deltron reducer (ratio 1.5:1 reducer/color)
1 qt PPG Omni Clearcoat
1 qt PPG fast clearcoat hardener
1 gal Aircraft Remover
tack cloths
buckets
strainers
mixers
Garage Prep!


The entertainment!! Womens volleyball came on after this You can also see my makeshift filtered exhaust system dumdumdum!!

First step was getting all of this old finish off the hood. Turns out the repaint of this hood was done directly over the original unsanded finish. Guess that's why it didn't adhere well. Prep is KING, dumbass!!!!!
It took 3-4 applications of aircraft remover, about 2 hours of labor, to get it all removed:


Here's the hood bare-*** naked:

I forgot to get a pic of the finished primer coat but it went like this:
1. Light (tack) coat
2. Medium coat
3. Medium coat
4. Medium coat
5. Drysand with 320-grit, then 400 grit
The spoiler in the background just got two light coats of primer since it already had a good primer layer.
Test fit!


LOLLERSK8

Hung up:

Basecoat!


HA! It mas workie!!!

Clearcoat!!!
By this time it was ~9:30pm and even though all doors were shut, tiny bug fuckers were getting in and a handful landed on the wet clear. You can see a couple in the reflection. Due to this, after I did two medium coats, I called it quits for the night. I will wetsand the clear, then apply one light (tack) then one heavy coat to get the "glass" finish.


What a long day!
Well to start off, my Camaro had been repainted at some point in its life. For whatever reason, JUST the hood finish failed. All fenders, body panels, hatch, etc are solid. The hood has been progressively getting worse to the point that water would creep under the clearcoat in spots every time it rained. Here's what it looked like before starting anything:
Here it all starts. $250 at the body supply store buys me:
1 gal of primer w/ 1 gal of reducer (it was cheaper than buying a quart of the exotic stuff) I'll be putting this primer to use somewhere else soon.
1 pt of PPG Deltron basecoat
1 qt of PPG Deltron reducer (ratio 1.5:1 reducer/color)
1 qt PPG Omni Clearcoat
1 qt PPG fast clearcoat hardener
1 gal Aircraft Remover
tack cloths
buckets
strainers
mixers
Garage Prep!
The entertainment!! Womens volleyball came on after this
First step was getting all of this old finish off the hood. Turns out the repaint of this hood was done directly over the original unsanded finish. Guess that's why it didn't adhere well. Prep is KING, dumbass!!!!!
It took 3-4 applications of aircraft remover, about 2 hours of labor, to get it all removed:
Here's the hood bare-*** naked:
I forgot to get a pic of the finished primer coat but it went like this:
1. Light (tack) coat
2. Medium coat
3. Medium coat
4. Medium coat
5. Drysand with 320-grit, then 400 grit
The spoiler in the background just got two light coats of primer since it already had a good primer layer.
Test fit!
LOLLERSK8
Hung up:
Basecoat!
HA! It mas workie!!!
Clearcoat!!!
By this time it was ~9:30pm and even though all doors were shut, tiny bug fuckers were getting in and a handful landed on the wet clear. You can see a couple in the reflection. Due to this, after I did two medium coats, I called it quits for the night. I will wetsand the clear, then apply one light (tack) then one heavy coat to get the "glass" finish.
What a long day!
10-31-2008 | 01:24 PM
#2
Thread Starter
TECH Regular
iTrader: (21)
Joined: Jan 2007
Posts: 497
Likes: 0
From: Long Island, NY
The next day I finished the clearcoat work:

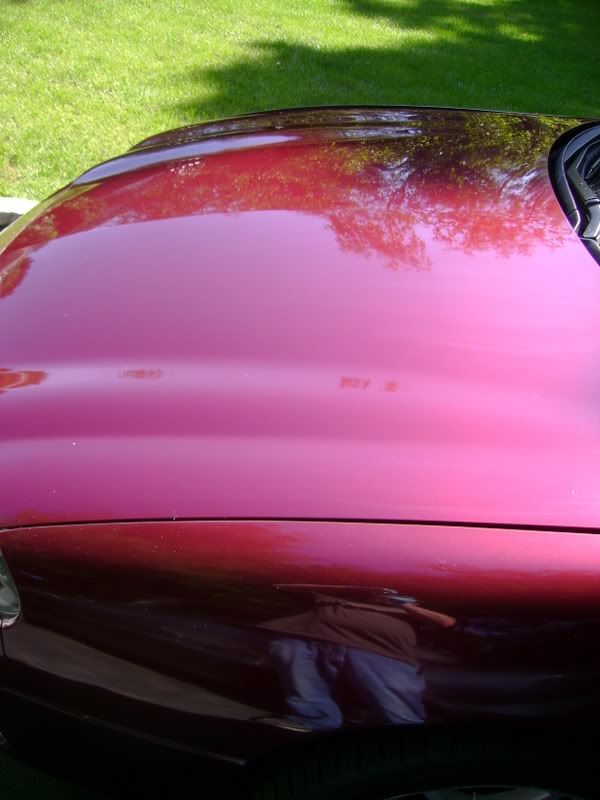
After installation, you can clearly see the amount of orange-peel. Had I thought of it, I would have opted for a "slower" drying clearcoat hardener. The clearcoat was dry to the touch after 30 minutes!!! T'aint right there...
I played it safe and just used 2000-grit sandpaper for wetsanding. If I have to do this again (and I will when I do the spoiler) I think going with 1500 first, then 2000 will go a LOT quicker. I spent upwards of 3 hours maybe even more, wetsanding this hood.
I kept the strokes in one direction. Once I got most of the orange peel out (I chose not to take it all out since it'd match the car less), I went to work with the compounds.
2 weekends ago I did some practice with my old spoiler. I used the compounds I had available at the time (some Turtle wax liquid rubbing compound, Meguiars paint cleaner, Meguiars polish, etc) to get a feel for things. One thing I noticed is my DA polisher does jack ****. Maybe this is why the Porter cable is so popular, because as much as I thought my 6" air-powered DA throws, it must not be enough. For this reason, I did most of my compounding with my Craftsman 6" rotary.
Another note of interest which I'm sure most are aware of, is YES the type of pad matters. Using a foam pad worked, but very slowly at getting the harsh scratches. I used a synthetic wool pad (best I could find) and it made work much quicker.
I ordered some Poorboys products, specifically SSR line 2.5 (harsh) and 1 (mild), also pro-polish.
All in order, I did the following:
- Wetsand 2000 grit, washed multiple times, let dry, inspect, re-sand, etc
- Compound step 1 6" rotary buffer, wool pad, poorboys SSR 2.5
- Compound step 2 6" rotary buffer, foam pad, poorboys SSR 2.5
- Compound step 3 6" DA buffer, foam pad, poorboys SSR 2.5 (to try to eliminate the "ghosting" from the rotary)
- Compound step 4 6" DA buffer, foam pad, poorboys SSR 1
- Pro-polish by hand
- Glaze by hand
Here's the result:
Before:


After:
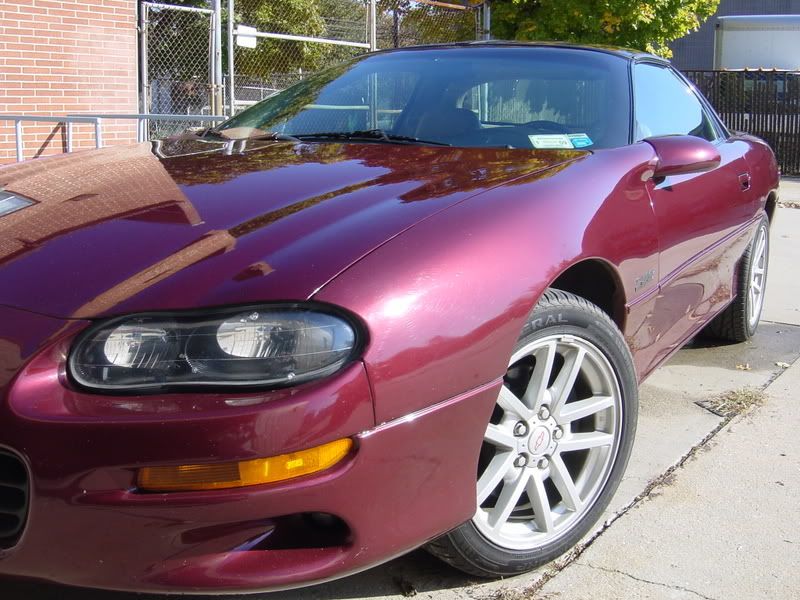
I'm gonna have to paint the front clip one day, you can see how faded and chipped it is vs the new hood. Wetsanding definitely made it match better.
After installation, you can clearly see the amount of orange-peel. Had I thought of it, I would have opted for a "slower" drying clearcoat hardener. The clearcoat was dry to the touch after 30 minutes!!! T'aint right there...
I played it safe and just used 2000-grit sandpaper for wetsanding. If I have to do this again (and I will when I do the spoiler) I think going with 1500 first, then 2000 will go a LOT quicker. I spent upwards of 3 hours maybe even more, wetsanding this hood.
I kept the strokes in one direction. Once I got most of the orange peel out (I chose not to take it all out since it'd match the car less), I went to work with the compounds.
2 weekends ago I did some practice with my old spoiler. I used the compounds I had available at the time (some Turtle wax liquid rubbing compound, Meguiars paint cleaner, Meguiars polish, etc) to get a feel for things. One thing I noticed is my DA polisher does jack ****. Maybe this is why the Porter cable is so popular, because as much as I thought my 6" air-powered DA throws, it must not be enough. For this reason, I did most of my compounding with my Craftsman 6" rotary.
Another note of interest which I'm sure most are aware of, is YES the type of pad matters. Using a foam pad worked, but very slowly at getting the harsh scratches. I used a synthetic wool pad (best I could find) and it made work much quicker.
I ordered some Poorboys products, specifically SSR line 2.5 (harsh) and 1 (mild), also pro-polish.
All in order, I did the following:
- Wetsand 2000 grit, washed multiple times, let dry, inspect, re-sand, etc
- Compound step 1 6" rotary buffer, wool pad, poorboys SSR 2.5
- Compound step 2 6" rotary buffer, foam pad, poorboys SSR 2.5
- Compound step 3 6" DA buffer, foam pad, poorboys SSR 2.5 (to try to eliminate the "ghosting" from the rotary)
- Compound step 4 6" DA buffer, foam pad, poorboys SSR 1
- Pro-polish by hand
- Glaze by hand
Here's the result:
Before:
After:
I'm gonna have to paint the front clip one day, you can see how faded and chipped it is vs the new hood. Wetsanding definitely made it match better.
10-31-2008 | 01:55 PM
#3
Its amazing what a little wet sand and buff will do.

 Looks like the spoiler didnt get **** for bugs in it. also nice exhaust fan. haha gotta do what ya gotta do.


Trending Topics
11-02-2008 | 04:15 PM
#10
On The Tree
Joined: Sep 2008
Posts: 162
Likes: 0
Wow thats amazing. very well descripted pics and all.
This is one of the best walk troughs ive even seen very nice post man.
Now when i buy a new hood i dont got to worry about taking it to a paint shop i can do it all my self . thanks for being kind enough to post this on LS1 tech
This is one of the best walk troughs ive even seen very nice post man.
Now when i buy a new hood i dont got to worry about taking it to a paint shop i can do it all my self
. thanks for being kind enough to post this on LS1 tech
11-02-2008 | 06:46 PM
#11

Launching!
Joined: Aug 2008
Posts: 281
Likes: 0
From: San Diego Ca
Im surprized that you didnt just shoot the whole car. Looks great, but Im sure the color difference is killing you. Use about 30% reducer next time, it will require a bit more care not to run it, but it will dry glass smooth - even if you use supercharger!
Of course these are things I would NEVER do because of EPA regulation
Of course these are things I would NEVER do because of EPA regulation
11-02-2008 | 08:42 PM
#12
Thread Starter
TECH Regular
iTrader: (21)
Joined: Jan 2007
Posts: 497
Likes: 0
From: Long Island, NY
Wow thats amazing. very well descripted pics and all.
This is one of the best walk troughs ive even seen very nice post man.
Now when i buy a new hood i dont got to worry about taking it to a paint shop i can do it all my self . thanks for being kind enough to post this on LS1
This is one of the best walk troughs ive even seen very nice post man.
Now when i buy a new hood i dont got to worry about taking it to a paint shop i can do it all my self . thanks for being kind enough to post this on LS1
Im surprized that you didnt just shoot the whole car. Looks great, but Im sure the color difference is killing you. Use about 30% reducer next time, it will require a bit more care not to run it, but it will dry glass smooth - even if you use supercharger!

 11-03-2008 | 06:17 PM
#17
Yea, thats why I asked. Thats how the brain works, you get used to hearing/seeing certain phrases and then you don't read the entire words. Either way it looks good
