My Complete Paint Job **LOTSA PICS**

 07-22-2011, 05:10 PM
#82

Hey man great job on doing it yourself. I'm currently prepping my car for the first time and was wondering what grit you used to sand down to factory primer and at what grit did you finish before you sprayed primer?Also could you pm me where you got that black primer at? Sorry for these questions but I want to do it right.
07-22-2011, 08:01 PM
#83
On The Tree
Thread Starter
iTrader: (5)

Join Date: Mar 2009
Posts: 102
Likes: 0
Received 0 Likes
on
0 Posts
Hey man great job on doing it yourself. I'm currently prepping my car for the first time and was wondering what grit you used to sand down to factory primer and at what grit did you finish before you sprayed primer?Also could you pm me where you got that black primer at? Sorry for these questions but I want to do it right.
After shooting primer, I sanded with 220, 400, then 600 wet. Make sure to have good sanding blocks. Without them, you might as well not even waste your time shooting primer. I got a durablock kit that came with like 5 different blocks. It's probably the most important $50 I have spent on the project.
The black primer is Sherwin Williams' Spectraprime P30B. I got it at the local SW Automotive. If you check their website, I'm sure there will be one close to you. Just make sure its SW Automotive and not the basic SW for household paints.
But I need to warn you, if you want to do this the right way, it will take a VERY long time. I have something like almost 300 hours into it so far, and I haven't even shot any color yet. To put that into perspective, If you were working a normal work week (8 hours a day, 5 days a week), that would be almost 2 months for me so far!!! Granted, I have done a lot of custom work like fixing bad panels, replacing the roof, etc. You also need to know what you are going to do, and I mean every step, and why you are doing it. I would suggest reading a book or two. It would help greatly with your understanding of the painting process.
Feel free to pm me if you have any questions (which I'm sure you will).
 07-24-2011, 12:17 AM
#87
We normally use 150-220 to take the clear coat layer off and finish with 320 before we seal it(if it gets that)
Even if you are using filler primer, even K38 its best to try and sand your 80 grit marks out and even 150. Again it depends on the performance of the filler primer.
If you are doing body work you can shape what you are doing with 80 grit and as andrewhlr said use a block of some sort. If you don't you end up working against yourself. Even though you think you are holding the sand paper flat, your fingers are round and will make high/low spots in the filler. If the panel you are working on allows, try and use a block bigger than the area that has filler on it. This helps to get the filler the same level as the rest of the panel. The sand paper basically will ride on the metal on the sides of spot you are repairing and will help prevent taking too much material off.
After you shape it with 80, stop before you get the filler where you want it. Then switch to 150 grit and finish it. If you "finish" it with 80, when you use the 150 you will have to take more material off to get the 80 scratches out and you will have to add more filler then go over it again. If you find yourself with some 80 grit scratches in it that's where glazing putty works great. It's thin, lays down smoother than regular filler. It's easier to apply a really thin coat. This fills in your 80 scratches. Smooth it out with some 150 and you are done. Don't apply too much glazing putty as you will pretty much have to re sand the whole thing over. If you put a thin coat on it you will be able to hit it with 150 and be done pretty quick.
After that you should feather out the edges of the paint with a DA sander. It doesn't take too long and you will see what feather looks like. The way I describe it is the the edges of the different layers start to look soft. It may sound goofy but that's how it looks to me.
As mentioned earlier in this thread or another one similar is with body work there are more than one right way to get a quality finished product. You ask 10 people and you will probably get 10 different answers. Does that mean some or all of them are wrong? No they just have different ways.
The best way to get better at is just to do it. It does help to have someone around that has experience. I was working on a truck bed side at work and it was kicking my ***. Our painter stopped by and I started picking his brain. He took the sand paper and block and did more in a minute that I had done in the past day. It's always cool to see someone that's really good at something work. I love to learn and want to get better at all the things I do at work.
Trial and error is also a big part of it. You find out depending on the shape/size of your panel, which way you should sand. You also learn that sanding in one direction for too long causes its own set of problems. When trying to figure out how close you are when doing body work I use a dry paper towel. Sometimes feeling the panel with your bare hand is tough. Put down a dry paper towel and then run your flat hand over the panel. The bondo dust lets the towel slide over the panel and you will feel way more detail in the panel.
I didn't mean to ramble. Hope some of my gibberish can help someone out.
Last edited by LilJayV10; 07-24-2011 at 12:22 AM.
07-24-2011, 07:41 AM
#88
On The Tree
Thread Starter
iTrader: (5)
Join Date: Mar 2009
Posts: 102
Likes: 0
Received 0 Likes
on
0 Posts
We normally use 150-220 to take the clear coat layer off and finish with 320 before we seal it(if it gets that)
Even if you are using filler primer, even K38 its best to try and sand your 80 grit marks out and even 150. Again it depends on the performance of the filler primer.
If you are doing body work you can shape what you are doing with 80 grit and as andrewhlr said use a block of some sort. If you don't you end up working against yourself. Even though you think you are holding the sand paper flat, your fingers are round and will make high/low spots in the filler. If the panel you are working on allows, try and use a block bigger than the area that has filler on it. This helps to get the filler the same level as the rest of the panel. The sand paper basically will ride on the metal on the sides of spot you are repairing and will help prevent taking too much material off.
After you shape it with 80, stop before you get the filler where you want it. Then switch to 150 grit and finish it. If you "finish" it with 80, when you use the 150 you will have to take more material off to get the 80 scratches out and you will have to add more filler then go over it again. If you find yourself with some 80 grit scratches in it that's where glazing putty works great. It's thin, lays down smoother than regular filler. It's easier to apply a really thin coat. This fills in your 80 scratches. Smooth it out with some 150 and you are done. Don't apply too much glazing putty as you will pretty much have to re sand the whole thing over. If you put a thin coat on it you will be able to hit it with 150 and be done pretty quick.
After that you should feather out the edges of the paint with a DA sander. It doesn't take too long and you will see what feather looks like. The way I describe it is the the edges of the different layers start to look soft. It may sound goofy but that's how it looks to me.
As mentioned earlier in this thread or another one similar is with body work there are more than one right way to get a quality finished product. You ask 10 people and you will probably get 10 different answers. Does that mean some or all of them are wrong? No they just have different ways.
The best way to get better at is just to do it. It does help to have someone around that has experience. I was working on a truck bed side at work and it was kicking my ***. Our painter stopped by and I started picking his brain. He took the sand paper and block and did more in a minute that I had done in the past day. It's always cool to see someone that's really good at something work. I love to learn and want to get better at all the things I do at work.
Trial and error is also a big part of it. You find out depending on the shape/size of your panel, which way you should sand. You also learn that sanding in one direction for too long causes its own set of problems. When trying to figure out how close you are when doing body work I use a dry paper towel. Sometimes feeling the panel with your bare hand is tough. Put down a dry paper towel and then run your flat hand over the panel. The bondo dust lets the towel slide over the panel and you will feel way more detail in the panel.
I didn't mean to ramble. Hope some of my gibberish can help someone out.
Even if you are using filler primer, even K38 its best to try and sand your 80 grit marks out and even 150. Again it depends on the performance of the filler primer.
If you are doing body work you can shape what you are doing with 80 grit and as andrewhlr said use a block of some sort. If you don't you end up working against yourself. Even though you think you are holding the sand paper flat, your fingers are round and will make high/low spots in the filler. If the panel you are working on allows, try and use a block bigger than the area that has filler on it. This helps to get the filler the same level as the rest of the panel. The sand paper basically will ride on the metal on the sides of spot you are repairing and will help prevent taking too much material off.
After you shape it with 80, stop before you get the filler where you want it. Then switch to 150 grit and finish it. If you "finish" it with 80, when you use the 150 you will have to take more material off to get the 80 scratches out and you will have to add more filler then go over it again. If you find yourself with some 80 grit scratches in it that's where glazing putty works great. It's thin, lays down smoother than regular filler. It's easier to apply a really thin coat. This fills in your 80 scratches. Smooth it out with some 150 and you are done. Don't apply too much glazing putty as you will pretty much have to re sand the whole thing over. If you put a thin coat on it you will be able to hit it with 150 and be done pretty quick.
After that you should feather out the edges of the paint with a DA sander. It doesn't take too long and you will see what feather looks like. The way I describe it is the the edges of the different layers start to look soft. It may sound goofy but that's how it looks to me.
As mentioned earlier in this thread or another one similar is with body work there are more than one right way to get a quality finished product. You ask 10 people and you will probably get 10 different answers. Does that mean some or all of them are wrong? No they just have different ways.
The best way to get better at is just to do it. It does help to have someone around that has experience. I was working on a truck bed side at work and it was kicking my ***. Our painter stopped by and I started picking his brain. He took the sand paper and block and did more in a minute that I had done in the past day. It's always cool to see someone that's really good at something work. I love to learn and want to get better at all the things I do at work.
Trial and error is also a big part of it. You find out depending on the shape/size of your panel, which way you should sand. You also learn that sanding in one direction for too long causes its own set of problems. When trying to figure out how close you are when doing body work I use a dry paper towel. Sometimes feeling the panel with your bare hand is tough. Put down a dry paper towel and then run your flat hand over the panel. The bondo dust lets the towel slide over the panel and you will feel way more detail in the panel.
I didn't mean to ramble. Hope some of my gibberish can help someone out.
07-24-2011, 10:09 PM
#89
On The Tree
iTrader: (1)
Join Date: Jul 2008
Location: sin city
Posts: 106
Likes: 0
Received 0 Likes
on
0 Posts
any more pictures? looks real good bro, mad props especially getting to look so straight that black is going to look sick!!
heres a link to my friends ws6 I painted not to long ago.
https://ls1tech.com/forums/western-m...-together.html
heres a link to my friends ws6 I painted not to long ago.
https://ls1tech.com/forums/western-m...-together.html
07-24-2011, 10:14 PM
#90
On The Tree
Thread Starter
iTrader: (5)
Join Date: Mar 2009
Posts: 102
Likes: 0
Received 0 Likes
on
0 Posts
any more pictures? looks real good bro, mad props especially getting to look so straight that black is going to look sick!!
heres a link to my friends ws6 I painted not to long ago.
https://ls1tech.com/forums/western-m...-together.html
heres a link to my friends ws6 I painted not to long ago.
https://ls1tech.com/forums/western-m...-together.html
Read your thread a couple months back. It helped inspire me to do mine. I have also learned from your mistakes, like if you paint it panel by panel you run the risk of different color panels lol. So I'm painting pretty much all of it at once.
Thanks!
07-24-2011, 11:27 PM
#91
The best way to spray metallic is have everything apart; doors, fenders, hatch, etc.
Spray the jambs, inside of the doors, etc. Then hang everything. Then spray two more coats on the exterior of the doors and the rest of everything.
Take everything back off and spray clear. That way everything gets base, everything lines up and looks good on the outside and everything has a good coat of clear.
That's the difference between a 3 hour paint job and a 10 hour paint job.
07-25-2011, 06:35 AM
#92
On The Tree
Thread Starter
iTrader: (5)
Join Date: Mar 2009
Posts: 102
Likes: 0
Received 0 Likes
on
0 Posts
The best way to spray metallic is have everything apart; doors, fenders, hatch, etc.
Spray the jambs, inside of the doors, etc. Then hang everything. Then spray two more coats on the exterior of the doors and the rest of everything.
Take everything back off and spray clear. That way everything gets base, everything lines up and looks good on the outside and everything has a good coat of clear.
That's the difference between a 3 hour paint job and a 10 hour paint job.
Spray the jambs, inside of the doors, etc. Then hang everything. Then spray two more coats on the exterior of the doors and the rest of everything.
Take everything back off and spray clear. That way everything gets base, everything lines up and looks good on the outside and everything has a good coat of clear.
That's the difference between a 3 hour paint job and a 10 hour paint job.
07-26-2011, 05:54 PM
#94
On The Tree
Thread Starter
iTrader: (5)
Join Date: Mar 2009
Posts: 102
Likes: 0
Received 0 Likes
on
0 Posts
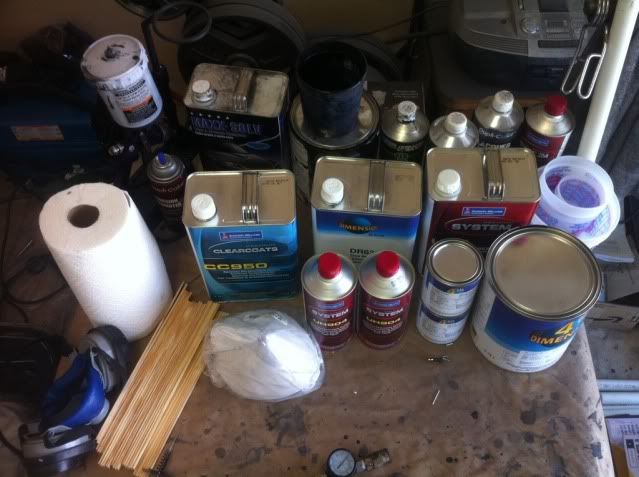
Not too much has happened since the last set of pics but I have a couple more.
Bought some paint today. I'm going to "paint in" the ram air and trans am decals. Here's the paint for them.
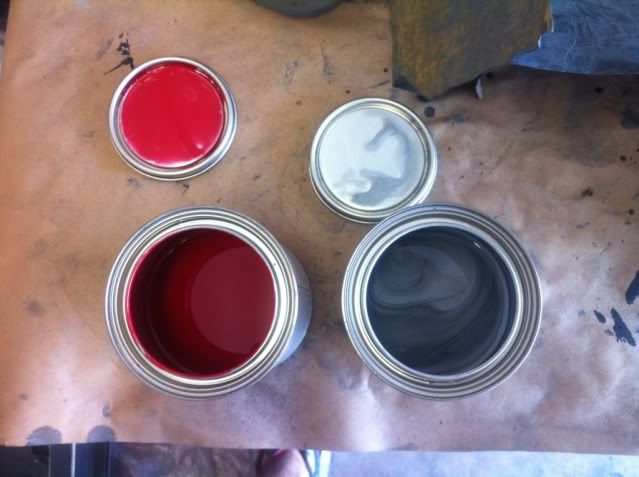
Everything I got.


The black I got.
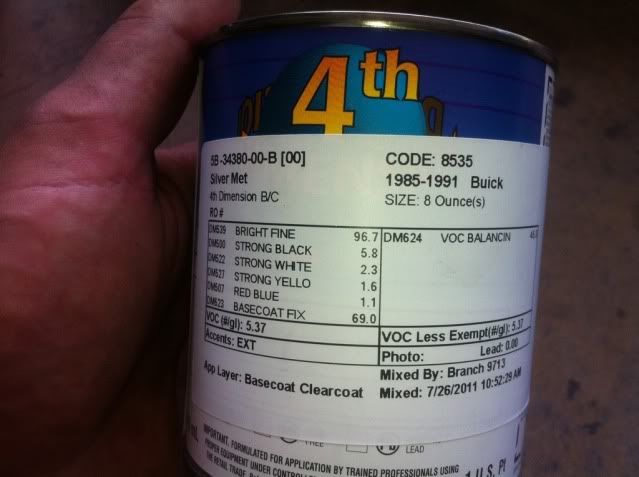
Silver Metallic
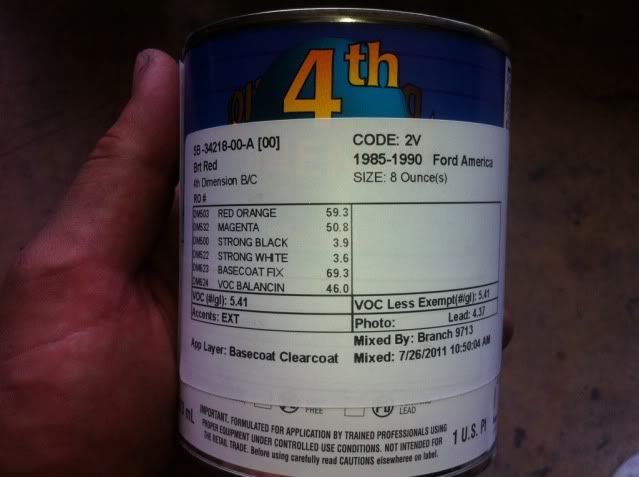
Red
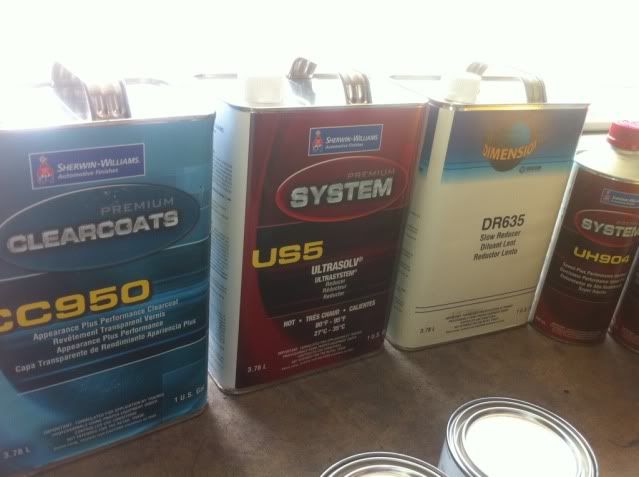
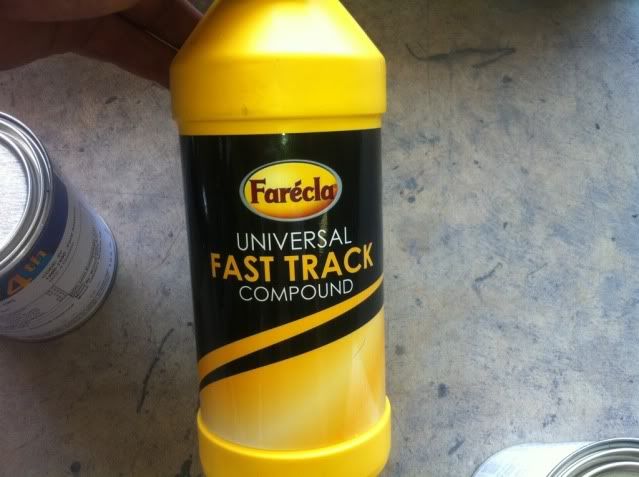
Cutting compound for buffing. It's water based and was recommended by my jobber.
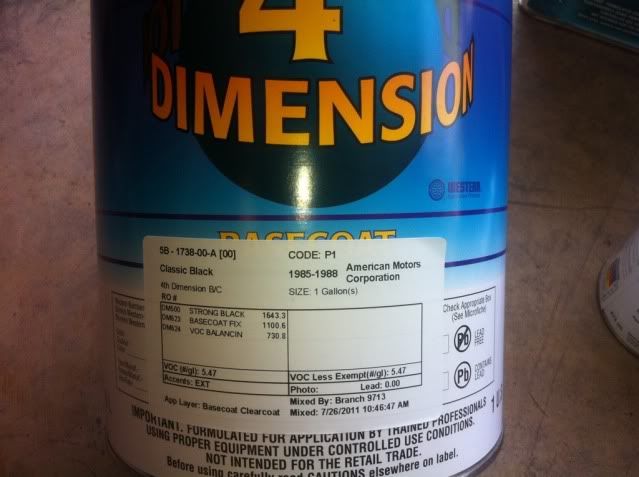
Black. It looks exactly like what I wanted (so black that it's almost not black anymore, but just a mirror ), but I'll have to wait to see if it looks the same after sprayed and cleared.
This is what $1300 of materials looks like.
Bought some paint today. I'm going to "paint in" the ram air and trans am decals. Here's the paint for them.
Everything I got.
The black I got.
Silver Metallic
Red
Cutting compound for buffing. It's water based and was recommended by my jobber.
Black. It looks exactly like what I wanted (so black that it's almost not black anymore, but just a mirror
), but I'll have to wait to see if it looks the same after sprayed and cleared.This is what $1300 of materials looks like.
07-28-2011, 03:54 PM
#96
On The Tree
Thread Starter
iTrader: (5)
Join Date: Mar 2009
Posts: 102
Likes: 0
Received 0 Likes
on
0 Posts
One of the large tubes that require their special caulking gun.
BUT, I just noticed yesterday that it has died back slightly over the past several weeks. Thankfully it's still in primer so all I have to do is sand it again and pray that it's done shrinking. I would recommend using something different if you're just going to "fill" in the gap. Duramix makes other things that would work better IMO. This plastic repair is more for structural repair than cosmetic
BUT, I just noticed yesterday that it has died back slightly over the past several weeks. Thankfully it's still in primer so all I have to do is sand it again and pray that it's done shrinking. I would recommend using something different if you're just going to "fill" in the gap. Duramix makes other things that would work better IMO. This plastic repair is more for structural repair than cosmetic
07-28-2011, 05:25 PM
#98
On The Tree
Thread Starter
iTrader: (5)
Join Date: Mar 2009
Posts: 102
Likes: 0
Received 0 Likes
on
0 Posts
The Harbor Freight 66222. Yea, It's not the best, but it is still a good gun. I'll be painting in two sets. The first one will be the jambs on the doors, underside of rear hatch, and bottum of the sail panel. The second round will be everything else. For the first one, I'll be using my 30 gal 6 cfm compressor and for the second one I'll be renting a gas powered 14 cfm compressor to handle the mass of painting required.
Let me guess, you would recommend the Astro EVO? lol.
IMO it's really not that important to have a great gun. I mean it's all going to be sanded smooth anyways (except the last coat of base obviously).
Let me guess, you would recommend the Astro EVO? lol.
IMO it's really not that important to have a great gun. I mean it's all going to be sanded smooth anyways (except the last coat of base obviously).
07-28-2011, 05:44 PM
#99
TECH Enthusiast
iTrader: (21)
Join Date: Oct 2008
Location: DFW
Posts: 504
Likes: 0
Received 0 Likes
on
0 Posts

You guessed it! How ever did you find out? Who spilled the beans? lol
The need for a quality gun is really just relative to the amount of time and work you want to spend making up for it after everything is sprayed. Here is the way I look at it: You are going to spend more money on sand paper, electricity running equipment, pads, blocks, compound, and PAINT by not using a quality gun. $400 out of the $1300 of the materials you paid for can potentially be wasted by a gun with bad transfer. I know from experience that that HF will produce a decent (for the price) finish. But it will waste a lot of paint doing so. Which is why the..... hmhmmhmh EVO hmmhmh... is worth the $100. Being an LVLP, it transfers MUCH better and will produce a finish requiring less work to perfect AND require a fraction of the air an HVLP does. Of course if you did this on a daily basis the resulting loss would grow exponentially. But at any rate, that's my $.02. I use the HF for small parts that won't be cut/buffed. Best "house" brand gun made, IMO.
Let me know your thoughts....