Paint & Body Work Custom Painting | Panel Repairs & Replacement

What prep is needed to paint ls6 intake?

Thread Tools
 
Search this Thread
 
Old 02-03-2014 | 02:37 PM
  #1  
ORPHAN-ANNIE's Avatar
Thread Starter
Teching In
iTrader: (1)
 
Joined: Jan 2014
Posts: 32
Likes: 0
From: Dallas,Texas
Default What prep is needed to paint ls6 intake?

Like the title says, I am in the process of painting my 00 SS and going to paint match the ls6 intake and air lid? anything special I need to prep the plastic with before I paint them?

Thanks
Old 02-04-2014 | 12:49 AM
  #2  
Whistler's Avatar
Sawzall and Welder Mod
iTrader: (46)
 
Joined: Nov 2001
Posts: 2,486
Likes: 4
From: Orlando, FL
Default

Do you plan to spray paint it or use auto body paint? If all you're planning on doing is spray painting it, just wash it thoroughly with dish soap and water, then wipe it down with wax/grease remover and scuff it up with a grey scotch-brite. Wipe it down again with wax/grease remover when you're done scuffing it up and spray your primer/paint of choice.
Old 02-04-2014 | 01:13 AM
  #3  
Zlow28's Avatar
TECH Addict

iTrader: (11)
 
Joined: Apr 2010
Posts: 2,080
Likes: 1
Default

I sanded my intake thoroughly to make the paint stick. I then used a clear coat at the end to give it a shiny finish.
Old 02-04-2014 | 02:25 AM
  #4  
4kiro's Avatar
On The Tree
 
Joined: Nov 2006
Posts: 175
Likes: 0
From: Southwest MO
Default

I was about to do a search on this topic, thanks for asking the questions. What color are you painting your intake and lid.
Old 02-04-2014 | 03:54 AM
  #5  
black79transam's Avatar
Launching!
 
Joined: May 2012
Posts: 282
Likes: 0
From: Wisconsin
Default

Sanded mine and then used adhesion promoter, primer, paint, clear.
Old 02-06-2014 | 12:53 PM
  #6  
ORPHAN-ANNIE's Avatar
Thread Starter
Teching In
iTrader: (1)
 
Joined: Jan 2014
Posts: 32
Likes: 0
From: Dallas,Texas
Default

Originally Posted by 4kiro
I was about to do a search on this topic, thanks for asking the questions. What color are you painting your intake and lid.
Painting them pewter to color match with car. Going to use auto body paint, so I plan on sanding them both down real smooth then once that is done, scuff them up and shoot primer, base and then some clear using the proper adhesive as well with each coat.
Old 02-06-2014 | 12:54 PM
  #7  
ORPHAN-ANNIE's Avatar
Thread Starter
Teching In
iTrader: (1)
 
Joined: Jan 2014
Posts: 32
Likes: 0
From: Dallas,Texas
Default

Originally Posted by black79transam
Sanded mine and then used adhesion promoter, primer, paint, clear.
pretty much what I am going to do. How is the paint holding up?
Old 03-14-2014 | 10:12 PM
  #8  
desormeaux05's Avatar
Staging Lane
 
Joined: Mar 2012
Posts: 97
Likes: 0
From: De Soto, IL
Default

https://ls1tech.com/forums/showthread.php?t=1388713

This what I did and my intake came out perfect. I just followed this guide step by step. Be prepared to sand ur a$$ off.
Old 03-15-2014 | 09:48 AM
  #9  
Socket's Avatar
On The Tree
iTrader: (6)
 
Joined: Oct 2009
Posts: 126
Likes: 0
From: Chicago
Default

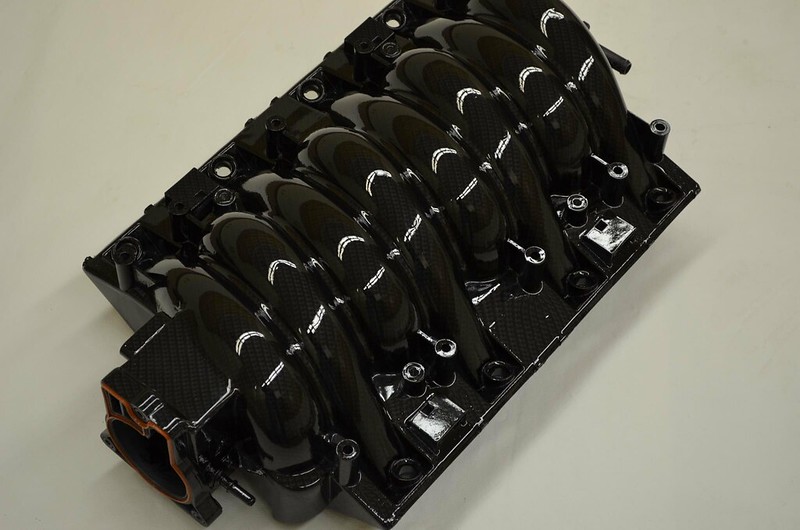
I had mine hydro dipped, but prep was the same process. I sanded everything down, and filled in all the molding marks on the top of the intake and made an aluminum plate that sits behind where the throttle body and molded that in and sanded everything smooth. It looks great all done, no casting marks, covered up that ugly web for support behind the tb. So glad I took the extra time to do that. Made it look a lot cleaner.
Old 03-15-2014 | 05:17 PM
  #10  
WS6ICK2k's Avatar
TECH Apprentice

 
Joined: Oct 2008
Posts: 332
Likes: 0
From: North Carolina
Default

Spray a promoter like duplicolor before the primer goes on the get good adhesion to the plastic.
Old 03-16-2014 | 01:50 AM
  #11  
Uneverknow's Avatar
11 Second Club
iTrader: (1)
 
Joined: Oct 2011
Posts: 295
Likes: 1
Default

Originally Posted by black79transam
Sanded mine and then used adhesion promoter, primer, paint, clear.
X2 ^^^^ this is what I did
Attached Thumbnails What prep is needed to paint ls6 intake?-image.jpg  
Old 03-16-2014 | 10:03 AM
  #12  
WS6ICK2k's Avatar
TECH Apprentice

 
Joined: Oct 2008
Posts: 332
Likes: 0
From: North Carolina
Default

Originally Posted by Socket
I had mine hydro dipped, but prep was the same process. I sanded everything down, and filled in all the molding marks on the top of the intake and made an aluminum plate that sits behind where the throttle body and molded that in and sanded everything smooth. It looks great all done, no casting marks, covered up that ugly web for support behind the tb. So glad I took the extra time to do that. Made it look a lot cleaner.
Post some pics of how you filled everything in, interested in taking that extra step when I paint mine.
Old 03-16-2014 | 09:10 PM
  #13  
Socket's Avatar
On The Tree
iTrader: (6)
 
Joined: Oct 2009
Posts: 126
Likes: 0
From: Chicago
Default

Originally Posted by WS6ICK2k
Post some pics of how you filled everything in, interested in taking that extra step when I paint mine.


I thought I had some during the process, but I can't seem to find them right now. This is when it was first finished. Like I said, I made a plate to fill in behind the throttle body. I used some epoxy to secure it in and then put on a light coat of body filler that works well with plastics to blend it in and I used the same filler to fill in the molding spots that are on the top of the intake. If I come across the in process pics I'll throw them up.
Old 03-17-2014 | 08:44 PM
  #14  
ORPHAN-ANNIE's Avatar
Thread Starter
Teching In
iTrader: (1)
 
Joined: Jan 2014
Posts: 32
Likes: 0
From: Dallas,Texas
Default

Thanks everyone for the information on how to prep! Here's my turn out along with my car as well. Once I put the car back together I will make a full thread from start to finish.


What prep is needed to paint ls6 intake?-image-4007009988.jpg


What prep is needed to paint ls6 intake?-image-4105726691.jpg
Old 03-17-2014 | 08:46 PM
  #15  
ORPHAN-ANNIE's Avatar
Thread Starter
Teching In
iTrader: (1)
 
Joined: Jan 2014
Posts: 32
Likes: 0
From: Dallas,Texas
Default

I see that pics don't upload very well iPhone app. Will reload better quality from PC later.
Old 03-17-2014 | 09:05 PM
  #16  
Socket's Avatar
On The Tree
iTrader: (6)
 
Joined: Oct 2009
Posts: 126
Likes: 0
From: Chicago
Default

Looks Great!
Old 03-17-2014 | 09:24 PM
  #17  
black79transam's Avatar
Launching!
 
Joined: May 2012
Posts: 282
Likes: 0
From: Wisconsin
Default

Originally Posted by ORPHAN-ANNIE

pretty much what I am going to do. How is the paint holding up?
I did it last year and it's holding up quite nice. I used dupli-color engine enamel rattle cans
Old 03-19-2014 | 11:01 AM
  #18  
Jonmichz28's Avatar
Registered User
 
Joined: Mar 2014
Posts: 17
Likes: 0
From: orlando, fl
Default

Nice work
Old 08-01-2014 | 06:10 PM
  #19  
Root2812's Avatar
On The Tree
iTrader: (1)
 
Joined: Sep 2013
Posts: 186
Likes: 2
From: Minnesota
Default

Originally Posted by Socket


I thought I had some during the process, but I can't seem to find them right now. This is when it was first finished. Like I said, I made a plate to fill in behind the throttle body. I used some epoxy to secure it in and then put on a light coat of body filler that works well with plastics to blend it in and I used the same filler to fill in the molding spots that are on the top of the intake. If I come across the in process pics I'll throw them up.
Did you dip your intake yourself?

I have sanded mine smooth (no casting marks), used adhesion promoter, primed and sanded, primed again, and now am ready for paint. I wanted to buy a DIY dip kit and dip it myself but with all the curves I don't know if I can get it looking right. Paying to have it dipped is just too expensive. If I can't dip it in carbon fiber I'll just paint it satin black to look similar to stock. (my intake was damaged so painting is the only way to mask the repair and deep scratches)


All times are GMT -5. The time now is 07:46 AM.