

G-body LS swap and a/c: my solution


figured id make a new thread for this instead of burying it in the build thread i had for the car. i searched a bunch on here and found a few ideas but nothing seemed to really "work" for me. originally i wanted to run the factory 98-2002 F-body compressor and condensor, and even purchased the BRP kit because it said on their site you could use it with their mount kit. well it turns out the truck compressor is the only one you can use without notching the frame because the lines are on the back of the F-body compressor and it wont clear the frame! i wasnt about to switch everything over from the F-body to the truck stuff and a vintage air setup wasnt an option because i wanted a "factory appearing" setup, also the stuff in the car worked perfectly fine so heres what i did:
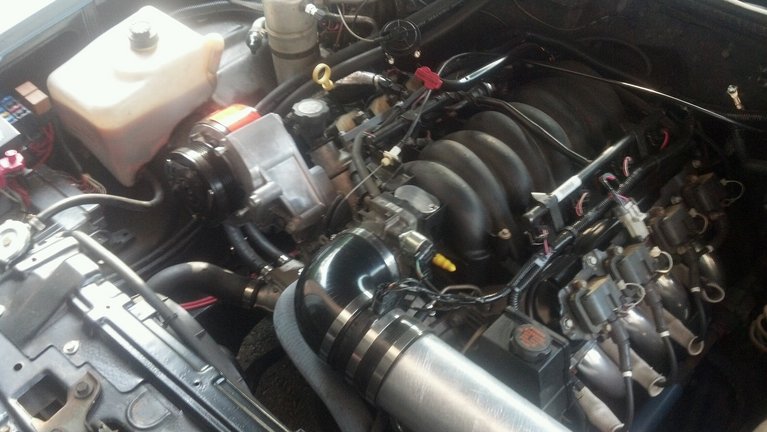
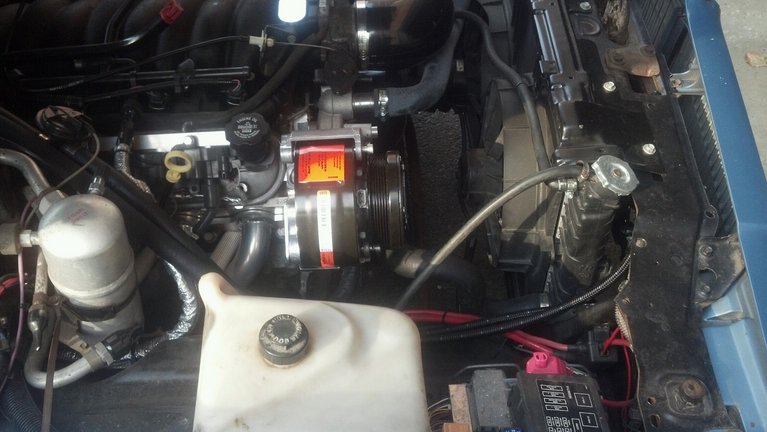
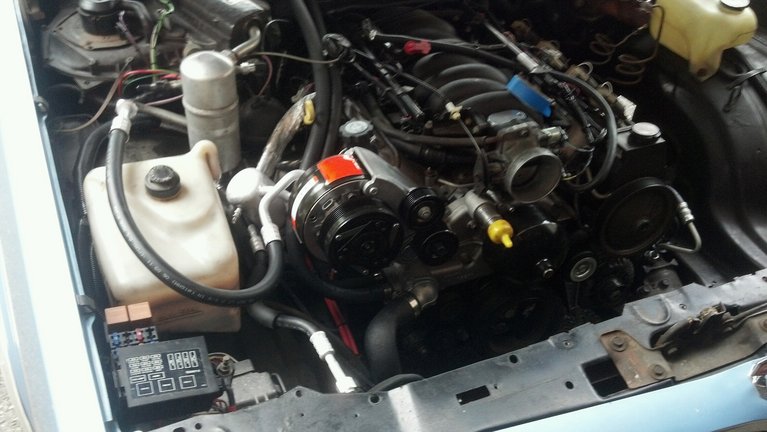
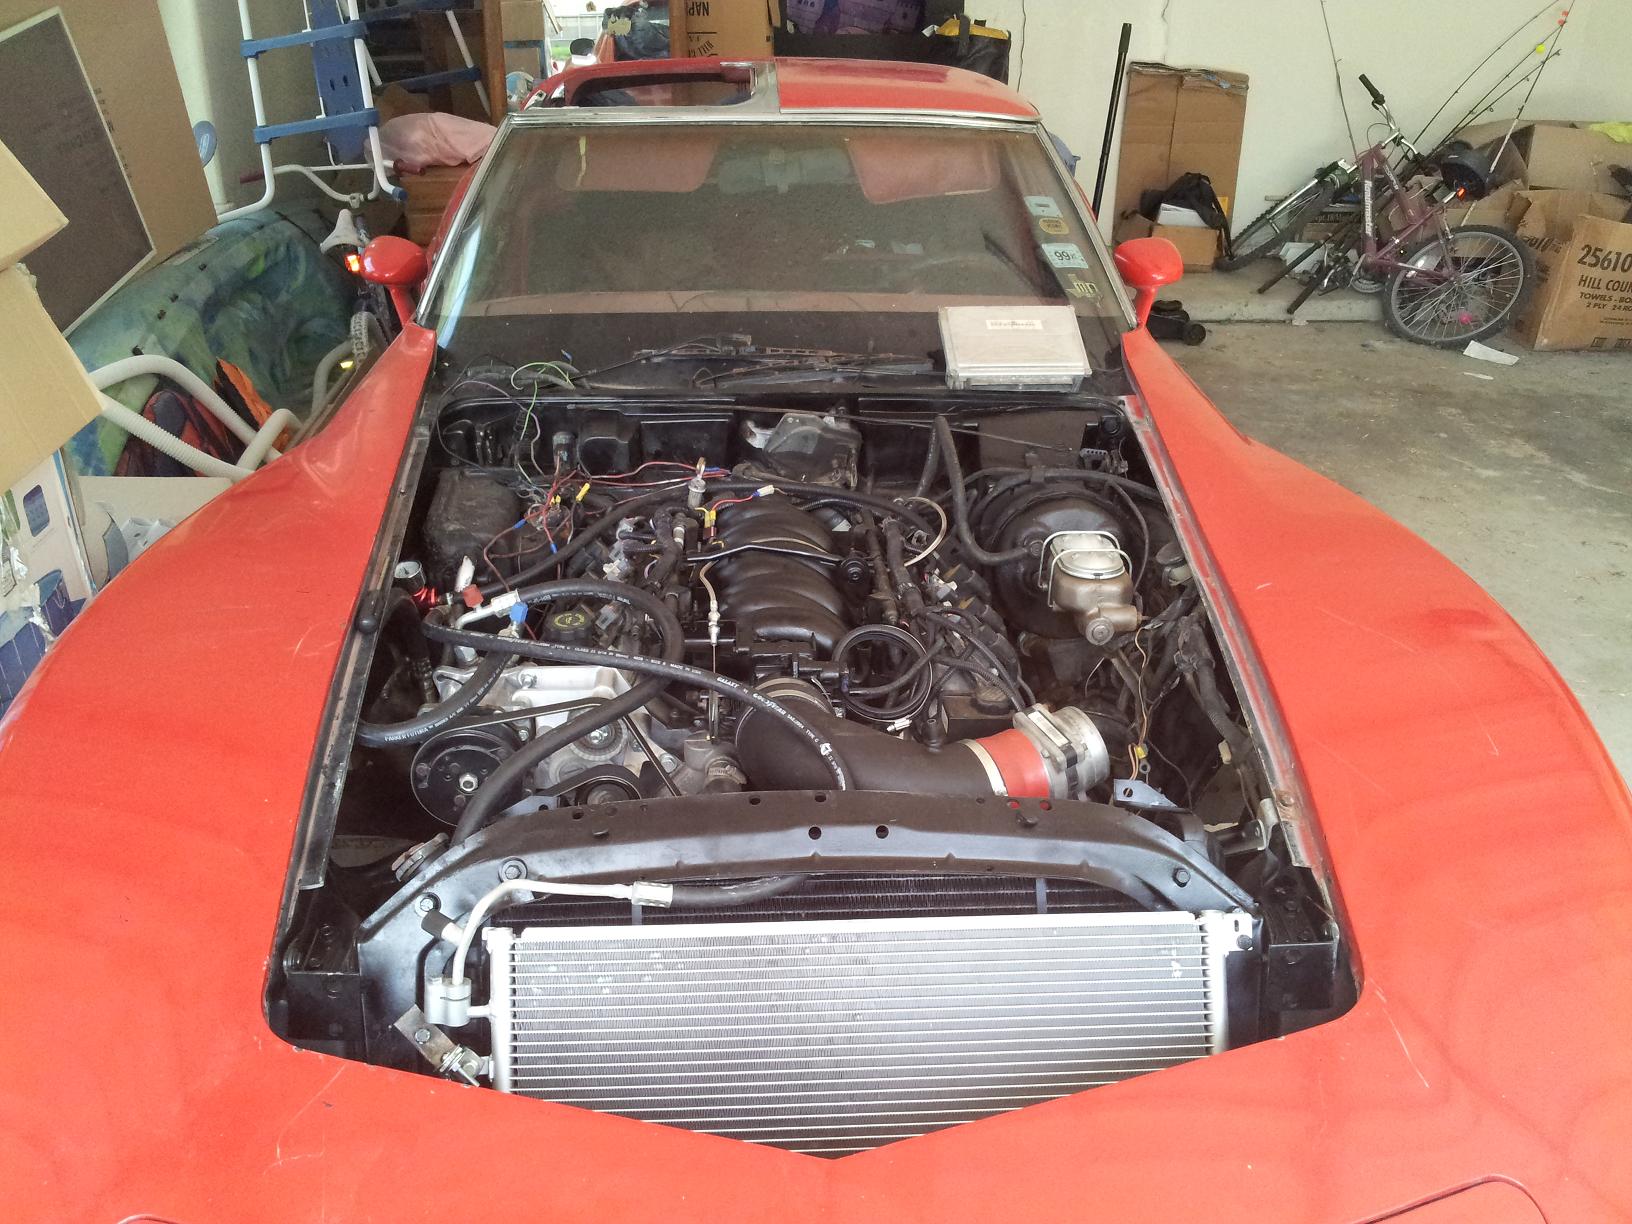
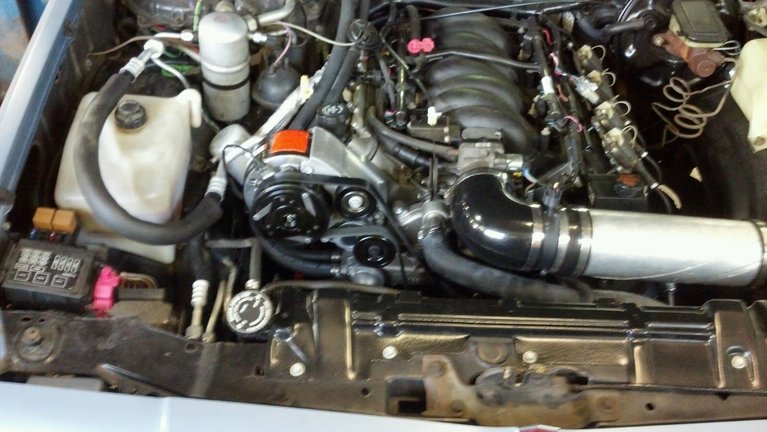
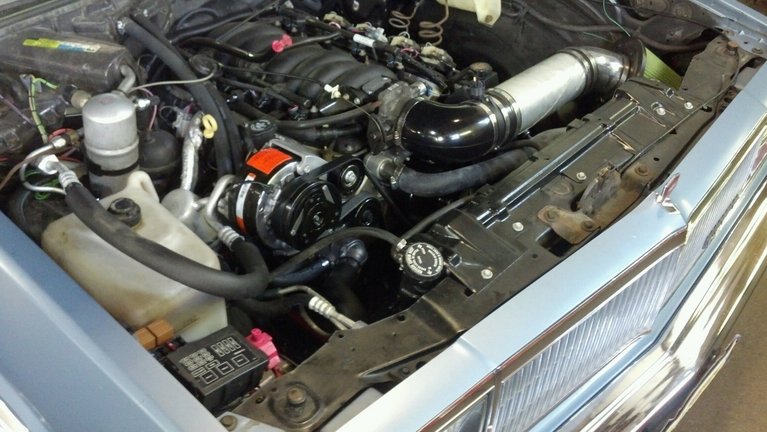
the car is a 1980 malibu 2 door(but this will work for every G-body 78-88) with factory heat/ac. i got the holley R4 bracket part number 20-133 ($130 from summit) and the install kit for the f-body/GTO accessories part number 21-2($60 from summit - comes with a spacer and hardware). the R4 compressor GM part number 88964863 (was used on TBI v8 camaros) i actually had but it runs @ $150-200. went to the U-pull it junkyard and got a condenser from an 87 cutlass($20), suction line($10) and high side line($10) - the 78-87 cutlass came with this style compressor mounted passenger side so it seemed like it was meant to be, and with a little tweaking here and there it fits great! it all bolts right in, i had to bend the line off the accumulator to get a better angle for the low-side hose. also had to bend the high side line a little (and have a high pressure switch port welded in).
i need to grab a belt tomorrow(according to my measurement it should take a 6PK2448) and modify the camaro radiator by cutting off the tabs for the factory condenser so it fits better. also need to move my trans cooler.
for the compressor control im going to wire it like it was a 2002 f-body (have the a/c request go through the pcm) so itll bump the idle up, turn on the fans, turn the compressor off @ WOT.
hope this is helpful to anyone looking to keep all this junk lol.
Last edited by lt4malibu; Aug 5, 2012 at 09:41 PM.


Staging Lane
Joined: Mar 2010
Posts: 60
Likes: 5
I did almost same thing to my 1977 C3 Corvette except I used Kwik Performance a/c bracket so that I could us new style Sanden Compressor. I did use 02 Camaro condenser with stock corvette accumulator and heater. I used custom lines (half camaro / half c3 corvette). I am using high pressure switch (port welded as well) and also sending a/c request signal to PCM in order to increase idle before a/c clicks on. I kept stock corvette HVAC controls.

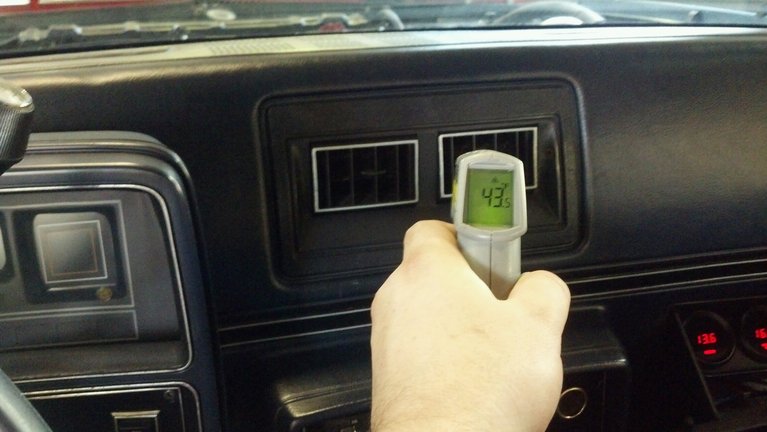
got everything wrapped up late last night, charged it up this afternoon and so far it works great. its not currently wired through the ECM im gonna try to do that this weekend(just wanted to see if it would actually blow cold air lol).

Trending Topics


everyone thats seen it says it looks factory, so i guess thats a good thing. also i think you maybe replied to my post on MalibuRacing to let you know what i ended up doing, so if you have any questions feel free to ask
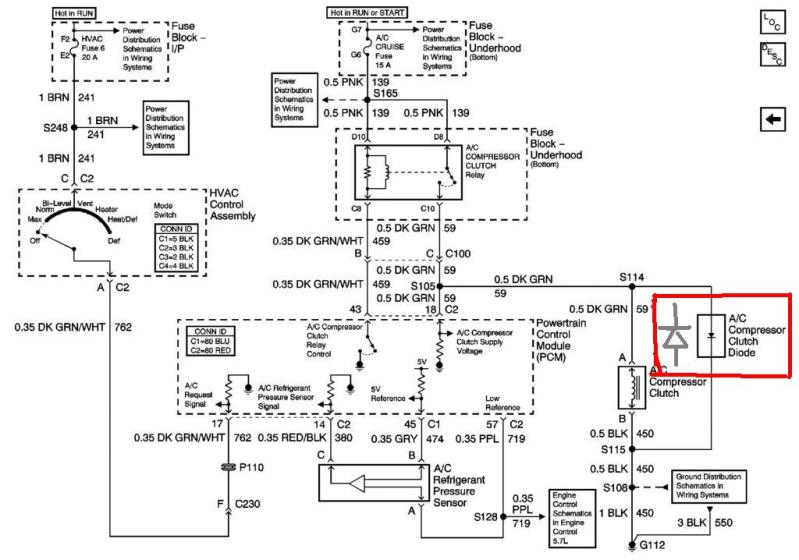
this morning i wired everything up permanently to be controlled by the ECM. basically 9 wires in a little stand-alone harness i made and tucked away since all the wiring was done 6 months ago -maybe this winter ill open it all back up and re-do it but for now its functional and not a show car by any means. the factory LS1 diagram has a diode in-line with the compressor clutch wiring so i put one it, fired it up and popped the fuse... so after some head scratching i ditched the diode and it worked fine (not sure if its the different compressor or whatever - the diode is supposed to stop voltage spiking back into the circuit). anyway, drove the car all day (it was 90* here today with high humidity) and it worked great. ECM controls everything, bumps the idle up when the compressor comes on, turns the fans on, yadda yadda yadda. overall very happy with how it works so far lol
this morning i wired everything up permanently to be controlled by the ECM. basically 9 wires in a little stand-alone harness i made and tucked away since all the wiring was done 6 months ago -maybe this winter ill open it all back up and re-do it but for now its functional and not a show car by any means. the factory LS1 diagram has a diode in-line with the compressor clutch wiring so i put one it, fired it up and popped the fuse... so after some head scratching i ditched the diode and it worked fine (not sure if its the different compressor or whatever - the diode is supposed to stop voltage spiking back into the circuit). anyway, drove the car all day (it was 90* here today with high humidity) and it worked great. ECM controls everything, bumps the idle up when the compressor comes on, turns the fans on, yadda yadda yadda. overall very happy with how it works so far lol
Last edited by lt4malibu; Aug 11, 2012 at 04:41 PM.
everyone thats seen it says it looks factory, so i guess thats a good thing. also i think you maybe replied to my post on MalibuRacing to let you know what i ended up doing, so if you have any questions feel free to ask
this morning i wired everything up permanently to be controlled by the ECM. basically 9 wires in a little stand-alone harness i made and tucked away since all the wiring was done 6 months ago -maybe this winter ill open it all back up and re-do it but for now its functional and not a show car by any means. the factory LS1 diagram has a diode in-line with the compressor clutch wiring so i put one it, fired it up and popped the fuse... so after some head scratching i ditched the diode and it worked fine (not sure if its the different compressor or whatever - the diode is supposed to stop voltage spiking back into the circuit). anyway, drove the car all day (it was 90* here today with high humidity) and it worked great. ECM controls everything, bumps the idle up when the compressor comes on, turns the fans on, yadda yadda yadda. overall very happy with how it works so far lol
this morning i wired everything up permanently to be controlled by the ECM. basically 9 wires in a little stand-alone harness i made and tucked away since all the wiring was done 6 months ago -maybe this winter ill open it all back up and re-do it but for now its functional and not a show car by any means. the factory LS1 diagram has a diode in-line with the compressor clutch wiring so i put one it, fired it up and popped the fuse... so after some head scratching i ditched the diode and it worked fine (not sure if its the different compressor or whatever - the diode is supposed to stop voltage spiking back into the circuit). anyway, drove the car all day (it was 90* here today with high humidity) and it worked great. ECM controls everything, bumps the idle up when the compressor comes on, turns the fans on, yadda yadda yadda. overall very happy with how it works so far lol

same as a camaro, control head sends a 12v signal to the ECM (a/c request) - on a G-body its the dark green wire in the 3-oin connector near the HVAC box (used to go directly to the compressor)
here's the scematic:
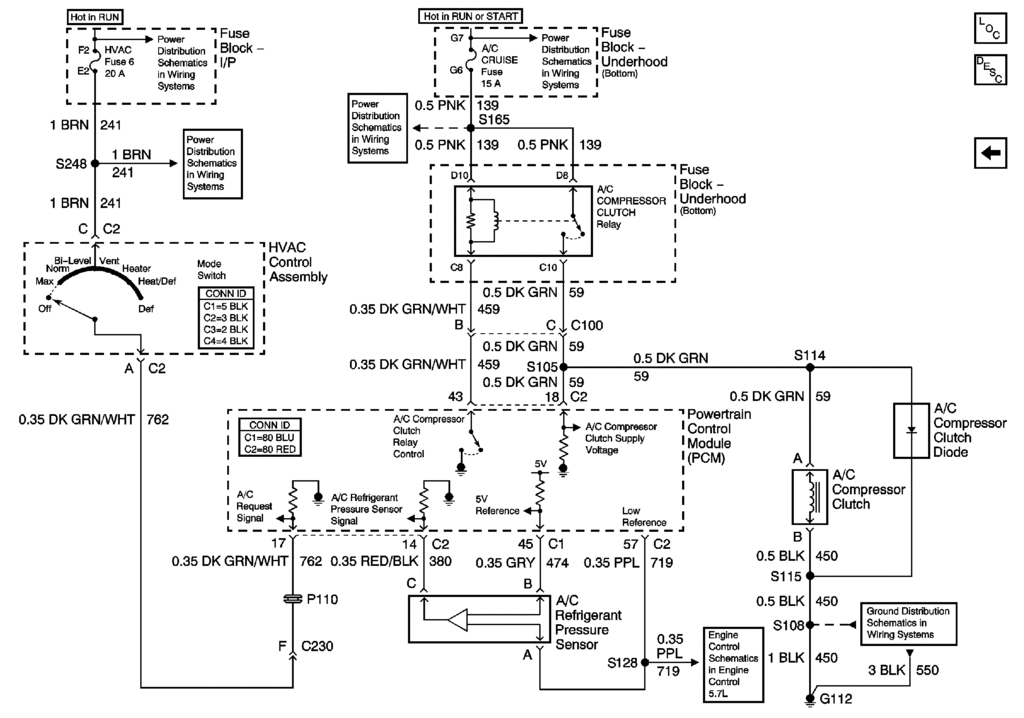
here's the scematic:

Teching In
Joined: Aug 2011
Posts: 2
Likes: 0
From: Annapolis, MD
the factory LS1 diagram has a diode in-line with the compressor clutch wiring so i put one it, fired it up and popped the fuse... so after some head scratching i ditched the diode and it worked fine (not sure if its the different compressor or whatever - the diode is supposed to stop voltage spiking back into the circuit).
The banded end of the diode (Cathode) should be wired towards the
12 volt source and the other end of the diode to ground.
Very nice install. If I undestand correctly you are using the factory Malibu high and low pressure lines?
Jon
PSI
Jon
PSI
__________________

Your Source for LSX Conversion Parts!
www.psiconversion.com
Ebay Store
Facebook/psiconversion
Instagram/psiconversion
'Dont Let EFI Pass You By!'
Your Source for LSX Conversion Parts!
www.psiconversion.com
Ebay Store
Facebook/psiconversion
Instagram/psiconversion
'Dont Let EFI Pass You By!'
Thanks for the info. Should help when I hook up the AC in the El Camino.
Jon
PSI
Jon
PSI
__________________
Your Source for LSX Conversion Parts!
www.psiconversion.com
Ebay Store
Facebook/psiconversion
Instagram/psiconversion
'Dont Let EFI Pass You By!'
Your Source for LSX Conversion Parts!
www.psiconversion.com
Ebay Store
Facebook/psiconversion
Instagram/psiconversion
'Dont Let EFI Pass You By!'