When you click on links to various merchants on this site and make a purchase, this can result in this site earning a commission. Affiliate programs and affiliations include, but are not limited to, the eBay Partner Network.
With tax season in full swing I'm getting ready to do something I've been waiting all too long to do. I'm finally ready to install a full Autometer cluster into my 99 ss. I'm honestly just tired of the performance and function, or lack-thereof, of the factory cluster, and the cheap look of it as well. I plan on running a speedo/tach/fuel level/oil pressure/ and volt gauge in the cluster, with the addition of oil temp/water temp/and boost gauge on the pillar. The goal is for it to come out clean but functional. The majority of my inspiration is coming from these 2 setups. The first coming from an old feature car out of GMHTP and another I just happened upon through searching through the forums.
I'm leaning slightly toward the GMHTP setup as I like the forward slope the gauges have more so than the straight-up, in your face, look from the other one. I pulled my bezel out to start looking at potential mounting points for the bracket and I just couldn't see how 2, 5" gauges were going to fit within the bezel. I brought it inside and started a rough mock-up with cardboard and from what I tell 5" gauges are going to be a stretch. It appears that, using the current plastic gauge cover as a point where ill have my new face lie, all I'll be able to fit in there are the 3 3/8" gauges.It just has me puzzled because I can almost guarantee that the gauges in the uppermost picture are indeed 5". I believe autometer only offers tach memory in a 5" size, so it isn't making much sense.
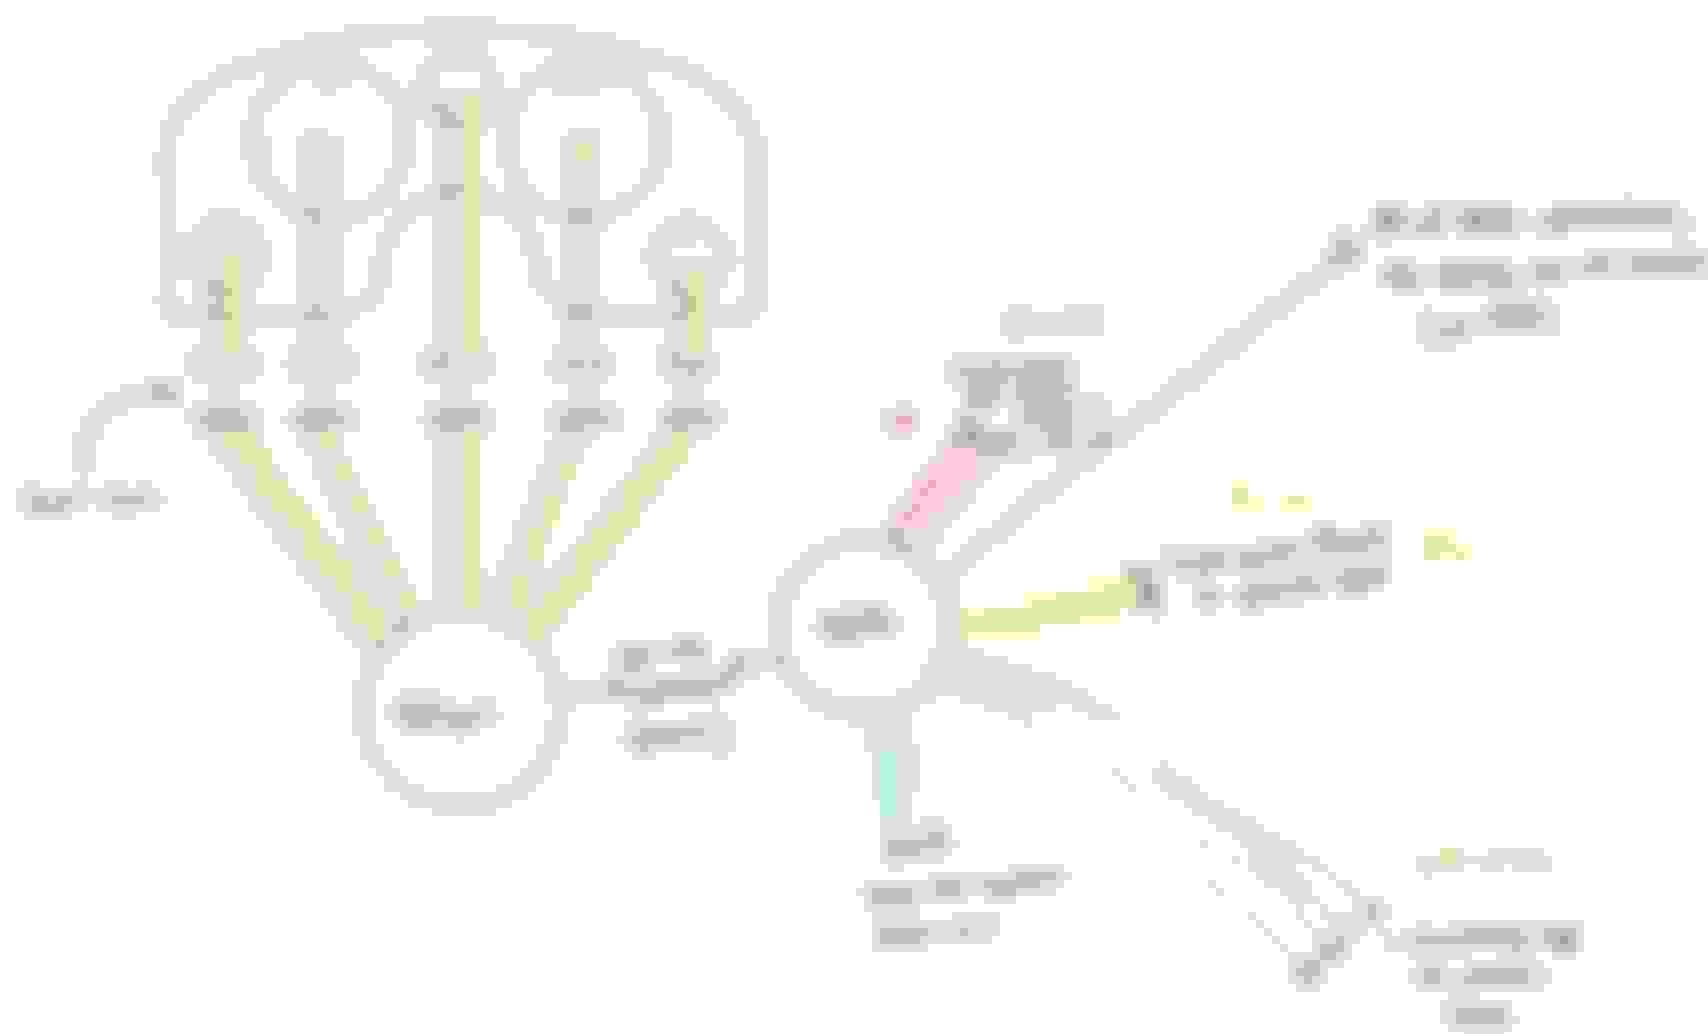
So far, 5" gauges don't appear to be feasible, but I might just be overlooking something stupid. In addition to the gauges in the cluster I plan on adding in some of the factory indicator lights, mostly for inspection purposes. These will include turn signals, highbeam/headlight, air bag, parking brake, low oil, and check engine light. And in the interest of making it all egress/digress friendly it will be wired up individually. Each gauge will be wired to its own 3/4/5 pin male connector. The female ends of these connectors will then all meet with a male 40 pin connector. The female of this 40 pin will then trail off either directly wired to the harness or will have wires with lugs that will go to distribution blocks (light dimmer/ fused ignition power/ grounds). This way the entire cluster is not only removable with a single connector, but can also be split down even further with the ability to remove single gauges from the cluster at a time.
This is acting half as a question thread and half as a build thread so feel free to ask questions or offer advise on the setup. I already have my preliminary wiring run in the car so now its just up to making a gauge bezel, mounting everything up, and running the speedo on a sine wave generator for a month or so to get the tach up to my current reading. Anyone that's built a similar setup feel free to chime in.
I didnt use the OE wiring when i did mine since I had a stand alone harness with signal wires, but I did the bulk connector to make it removable.
one thing to be mindful of is gauge depth, I had to do some trimming behind the dash to make my setup work, but I retained the glass over mine so it may not matter on yours.
Ive had a few talks with LT4vert about redoing mine honestly i want to do two large Oled screens and a center Tach/Speedo. Have everything else split on the screens
You're right, those top pics most definitely look like 5" gauges. Maybe it's because they are slanted back you gain the room for 5's. I did a cluster in my 95 and have it similar to your cardboard with 3 3/8 and 2 1/16 gauges.
Alright so while I wait for my return to direct deposit I figured that I might as well start buying up the cheaper portions of the build. It took my a little while to find ones that I would like, but I decided to use these lights for my dash lights. The only complaint some people had was saying that they could physically see the LED behind the cutout of the lights, I am going to solve this by taking apart the lights as slightly sanding the inner face so it creates a clouded image. They should be to my door in the next week or so, so ill be able to comment on the actual quality of the lights. Overall it was about $35 for all the lights, a little on the steep side, but I think it'll turn out killer when its done. I will have 2 turn signals, high beam, parking brake, engine oil, chekc engine, trunk light, and air bag.
Alright so while I wait for my return to direct deposit I figured that I might as well start buying up the cheaper portions of the build. It took my a little while to find ones that I would like, but I decided to use these lights for my dash lights. The only complaint some people had was saying that they could physically see the LED behind the cutout of the lights, I am going to solve this by taking apart the lights as slightly sanding the inner face so it creates a clouded image. They should be to my door in the next week or so, so ill be able to comment on the actual quality of the lights. Overall it was about $35 for all the lights, a little on the steep side, but I think it'll turn out killer when its done. I will have 2 turn signals, high beam, parking brake, engine oil, chekc engine, trunk light, and air bag.
Interesting, they look pretty sweet. It's kinda hard to see in my last pic, but i used some 3mm LED's that i hit with VHT night shades so they blend in, I've got a left and right turn signal(green) and high beam indicator(in red).
Alright so while I wait for my return to direct deposit I figured that I might as well start buying up the cheaper portions of the build. It took my a little while to find ones that I would like, but I decided to use these lights for my dash lights. The only complaint some people had was saying that they could physically see the LED behind the cutout of the lights, I am going to solve this by taking apart the lights as slightly sanding the inner face so it creates a clouded image. They should be to my door in the next week or so, so ill be able to comment on the actual quality of the lights. Overall it was about $35 for all the lights, a little on the steep side, but I think it'll turn out killer when its done. I will have 2 turn signals, high beam, parking brake, engine oil, chekc engine, trunk light, and air bag.
^ thats actually not that expensive for what you are getting. Mind posting the link though? I maight be interested in those for my setup
Originally Posted by jaxcam02
can you PM me a link where you found these?
They are both on the fleabay, I got them from a supplier in Hong Kong, delivery time has been slow, but I think it'll be worth it. Just search for "12V dash warning lights" and they should pop up with this picture. Search around and you can find them for under $4 a light with around 3-4 weeks shipping time.
Just got some of the lights in today and mocked them up where they might end up going. The quality of these lights is actually not terrible for the price. They are metal housings with a plastic light threaded into them. They come with about 7" of wire and seem to light well. They had to ship with 2 packages for some reason so I have 3 more lights coming in the mail. I rigged up an iPhone charger and an old micro usb cord to test them all, they led is slightly noticeable but I don't think I'm even going to modify them at all unless they are annoying in the car. Here's a few pictures to get the idea across
Last edited by GtoProject; 04-13-2018 at 07:34 AM.
Gauge layout and lights look good, buuuut can we talk about what appears to be an LS as a coffee table?!?!?!
The coffee table is another on-going project that is nearing completion. It all started when my 5.7 finally gave up on itself and ruined the block. I turned the block and 4 pistons/rods in to my initial table with a piece of 3/8 tempered glass I found at a goodwill. I took it to my first apartment in college where it stayed as is for a while. Then when I took the opportunity to build a boost ready iron 408, I ended up buying an entire truck so I could pull anything I needed from it. I had coils, heads, covers and all laying around for while and decided to do some table upgrades recently. I blasted everything first. Then I wire brushed the heads to get a good sheen on them again, and I painted the covers. I found the shorty headers super cheap as blems and everything else just got cleaned up. Im still scheming around trying to find a super cheap carb intake because when I tried an old ls1 intake it just sat way too high. Other than that its pretty much done. It could probably use a larger piece of glass now as well
Last edited by GtoProject; 04-13-2018 at 07:16 AM.
gauge layout looks good two! I sometimes wish I had brought mine closer (part of the reason im redoing it sometime) but what I want to do will eliminant the constraints of the opening of the bezel forcing the guage size. i want a floating pod that rests in the bezel but appears un attached on the face of it.
 03-28-2018, 03:45 PM