My Custom Air Suspension Install - 99 Trans Am

 05-29-2009, 08:22 PM
#42
Well, I figured out why I wasn't getting full extension in the front. The 12v pump/gauge I was using is a piece a crap and reads way too high. My home compressor will lift the front of the car from 23" to 26", but I knew it didn't get very high pressure. Sure enough, it only does 100 psi. So something is way off. 100 psi in the bags, verified with a digital gauge, was reading 145 psi on my 12v compressor. So no way was I at 180 the other day.
Now then, I bet I can get full extension with less than 140psi. I just don't have a pump that can go that high. Any sugestions on a cheap way to get it that high at least once to verify?
Now then, I bet I can get full extension with less than 140psi. I just don't have a pump that can go that high. Any sugestions on a cheap way to get it that high at least once to verify?
 05-29-2009, 10:28 PM
#43

I bought a $60 Slime pump, the 3 minute one, and a higher digital pressure gauge.
At a true 160psi the front fender went from:
23" to 28.25" = 5.25"
That's much better. Even though the shock travel is about 3.5" you have to keep in mind that the bumpstop reduces that a little. So 160psi gives me 3" travel at the shock. More pressure might squeeze out a little more, but I'm pretty happy with what I'm getting right now.
Last edited by JasonWW; 05-29-2009 at 10:33 PM.
06-01-2009, 02:58 AM
#45
Time for some "out of the box" thinking. Forget everything you know about traditional air systems.
Because of the stiffness of my shocks, my car does not want to pop up quick like other vehicles. So I'm thinking of running a 150psi storage tank, instead of 200, and maybe some toggle valves. If it's going to be slow to lift, why not save some money.
I also have an idea to not use pressure guages. Who really cares what pressure the bags are at? It's irrelavant. All I care about is dropping it way low and then getting it back up to ride height. You don't have to have gauges for that.
I'm thinking I'll park the car, flip 2 toggle switches down (car slowly drops). When I get back in, hit the same 2 toggles the other direction and hold it until the car stops lifting. Then I'm good to go. Very simple, fast and I don't have to look down at any gauges.
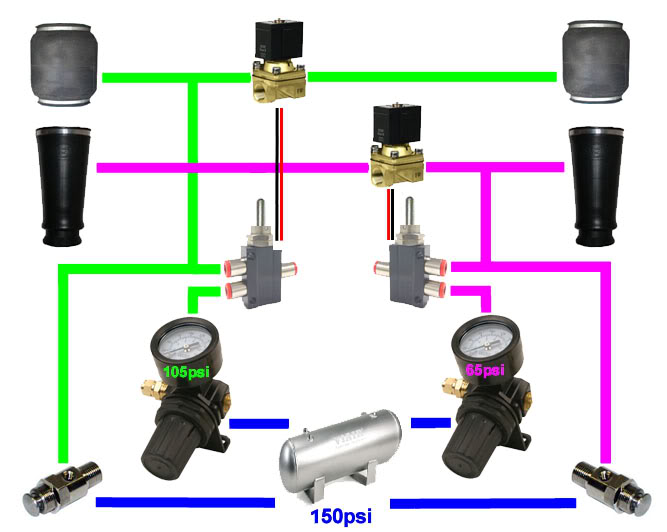
The key to this would be to run two air compressor pressure regulators and 2 cheap electric valves. One electric valve will connect the 2 front bags only when I flip the toggle up or down. That way both bags will move at the same time, but they will not share pressure when driving. I'll install a pressure regulator set at about 105psi for the front line and the other at about 65psi for the rear. Those will be my ride height pressures. These regulators run less than $25ea.
Then I can have a button that will run a tank feed (150psi) to the front bags and another button for the rears for those special occasions when I need to lift the front or rear above ride height.
What do you think?
Dang, I just remembered that the push buttons don't have elecrecal connectors in them. I may have to use toggle switches instead.
Because of the stiffness of my shocks, my car does not want to pop up quick like other vehicles. So I'm thinking of running a 150psi storage tank, instead of 200, and maybe some toggle valves. If it's going to be slow to lift, why not save some money.
I also have an idea to not use pressure guages. Who really cares what pressure the bags are at? It's irrelavant. All I care about is dropping it way low and then getting it back up to ride height. You don't have to have gauges for that.
I'm thinking I'll park the car, flip 2 toggle switches down (car slowly drops). When I get back in, hit the same 2 toggles the other direction and hold it until the car stops lifting. Then I'm good to go. Very simple, fast and I don't have to look down at any gauges.
The key to this would be to run two air compressor pressure regulators and 2 cheap electric valves. One electric valve will connect the 2 front bags only when I flip the toggle up or down. That way both bags will move at the same time, but they will not share pressure when driving. I'll install a pressure regulator set at about 105psi for the front line and the other at about 65psi for the rear. Those will be my ride height pressures. These regulators run less than $25ea.
Then I can have a button that will run a tank feed (150psi) to the front bags and another button for the rears for those special occasions when I need to lift the front or rear above ride height.
What do you think?
Dang, I just remembered that the push buttons don't have elecrecal connectors in them. I may have to use toggle switches instead.
Last edited by JasonWW; 06-01-2009 at 03:10 AM.
06-02-2009, 04:39 AM
#48
Here's an updated layout.
I tried out a Husky regulator from Home Depot ($20)
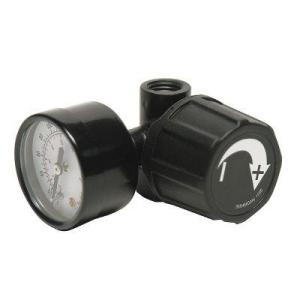
to see that if I set it for a specific pressure/ride height, released the pressure and then reapplied air if the car would return to the same ride height. Sure enough, it worked. The only problem with the Husky unit is that the **** is easily bumped and does not lock into position. I'm returning it and will replace it with one that can be locked into position. I really don't even need a guage on it. I just lower the car and then turn the **** until it lifts to the correct ride height.
Now the only real question is whether the regulator will stay consistant and not vary over time or in different temperatures. A regulator with a very accurate adjustment **** would also be a plus.
I'm also thinking I need to replace the 90 fittings on the front bags with a straight fitting and run a braided line from the bag to the frame and then run hard line. I don't trust that nylon being flexed all the time.
I tried out a Husky regulator from Home Depot ($20)
to see that if I set it for a specific pressure/ride height, released the pressure and then reapplied air if the car would return to the same ride height. Sure enough, it worked.
The only problem with the Husky unit is that the **** is easily bumped and does not lock into position. I'm returning it and will replace it with one that can be locked into position. I really don't even need a guage on it. I just lower the car and then turn the **** until it lifts to the correct ride height.Now the only real question is whether the regulator will stay consistant and not vary over time or in different temperatures. A regulator with a very accurate adjustment **** would also be a plus.
I'm also thinking I need to replace the 90 fittings on the front bags with a straight fitting and run a braided line from the bag to the frame and then run hard line. I don't trust that nylon being flexed all the time.
Last edited by JasonWW; 06-02-2009 at 09:22 AM.
06-02-2009, 07:49 AM
#50
Hey, what fittings would I need to to go from the 1/4npt bags up front, through 1.5" of braided line to a hard line? I can't figure out this AN fitting stuff. I guess -6 line would work for me.
Last edited by JasonWW; 06-02-2009 at 09:20 AM.
06-02-2009, 07:54 AM
#51
I think I would need 2 of these to go into the bags.
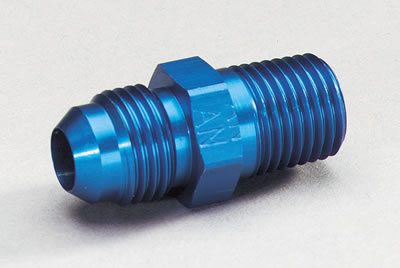
Fitting, Adapter, Straight, Male -6 AN to Male 1/4 in. NPT
2 preassembled hoses

Hose, Braided Stainless Steel, -6 AN Female End, Blue/-6 AN Female End, Blue, 18 in. Length
Then get 2 of these. I can screw my push connectors into these.
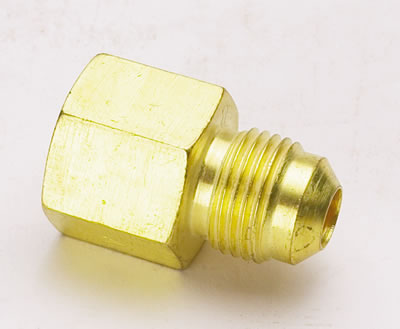
Fitting, Straight, -6 AN Male to 1/4 in. NPT Female
Fitting, Adapter, Straight, Male -6 AN to Male 1/4 in. NPT
2 preassembled hoses
Hose, Braided Stainless Steel, -6 AN Female End, Blue/-6 AN Female End, Blue, 18 in. Length
Then get 2 of these. I can screw my push connectors into these.
Fitting, Straight, -6 AN Male to 1/4 in. NPT Female
Last edited by JasonWW; 06-02-2009 at 08:24 AM.
06-03-2009, 01:21 AM
#53
I was talking to Zack Ratcliff of Universal Air Suspension earlier when I thought there was an issue with their front bags not lifting the car. That turned out to be a non-issue. Here's what he said about my setup:
I had a look through your thread and a few things you may want to consider.
For the upper bag mounts, you will want to put 2 bolt holes in there to secure the bags to them. If the bag moves too far off that plate you will rip the inside of the bags.
For your plumbing ideas with the electric valve between them. Every Pilot operated (diaphragm) and direct acting valve that I have seen all require a higher pressure before the valve then after the valve. Now, there is a type of valve out, called a spool valve that will not require a pressure differential, but typically those are very low pressure valves. So if you were to put them inline like your planning, it will stop the air from going from the left side to the right when you close it, but, it will allow for the air to go from the right side to the left around a corner. Now, you can get around this by putting in 2 valves, going out to each valve, so then you can lift the car up, and then close the valves, and then you will want to put a little more psi up again with the manual valve so that way its a higher pressure before the valve. that way when you hit a large bump, and the psi spikes, it won't push through the valve and get trapped between the manual valve and the electric valve. Then when you release the air out of the manual valve, it will flow backwards through the valve because you will now have a higher psi after the valve, then before it and the car will drop.
How is your rear bags looking when its lifted/dropped. Something to keep in mind when your working with a sleeve bag, if your putting to much of an angle on them, it will cause the bags to wear one side allot more then if its straight up and down. Also, it looks like your more of a performance oriented customer. A sleeve bag will give you the lowest spring rate vs.. a single bellow, or a double bellow bag would. I know that you already have all of your mounts done, but something to entertain next time, our double play bags will give you 8" of travel with a 3" collapsed height, or our air house 2 will give 6" of travel with a 2" collapsed height.
Personally I always like to run the higher pressure, that way when you go to lift it up, you don't have to wait for a refill if you want to go upto a higher height. If your at say 150 psi in your tank, and you need to exit a very bad drive way, you would need to say go from layed out to 105 (depending on your air volume, will determine the amount of psi drop) and then say the compressors kits on, and runs and you will have to hold your switch down in order to hit your 150 inside the bag when the compressors kick off. Now, if your at say 105 in the bag with 150 in the tank, and you need to go to 150. when you hit the switch, you may only be able to get 130 in the bag, and it might not be low enough to kick the compressor on. So you would have to lift/drop say the back to get them to kick on, and then you can lift it the rest of the way. If you had 200 in the tank, it would ensure that your always able to hit the 150 with out worrying if the compressor would kick on because the psi switch turns the compressors back on at 165-200.
The down side to running 200 is that you have to make sure that your other components can handle the pressure. If you go with the manual valve, you may run into issues with those. If you regulate it down, you may run into an issue if the regulator can handle the pressure. With trying to piece together different components you will really want to do your research on those individual components to make sure that they can handle what we are putting them under.
Zack Ratcliff
Universal Air Suspension
800-864-2470 x 114
909-495-1350 Fax
Zack@UniversalAirSuspension.com
06-03-2009, 01:36 AM
#54
I'm not quite sure how I can add some mounting holes to the upper plates without taking everything apart. I don't really want to do that.
Well, I guess I can take my time and make some new top mounts from scratch. Have Ekstensive laser cut the small and larger plates and then I'll add the pipe extension between the 2 and do a nicer welding job. Now that I've built them once, I've thought up a few design improvements I can implement.
I was also able to get a PDF file for the Velvac 032228 Air-Electric Toggle Valve I was wanting to use. It turns out it is a full pressure or no pressure only switch, so I can't use it. I'm going to have to rethink my plans completely.
I still like the dual regulator idea for ride height lifting.
Last edited by JasonWW; 06-03-2009 at 03:52 AM.
06-04-2009, 06:08 PM
#56
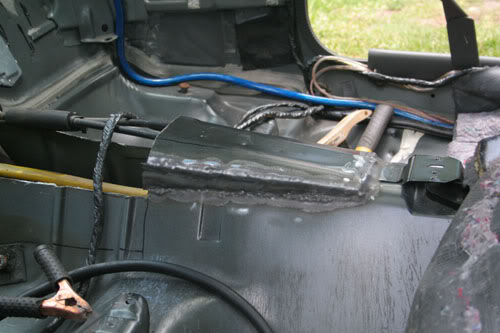
Here's something you don't see everyday.
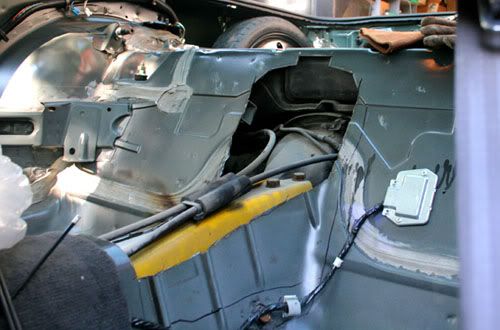
Here's my biggiest issue. The parking brake bracket.
Now Kenny just removed his, but he's running an automatic. I'm running a 6 speed, so I have to keep it. I just don't want to raise the trans tunnel to the point that the center console doesn't fit right.
Here's my biggiest issue. The parking brake bracket.
Now Kenny just removed his, but he's running an automatic. I'm running a 6 speed, so I have to keep it. I just don't want to raise the trans tunnel to the point that the center console doesn't fit right.
06-05-2009, 12:10 AM
#58
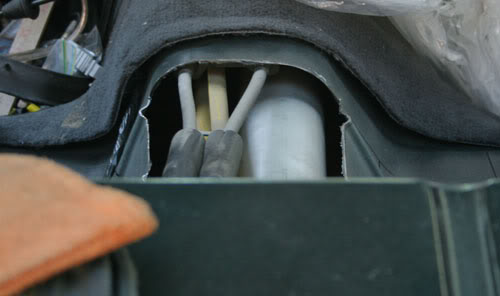
If you trim the bottom of the console, you'll cut into the molded drink holders in the back. Won't you? I think I'm going to lift the back of the console some (tilt it) and you won't be able to tell.
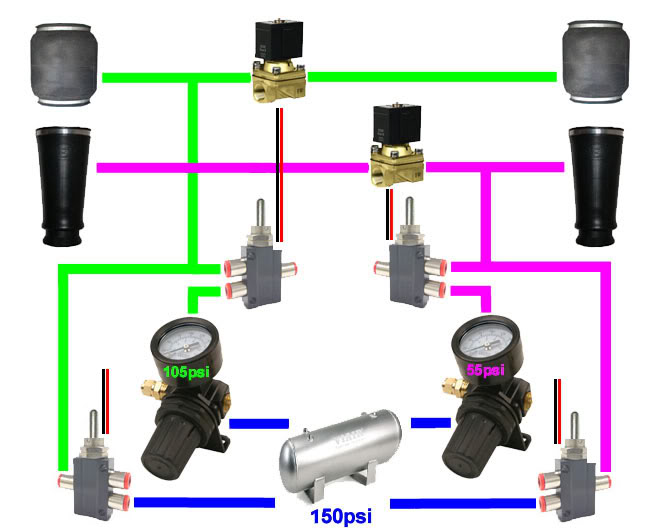
I'll probably run a setup like this:
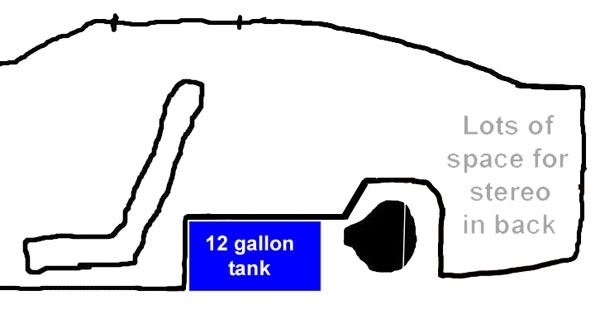
With a single 12 gallon tank on one side and an air tank and battery on the other. Then I can enlarge the rear storage well for stereo stuff. Nothing is set in stone, but thats my general thinking at the moment. I wish I had the money to do the IRS swap right now so I can kill 2 birds with 1 stone, but I'm stuck. Oh well, this will keep me busy for a while.
I'll probably run a setup like this:
With a single 12 gallon tank on one side and an air tank and battery on the other. Then I can enlarge the rear storage well for stereo stuff. Nothing is set in stone, but thats my general thinking at the moment. I wish I had the money to do the IRS swap right now so I can kill 2 birds with 1 stone, but I'm stuck. Oh well, this will keep me busy for a while.
06-05-2009, 01:48 PM
#59
I'm going to redesign the front upper bag mounts. I'm going the flip the bag over and run a 90* fitting on top as well as bolt the bag to the top mount only. The 1/2" line doesn't bend tight enough to avoid the upper arm, so I'll swap over to 3/8" or 1/4". This way the fitting and line will not move with the suspension.