


How does this pinion angle look
Finally pretty much done with my 9" and full rear suspension install

I set the pinion angle to be parallel to the drive shaft angle, per the instructions I got from talking to UMI. The angles are parallel as measured at the flat spot on the bottom of where the torque arm mounts to the rear and the DS near the rear end.
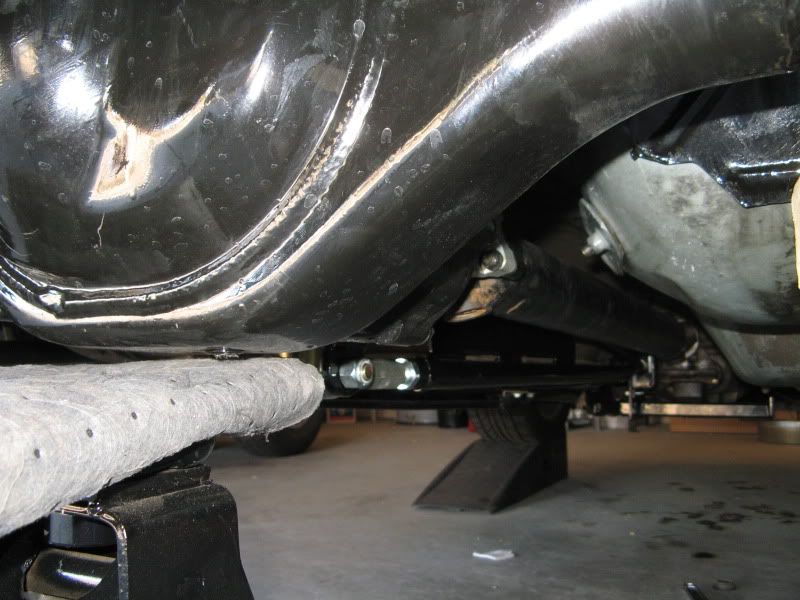
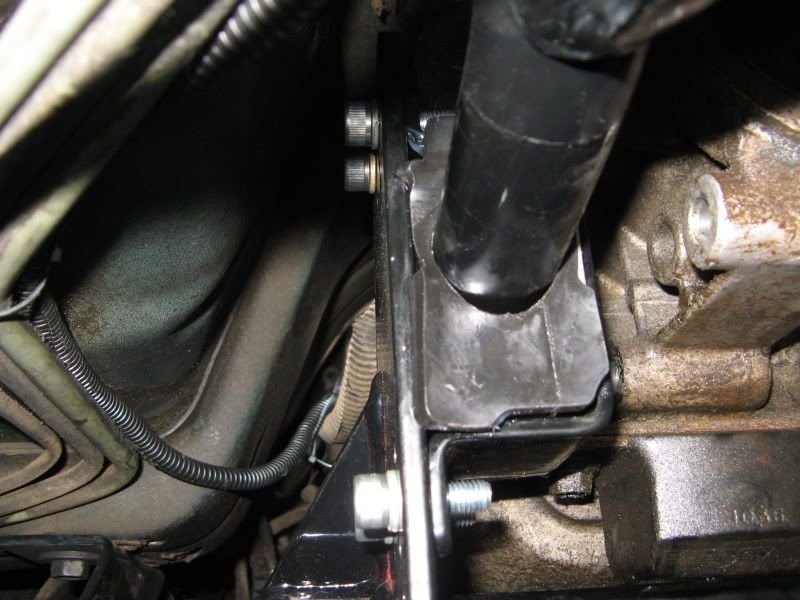
It seems to drive fine but the front of the torque arm seems to be pushing up on its poly mount pretty hard, as seen here:
I have the reloaction bracket set in the holes that are third up from the bottom, which is what UMI also suggested.
So does this look okay? Am I doing something wrong?
I set the pinion angle to be parallel to the drive shaft angle, per the instructions I got from talking to UMI. The angles are parallel as measured at the flat spot on the bottom of where the torque arm mounts to the rear and the DS near the rear end.
It seems to drive fine but the front of the torque arm seems to be pushing up on its poly mount pretty hard, as seen here:
I have the reloaction bracket set in the holes that are third up from the bottom, which is what UMI also suggested.
So does this look okay? Am I doing something wrong?
Is the frt of the t arm nose up ,down or neut. in the front mount ? I have mine nose up alittle in the frt. mount and then basically neut, or zero with the drive shaft on the rear. You could raise it up one hole in the front. Looks good in the rear. I think of the torque arm like the rear control arms you want it at a small positive angle in the front mount and a zero or neg 1 degree down in the rear.
Hey Valkyn. Thanks for choosing UMI. Your driveline looks pretty awesome. I liked the pic of everything bolted together on the floor.
Denny's Driveshaft? Good choice.
Who built your 9"?
As you add poly bushings, etc. you can minimize pinion angle as you've done. Rubber bushings need a degree difference so everything goes to zero under acceleration.
You should be good to go on the rear as you have it set. If you get any wheel hop or other weird issues, you can put it a degree nose down.
Agree with 1lejohn, if you can move your biscuit up a hole, go for it. Were the pics taken with the suspension fully loaded? Raising the nose a bit, or at least relieving the pressure, will add a bit more instant center which will help forward traction.
Your relo brackets sound fine. Once again, if you need more forward traction you can lower the arms a hole, then try.
Let me know how it looks after you move the front up a hole.
Did you like how it felt with the new suspension and rear?
ramey
Hey Ramey...Was it you I talked to about setting the pinion angle?
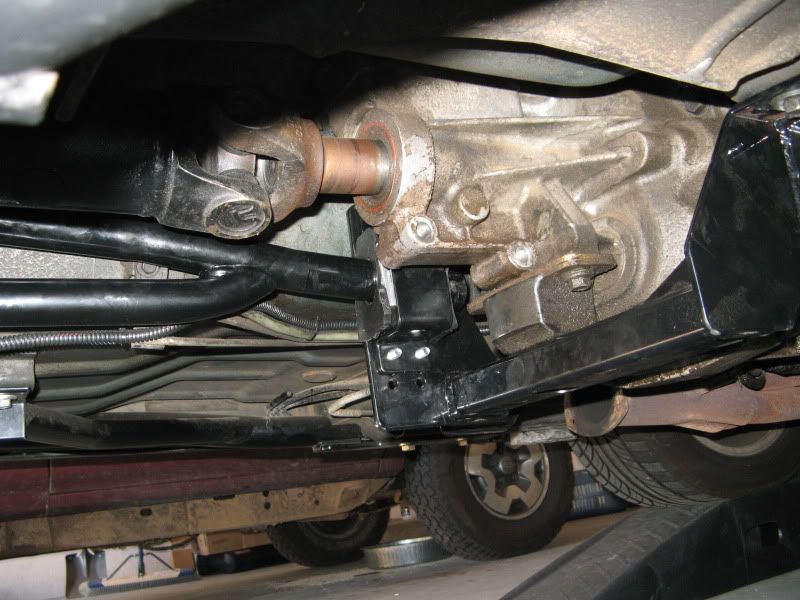
Yeah its a Denny's DS...I figured that nothing else on the car was light so I might as well go for a bullet proof setup. I bought a moser housing and axle package and had the center section setup at a local shop and did the rest myself. The POR-15 paint came out great.
The pictures are taken with the suspenion fully loaded...heres a pic:
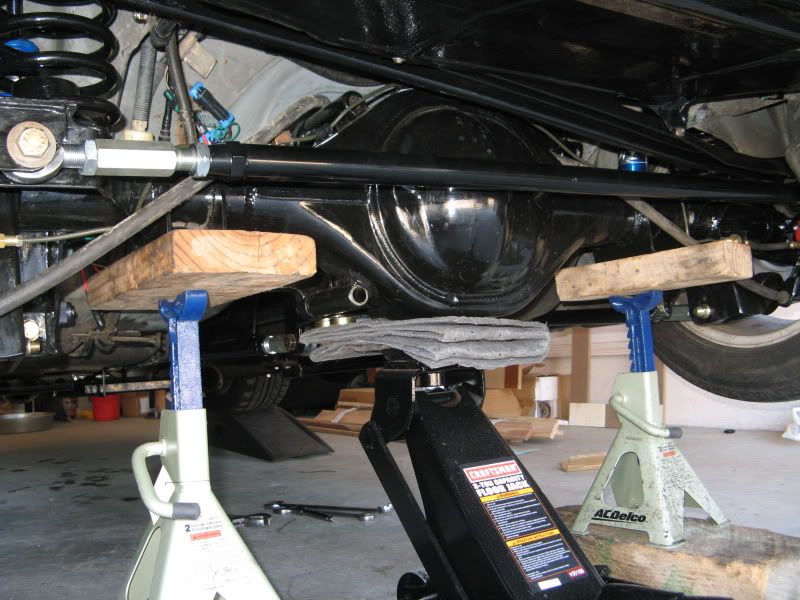
The jack is just there for safety...all the weight is on the jack stands.
It feels good on the street so far. The spool makes it abit interesting on low speed corners but feels very solid.
Maybe you could tell me how to set the drag sway bar? I have the links connected but not tightened...How tight should each side be?
Yeah its a Denny's DS...I figured that nothing else on the car was light so I might as well go for a bullet proof setup. I bought a moser housing and axle package and had the center section setup at a local shop and did the rest myself. The POR-15 paint came out great.
The pictures are taken with the suspenion fully loaded...heres a pic:
The jack is just there for safety...all the weight is on the jack stands.
It feels good on the street so far. The spool makes it abit interesting on low speed corners but feels very solid.
Maybe you could tell me how to set the drag sway bar? I have the links connected but not tightened...How tight should each side be?
Last edited by Valkyn; Jan 8, 2012 at 08:27 PM. Reason: asdfas
If you have the same UMI torque arm as the one above yours is upside down cause OPs is right Lol Otherwise its probably the difference in companies. Some have the top bar coming down and some have the bottom bar coming up.
Trending Topics
LS1 Tech Stories
The Best V8 Stories One Small Block at Time

Gas Monkey Built a 6-Wheel Ferrari Testarossa With a Corvette LT4 Engine
Verdad Gallardo
7 Most Reliable High-Performance Engines GM Has Ever Built
Verdad Gallardo
Amazing '71 Camaro Restomod Is Modern Muscle Car Under the Skin
Verdad Gallardo
6 Common C5 Corvette Failures and What's Involved In Repairing Them
Pouria Savadkouei
Retro Modern Bandit Pontiac Trans AM Comes With Burt Reynolds' Autograph
Verdad Gallardo
Top 10 Greatest Cadillac V Series Performance Models Ever, Ranked
Pouria Savadkouei
Top 10 Most Powerful Chevy Trucks Ever Made!

Hennessey's New Supercharged Silverado ZR2 Has 700 HP
Verdad Gallardo
Coachbuilt N2A Anteros Is an LS2-Powered C6 Corvette In Italian Clothes
Verdad Gallardo Ours should have the solid tube up and the "butted" tube down. Also, turnbuckle down. And yes, different manufacturers can be different.
For the drag bar, at ride height with driver in car, the end links should be set neutral. From an engineering standpoint it's best to minimize the number of turns out so the maximum threads engage in the adjusters. Basically if one end link is installed and the jam nuts tightened, the other end should slip right on when everything is neutral. If the car leaves crooked, one way or the other, you can preload the bar. If the car darts right on launch, lengthen the passenger side endlink one turn then repeat the test. This testing may require multiple evenings at the dragstrip...
ramey
Hey Valkyn.
There is really no particular negative effect to running the bars in the lowest hole on a mid powered street car other than potential roll steer. If you use them in a handling application (i.e. autocross, road race, etc) it can make the car oversteer a bit. Lower trailing arms parallel to the ground at ride height tend to minimize roll steer.
Also, as you increase power and traction, having the bars at the lowest holes can make the car hit too hard on launch and potentially unload the rear tires.
Let me know your thoughts.
ramey
Thanks, I guess ill keep them where they are at for now. Will just have to drive it more and see how it feels.
I have a boost ready 385 engine waiting to go in with an F1A procharger when I get the money, so other than tweaking the settings abit I think the rear end and suspension are all ready for the power.
I have a boost ready 385 engine waiting to go in with an F1A procharger when I get the money, so other than tweaking the settings abit I think the rear end and suspension are all ready for the power.
I'm liking the sounds of this project. Agree, you have an awesome suspension baseline and it appears you've done your homework. Let's keep this thread going with how your car is driving and we'll get it perfected. Then you can add boost. Yes!
ramey
ramey
In the mean time I have an NX kit thats going in too lol...multiple stage project.
Would you recommend raising the LCAs up one hole to get them closer to parallel? I don't autox or anything, just street driving and track duty.
Thinking raising them a hole might relieve some of the stress on the poly mount in front also..
Would you recommend raising the LCAs up one hole to get them closer to parallel? I don't autox or anything, just street driving and track duty.
Thinking raising them a hole might relieve some of the stress on the poly mount in front also..
Hi valkyn.
If you don't have forward traction trouble now, it wouldn't hurt to raise them so they're closer to parallel. If you end up with too much wheelspin or wheel hop you can always lower them back down. I think up a hole would be worth a try.
Do you have holes available on the front mount?
ramey
If you don't have forward traction trouble now, it wouldn't hurt to raise them so they're closer to parallel. If you end up with too much wheelspin or wheel hop you can always lower them back down. I think up a hole would be worth a try.
Do you have holes available on the front mount?
ramey
Hi Valkyn.
LCA's should not affect pinion angle. Moving the front mount up a hole would usually change it but since it's in a bind, it might not.
I would still check the pinion angle afterward and make sure it doesn't go past zero to the plus side. It should always have at least some pinion angle in it with everything at ride height so that under load it never goes positive.
Let me know what you find.
ramey
Alright I moved the LCAs up a hole and moved the clam shell at the front up to the top holes. The front seems to be in less of a bind now.
Moving the front moved the pinion angle up abit, so I readjusted it. Set it with the pinion about half of a degree negative of the drive shaft.
With the suspension loaded the LCAs are right around parallel to the ground, my digital angle finder said they were 2* up in the rear. Would I be better off going back to the bottom hole?
Hey Valkyn. I took another look at your pics and just realized the little aluminum square on your trans mount needs moved from right to left. That's whats squishing your bushing into a funny shape.
As for the trailing arms, they should be pointing downward toward the rear when the suspension is loaded. With a fabricated 9" and there not being an industry standard for those adjustment holes, just do whatever you need to in order for the arms to be pointed down toward the rear. We have a ton of customers who automatically use the bottom hole on our relocation brackets with great traction and no troubles. I'd say the bottom holes would be fine.
Let me know how the plate swap makes it look. I have a feeling it's going to be better.
ramey
Last edited by UMI Sales; Jan 11, 2012 at 08:26 AM. Reason: added info
Hey Valkyn.
There is really no particular negative effect to running the bars in the lowest hole on a mid powered street car other than potential roll steer. If you use them in a handling application (i.e. autocross, road race, etc) it can make the car oversteer a bit. Lower trailing arms parallel to the ground at ride height tend to minimize roll steer.
Also, as you increase power and traction, having the bars at the lowest holes can make the car hit too hard on launch and potentially unload the rear tires.
Let me know your thoughts.
ramey
There is really no particular negative effect to running the bars in the lowest hole on a mid powered street car other than potential roll steer. If you use them in a handling application (i.e. autocross, road race, etc) it can make the car oversteer a bit. Lower trailing arms parallel to the ground at ride height tend to minimize roll steer.
Also, as you increase power and traction, having the bars at the lowest holes can make the car hit too hard on launch and potentially unload the rear tires.
Let me know your thoughts.
ramey
We have cut 1.4's 60's with the stock rear bar in place. The car launches straight but twists bad if the frt bar is removed. Trying to hook on 18" drag radials now. So ording one soon.