Suspension & Brakes Springs | Shocks | Handling | Rotors

MWC anti rollbar pics

Thread Tools
 
Search this Thread
 
Old 10-30-2016, 02:15 PM
  #21  
11 Second Club
iTrader: (107)
 
tnmotown's Avatar
 
Join Date: Aug 2007
Location: Cali
Posts: 1,459
Received 24 Likes on 16 Posts

Default

Any else with installed pics of the bolt-on version?

I got my MWC ARB the other day and no instructions. Just want to make sure I'm doing it right.
Old 10-31-2016, 08:40 AM
  #22  
LS1Tech Premium Sponsor
iTrader: (5)
 
MidwestChassis's Avatar
 
Join Date: Feb 2010
Posts: 1,506
Likes: 0
Received 1 Like on 1 Post
Default

Which version do you have weld on or bolt on?
Old 10-31-2016, 10:24 AM
  #23  
TECH Fanatic
iTrader: (1)
 
MidwestChassis2's Avatar
 
Join Date: Jan 2015
Posts: 1,504
Received 38 Likes on 37 Posts
Default

Originally Posted by Vicious95Z28
Anyone have any experience with one of these on an 8.8?
Housing doesn't matter with our bent style ARB. If you do not have weld on swaybar brackets you will just need to purchase a set with your order.
Old 10-31-2016, 10:26 AM
  #24  
TECH Fanatic
iTrader: (1)
 
MidwestChassis2's Avatar
 
Join Date: Jan 2015
Posts: 1,504
Received 38 Likes on 37 Posts
Default

Originally Posted by tnmotown
Any else with installed pics of the bolt-on version?

I got my MWC ARB the other day and no instructions. Just want to make sure I'm doing it right.
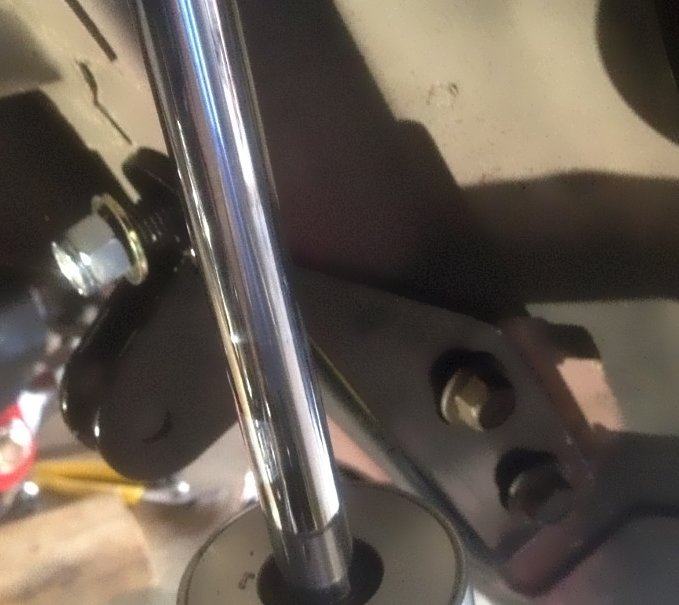
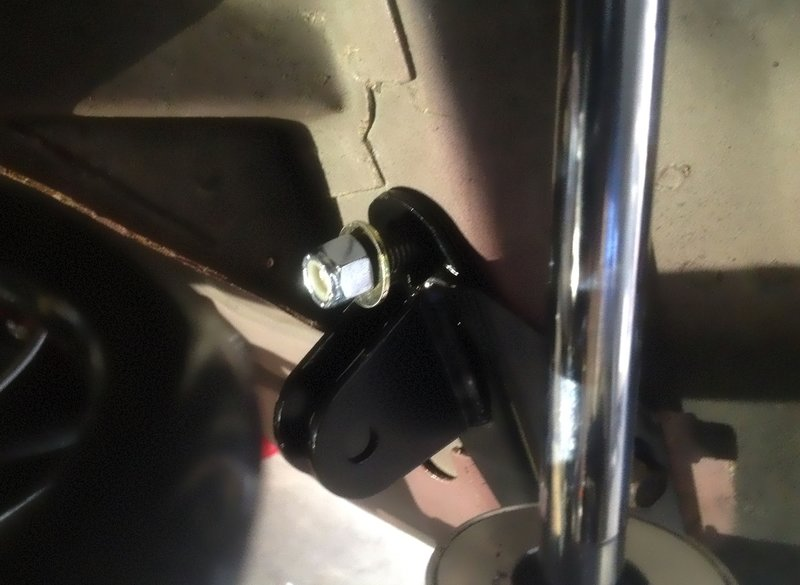
This shows you the passenger side.


Install pictures.
Old 10-31-2016, 10:32 AM
  #25  
11 Second Club
iTrader: (107)
 
tnmotown's Avatar
 
Join Date: Aug 2007
Location: Cali
Posts: 1,459
Received 24 Likes on 16 Posts

Default

It's the bolt-on version. Thanks for those pics, it helped out on where to place it. Basically the new supplied brackets replaced the factory ones the held the end links rights?
Old 10-31-2016, 10:37 AM
  #26  
LS1Tech Premium Sponsor
iTrader: (5)
 
MidwestChassis's Avatar
 
Join Date: Feb 2010
Posts: 1,506
Likes: 0
Received 1 Like on 1 Post
Default

Yes you are correct.
Old 10-31-2016, 10:55 AM
  #27  
11 Second Club
iTrader: (107)
 
tnmotown's Avatar
 
Join Date: Aug 2007
Location: Cali
Posts: 1,459
Received 24 Likes on 16 Posts

Default

Originally Posted by MidwestChassis
Yes you are correct.
Ok got it.

The only thing I need help on is how to make the adjustments for the pre-load? Is the bar suppose to be level?


Last edited by tnmotown; 11-01-2016 at 12:40 AM.
Old 11-01-2016, 10:23 AM
  #28  
TECH Fanatic
iTrader: (1)
 
MidwestChassis2's Avatar
 
Join Date: Jan 2015
Posts: 1,504
Received 38 Likes on 37 Posts
Default

Here is our help link. Choose ARB instructions.

The ARB doesn't care where it is at with-in reason.
Old 11-01-2016, 10:25 AM
  #29  
TECH Fanatic
iTrader: (1)
 
MidwestChassis2's Avatar
 
Join Date: Jan 2015
Posts: 1,504
Received 38 Likes on 37 Posts
Default

tnmotown it may be time to get rid of those poly LCA, no settings are going to work consistently with that style bushing.
Old 11-01-2016, 10:44 AM
  #30  
11 Second Club
iTrader: (107)
 
tnmotown's Avatar
 
Join Date: Aug 2007
Location: Cali
Posts: 1,459
Received 24 Likes on 16 Posts

Default

Originally Posted by MidwestChassis2
Here is our help link. Choose ARB instructions.

The ARB doesn't care where it is at with-in reason.
Yeah I seen those instructions but I must be confusing myself on where to initially set the adjustment. Also waiting for a buddy to come over and sit in the car while I adjust it.

Originally Posted by MidwestChassis2
tnmotown it may be time to get rid of those poly LCA, no settings are going to work consistently with that style bushing.
Exactly what I have been thinking. Those and a set of Viking shocks are on my Christmas list LOL
Old 11-01-2016, 12:12 PM
  #31  
TECH Fanatic
iTrader: (1)
 
MidwestChassis2's Avatar
 
Join Date: Jan 2015
Posts: 1,504
Received 38 Likes on 37 Posts
Default

Originally Posted by tnmotown
Yeah I seen those instructions but I must be confusing myself on where to initially set the adjustment. Also waiting for a buddy to come over and sit in the car while I adjust it.


Exactly what I have been thinking. Those and a set of Viking shocks are on my Christmas list LOL
Setting it up is extremely easy, it will all make sense once you are under there.

Let me know when you are ready for LCA and we will take care of you.
Old 11-02-2016, 01:26 PM
  #32  
TECH Apprentice
iTrader: (18)
 
455GTO's Avatar
 
Join Date: Sep 2009
Location: CA
Posts: 355
Received 17 Likes on 9 Posts

Default

Not to hijack the thread but I just installed my MWC ARB and my driver side doesnt have any free play in the link while the passenger side does. There is constant tension on the driver side link. Is this normal?
Old 11-03-2016, 09:14 AM
  #33  
TECH Fanatic
iTrader: (1)
 
MidwestChassis2's Avatar
 
Join Date: Jan 2015
Posts: 1,504
Received 38 Likes on 37 Posts
Default

That is how the ARB is set up in the direction.

Set drivers sire Heim joints to three threads past the jamb nuts and tighten. Drivers side is done.

With the driver in the vehicle and all four tire pressures set establish a neutral load position with the passenger link then add a half turn. and tighten everything up and then your done.

This means the drivers side the bolt will not slide in and out easily on the drivers side when loaded and before the 1/2 turn the passenger side bolts will slide in and out with ease.
Old 11-03-2016, 11:00 AM
  #34  
TECH Apprentice
iTrader: (18)
 
455GTO's Avatar
 
Join Date: Sep 2009
Location: CA
Posts: 355
Received 17 Likes on 9 Posts

Default

Originally Posted by MidwestChassis2
That is how the ARB is set up in the direction.

Set drivers sire Heim joints to three threads past the jamb nuts and tighten. Drivers side is done.

With the driver in the vehicle and all four tire pressures set establish a neutral load position with the passenger link then add a half turn. and tighten everything up and then your done.

This means the drivers side the bolt will not slide in and out easily on the drivers side when loaded and before the 1/2 turn the passenger side bolts will slide in and out with ease.
Got it. I was just worried because I thought both links should have free play to spin for Pre-load. Can you clarify why the 3 threads on the driver side is required?
Old 11-03-2016, 11:46 AM
  #35  
TECH Fanatic
iTrader: (1)
 
MidwestChassis2's Avatar
 
Join Date: Jan 2015
Posts: 1,504
Received 38 Likes on 37 Posts
Default

Originally Posted by 455GTO
Got it. I was just worried because I thought both links should have free play to spin for Pre-load. Can you clarify why the 3 threads on the driver side is required?
You never want more thread showing on a heim joint passed the nut that is wider than the heim itself.
Old 07-22-2018, 02:25 PM
  #36  
TECH Resident
iTrader: (12)
 
gjohnsonws6's Avatar
 
Join Date: Aug 2009
Location: Litchfield Park AZ
Posts: 987
Received 110 Likes on 86 Posts

Default

Does anyone have any pics of this ? Specifically the back side on a 12 bolt. Is the anti roll bar tube centered with the axle tube ?
Old 07-23-2018, 08:40 AM
  #37  
TECH Fanatic
iTrader: (1)
 
MidwestChassis2's Avatar
 
Join Date: Jan 2015
Posts: 1,504
Received 38 Likes on 37 Posts
Default

Originally Posted by gjohnsonws6
Does anyone have any pics of this ? Specifically the back side on a 12 bolt. Is the anti roll bar tube centered with the axle tube ?
I am not entirely sure I understand your question but the ARB will be located by the mounts attached to the housing themselves. If those mounting locations are not centered then the ARB will not be centered.


Quick Reply: MWC anti rollbar pics


All times are GMT -5. The time now is 06:24 AM.