Modifying Your Front Upper Shock Mount
 06-28-2009, 07:52 PM
#121

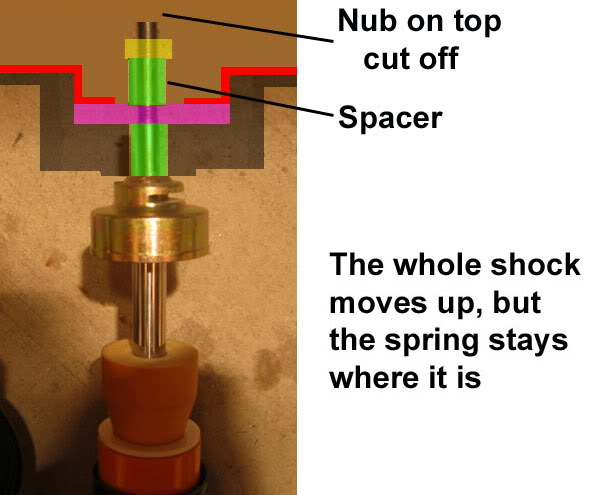
Let me try to explain using these pics of a stock style setup.
Here's the base setup
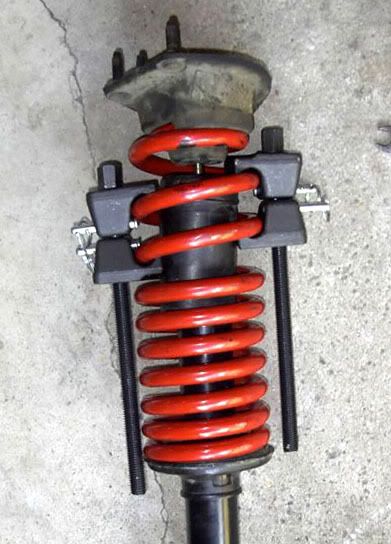
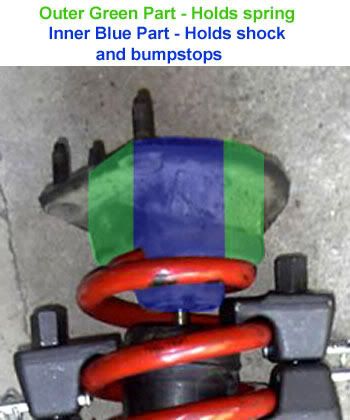
The upper shock mount serves many functions. Mainly it holds the spring and shock as a single unit. The inner portion of the mount is the part we are modifying and the outer part of the mount stays the same.
Since the spring part is uneffected, the ride height is uneffected.
Here's the base setup
The upper shock mount serves many functions. Mainly it holds the spring and shock as a single unit. The inner portion of the mount is the part we are modifying and the outer part of the mount stays the same.
Since the spring part is uneffected, the ride height is uneffected.
The top pigtail on the spring is located in the stock position and held in place by the blunt end of the upper mount. The portion of the upper mount that extends below the upper coil is what is removed by cutting.
 07-01-2009, 03:42 AM
#124
TECH Enthusiast
iTrader: (22)
Join Date: Aug 2004
Location: >>>_FRISCO_MUSCLE_<<<
Posts: 544
Likes: 0
Received 0 Likes
on
0 Posts

After 30 mins of reading at 1am, I totally understand how it work to regain the loss suspension travel after lowering the car. I'm kinda confuse about the washer part and the top mount tite part.
I've 1.2 drop spring (non-sponsor but same as Strano) and Koni DA. So after I cut the center section of the top mount, where do I put the washer? Should I use the Koni big flat washer?
Please help Jason or 99Bluz28.
I've 1.2 drop spring (non-sponsor but same as Strano) and Koni DA. So after I cut the center section of the top mount, where do I put the washer? Should I use the Koni big flat washer?
Please help Jason or 99Bluz28.
07-01-2009, 05:38 AM
#125
After 30 mins of reading at 1am, I totally understand how it work to regain the loss suspension travel after lowering the car. I'm kinda confuse about the washer part and the top mount tite part.
I've 1.2 drop spring (non-sponsor but same as Strano) and Koni DA. So after I cut the center section of the top mount, where do I put the washer? Should I use the Koni big flat washer?
Please help Jason or 99Bluz28.
I've 1.2 drop spring (non-sponsor but same as Strano) and Koni DA. So after I cut the center section of the top mount, where do I put the washer? Should I use the Koni big flat washer?
Please help Jason or 99Bluz28.
Last edited by JasonWW; 07-01-2009 at 05:44 AM.
07-01-2009, 08:47 PM
#127
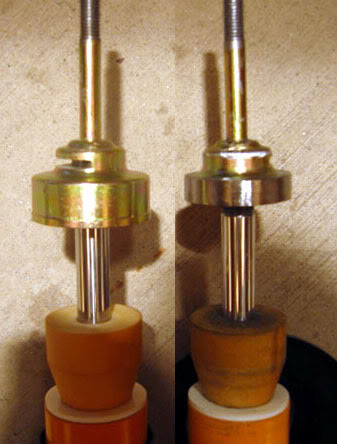
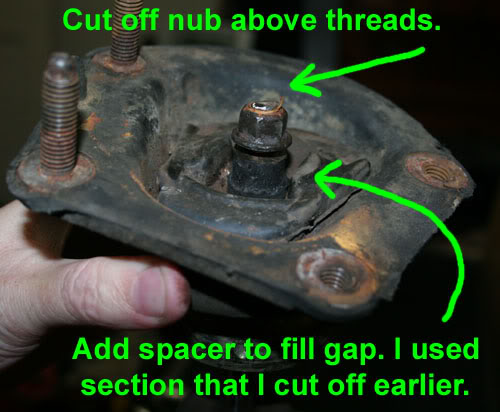
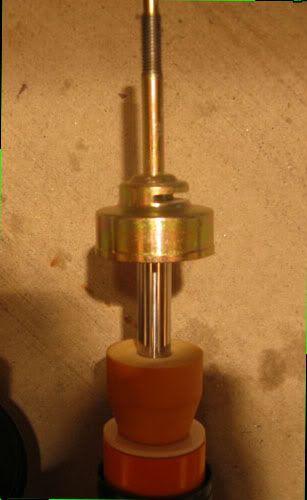
Don't forget the other steps such as cutting the tip (non threaded part) off of the koni hat and adding a spacer so you can bolt the top hat to the shock mount.
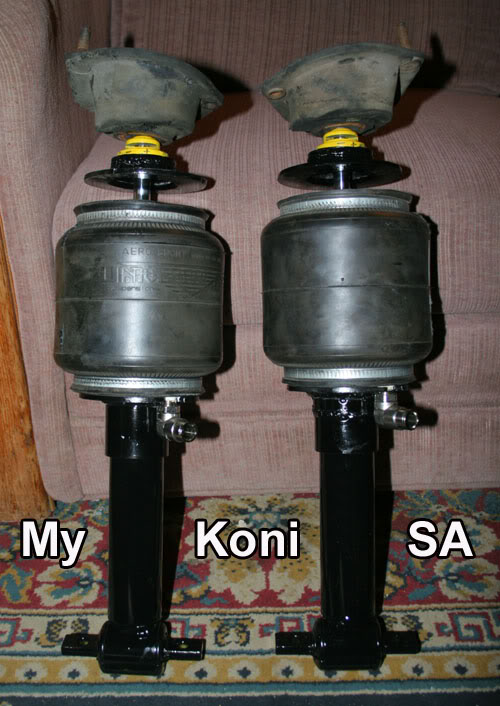
Here's a current picture of my konis. Focus on the top part and not the air bag stuff.
Last edited by JasonWW; 07-01-2009 at 09:10 PM.

 07-02-2009, 09:03 AM
#131

This mod looks like it would work great with my strano/kyb setup which has horrible suspension travel in the front end.
The only thing that concerns me is by cutting away the bump stop it seems you would be weakening the integrity of the shock mount alot.
- And by that I mean you would be loosing alot of it's ability to hold the dampener in place (rod in shock that goes up and down, and through the mount). And that it would eventually weaken and the rod would blow right through the mount and be riding on the inside of your wheel well. -because you took away alot of it's strength.
could you comment on this man ?
07-02-2009, 09:32 AM
#132

The only thing that concerns me is by cutting away the bump stop it seems you would be weakening the integrity of the shock mount alot.
- And by that I mean you would be loosing alot of it's ability to hold the dampener in place (rod in shock that goes up and down, and through the mount). And that it would eventually weaken and the rod would blow right through the mount and be riding on the inside of your wheel well. -because you took away alot of it's strength.
could you comment on this man ?
Short answer, this mod does nothing to compromise the effective structural integrity of the upper shock mount.
07-02-2009, 09:59 AM
#133
The only thing that concerns me is by cutting away the bump stop it seems you would be weakening the integrity of the shock mount alot.
- And by that I mean you would be loosing alot of it's ability to hold the dampener in place (rod in shock that goes up and down, and through the mount). And that it would eventually weaken and the rod would blow right through the mount and be riding on the inside of your wheel well. -because you took away alot of it's strength.
- And by that I mean you would be loosing alot of it's ability to hold the dampener in place (rod in shock that goes up and down, and through the mount). And that it would eventually weaken and the rod would blow right through the mount and be riding on the inside of your wheel well. -because you took away alot of it's strength.
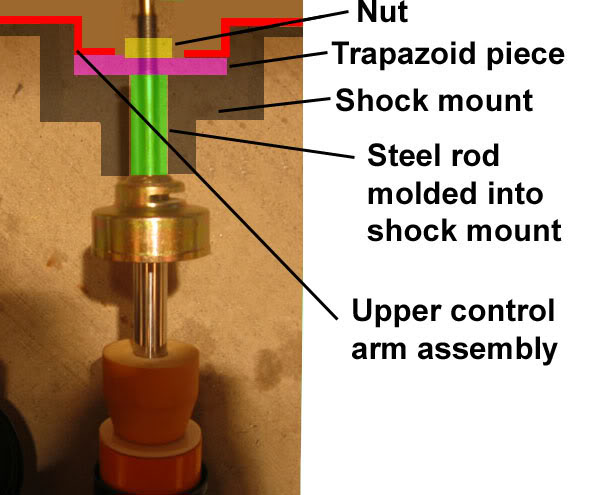
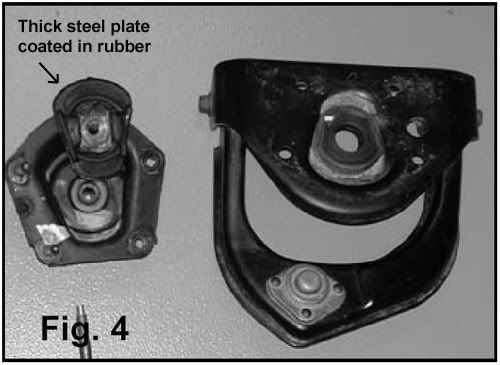
About your second concern, the entire weight of the car is supported by the spring and transfered to the outer part of the mount which is untouched. The top of the shock is bolted to a trapazoidal shaped piece of thick steel that is sandwiched (locked into place) between the stamped steel upper control arm base and the steel upper mount. That also is not touched, so there is no structural integrity lost at all. Everything is just as strong as stock.
The only forces being exerted through the rod into the shock mount are some minor lateral forces to maintain proper orientation of the shock and spring throughout the suspension travel, and the vertical forces exerted by the damping the shock is doing, which are also relatively minor.
Last edited by JasonWW; 07-03-2009 at 12:55 AM.
07-02-2009, 06:57 PM
#134
[QUOTE=JasonWW;11848597]You might want to read page one again because I didn't say anything about cutting your bumpstop. In fact, I recommend using a longer, more progressive 40mm bumpstop that Koni makes.
- When I said bumpstop i meant the cylindrical center section of the strut mount that projects downward, (the part that is being cut off).
About your second concern, the entire weight of the car is supported by the spring and transfered to the outer part of the mount which is untouched. The top of the shock is bolted to a trapazoidal shaped piece of thick steel that is sandwiched (locked into place) between the shocktower and the steel upper mount. That also is not touched, so there is no structural integrity lost at all. Everything is just as strong as stock.
- I'm guessing your referring to the insulator (or isolator ?) I didn't realize that once assembled it also acted as a positive load bearer as well as negative. but how does it work as a positive when the shoulder of the damp. rod sits on the shock mount NOT the isolator ?
---- so... what about pushing up through the mount ? ( I'm guessing there's just not enough force? ) because the shoulder of the dampening rod of the shock sits on the strut mount not the isolator, transferring the force of its dampening action into the shock mount itself on a positive movement when hitting a bump.
which is where I think doing this would affect structual integrity because you are cutting away some of the center bushing that keeps the dampener from pushing upward .. see what I'm trying to get at man ?
thanks for the help man really appreciate your replies
Last edited by Pro_built7; 07-02-2009 at 07:02 PM.
07-02-2009, 08:57 PM
#135
This mod looks like it would work great with my strano/kyb setup which has horrible suspension travel in the front end.
The only thing that concerns me is by cutting away the bump stop it seems you would be weakening the integrity of the shock mount alot.
- And by that I mean you would be loosing alot of it's ability to hold the dampener in place (rod in shock that goes up and down, and through the mount). And that it would eventually weaken and the rod would blow right through the mount and be riding on the inside of your wheel well. -because you took away alot of it's strength.
could you comment on this man ?
The only thing that concerns me is by cutting away the bump stop it seems you would be weakening the integrity of the shock mount alot.
- And by that I mean you would be loosing alot of it's ability to hold the dampener in place (rod in shock that goes up and down, and through the mount). And that it would eventually weaken and the rod would blow right through the mount and be riding on the inside of your wheel well. -because you took away alot of it's strength.
could you comment on this man ?
 07-03-2009, 01:01 AM
#136
Let me know if this helps you to understand.
Here is the upper shock mount, the trapazoid shaped piece and the upper control arm assembly. The trapazoid piece is directly bolted to the shock and gets traped in between the 2 bigger pieces.
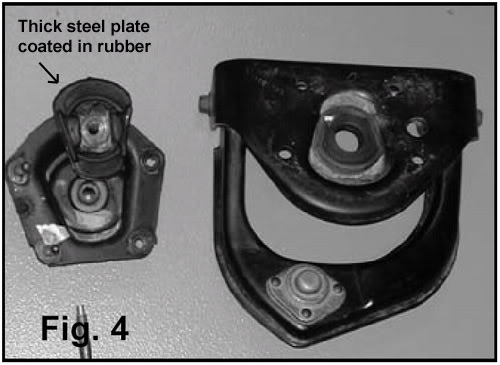
Here it is a stock Koni shock.

Here are all the pieces together in stock form:
Here is everything after the modification.
The pink trapazoidal piece stays locked into place and controls all the up and down forces the shock gives it, but it still has enough give to allow the shock to tilt slightly.
.
Here is the upper shock mount, the trapazoid shaped piece and the upper control arm assembly. The trapazoid piece is directly bolted to the shock and gets traped in between the 2 bigger pieces.
Here it is a stock Koni shock.
Here are all the pieces together in stock form:
Here is everything after the modification.
The pink trapazoidal piece stays locked into place and controls all the up and down forces the shock gives it, but it still has enough give to allow the shock to tilt slightly.
.
Last edited by JasonWW; 07-03-2009 at 07:39 AM.
07-03-2009, 03:28 AM
#138
Let me know if this helps you to understand.
Here is the upper shock mount, the trapazoid shaped piece and the upper control arm assembly. The trapazoid piece is directly bolted to the shock and gets traped in between the 2 bigger pieces.
Here it is a stock Koni shock.
Here are all the pieces together in stock form:

Here is everything after the modification.

The pink trapazoidal piece stays locked into place and controls all the up and down forces the shock gives it, but it still has enough give to allow the shock to tilt slightly.
.
Here is the upper shock mount, the trapazoid shaped piece and the upper control arm assembly. The trapazoid piece is directly bolted to the shock and gets traped in between the 2 bigger pieces.
Here it is a stock Koni shock.
Here are all the pieces together in stock form:
Here is everything after the modification.
The pink trapazoidal piece stays locked into place and controls all the up and down forces the shock gives it, but it still has enough give to allow the shock to tilt slightly.
.
yeahhhhhhhh put this on the first page!! i just read this entire thing and just figured it out with that picture hahahahah
07-03-2009, 07:50 AM
#140
Done
I seriously doubt it would effect the warranty, but yes, there is a way to avoid it. You can cut or drill a hole in the shock tower for it to stick through. Here is the exact spot.

Last edited by JasonWW; 07-03-2009 at 08:00 AM.