






Post your best welds!

Teching In
Joined: Jun 2015
Posts: 36
Likes: 0
 Post your best welds!
 these are some of mine. I'm in school for welding. I've no real experience welding mig yet, burning did this at school when we redid our grinding tables. we put metal barriers up because someone was shooting sparks at my prescription glasses.
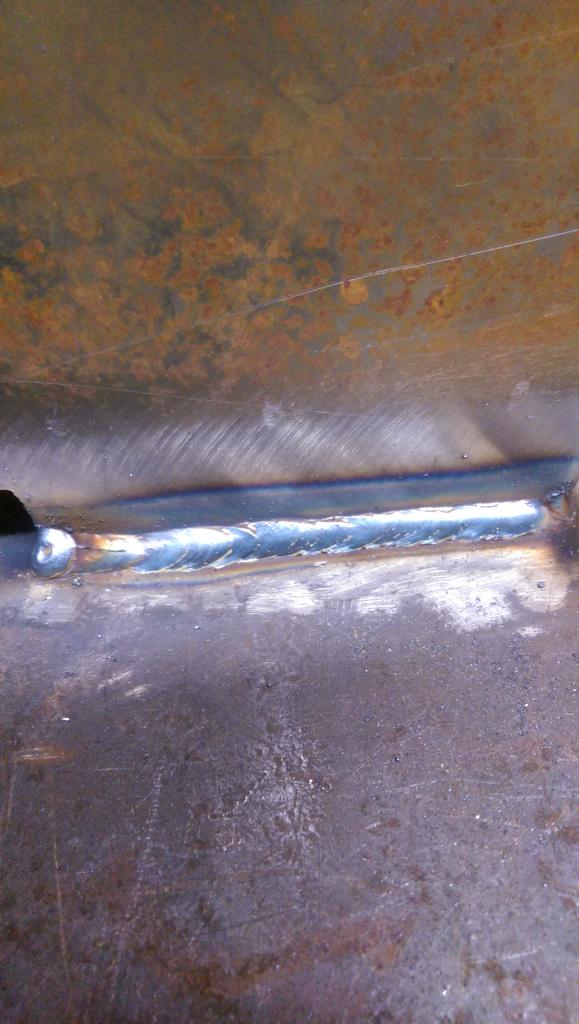

and this is the result of a open root 4g smaw bend test. gonna buy a welder soon, getting ready to start mig in the fall, and tig next spring. Miller Matic, stick 6013 root pass at 90 amps, 7018 hot, fill, and cover at 145 amps.


and this is the result of a open root 4g smaw bend test. gonna buy a welder soon, getting ready to start mig in the fall, and tig next spring. Miller Matic, stick 6013 root pass at 90 amps, 7018 hot, fill, and cover at 145 amps.
Last edited by Matthan; Jun 27, 2015 at 10:13 PM.
I had it set to 120 but was going by eye with the pedal so wasn't using all of that. Also had pulse on so it welds probably like 70% of whatever the max current is set to - only did that to help focus the arc since the clamp was only 1/16" away from the weld area.
That being said it was obviously too hot and I'm going to try it without pulse and lower amperage so I don't have to camp out as long to get melted. Would you suggest letting it rest to cool at all intermittently? Like giving it a minute or two break every now and then?
And thanks, I built that fixture after I realized it was extremely difficult trying to fit it all up by eye - trying to hit a moving target so to speak. I cut everything myself - they started as 45 degree mandrel bends that I cut in half, then I made a model in solidworks and 3D printed a fixture to position the bends in my chop saw to make the cuts. I cut them a little proud of the reference faces and did fit / final sanding while checking on the fixture. Worked worlds better than my first one that I tried to fit up freehand.


All of the faces serve as a reference for where the cut edges need to be for theoretical fit up. Some attention is required to keep the tube from slipping while cutting but all you have to do is flip the fixture around in the jaws to make your cuts, no careful realignments or thinking necessary.
Lots of gotchas during the process of building this first (successful) one. It's far from perfect but I learned enough to hopefully make the second one better.
That being said it was obviously too hot and I'm going to try it without pulse and lower amperage so I don't have to camp out as long to get melted. Would you suggest letting it rest to cool at all intermittently? Like giving it a minute or two break every now and then?
And thanks, I built that fixture after I realized it was extremely difficult trying to fit it all up by eye - trying to hit a moving target so to speak. I cut everything myself - they started as 45 degree mandrel bends that I cut in half, then I made a model in solidworks and 3D printed a fixture to position the bends in my chop saw to make the cuts. I cut them a little proud of the reference faces and did fit / final sanding while checking on the fixture. Worked worlds better than my first one that I tried to fit up freehand.
All of the faces serve as a reference for where the cut edges need to be for theoretical fit up. Some attention is required to keep the tube from slipping while cutting but all you have to do is flip the fixture around in the jaws to make your cuts, no careful realignments or thinking necessary.
Lots of gotchas during the process of building this first (successful) one. It's far from perfect but I learned enough to hopefully make the second one better.
very nice man, on the v band the start and stop, when you start up again start up on your last stop. That helps make the weld look like a single weld around the whole v band. typically when im welding a v band i weld a 80 amps but im not using all of that. that fixture for the collector is really cool
very nice man, on the v band the start and stop, when you start up again start up on your last stop. That helps make the weld look like a single weld around the whole v band. typically when im welding a v band i weld a 80 amps but im not using all of that. that fixture for the collector is really cool
practice makes perfect man, always pay attention to the puddle and be sure to watch your arc length. other then that man just keep going dont let anyone tell you to just drop it. your welds look good just keep praticing man, keep it up.
if you dont minf me asking were did you get that fixture? for the collector?
if you dont minf me asking were did you get that fixture? for the collector?
practice makes perfect man, always pay attention to the puddle and be sure to watch your arc length. other then that man just keep going dont let anyone tell you to just drop it. your welds look good just keep praticing man, keep it up.
if you dont minf me asking were did you get that fixture? for the collector....
if you dont minf me asking were did you get that fixture? for the collector....
There's some serious talent in here.
This is my latest project - I decided to try my hand at building some double slip merge collectors for my m3 swap project. 1-7/8" to 2.75" merge, which expands out to 3.5" then an anti-reversion back to a 3" vband. It isn't the greatest welding in the world but it's my personal best so far in terms of the fabrication effort involved....still a lot to learn.


Vband flange weld


I did some reading about the vband weld ahead of time to get some insight into managing heat input and hopefully prevent warping, but it still warped pretty bad despite my best efforts. I was able to bump and file it back to being pretty flat though, fortunately, so I think it will still seal. When welding, I clamped the other half of the flange on there and set the whole thing on a big aluminum chill block to help draw the heat out.
As far as weld settings:
-1/16" tungsten sharpened to a fine point
-.045" filler
- about 3/4 pedal with the machine set to 120 amps, 30 hz pulse with 50% on time and 20% background. I used the pulse feature to help keep the arc from wandering over onto the clamp since it was extremely close to the flange.
I'd weld about 1/2" at a time, stop and give it ~10s of postflow to cool it down, then rotate the whole thing around and weld a little on the opposite side to try and spread out the heat. My HAZ isn't that wide so I didn't think I was putting that much heat into it. I left the assembly clamped together until it cooled back down, but when I unclamped it the flange looked like a pringle.
Anybody in here have any tips for a noob on how to prevent warpage when welding a v-band flange?
This is my latest project - I decided to try my hand at building some double slip merge collectors for my m3 swap project. 1-7/8" to 2.75" merge, which expands out to 3.5" then an anti-reversion back to a 3" vband. It isn't the greatest welding in the world but it's my personal best so far in terms of the fabrication effort involved....still a lot to learn.
Vband flange weld
I did some reading about the vband weld ahead of time to get some insight into managing heat input and hopefully prevent warping, but it still warped pretty bad despite my best efforts. I was able to bump and file it back to being pretty flat though, fortunately, so I think it will still seal. When welding, I clamped the other half of the flange on there and set the whole thing on a big aluminum chill block to help draw the heat out.
As far as weld settings:
-1/16" tungsten sharpened to a fine point
-.045" filler
- about 3/4 pedal with the machine set to 120 amps, 30 hz pulse with 50% on time and 20% background. I used the pulse feature to help keep the arc from wandering over onto the clamp since it was extremely close to the flange.
I'd weld about 1/2" at a time, stop and give it ~10s of postflow to cool it down, then rotate the whole thing around and weld a little on the opposite side to try and spread out the heat. My HAZ isn't that wide so I didn't think I was putting that much heat into it. I left the assembly clamped together until it cooled back down, but when I unclamped it the flange looked like a pringle.
Anybody in here have any tips for a noob on how to prevent warpage when welding a v-band flange?
Looking at pics 1, 3 and 4.........how the hell do you get to the inside to weld it?
That is typically achieved with the correct settings, that is good penetration. Back purge the stainless and it finishes very smooth and nice as it is covered by the shielding gas.
LS1 Tech Stories
The Best V8 Stories One Small Block at Time

Gas Monkey Built a 6-Wheel Ferrari Testarossa With a Corvette LT4 Engine
Verdad Gallardo
7 Most Reliable High-Performance Engines GM Has Ever Built
Verdad Gallardo
Amazing '71 Camaro Restomod Is Modern Muscle Car Under the Skin
Verdad Gallardo
6 Common C5 Corvette Failures and What's Involved In Repairing Them
Pouria Savadkouei
Retro Modern Bandit Pontiac Trans AM Comes With Burt Reynolds' Autograph
Verdad Gallardo
Top 10 Greatest Cadillac V Series Performance Models Ever, Ranked
Pouria Savadkouei
Top 10 Most Powerful Chevy Trucks Ever Made!

Hennessey's New Supercharged Silverado ZR2 Has 700 HP
Verdad Gallardo
Coachbuilt N2A Anteros Is an LS2-Powered C6 Corvette In Italian Clothes
Verdad Gallardo Thats not really what I meant. I mean, how the hell do you even get the torch in there to weld it. Not in the collector, but on the outside between all 4 tubes.
big gas lense, you would have to supply more argon to cover and shield from the other side as well to make sure you get the proper coverage. You would have to bend your tungsten and steady hand
The outside welds are primarily for strength. Yes you can dial it in to penetrate the inside, but you're still left with the center portion of the seams that need welded to actually seal everything up. There's no way to get to the center from the outside unless the merge pipes are splayed apart like a lot of turbo collectors are.
Since my collector outlet is only 2.75", I couldn't get the jumbo cup / long stickout to work since I was left with very little room to manipulate the torch angle - the cup would keep running into the merge peak and the walls of the collector. If you rig up another gas lens on a secondary purge line to flood the area, maybe you could get away with using a smaller cup (like a #7 gas lens) but I haven't tried that yet.
I ended up using a 70 amp micro-torch with a 45 degree head from CK to weld the inside. It has a long pencil tip on it that makes it useful for getting into really tight areas. I had plenty of room to move the torch head around as needed, but filler placement is a little tricky because there's not much room between the cup and the work. You can get around that by bending the filler rod slightly at the end. With a good fitup, you don't really need filler but I figured it'd be a good idea to add some for strength and also so I had a little extra material to work with when blending the inside.

More than one way to do it of course - with more experience you could get by with less probably but I'm still on my way up the learning curve and have probably several dozen of these things to build yet before I would claim to have any idea of what I am doing.
Since my collector outlet is only 2.75", I couldn't get the jumbo cup / long stickout to work since I was left with very little room to manipulate the torch angle - the cup would keep running into the merge peak and the walls of the collector. If you rig up another gas lens on a secondary purge line to flood the area, maybe you could get away with using a smaller cup (like a #7 gas lens) but I haven't tried that yet.
I ended up using a 70 amp micro-torch with a 45 degree head from CK to weld the inside. It has a long pencil tip on it that makes it useful for getting into really tight areas. I had plenty of room to move the torch head around as needed, but filler placement is a little tricky because there's not much room between the cup and the work. You can get around that by bending the filler rod slightly at the end. With a good fitup, you don't really need filler but I figured it'd be a good idea to add some for strength and also so I had a little extra material to work with when blending the inside.
More than one way to do it of course - with more experience you could get by with less probably but I'm still on my way up the learning curve and have probably several dozen of these things to build yet before I would claim to have any idea of what I am doing.
Last edited by ckpitt55; Jul 1, 2015 at 11:34 PM.
practice makes perfect man, always pay attention to the puddle and be sure to watch your arc length. other then that man just keep going dont let anyone tell you to just drop it. your welds look good just keep praticing man, keep it up.
if you dont minf me asking were did you get that fixture? for the collector....
if you dont minf me asking were did you get that fixture? for the collector....
Thanks for the words of encouragement
As for the fixtures, I 3D printed the cutting jig and machined the alignment fixture myself. Shoot me a PM if there's anything I can help you with.
The outside welds are primarily for strength. Yes you can dial it in to penetrate the inside, but you're still left with the center portion of the seams that need welded to actually seal everything up. There's no way to get to the center from the outside unless the merge pipes are splayed apart like a lot of turbo collectors are.
Since my collector outlet is only 2.75", I couldn't get the jumbo cup / long stickout to work since I was left with very little room to manipulate the torch angle - the cup would keep running into the merge peak and the walls of the collector. If you rig up another gas lens on a secondary purge line to flood the area, maybe you could get away with using a smaller cup (like a #7 gas lens) but I haven't tried that yet.
I ended up using a 70 amp micro-torch with a 45 degree head from CK to weld the inside. It has a long pencil tip on it that makes it useful for getting into really tight areas. I had plenty of room to move the torch head around as needed, but filler placement is a little tricky because there's not much room between the cup and the work. You can get around that by bending the filler rod slightly at the end. With a good fitup, you don't really need filler but I figured it'd be a good idea to add some for strength and also so I had a little extra material to work with when blending the inside.
More than one way to do it of course - with more experience you could get by with less probably but I'm still on my way up the learning curve and have probably several dozen of these things to build yet before I would claim to have any idea of what I am doing.
Since my collector outlet is only 2.75", I couldn't get the jumbo cup / long stickout to work since I was left with very little room to manipulate the torch angle - the cup would keep running into the merge peak and the walls of the collector. If you rig up another gas lens on a secondary purge line to flood the area, maybe you could get away with using a smaller cup (like a #7 gas lens) but I haven't tried that yet.
I ended up using a 70 amp micro-torch with a 45 degree head from CK to weld the inside. It has a long pencil tip on it that makes it useful for getting into really tight areas. I had plenty of room to move the torch head around as needed, but filler placement is a little tricky because there's not much room between the cup and the work. You can get around that by bending the filler rod slightly at the end. With a good fitup, you don't really need filler but I figured it'd be a good idea to add some for strength and also so I had a little extra material to work with when blending the inside.
More than one way to do it of course - with more experience you could get by with less probably but I'm still on my way up the learning curve and have probably several dozen of these things to build yet before I would claim to have any idea of what I am doing.
Also, what is yalls preferred tungsten for welding stainless?


I feel embarrassed even putting a picture up here with all the killer work that's being shown off but I figure maybe someone can advise/assist me in getting things looking better.
This is about 30 amps, 16 ga 304ss pipe, very good fitment no filler, alignment on the pieces wasn't perfect so some of the crookedness is due to that. back purging with Argon, same stuff I'm welding with. Standard tungsten that comes with a miller diversion 165, as that's what I'm currently borrowing, I believe it's the lanthanated blue one if I remember right
Flame away, like to hear from experts what would you do to make this look better, and be more sound. I'm getting pretty good penetration thru the material, can be a little better I think but I'm trying to keep the joints as tight as possible, can add a little more current if needed, or just go a little slower either I think would help the penetration.
This is about 30 amps, 16 ga 304ss pipe, very good fitment no filler, alignment on the pieces wasn't perfect so some of the crookedness is due to that. back purging with Argon, same stuff I'm welding with. Standard tungsten that comes with a miller diversion 165, as that's what I'm currently borrowing, I believe it's the lanthanated blue one if I remember right
Flame away, like to hear from experts what would you do to make this look better, and be more sound. I'm getting pretty good penetration thru the material, can be a little better I think but I'm trying to keep the joints as tight as possible, can add a little more current if needed, or just go a little slower either I think would help the penetration.


