Wanna mount speakers on a roll bar?
 07-05-2009, 06:39 PM
#1
TECH Apprentice
Thread Starter
iTrader: (1)

Join Date: Jun 2008
Location: Fort Worth, Texas
Posts: 303
Likes: 0
Received 0 Likes
on
0 Posts
Just like the title says.. I am in the process of completely restoring my car. For those of us who have roll bars in their cars, some roll bars prevent (or severely hinder) the doors from closing if you have those built in "premium" door panels (the ones with the seperate mid and tweeter mounts). Some people have taken off their door panels or reverted to removing the part of the panel that sticks out. I was no different. I was going to "notch" my door panel but instead purchased a basic firebird door panel.
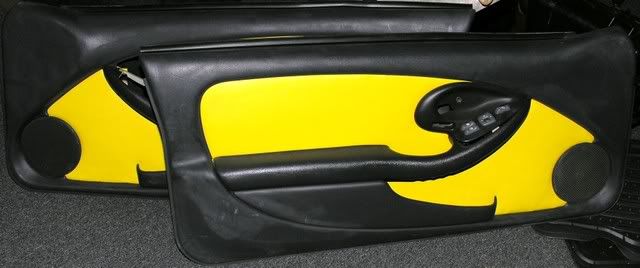
I had it reupholstered but lets face it, the speakers in the doors are NOT in the best position to be heard (especially if you have a loud car, have your T-Tops off or both)! Even worse, some people cannot get to their sail panel speakers with a roll bar or roll cage in place. Again, the sail panel location is not a bad place to mount speakers but what if you could do away with the door and sail panel speaker locations? Here is a great way to put your roll bar to use. About a year ago, I was driving down the street and saw a very nice boat being towed to the lake. It was obvious that the owner of that boat spared no expense. It was VERY nice. Well, the closer I looked at his boat, I noticed he had a wakeboard bar. In its' construction, a "wakeboard bar" is very similiar to a roll bar for a car. The guy had his fishing poles, a GPS unit, his tow ropes and some speakers mounted on his wakeboard bar.
It was in that moment that it hit me.. LOL! You could see the cobwebs move and the gears begin to turn in my head.. If you can mount stuff on a wakeboard bar and keep it from moving or shifting, why can't you do that for a car.. I went home and googled the heck out of finding anyone who has performed this little idea but I did not have any luck finding any DIY articles. So, I figured I should document it in case anyone else wanted to do something similiar. So, here is how my idea transpired:
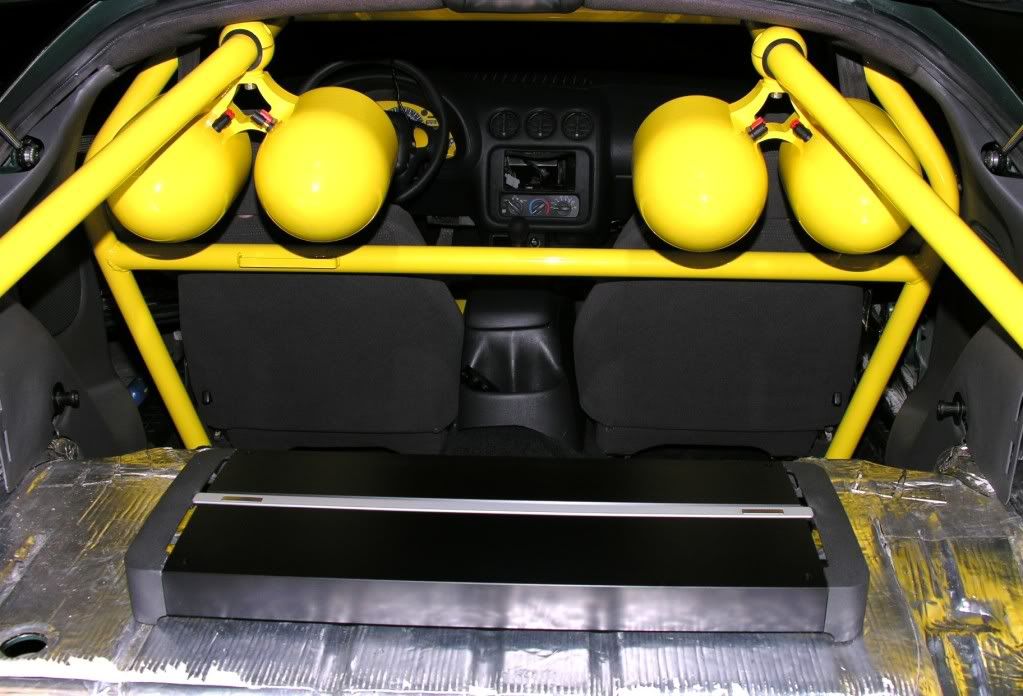
- First things first.. I found out the diameter of the tubing on my Wolfe Racecraft 6 point roll bar (found it on their website).
"Material: 1 3/4" x .134" Mild Steel Tubing"
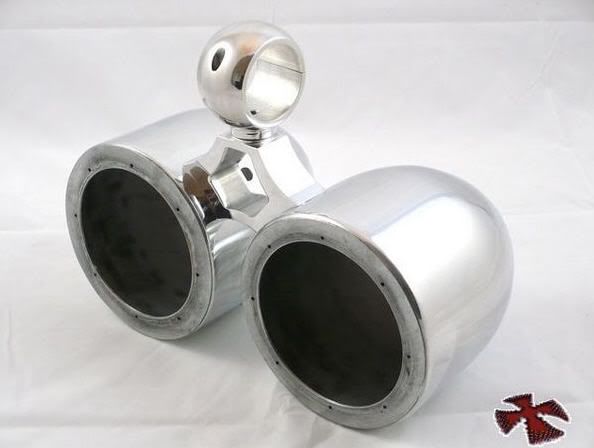
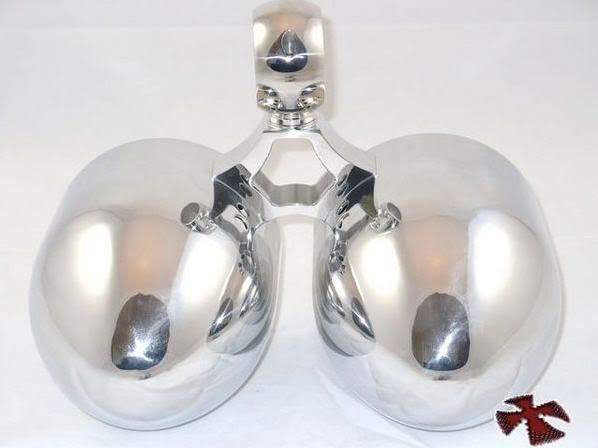
- Next, I did some shopping and found a set of wakeboard speaker pods that I liked. I called the company and made sure their pod would fit the tubing size on my roll bar.
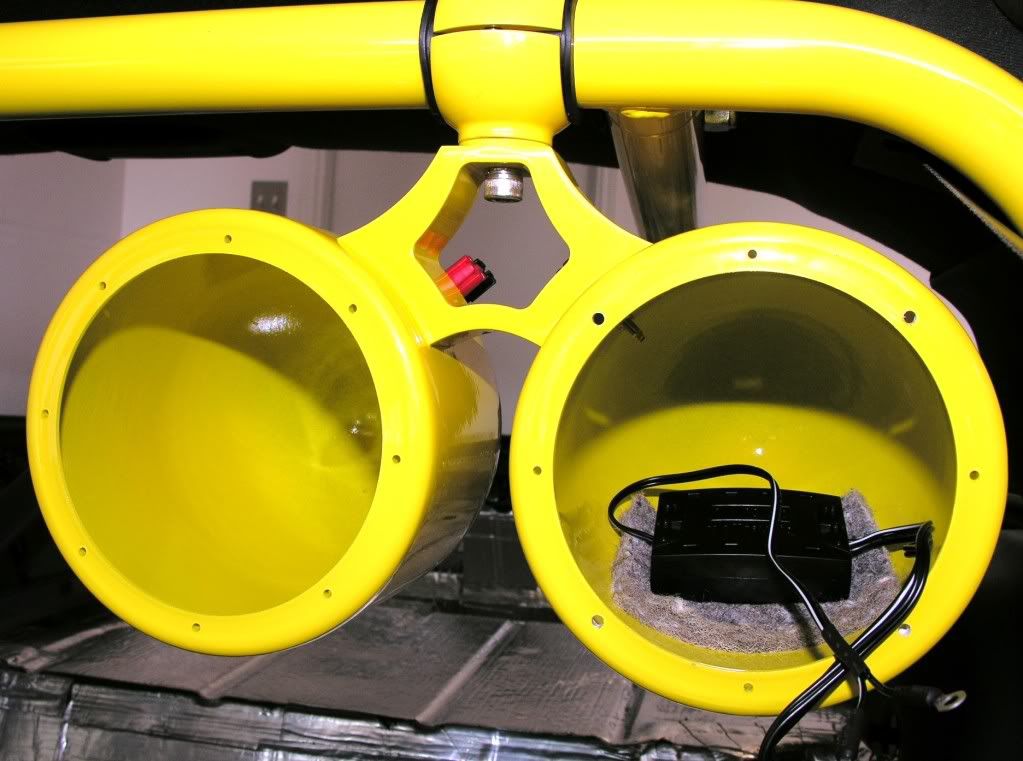
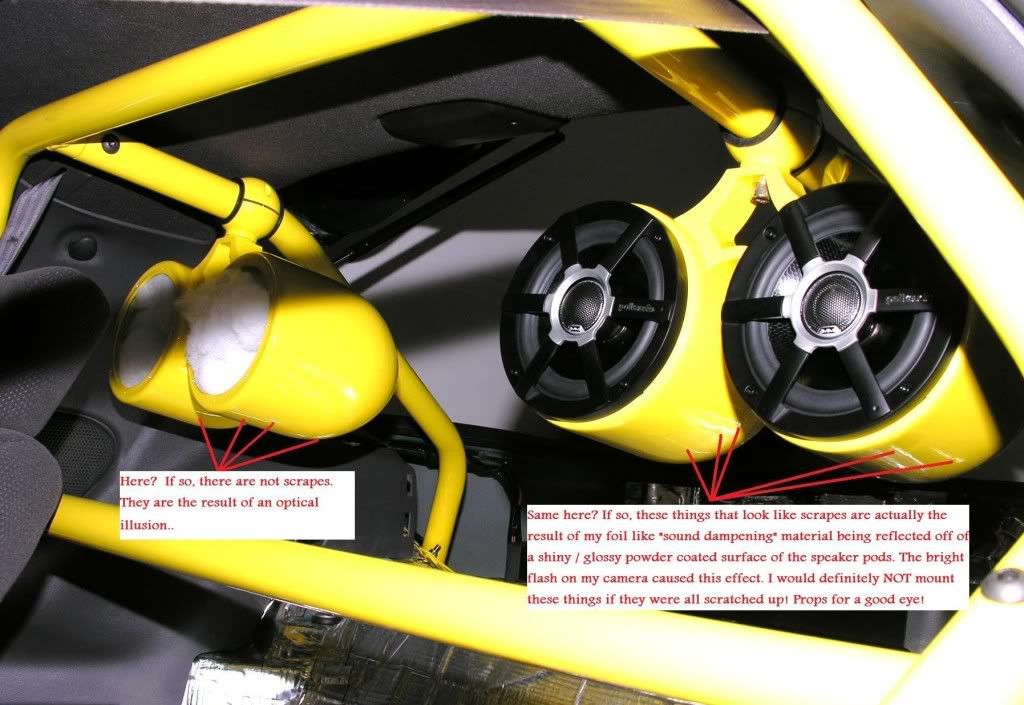
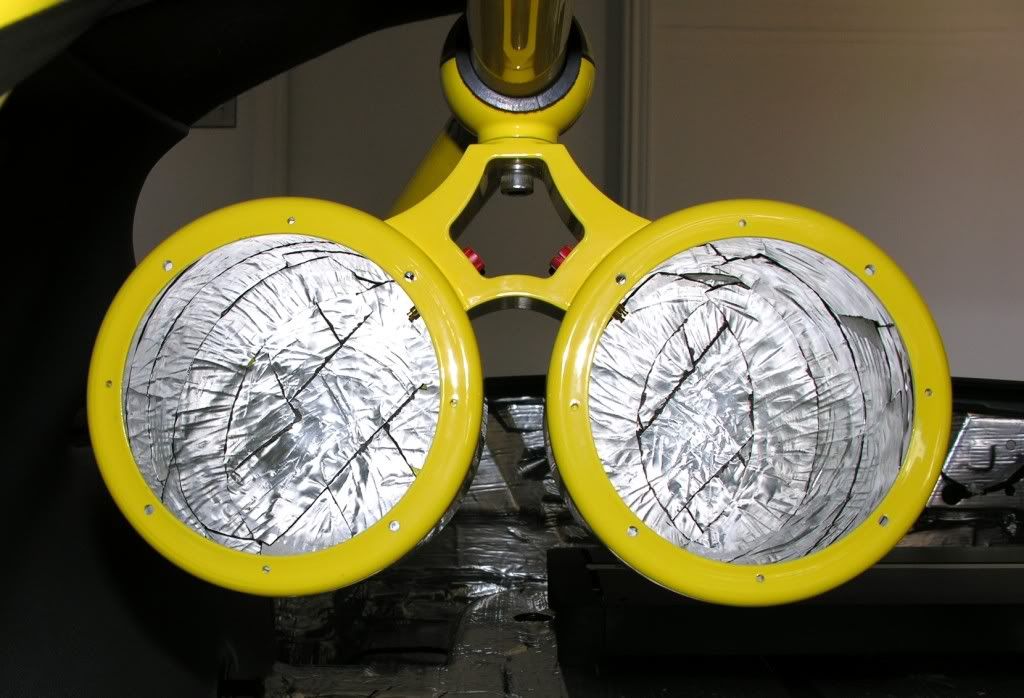
- I placed my order and received my pods shortly thereafter. They originally were polished aluminum but since my roll bar was powder coated yellow, I decided to have my speaker pods powder coated the same color to match.
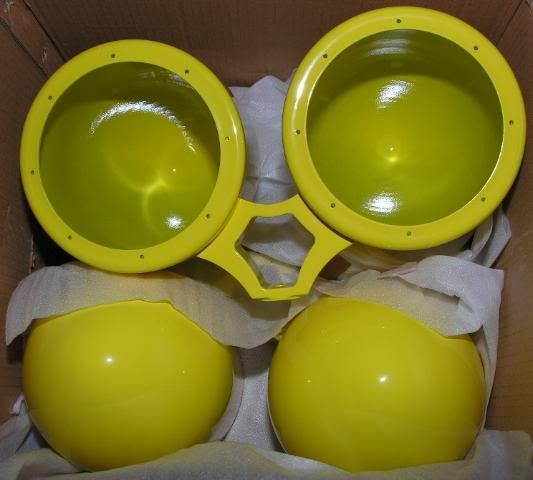
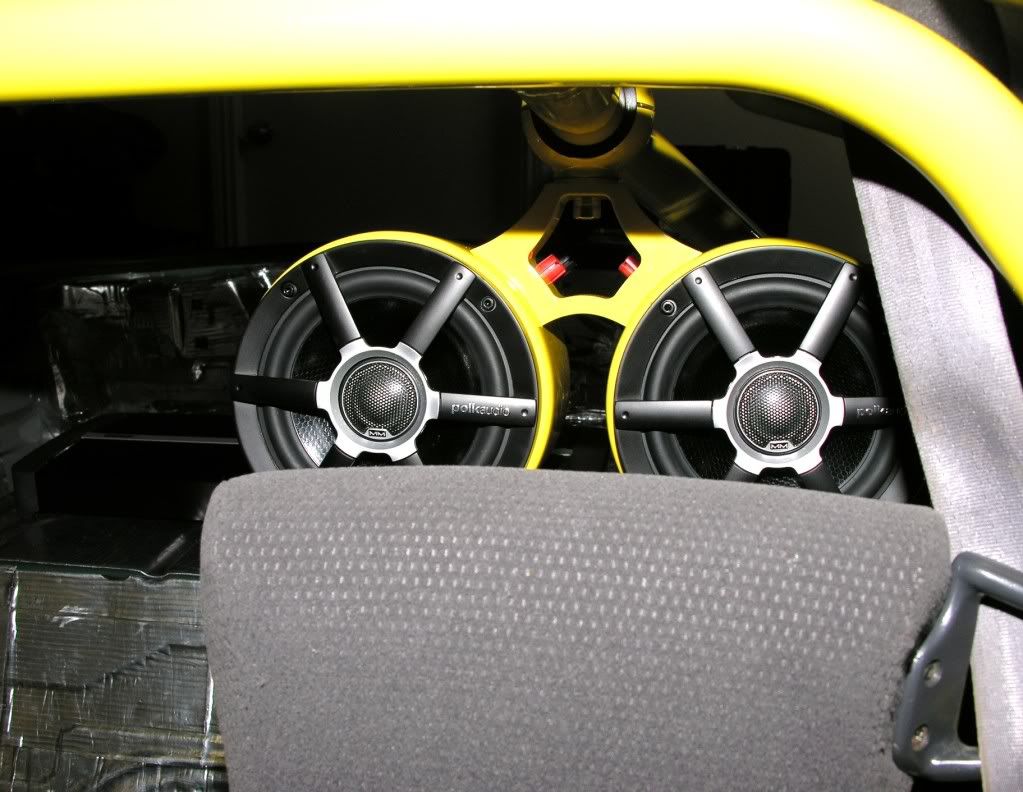
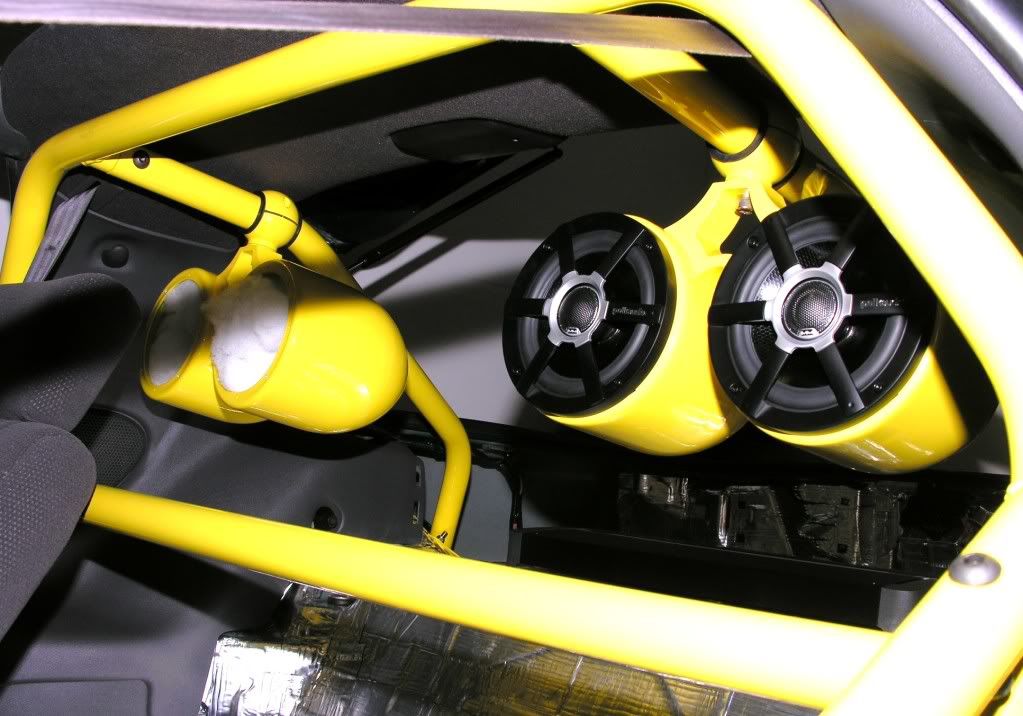
With my roll bar mounted in place, I decided to install my speaker pods. I got the pods installed and checked to see if I could move them. NOPE! They are solidly mounted on the roll bar. They would not budge, even a little.. Satisfied that they were firmly mounted and unable to budge, I drilled out (4) of the "pre-drilled" mounting holes that came with the pods, to mount my speakers. I started with the crossover that came with my speakers.. I chose the Polk Audio MM651 6.5" speakers, but you could use the speaker of your liking. I removed the black plastic cap from the crossover and bolted the crossover to a thick piece of carpet padding. Next, I took that padding and glued it to the inside of the speaker pod. I let it dry and checked to see if it would move. NOPE! That crossover isn't going anywhere..
I then cut the Polk Audio supplied speaker wire down to a length to fit my needs. I spliced the ends, crimped on some terminal connectors and then used a heat gun with some heat shrink over the crimped terminal..
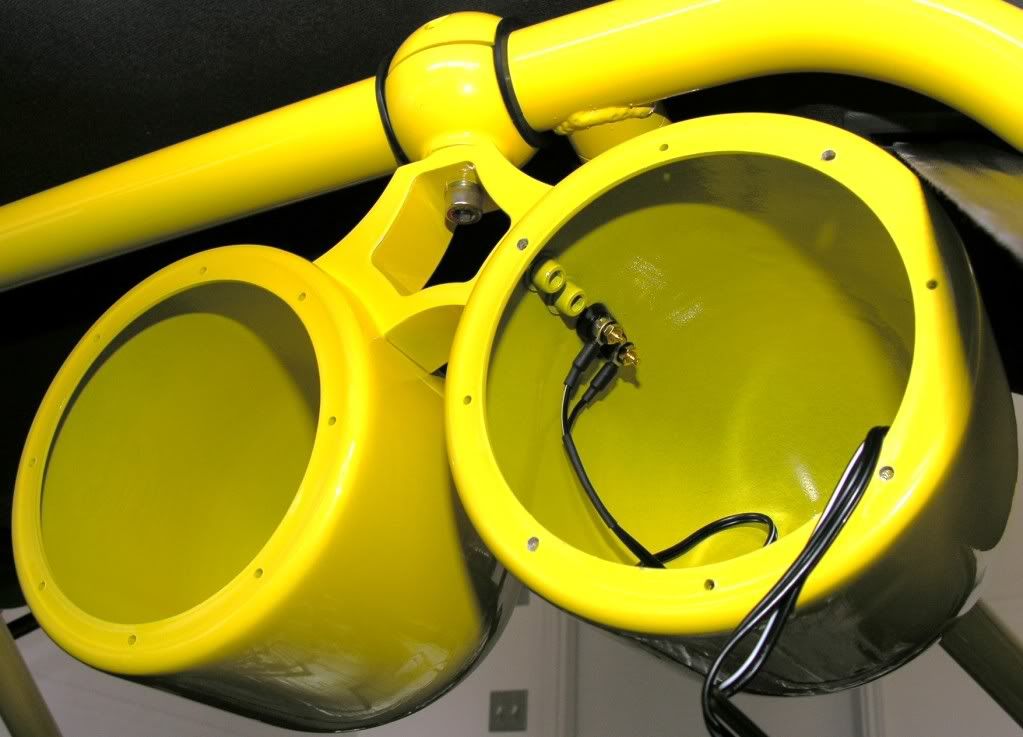
Next, I added some poly fill and snapped the screw mounts into place..
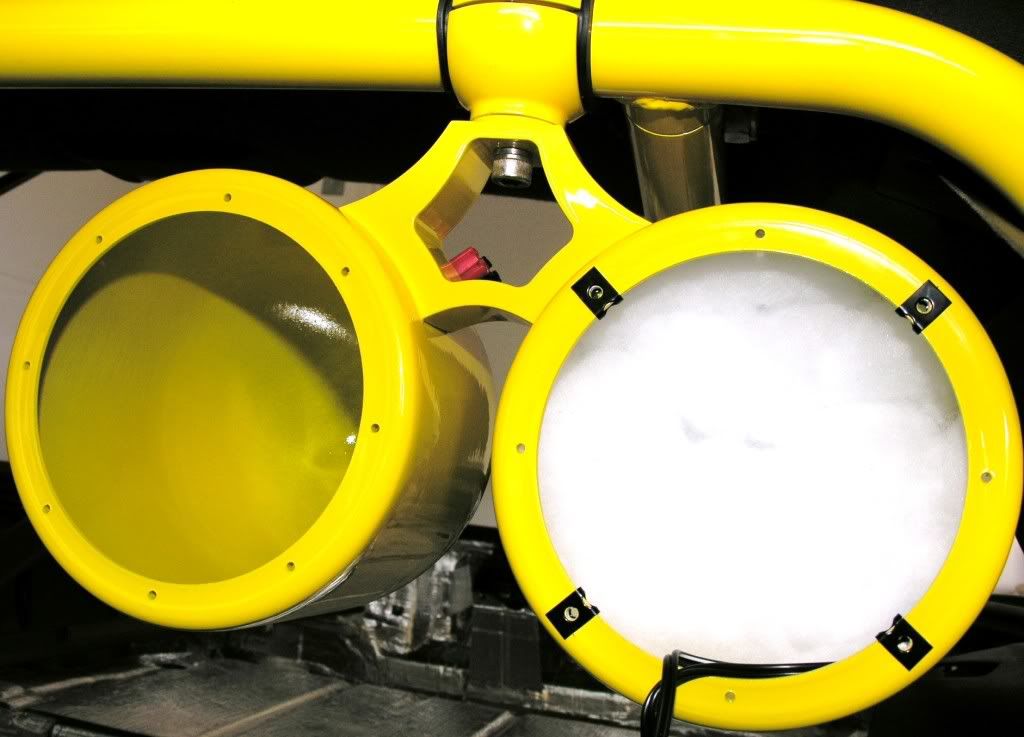
I connected the speaker wires accordingly and installed the first speaker..
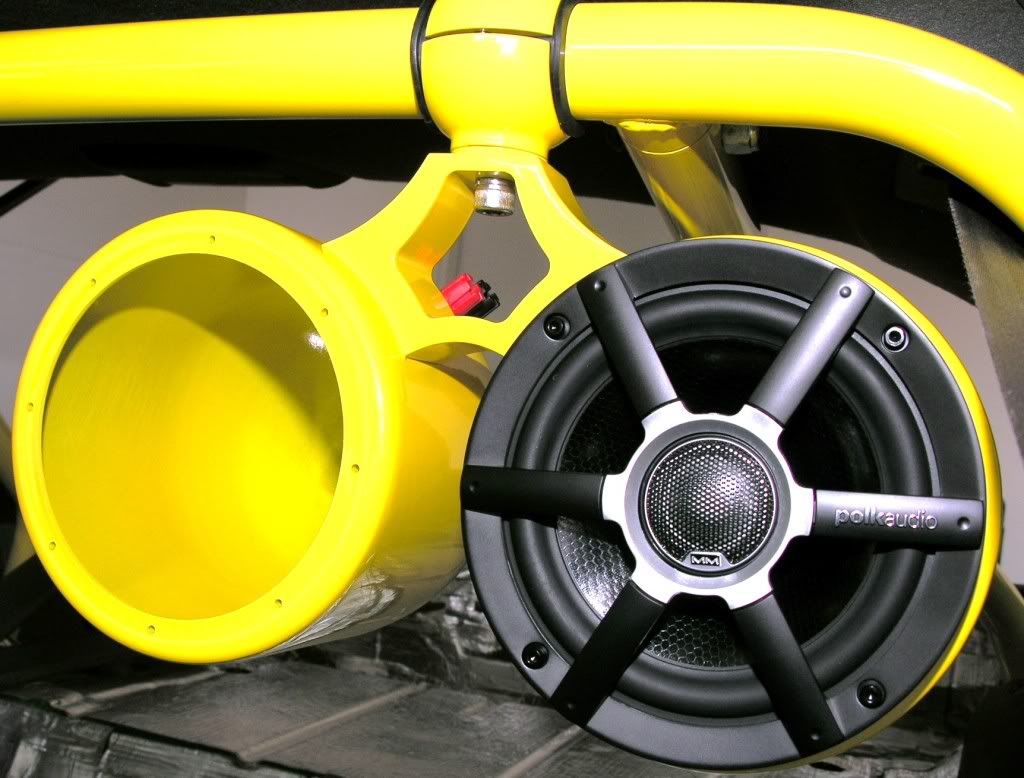
I repeated the same process above and installed the second speaker..
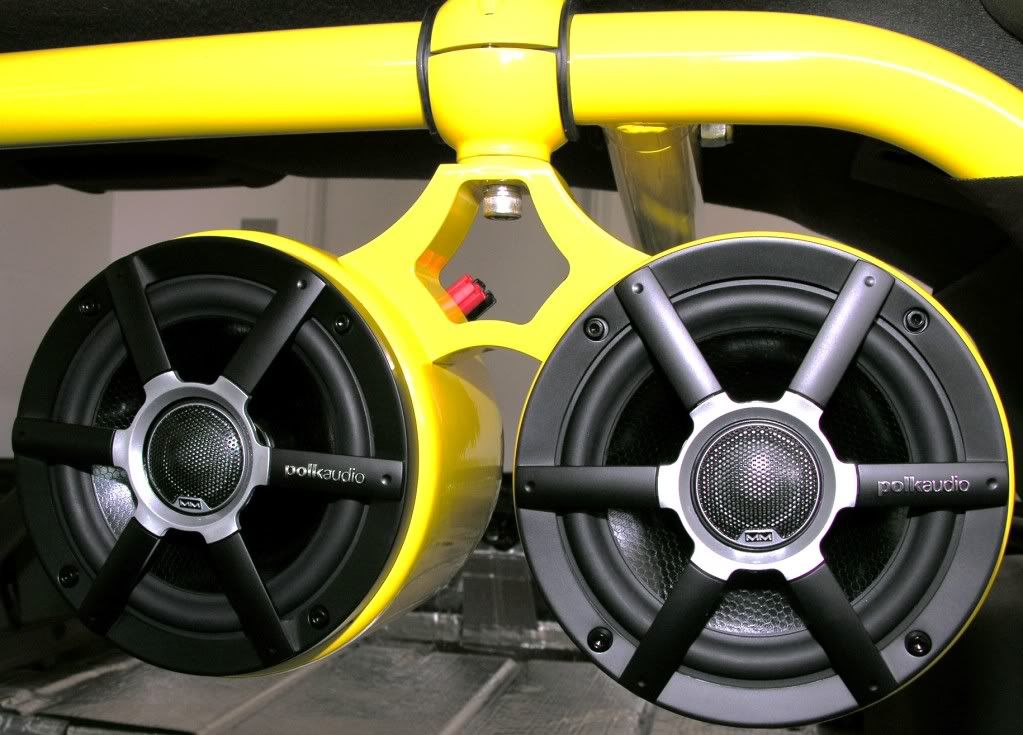
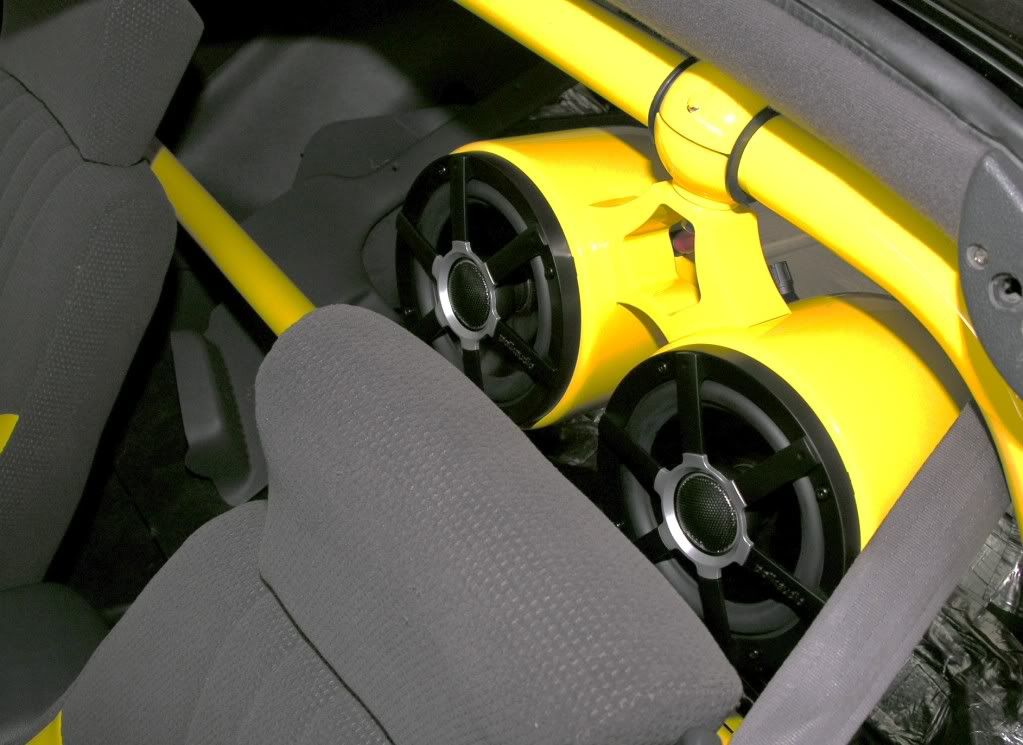
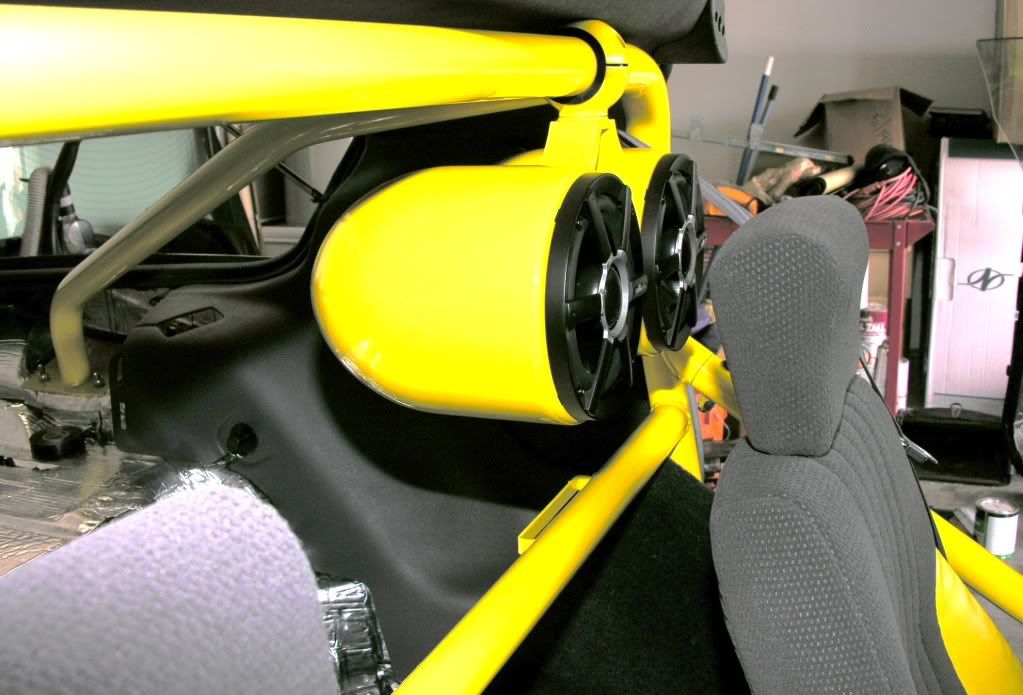

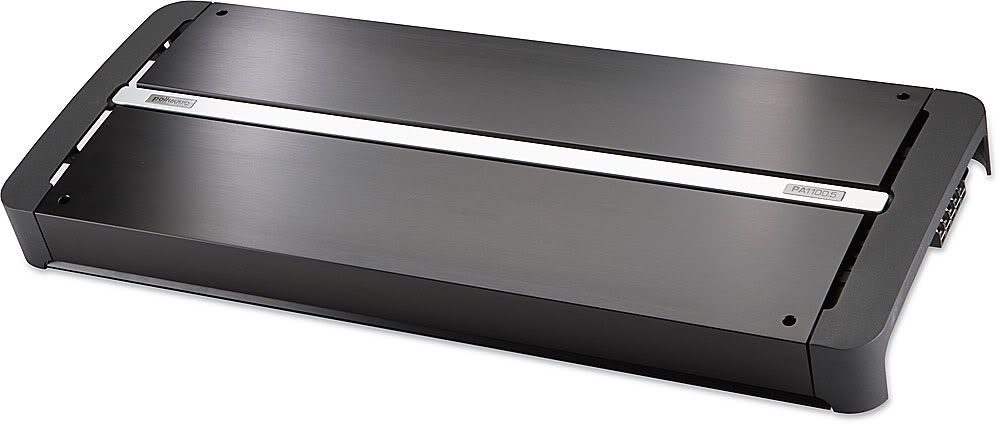
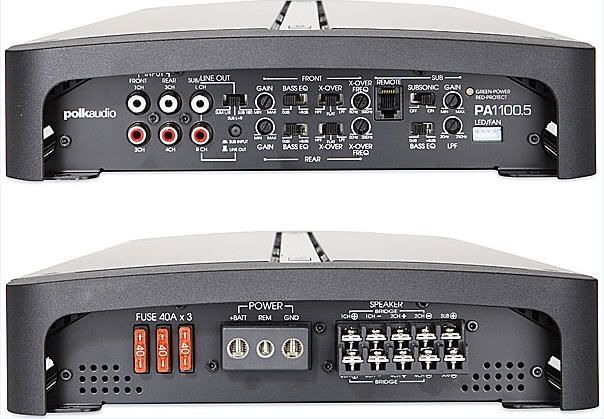
That's basically it. Really easy and straight forward. The process will be repeated for the passenger side as well. All (4) Polk Audio MM651's will be powered by a Polk Audio PA1100.5 (5 channel) amplifier.
I had it reupholstered but lets face it, the speakers in the doors are NOT in the best position to be heard (especially if you have a loud car, have your T-Tops off or both)! Even worse, some people cannot get to their sail panel speakers with a roll bar or roll cage in place. Again, the sail panel location is not a bad place to mount speakers but what if you could do away with the door and sail panel speaker locations? Here is a great way to put your roll bar to use. About a year ago, I was driving down the street and saw a very nice boat being towed to the lake. It was obvious that the owner of that boat spared no expense. It was VERY nice. Well, the closer I looked at his boat, I noticed he had a wakeboard bar. In its' construction, a "wakeboard bar" is very similiar to a roll bar for a car. The guy had his fishing poles, a GPS unit, his tow ropes and some speakers mounted on his wakeboard bar.
It was in that moment that it hit me.. LOL! You could see the cobwebs move and the gears begin to turn in my head.. If you can mount stuff on a wakeboard bar and keep it from moving or shifting, why can't you do that for a car.. I went home and googled the heck out of finding anyone who has performed this little idea but I did not have any luck finding any DIY articles. So, I figured I should document it in case anyone else wanted to do something similiar. So, here is how my idea transpired:
- First things first.. I found out the diameter of the tubing on my Wolfe Racecraft 6 point roll bar (found it on their website).
"Material: 1 3/4" x .134" Mild Steel Tubing"
- Next, I did some shopping and found a set of wakeboard speaker pods that I liked. I called the company and made sure their pod would fit the tubing size on my roll bar.
- I placed my order and received my pods shortly thereafter. They originally were polished aluminum but since my roll bar was powder coated yellow, I decided to have my speaker pods powder coated the same color to match.
With my roll bar mounted in place, I decided to install my speaker pods. I got the pods installed and checked to see if I could move them. NOPE! They are solidly mounted on the roll bar. They would not budge, even a little.. Satisfied that they were firmly mounted and unable to budge, I drilled out (4) of the "pre-drilled" mounting holes that came with the pods, to mount my speakers. I started with the crossover that came with my speakers.. I chose the Polk Audio MM651 6.5" speakers, but you could use the speaker of your liking. I removed the black plastic cap from the crossover and bolted the crossover to a thick piece of carpet padding. Next, I took that padding and glued it to the inside of the speaker pod. I let it dry and checked to see if it would move. NOPE! That crossover isn't going anywhere..
I then cut the Polk Audio supplied speaker wire down to a length to fit my needs. I spliced the ends, crimped on some terminal connectors and then used a heat gun with some heat shrink over the crimped terminal..
Next, I added some poly fill and snapped the screw mounts into place..
I connected the speaker wires accordingly and installed the first speaker..
I repeated the same process above and installed the second speaker..
That's basically it. Really easy and straight forward. The process will be repeated for the passenger side as well. All (4) Polk Audio MM651's will be powered by a Polk Audio PA1100.5 (5 channel) amplifier.
Last edited by officermartinez; 07-05-2009 at 06:50 PM.


 07-18-2009, 01:26 PM
#6
TECH Apprentice
Thread Starter
iTrader: (1)
Join Date: Jun 2008
Location: Fort Worth, Texas
Posts: 303
Likes: 0
Received 0 Likes
on
0 Posts
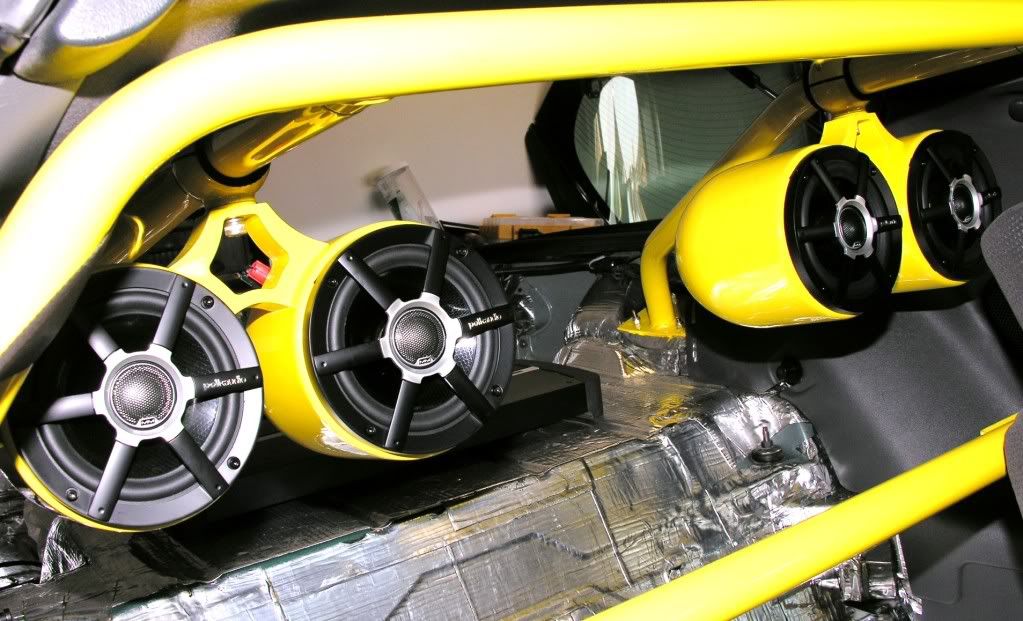
Thanks guys! I am still waiting for my other pair of Polk MM651's but they should be here sometime this upcoming week. I am still in the "design" phase on where I want to mount my amplifier.. I ended up going with a Subthump box for (3) 10" Polk Subs (MM1040DVC). I also decided to back those pods up just a little and ended up "centering" them on the back mount bar. Still looks great as far as I'm concerned..
Last edited by officermartinez; 07-19-2009 at 04:11 PM.
Trending Topics

 07-20-2009, 10:13 AM
#12
TECH Addict

I said inside, not outside... point was for some sound damping and to help reduce reflections in the box. Metal does not really make the best speaker box, especially when it's spherical.
07-20-2009, 10:21 AM
#13
TECH Apprentice
Thread Starter
iTrader: (1)
Join Date: Jun 2008
Location: Fort Worth, Texas
Posts: 303
Likes: 0
Received 0 Likes
on
0 Posts
Ohhhhh.. I totally misunderstood. You bring up a very good point! Well I have several yards of Fatmat left over. I will take your advice and line the interior of the pods with it! I appreciate the input!
07-20-2009, 07:45 PM
#14
TECH Apprentice
Thread Starter
iTrader: (1)
Join Date: Jun 2008
Location: Fort Worth, Texas
Posts: 303
Likes: 0
Received 0 Likes
on
0 Posts
 07-21-2009, 06:16 PM
#18
I have to say that looks incredibly cool!! For a show type of setup, that looks amazing and was very well done!
The only thing I can say is I'm not sure how 4 sets of components will sound blasting you in the back of the head though. Thankfully those look to be silk dome tweeters which can be a little more forgiving on the high frequencies. Definetely will have to do some tuning to compensate for location of the speakers. There will be virtually no front sound stage with this set up but as I said it does look damn cool!!!!! Well done!!
The only thing I can say is I'm not sure how 4 sets of components will sound blasting you in the back of the head though. Thankfully those look to be silk dome tweeters which can be a little more forgiving on the high frequencies. Definetely will have to do some tuning to compensate for location of the speakers. There will be virtually no front sound stage with this set up but as I said it does look damn cool!!!!! Well done!!
07-21-2009, 08:41 PM
#19
TECH Apprentice
Thread Starter
iTrader: (1)
Join Date: Jun 2008
Location: Fort Worth, Texas
Posts: 303
Likes: 0
Received 0 Likes
on
0 Posts
I have to say that looks incredibly cool!! For a show type of setup, that looks amazing and was very well done!
The only thing I can say is I'm not sure how 4 sets of components will sound blasting you in the back of the head though. Thankfully those look to be silk dome tweeters which can be a little more forgiving on the high frequencies. Definetely will have to do some tuning to compensate for location of the speakers. There will be virtually no front sound stage with this set up but as I said it does look damn cool!!!!! Well done!!
The only thing I can say is I'm not sure how 4 sets of components will sound blasting you in the back of the head though. Thankfully those look to be silk dome tweeters which can be a little more forgiving on the high frequencies. Definetely will have to do some tuning to compensate for location of the speakers. There will be virtually no front sound stage with this set up but as I said it does look damn cool!!!!! Well done!!
 07-21-2009, 09:11 PM
#20
TECH Apprentice
Thread Starter
iTrader: (1)
Join Date: Jun 2008
Location: Fort Worth, Texas
Posts: 303
Likes: 0
Received 0 Likes
on
0 Posts