When you click on links to various merchants on this site and make a purchase, this can result in this site earning a commission. Affiliate programs and affiliations include, but are not limited to, the eBay Partner Network.
Way back in the day... when I purchased my new Firebird, I purchased a LoJack. I was never told about the primary battery inside, which needs to be replaced every 3-5 years at a considerable expense!!!
Sometime over the past 19 years, I fell for the purchase of a new LoJack unit, probably because they didn't make the original type of battery anymore. (Bastards...) These days, I have the new-ish version, which runs off of a custom battery set made up of two soldered A123 Lithium batteries.
LoJack wants $100 to inconvenience us with a "visit and test & replace the battery every 3-5 years. LoJack has also created a proprietary pack with a battery connector that is impossible to find in North America. (Bastards...) I was able to just do the battery replacement for less than $10 of materials. This thread is to share that procedure.
I know few people use this type of thing anymore and I know this doesn't provide any piece of mind to test the thing and actually make sure it works - but hopefully it's better than nothing; particularly in a situation where one doesn't want to make a continued large investment in LoJack service. Please post back if this helps you.
Here is what the LoJack unit looks like. They will hide it behind a trim panel in your car. If you don't know where your unit is, the hard part will be hunting for this:
At the top of the unit are 4 Philips screws. Once those come off, the top can be removed, the circuit board slid out and the primary battery removed:
The original battery is simply two A123 Lithium batteries soldered together in series with tabs, giving a 6V pack. I understand that this unit powers the unit when the car is off, so it doesn't drain the car's battery.
I looked for similar battery packs for a good bit of time, and was also able to confirm that the connector is a A2007H00-2P by JWT, out of Korea. ... and we can't get any of that (welded A123 batteries or the connector) in North America in small quantities.
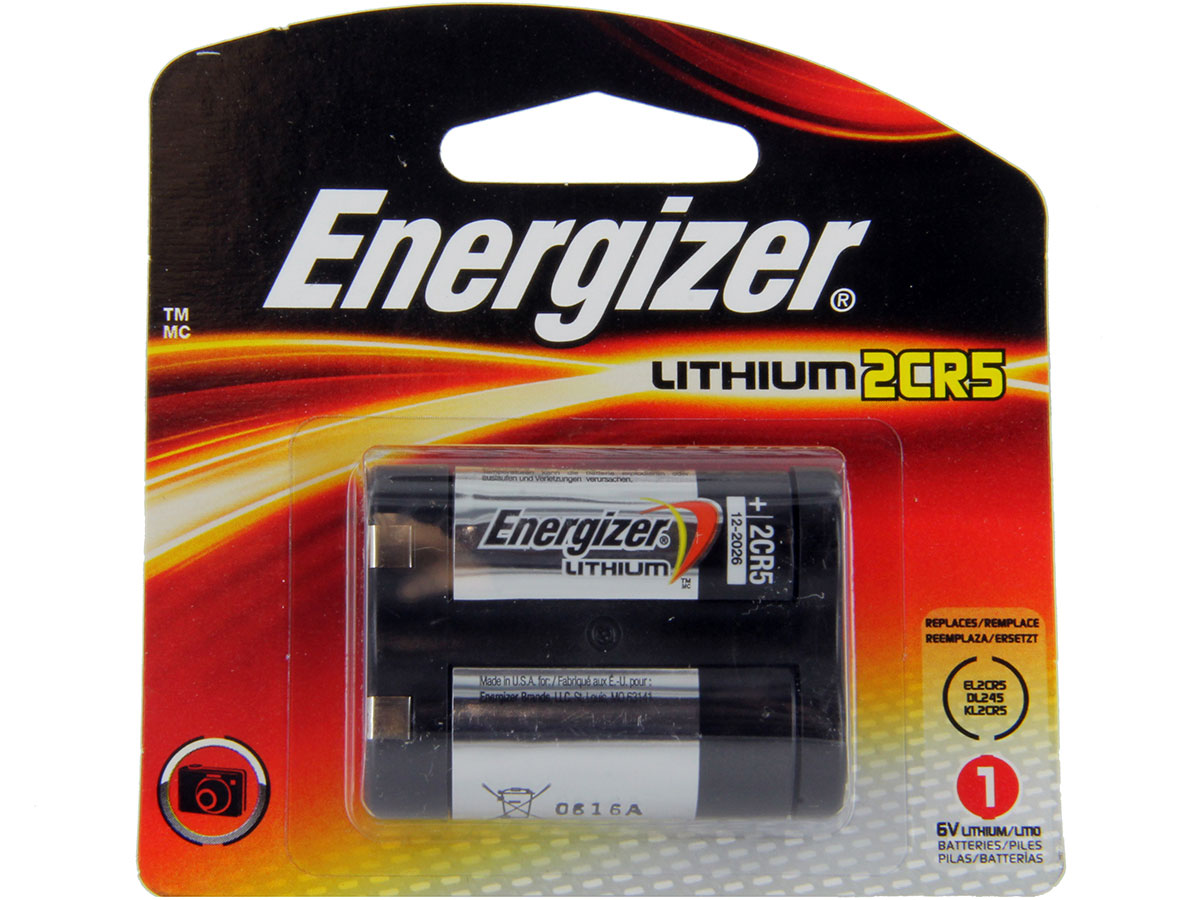
Then, as I was shopping to doctor something up on my own, I found the 2CR5 battery, which is exactly two A123 batteries, welded together in this configuration - just packaged under a different number and wrapper!
On top of that, I was able to score one on sale for $6. Cool.
The next step is to recycle the parts from the original battery and liberate the 2CR5 from its shell:
1) Cut apart the old battery, snip off the old leads for reuse, and recycle your old batteries:
2) Take the 2CR5 battery and make a cut across the bottom of the case. Don't worry - since this end won't connect the circuit, you won't have to worry about a spark hazard. No need to cut all the way through, either - get most of the way through and then use a screw driver to pry the plastic apart.
3) Next, spread the wings created by slicing the bottom:
4) Using a pair of diagonal cutters, snip the sides of the top of the battery case (staying away from the leads) so that the sides are cut, up to the snap-on top part of the case:
5) Once the top of the case is cut so the snap-on cap is free, the leads will come free and the plastic case should come completely apart:
With the parts free, the tabs on the new battery can be drilled, soldered, and shrink-tubed to the original leads:
The black wire goes to the negative end and the red wire goes to the positive end.
KEY HINTS:
- You will need to use a high quality flux when soldering these tabs. (rosin core solder will not work so well)
- Be sure you test the new battery. The 2CR5 has a special wrapper on it and doesn't have the positive and negative terminals marked.
I used a piece of 6" Thin Wall Heat Shrink Tubing (4RCW6) from Grainger to shrink it all together and insulate the pack.
From there, the board slides back into the case and the battery fits into its slot, also molded into the case. Replace the 4 Phillips screws holding the case together.
^ If I had to do it all over again, I'd use a thinner shrink tube or some tape to wrap the battery. This rubber tube made for a really tight fit putting everything back together.
I have LoJack as well and didn't realize about the battery. I can do this myself too. Thanks for posting.
If you have an older model, please post what you find. I don't remember what my original unit looked like but expect it should be similar. I'm sure your unit would not work unless the car is powered on. Assuming the unit is still good and that LoJack is keeping our registrations in order... a new battery should put you back in business.
Originally Posted by VIP1
Supposedly they mount it in a random place in the car, but I bet its not so random. Is there a typical place where they mount this unit?
They have to mount by an electrical umbilical to tap into one of the car's accessory power wires and also need a vertical area (A, B, or C Pillar) to run the antenna. On an F-Body, I would look behind the right sail panel trim and behind the right kick panel trim first.
From: Jacksonville, FL (originally from Toronto Canada)
I'm curious... couldn't you drill a small hole in the case to run the two leads out, seal it with epoxy, and connect the 2CR5 battery pack external to the device?
Or even use something like this to produce 6V output using four ordinary 1.5V AA batteries?
Last edited by WhiteBird00; May 15, 2018 at 07:36 AM.
If you have an older model, please post what you find. I don't remember what my original unit looked like but expect it should be similar. I'm sure your unit would not work unless the car is powered on. Assuming the unit is still good and that LoJack is keeping our registrations in order... a new battery should put you back in business.
They have to mount by an electrical umbilical to tap into one of the car's accessory power wires and also need a vertical area (A, B, or C Pillar) to run the antenna. On an F-Body, I would look behind the right sail panel trim and behind the right kick panel trim first.
Thanks. the car has had LoJack since I bought it new in 2001, but the car has been sitting unused in storage for the last 2yrs. Not sure when I'll be able to get to it.
Originally Posted by WhiteBird00
I'm curious... couldn't you drill a small hole in the case to run the two leads out, seal it with epoxy, and connect the 2CR5 battery pack external to the device?
Or even use something like this to produce 6V output using four ordinary 1.5V AA batteries?
That all depends on whether or not the LoJack unit re-charges the batteries. Even with the replacement wssix99 did, I'd be concerned with recharging. You really shouldn't try to charge non-rechargeable batteries. They could leak or explode. However, I'm no expert on batteries and since those look like regular 123 Lithium, what he did may be fine, especially if the unit doesn't recharge, but I still wouldn't trust standard AA batteries there. If there is a charging circuit, you need to keep the same battery chemistry that it was designed to charge.
I'm curious... couldn't you drill a small hole in the case to run the two leads out, seal it with epoxy, and connect the 2CR5 battery pack external to the device?
Or even use something like this to produce 6V output using four ordinary 1.5V AA batteries?
I understand that an external battery pack would make it much easier for a perpetrator to defeat the device. All they would have to do is locate the unit and pull the batteries out.
With the internal batteries, the unit is a little more discrete and it takes a little more work to dig the batteries out.
That all depends on whether or not the LoJack unit re-charges the batteries. Even with the replacement wssix99 did, I'd be concerned with recharging. You really shouldn't try to charge non-rechargeable batteries. They could leak or explode. However, I'm no expert on batteries and since those look like regular 123 Lithium, what he did may be fine, especially if the unit doesn't recharge, but I still wouldn't trust standard AA batteries there. If there is a charging circuit, you need to keep the same battery chemistry that it was designed to charge.
The LoJack batteries are non-rechargeable. This brings up a good point as there are rechargeables out on the market in the 123 form factor.
I expect that they chose the Lithium 123 battery because it has a very long shelf life - much longer than a standard Alkaline AA battery or a rechargeable. That being said, a Lithium AA battery should be fine, but that takes us back to the issue of form factor and needing the external battery pack.
From: Jacksonville, FL (originally from Toronto Canada)
Originally Posted by wssix99
I understand that an external battery pack would make it much easier for a perpetrator to defeat the device. All they would have to do is locate the unit and pull the batteries out.
With the internal batteries, the unit is a little more discrete and it takes a little more work to dig the batteries out.
That's a very good point although if they locate the unit they could just pull it out and throw it in the back of a passing pickup truck to have it go someplace else. You said yourself that "If you don't know where your unit is, the hard part will be hunting for this:" so it would seem that finding the unit would be the time consuming thing rather than disabling it once found.
That's a very good point although if they locate the unit they could just pull it out and throw it in the back of a passing pickup truck to have it go someplace else. You said yourself that "If you don't know where your unit is, the hard part will be hunting for this:" so it would seem that finding the unit would be the time consuming thing rather than disabling it once found.
Fair point. One could even add more batteries in parallel to beef up the capacity and also run the packs further away from the unit to make them remote. (We could hide them under the center console for easier access, etc.)
Taking a look at the 123 battery vs. a regular AA battery, it looks like we (regardless) should stick with the 123 battery with the Lithium / Manganese Dioxide (Li/MnO2) chemistry. It looks to me like the 123 battery would perform in cold weather, where batteries in the AA form factor would be suspect:
We have one in our 50 Chevy. I know where it is because installer asked for permission to put it there. It's been there about 8 years. How can I tell if it needs a new battery. It has the remote warning to call if the car is moved and remote is not near. That does not work any more. I have replaced batteries in the remotes.
Take the battery out and put a voltmeter on it. A new battery should be 6V. If you are far away from that, it's time for a new one. From my reading on the subject, I understand that we aren't going to get more than 3 to 5 years out of a pack. So, you are most certainly due.
I have the newer early warning system with mine to test my battery all i do is remove the key fob and drive my car it takes exactly 7 min for the calls and emails to start , meaning the motion sensor and key fob was not detected , i love it its got my car back once already within 1 hour my car was recovered in Oakland ca , but i woke up 7 min after they stole it and called the police got a huge head start on them
6 Common C5 Corvette Failures and What's Involved In Repairing Them
Slideshow: From wobbling harmonic balancers to failed EBCMs, these are the issues that define long-term C5 ownership and what repairs typically involve.
Retro Modern Bandit Pontiac Trans AM Comes With Burt Reynolds' Autograph
Slideshow: A modern Camaro transformed into a retro icon, this limited-run "Bandit" build blends nostalgia with brute force in a way few revivals manage.
Top 10 Greatest Cadillac V Series Performance Models Ever, Ranked
Slideshow: Cadillac didn't just crash the high-performance luxury vehicle party, it showed up loud, supercharged, and occasionally a little unhinged...
Coachbuilt N2A Anteros Is an LS2-Powered C6 Corvette In Italian Clothes
Slideshow: A one-off sports car that looks like a vintage Italian exotic-but hides a C6 Corvette underneath-just sold for the price of a new mid-engine Corvette.