
'70 Nova LY6/TH400 6.0VVT


 02-13-2014, 09:21 AM
#962

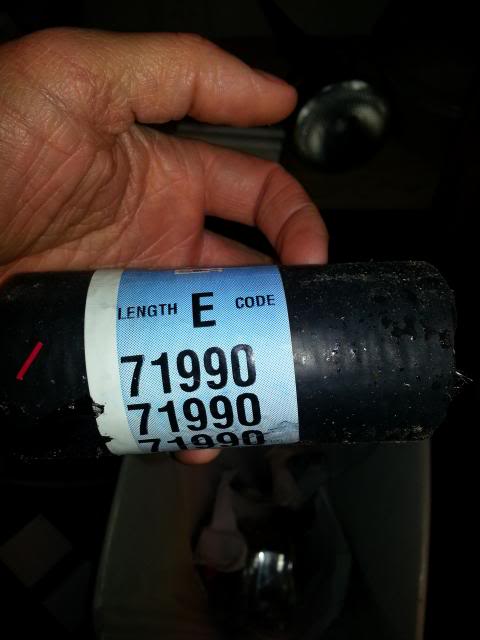
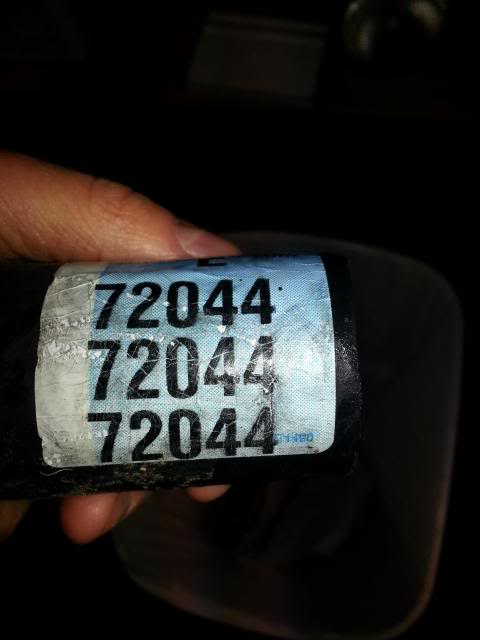
Hey Clint, have you figured out a lower radiator hose yet? I am using the L99 water pump and a stock type Champion radiator and I cannot find anything that fits. BTW, a 2002 Chrysler Voyager upper rad hose a near perfect fit for the upper hose. It has a 1 1/2 end for the radiator and a 1 5/16 for the water pump. The water pump side needs a little trimming but it works pretty well. I used a Dayco p/n 72044. Keep it up, your swap is looking good.
02-13-2014, 11:31 AM
#963
Kirk - I have't sorted out a lower hose yet, but I think the L99 waterpump inlet is in the same location as the truck pumps so there should be someone that has figured this out. I would check the x-body thread. Do you have any photos of the Voyager hose you found? I did come across a Subaru hose that had the right length and bends, but the ID is the same on both ends and fits loosely on the waterpump. Sounds like you found a better match. Is the routing a simple jog (two 90 degree bends)?
02-13-2014, 02:43 PM
#965
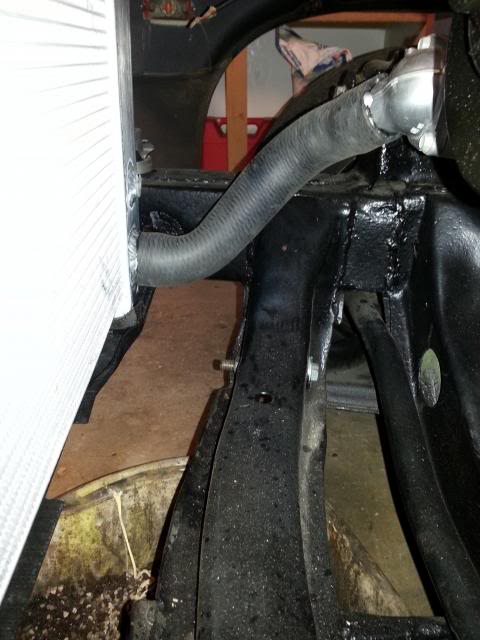
I found a thread today that suggested a 2005 Silverado V8 lower rad hose. It is 1 1/2" the whole length and works great. I had to trim off of both ends to make it work, but the "S" in the middle is what I needed..
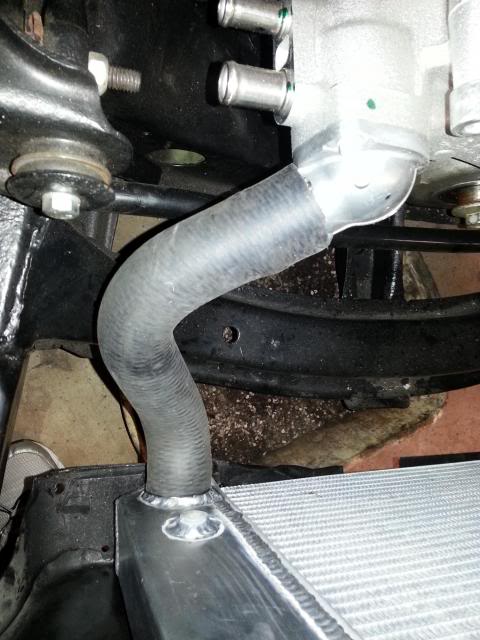
Here is the upper hose. As mentioned, it is for a 2002 Chrysler Voyager 3.3 liter. I had to trim about 4 inches off the water pump side and about 1/4" off the rad side.
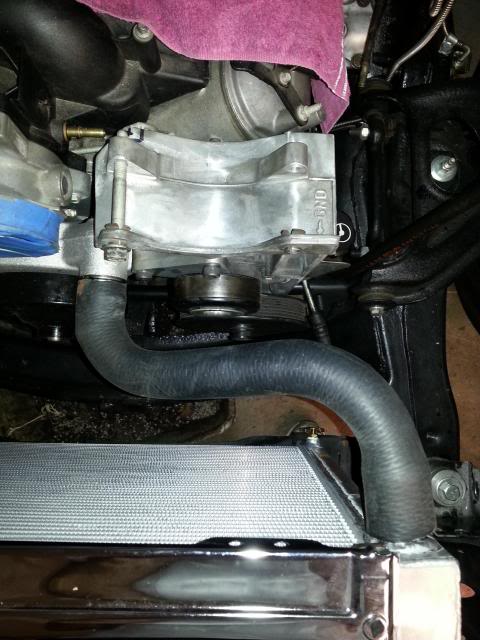


Here is the upper hose. As mentioned, it is for a 2002 Chrysler Voyager 3.3 liter. I had to trim about 4 inches off the water pump side and about 1/4" off the rad side.

 02-13-2014, 05:40 PM
#966
Kirk - That's a huge help, thank you! I'll pick some of those up and see how they work out on mine. The nice thing about the Subaru upper I found is you could use it without any trimming, but the ID fit is just a bit loose for my liking.
03-05-2014, 11:27 AM
#968
I think I ended up using the same bolts that were used on the LY6/truck bracket.
Not much to update on. I put a couple more rivet nuts in the firewall to support the coil bracket and finish welded the passenger side of the exhaust. Most of my time has been sucked by the wife and kids. I'm going to the races this weekend (March Meets in Fomoso) so that will be nice.
Not much to update on. I put a couple more rivet nuts in the firewall to support the coil bracket and finish welded the passenger side of the exhaust. Most of my time has been sucked by the wife and kids. I'm going to the races this weekend (March Meets in Fomoso) so that will be nice.
05-30-2014, 10:21 AM
#969
I bought a "SureFit" AC condenser & drier kit from Vintage Air that included mounting brackets and prebent tube from the condenser to the drier specific to this car. It includes about the largest universal parallel flow AC condenser that can fit in this space (14x24) which should be great for AC performance, but the mounting and positioning with the VA brackets is unacceptable for me. Here are some photos after installing it with the VA brackets:


With this mounting the condenser was shifted way over to the driver's side and there was contact/interference at the bottom driver's side corner between the condenser end tube/cap and the core support. Even when I spaced the thing out at the bottom to clear, having the lower bracket at the middle allows the whole condenser to rock a bit and I'm sure it would end up rattling against the core support in this mounting configuration. Not to mention the air flow is far from ideal with a good portion of the driver side of the condenser masked by the core support and the passenger side end cap blocking flow to the radiator.
I talked to VA a few times over the phone and sent photos; they say my positioning is per instructions and looks the same as their install, but couldn't understand why I'm having a problem. I wasn't very impressed with the tech support and they seemed to be more interested in telling me how this should work fine as is than offering to help resolve the issue or improve their own product. So I gave up on VA's help and started down my own path which should improve the overall fit & performance, but isn't plug & play like what I thought I was buying.
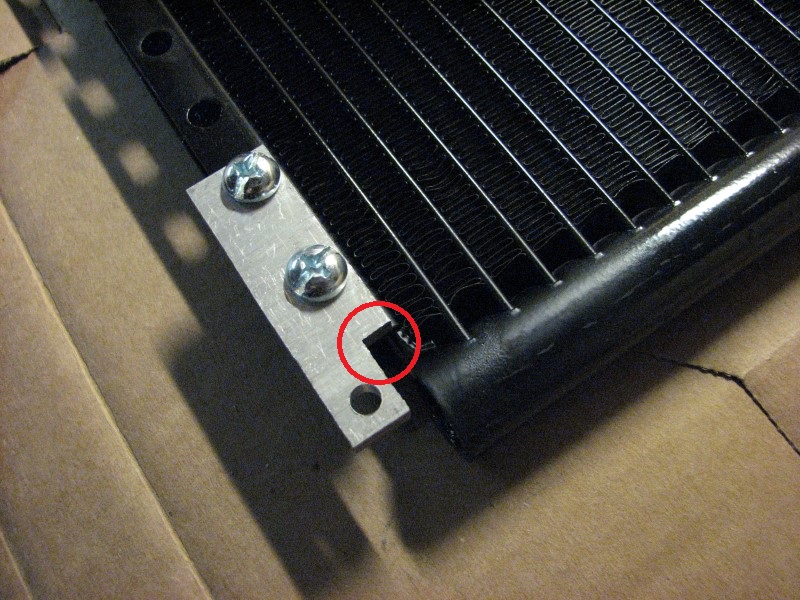
I had some 3/16" aluminum bar sitting around so I made a few simple brackets on the bandsaw & drill press.


With my revised mounting, the condenser is centered on the radiator opening and sits about 1/2" away from the radiator itself. It is supported at the four corners and I suspect will offer better cooling capacity. Unfortunately I will have to make more custom lines, but that shouldn't be a big deal and I can at least use the condenser and drier that came with the VA kit. I would like to add some rubber isolators at the 4 corners - I just need to find suitable hardware.
With that out of the way, I am now on to figuring out how to mount the transmission cooler. If you recall the car had a set of coolers mounted by the previous owner as shown below:

I have since put in a Griffen radiator with an integral cooler, so I am going to just use one of the two auxiliary coolers in series with the radiator. Here are the starts of mounting. I bent the 3/4" x 1/8" flatbar by hand in the vise and did the z-bracket on my press brake. Both need to be trimmed and the z-bracket needs mounting and speed holes added still. I was working quickly with remnants just to get an idea of how this would turn out. I put the cooler with ports at top and bottom so air will more readily bleed out (inlet bottom, outlet top).


After I finish this up, my goals are to get the AC & transmission lines ran and then work on the fan shroud so I finish off wiring. I can also start putting some of the body components back together once that's done.
With this mounting the condenser was shifted way over to the driver's side and there was contact/interference at the bottom driver's side corner between the condenser end tube/cap and the core support. Even when I spaced the thing out at the bottom to clear, having the lower bracket at the middle allows the whole condenser to rock a bit and I'm sure it would end up rattling against the core support in this mounting configuration. Not to mention the air flow is far from ideal with a good portion of the driver side of the condenser masked by the core support and the passenger side end cap blocking flow to the radiator.
I talked to VA a few times over the phone and sent photos; they say my positioning is per instructions and looks the same as their install, but couldn't understand why I'm having a problem. I wasn't very impressed with the tech support and they seemed to be more interested in telling me how this should work fine as is than offering to help resolve the issue or improve their own product. So I gave up on VA's help and started down my own path which should improve the overall fit & performance, but isn't plug & play like what I thought I was buying.
I had some 3/16" aluminum bar sitting around so I made a few simple brackets on the bandsaw & drill press.
With my revised mounting, the condenser is centered on the radiator opening and sits about 1/2" away from the radiator itself. It is supported at the four corners and I suspect will offer better cooling capacity. Unfortunately I will have to make more custom lines, but that shouldn't be a big deal and I can at least use the condenser and drier that came with the VA kit. I would like to add some rubber isolators at the 4 corners - I just need to find suitable hardware.
With that out of the way, I am now on to figuring out how to mount the transmission cooler. If you recall the car had a set of coolers mounted by the previous owner as shown below:
I have since put in a Griffen radiator with an integral cooler, so I am going to just use one of the two auxiliary coolers in series with the radiator. Here are the starts of mounting. I bent the 3/4" x 1/8" flatbar by hand in the vise and did the z-bracket on my press brake. Both need to be trimmed and the z-bracket needs mounting and speed holes added still. I was working quickly with remnants just to get an idea of how this would turn out. I put the cooler with ports at top and bottom so air will more readily bleed out (inlet bottom, outlet top).
After I finish this up, my goals are to get the AC & transmission lines ran and then work on the fan shroud so I finish off wiring. I can also start putting some of the body components back together once that's done.
 05-30-2014, 02:05 PM
#971
LOL. Funny I was kicking myself for that just after I cut them. For some reason I had it in my mind that they would go inside the c-channel and need full sharp corner cuts to clear the end tubes of the condenser, so decided in my haste not to put a radius there. Some day when they crack and fall to bits I will be sure to fillet their replacements.
 05-30-2014, 02:37 PM
#973
That would be a riot. I am scared to take the Nova there though. I would be devastated if I wadded it up. The speeds can get pretty high there and you never know who else is going to be on the track with you. It's one thing to spin out harmlessly on your own, but if some ***** in a Honda cuts in front of you and shuts down, there's not a lot you can do.
I will probably stick to autocross for a while until I can get the safety equipment, cage, brakes, and ***** needed for pushing higher speeds.
I will probably stick to autocross for a while until I can get the safety equipment, cage, brakes, and ***** needed for pushing higher speeds.
 06-01-2014, 11:41 PM
#976
For the above-posted rad hose pics, that rad looks like a stock-replacement narrow one eh?
If so, looks like those hoses will work fine. If anyone is looking for a lower rad hose for a wider-than-stock rad, check out what I found...
https://ls1tech.com/forums/18244374-post1459.html
If so, looks like those hoses will work fine. If anyone is looking for a lower rad hose for a wider-than-stock rad, check out what I found...
https://ls1tech.com/forums/18244374-post1459.html
07-10-2014, 10:50 AM
#977
Finally picked up a piece of 18 gauge sheet metal and started working on my fan shroud. Originally I planned to use the plastic shroud from the Volvo, but it positioned the fan toward the passenger side and, as it turns out, I need the fan shifted toward the opposite side for cold air intake clearance. I have virtually no sheet metal tools: a jigsaw, hand shears - that's pretty much it. I don't own a brake, bead roller, shear, or any of the fun stuff. So I decided to try my hand at forming with clamps and hammer. I cut a piece of 3/4" oak plywood to use as a form, routed two edges with a 3/8" radius, and got to work.
Here is the first bend, going over the 3/8" radius edge. This is WAY under clamped. The result is that the part shifted on the form and I had to tweak it a bit afterwards. I added more clamps for future bends.


The radius bends (well the second one I did anyway) turned out great. I used a rubber mallet staying right on the edge of the from, working end to end over many blows, finally ending with what you see above. I left extra on the ends and used hand shears to trim to length once done. I also used a jig saw to cut the fan opening.
On to the next, more clamps this time. This one is over a hard edge (no radius). I wanted radiuses on all four edges, but I didn't have room due to the diameter of the fan and where the flanges need to be for mounting.


I added another bend to the shroud to make the upper flange, but didn't take any photos in process. Here it is mocked up; I still need to do the lower flange.


Well that's where I'm at. The top needs to be trimmed and I think I'm going to fold it over on itself to make a non-sharp edge.
I have very little experience with sheet metal so I am stoked it looks half decent despite my inexperience and crude technique. I have to thank a friend from another forum, Jaysin, for inspiration. He posted this great thread describing how he made a similar shroud which made me want to do radius bends and also the awesome video below showing people making something from virtually nothing using very simple hand tools.
I had plans to try debossing it using a press form (see this thread) but have since abandoned the idea after realizing the fan needed to be offset to one side and that the debossed area will likely be obscured by cold air intake etc. In the end it probably wouldn't be seen, so I will save my time for other things. I am still considering adding flaps in that area to allow air flow when going down the road.
Here is the first bend, going over the 3/8" radius edge. This is WAY under clamped. The result is that the part shifted on the form and I had to tweak it a bit afterwards. I added more clamps for future bends.
The radius bends (well the second one I did anyway) turned out great. I used a rubber mallet staying right on the edge of the from, working end to end over many blows, finally ending with what you see above. I left extra on the ends and used hand shears to trim to length once done. I also used a jig saw to cut the fan opening.
On to the next, more clamps this time. This one is over a hard edge (no radius). I wanted radiuses on all four edges, but I didn't have room due to the diameter of the fan and where the flanges need to be for mounting.
I added another bend to the shroud to make the upper flange, but didn't take any photos in process. Here it is mocked up; I still need to do the lower flange.
Well that's where I'm at. The top needs to be trimmed and I think I'm going to fold it over on itself to make a non-sharp edge.
I have very little experience with sheet metal so I am stoked it looks half decent despite my inexperience and crude technique. I have to thank a friend from another forum, Jaysin, for inspiration. He posted this great thread describing how he made a similar shroud which made me want to do radius bends and also the awesome video below showing people making something from virtually nothing using very simple hand tools.
I had plans to try debossing it using a press form (see this thread) but have since abandoned the idea after realizing the fan needed to be offset to one side and that the debossed area will likely be obscured by cold air intake etc. In the end it probably wouldn't be seen, so I will save my time for other things. I am still considering adding flaps in that area to allow air flow when going down the road.
07-10-2014, 10:52 AM
#978
I also made progress on plumbing the transmission cooler.

I added a few holes on the side of the z-bracket, but I don't think they will have much effect. For the plumbing, I am using the same 3/8" steel tubing I used for fuel lines. You can see the lines going into and out of the radiator in the photos below of the fan shroud. I had to use a hard 90 degree fitting at the top port of the radiator for cold air intake clearance. Otherwise the bends are about 1" CLR.
For the lines going back to the transmission cooler, I have very little room to work due to the AC compressor, bracket and tensioner. I decided to try running hardlines along the outside of the frame rail. I ran one of them and it looks okay - photos are linked below because I did not resize them appropriately for the forum.
http://cjnn.xtremefabricator.com/ima...ly6swap748.JPG
http://cjnn.xtremefabricator.com/ima...ly6swap749.JPG
My plan is to add bulkhead fittings and a bracket on top of the frame rail near the back then run braided hose over the top of the headers to the transmission. Hopefully I can tear this all off in a few years and put in a 3rd pedal / six speed.
07-10-2014, 08:37 PM
#980
For the above-posted rad hose pics, that rad looks like a stock-replacement narrow one eh?
If so, looks like those hoses will work fine. If anyone is looking for a lower rad hose for a wider-than-stock rad, check out what I found...
https://ls1tech.com/forums/18244374-post1459.html
If so, looks like those hoses will work fine. If anyone is looking for a lower rad hose for a wider-than-stock rad, check out what I found...
https://ls1tech.com/forums/18244374-post1459.html