
1970 GTO Version 2.0


 05-02-2008, 01:39 PM
#103
TECH Senior Member
Thread Starter
iTrader: (7)
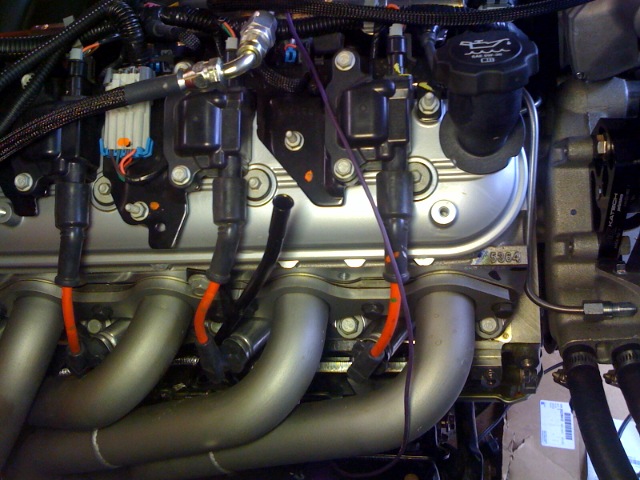
Since this was a truck engine there are a few things on it that are specific to being in a truck. The oil filler tube in the valve cover is one of those things, and the other is the dipstick. While both of these items are perfectly functional, they look a little out of place with the low, car style intake. Here is what I am talking about:
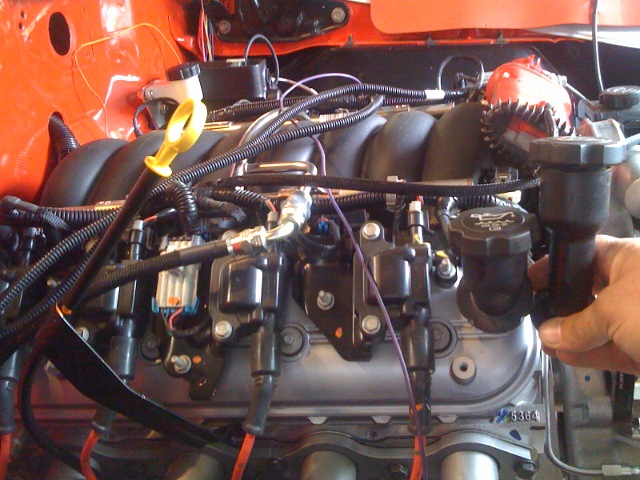
The short filler tube is from a C6. You can see how much better it looks than the tall truck style filler. Same goes for the dipstick. Here you can see the C6 dipstick tube. (I am still waiting for the dipstick to arrive)
The total for the 3 items at the local dealership was just over $40. No doubt mail order would be less, but then you have to add shipping. If you are ordering a bunch of other parts it would make sense to include these small items.
A while back I also received this handy, dandy fitting adapter kit:
Metric fitting kit
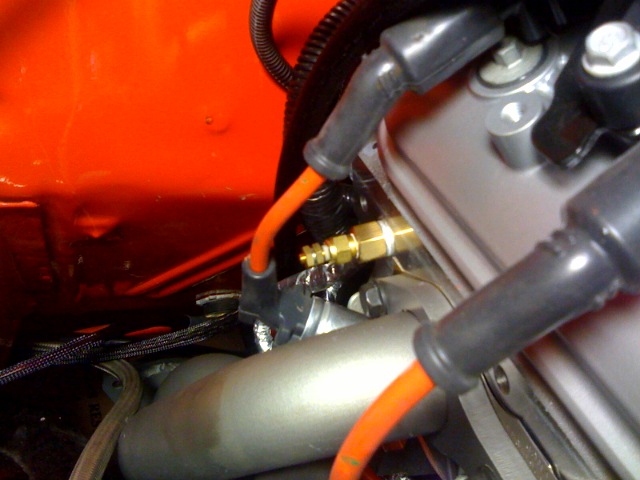
I used the adapters to install my oil filter sender behind the intake manifold, as well as to install the water temperature sending unit into the passenger side head:
Another company that has great products for adapting LSx engines into all kinds of cars is Jags That Run. JTR offers these simple aluminum tubes that allow you to mate up two radiator hoses of different diameters. This make making radiator hoses a breeze. Here is the adapter for the lower hose. It reduces the 1 3/4" lower radiator hose on my radiator, to the 1 1/2" hose on the thermostat housing of LSx engines:
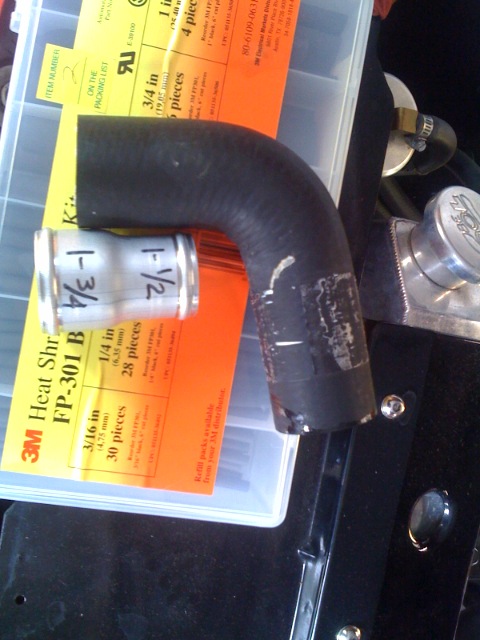
I got the hoses at O'Reilly's autoparts. The little 90 degree upper hose was PN 20267.
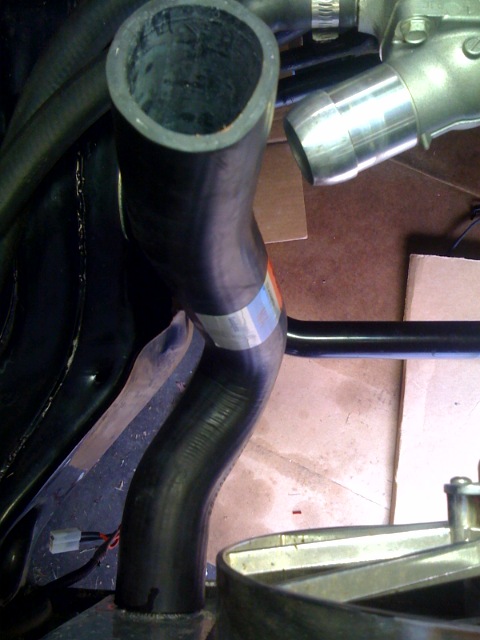
The lower hose was PN 21064. It has the perfect bend that follows the frame and included an internal spring. Here is the end result after the hoses were trimmed and joined together by the coupler:
Andrew
The short filler tube is from a C6. You can see how much better it looks than the tall truck style filler. Same goes for the dipstick. Here you can see the C6 dipstick tube. (I am still waiting for the dipstick to arrive)
The total for the 3 items at the local dealership was just over $40. No doubt mail order would be less, but then you have to add shipping. If you are ordering a bunch of other parts it would make sense to include these small items.
A while back I also received this handy, dandy fitting adapter kit:
Metric fitting kit
I used the adapters to install my oil filter sender behind the intake manifold, as well as to install the water temperature sending unit into the passenger side head:
Another company that has great products for adapting LSx engines into all kinds of cars is Jags That Run. JTR offers these simple aluminum tubes that allow you to mate up two radiator hoses of different diameters. This make making radiator hoses a breeze. Here is the adapter for the lower hose. It reduces the 1 3/4" lower radiator hose on my radiator, to the 1 1/2" hose on the thermostat housing of LSx engines:
I got the hoses at O'Reilly's autoparts. The little 90 degree upper hose was PN 20267.
The lower hose was PN 21064. It has the perfect bend that follows the frame and included an internal spring. Here is the end result after the hoses were trimmed and joined together by the coupler:
Andrew
Last edited by Project GatTagO; 05-03-2008 at 07:47 PM.
05-03-2008, 08:23 PM
#104
TECH Senior Member
Thread Starter
iTrader: (7)
I spent all day in the garage today, but I am afraid that there wasn't really anything new to show you guys. I did a lot more of "connecting the dots." I found the wire under the dash that went back to the relay for my fuel pump. This was used by the Commander 950 to turn on the pump. The GMPP harness already had a relay for the fuel pump, but I really like taking power directly from the battery to run the fuel pump. So after consulting with a couple of folks I decided to just run two relays. The relay in the harness activates the relay in the back of the car. After hooking everything up it worked perfectly. When the ignition key is in the "Run" position the pump primes for about 5 seconds and then shuts off.
Since I got all of the coolant hoses hooked up, I went ahead and filled the system. I filled the radiator. Then I filled the block through the upper radiator hose. I fired it up and ran the engine for a while. The O2 sensors are not hooked up and as it warmed up, and went into closed loop, it started idling a little rough, but it did not die. So I let it idle and warm up a bit. The stock thermostat is probably around 205 and the ECU turns on the fans at 212. The lower radiator hose stayed relatively cool until the thermostat opened. Once that happened, I just topped off the radiator and hopefully that will do it. The fans kicked on at around 212 as they were supposed to. Nice thing about the GTO is that I already had a giant Be Cool radiator. I never had any issues with the 502 and I am sure it will cool this engine just fine. The RX7 had half the radiator, and almost no grill, and I didn't have any issues.
Now I need a little help from everyone. The GMPP harness instruction say that the tach signal is a low voltage 2 pulse square wave. It also said that some older tachs may require a pull up resistor in order to function properly. I hooked up the wire from the tack and sure enough it did not work. So, what the heck is a pull up resistor and how do I hook it up?
I am trying really hard to resist project "scope creep." So with some luck this thing will move under its own power next weekend. LS swap in less than 2 months, not bad, if I do say so myself.
Andrew
 05-04-2008, 11:28 PM
#107
TECH Senior Member
Thread Starter
iTrader: (7)
So today I did as this thread above indicated:
https://ls1tech.com/forums/showthrea...sistor+up+pull
I installed a 1K Ohm resistor between a switched power source and the tach signal wire:
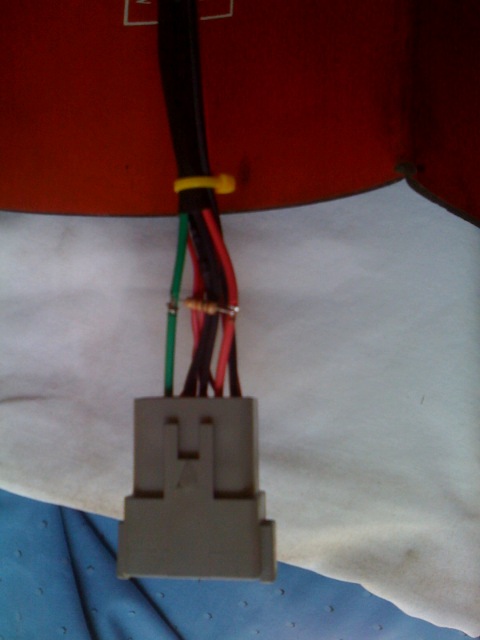
The tach worked, but the needle was kind of jumpy below 1000 RPM. Any electronics experts have a suggestion?
Andrew
https://ls1tech.com/forums/showthrea...sistor+up+pull
I installed a 1K Ohm resistor between a switched power source and the tach signal wire:
The tach worked, but the needle was kind of jumpy below 1000 RPM. Any electronics experts have a suggestion?
Andrew
05-05-2008, 09:12 AM
#108
TECH Senior Member
Thread Starter
iTrader: (7)
So I gave Autometer a call to see what words of wisdom they may have for me. Basically they told me that they have been unsuccessful in making their tachometers work with the low voltage signal that comes off late model ECU output wires. Their suggestion was to purchase the 9117 box that taps directly into the coil harness and converts the signal (whatever that means) to a square wave that can be read by the tach. My initial reaction is that this is BS, to get me to buy an $80 dollar box that costs them 5 bucks (at most) to make. I am going back to Radio Shack for a collection of 99 cent resistors.
This brings up another point. Why couldn't the GM engineer who worked on the GMPP harness pick up the phone and dial up Autometer, VDO, and Stewart Warner? Between those 3 brands I bet you will cover 95% of the aftermarket gauge market. It would have been a 15 minute discussion to determine what these tachometers need in order to function properly. The information could have been easily outline in the harness instructions. Instead, they put this in the documentation of the harness:
"Note the signal is a low voltage square wave, some older style of tachometers may need a pull-up resistor in order to read the signal -- this detail is left to the user"
WTF?!?!?!
Andrew
 05-05-2008, 09:34 AM
#110
TECH Senior Member
Thread Starter
iTrader: (7)
Andrew
05-05-2008, 09:41 AM
#111
Well when you figure it out, let the rest of us know  They told me it was a result of the LS1 acting like a 4 cylinder and that you could have their tach be smooth at low RPM or at high rpms but not both
My stock BMW tach is also as smooth as silk, so which one is a POS??
BTW, I never saw red stock spark plug wires - nice
They told me it was a result of the LS1 acting like a 4 cylinder and that you could have their tach be smooth at low RPM or at high rpms but not both My stock BMW tach is also as smooth as silk, so which one is a POS??
BTW, I never saw red stock spark plug wires - nice
05-05-2008, 10:02 AM
#112
TECH Senior Member
Thread Starter
iTrader: (7)
Andrew
 05-05-2008, 09:51 PM
#114
TECH Senior Member
Thread Starter
iTrader: (7)
So after being a little ticked off this morning about the whole tachometer ordeal I decided to make some calls. I called my buddy John Parsons and he gave me a quick run down of Ohms Law. So I decided that instead of getting a collection of various resistors I would get a 10K Ohm potentiometer and see what works best. So I hooked up the potentiometer to the tach and set it to the 10K setting. Fired up the car and the tach seemed to work fine at low RPM. I then kept reducing the resistance until the tach stopped responding. The I zeroed in on the lowest setting where the tach responded smoothly. I then turned off the car and measured the resistance across the potentiometer. It rea 3.9K Ohms. So I gave myself some headroom and installed a 4.7K Ohm resistor. So far so good. The tach does seem to flutter ever so slightly at about 800 RPM, but there are no random fluctuations to zero. I think that will do it.
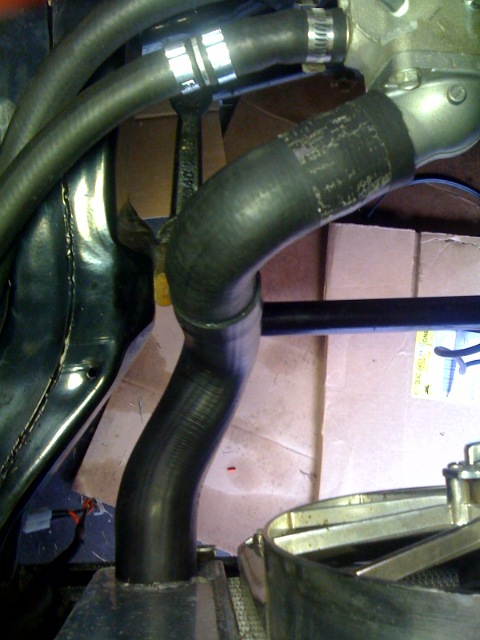
I also went to Napa and they had the Gates heat shrink hose clamps in stock. They only had a couple of sizes, but I was able to do the upper radiator hose:

I have to say that the hose clamps work as advertised. I will order some extras from McMaster just to have them around.
I also finished bleeding the brakes, filled up the transmission with fluid, and tightened up the rear suspension bolts. Hopefully next weekend I can get it into the fabricator to have the exhaust finishes up.
Andrew
05-08-2008, 05:13 PM
#115
TECH Senior Member
Thread Starter
iTrader: (7)
The Big Brown truck showed up today with the hose clamps from McMaster Carr. I got the big clamps to do the 1.75" section of the lower radiator hose, as well as some smaller clamps to do the heater hose.

In retrospect, I should have installed the little hose reducer a little further back in the heater hose so it would not be so visible, but oh well. It's done.
One thing that I learned while working on the RX7 is that the LSx engines are a little finicky to "burp." One trick that really helps is to fill the engine through the upper radiator hose. What this does is fill the block as much as possible before the engine is even started. After filling the engine through the upper hose, I fired it up and topped off the radiator. I don't think that cooling will be an issue at all with this engine. I have a huge Be Cool radiator and it took about 20 minutes for the engine to reach 210. Once the thermostat opened I topped off the radiator again. The fans kicked on at just over 210 (the ECU documentation said they are supposed to kick on at 212) and it only took about 10 seconds for the temp to drop enough for the fans to shut off. Driving around I don't think the fans will kick on at all.
Andrew
05-08-2008, 09:11 PM
#117
TECH Senior Member
Thread Starter
iTrader: (7)
In a previous update I mentioned that I swapped out my brake master cylinder for another one. I did this mainly to resolve an issue with the push rod retention method. The MC that I am currently using has a nice deep pushrod hole as well as a clip on the tip of the pushrod that retains it inside the MC. Just because everything bolted up fine, doesn’t mean that this MC will work in my application. The pedal seemed to be very high and the pedal effort is rather high. So I decided to see what was really happening at the caliper. I went to my local hydraulic hose retailer and picked up an inexpensive pressure gauge. After installing the gauge in a bleeder screw in my caliper I had a friend step on the break pedal and to see what kind of pressure was being generated. Keep in mind that Wilwood rates their calipers at a maximum of 1200psi. From what I understand, past that point the caliper starts to deflect. So here is the result:
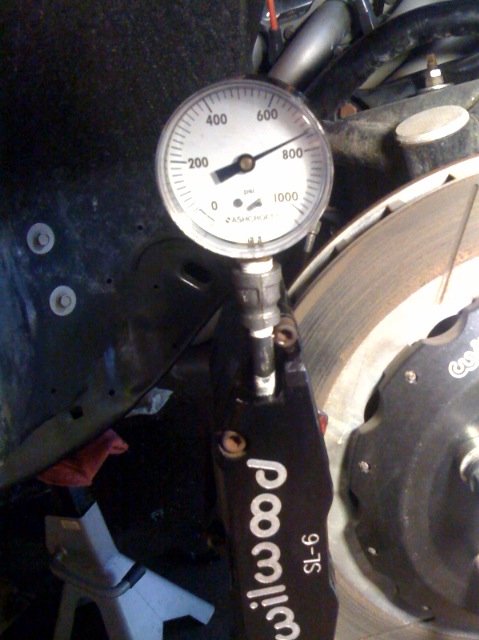
With moderate pedal effort my friend was able to generate a fairly easy 800-1000psi at the caliper. By pushing a little harder I am sure that he was going past 1200psi. With all that being said, I think that this MC will work just fine. The pedal effort will be moderate and the braking will be excellent!
Andrew