
Battery Relocation Pics
 10-30-2005, 09:25 AM
#1
TECH Addict
Thread Starter
iTrader: (17)

Join Date: Dec 2002
Location: Hanover, MD
Posts: 2,190
Likes: 0
Received 0 Likes
on
0 Posts

Here are some pics of the hatch end of my battery relocation. Used an Optima Red Top, AFCO battery tray(same as BMR only $60.00 cheaper from Summitt) , 2/0 Gauge Positive Wire(probably overkill but wanted to be safe) and 2 gauge ground wire, and 200 Amp inline Type T fuse.
Here's an overall shot of the setup:

Here's a shot of the 200 Amp fuse:

Here's a shot of the 2/0 gauge + wire. This is a big *** wire at 5/8" diameter:

Bryan
parbreak
Here's an overall shot of the setup:
Here's a shot of the 200 Amp fuse:
Here's a shot of the 2/0 gauge + wire. This is a big *** wire at 5/8" diameter:
Bryan
parbreak

 10-30-2005, 10:56 AM
#5
TECH Fanatic
iTrader: (7)
Join Date: Dec 2004
Location: pensacola, fl.
Posts: 1,555
Likes: 0
Received 0 Likes
on
0 Posts
instead of the fuse i would of got one on the rockford fosgate breakers so if it does trip your not stranded...just my .02 but looks good wish i had the time and money to do it...
10-30-2005, 11:08 AM
#6
TECH Addict
Thread Starter
iTrader: (17)
Join Date: Dec 2002
Location: Hanover, MD
Posts: 2,190
Likes: 0
Received 0 Likes
on
0 Posts
Originally Posted by slimcracka
instead of the fuse i would of got one on the rockford fosgate breakers so if it does trip your not stranded...just my .02 but looks good wish i had the time and money to do it...
Won't be stranded. You probably can't see it too clearly in the pics, but
the fuse is simply connected on each end by 2 gauge copper lugs that are secured by bolts and nuts. If the fuse blows, you unscrew the nuts, pull the bolts, remove fuse and attach the two copper lugs directly together with one of the bolt/nut combos. Very easy and a good system.
Bryan
10-30-2005, 11:55 AM
#7
TECH Addict
Thread Starter
iTrader: (17)
Join Date: Dec 2002
Location: Hanover, MD
Posts: 2,190
Likes: 0
Received 0 Likes
on
0 Posts
Originally Posted by davered00ss
Looks good, but how much extra weight was that?
Don't really care about the weight, this was done mostly as an appearance mod. Weight distribution is definitely better though. 2/0 gauge wire probably added about 15-18 lbs over the entire run, but I've reduced weight in a lot of other ways, such as AC system removal.
Bryan
Trending Topics
10-30-2005, 12:07 PM
#8
TECH Addict
Thread Starter
iTrader: (17)
Join Date: Dec 2002
Location: Hanover, MD
Posts: 2,190
Likes: 0
Received 0 Likes
on
0 Posts
Originally Posted by ATLHwyRacer
Hey Bryan,
Looks good, could you post a parts list and price of what it cost you to do all that?
Thanks!
Looks good, could you post a parts list and price of what it cost you to do all that?
Thanks!
+ Wire: 2/0 gauge: Need about 20 feet $1.30 ft. +/- off Ebay
- Wire: 2 gauge: Need about 3-4 feet for rear ground.
- Wire: 4 gauge: Used for front ground
200 Amp Fuse: Bought from a board member for $30.00
Various connectors 2 and 2/0 and 4 gauge, electrical tape, shrink wrap tape, etc.
Didn't keep track of everything, but probably less than $100 for everything.
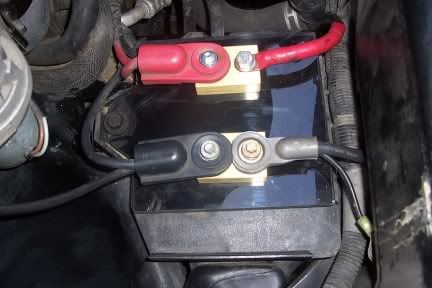
I also made this as a distribution box for the front end:
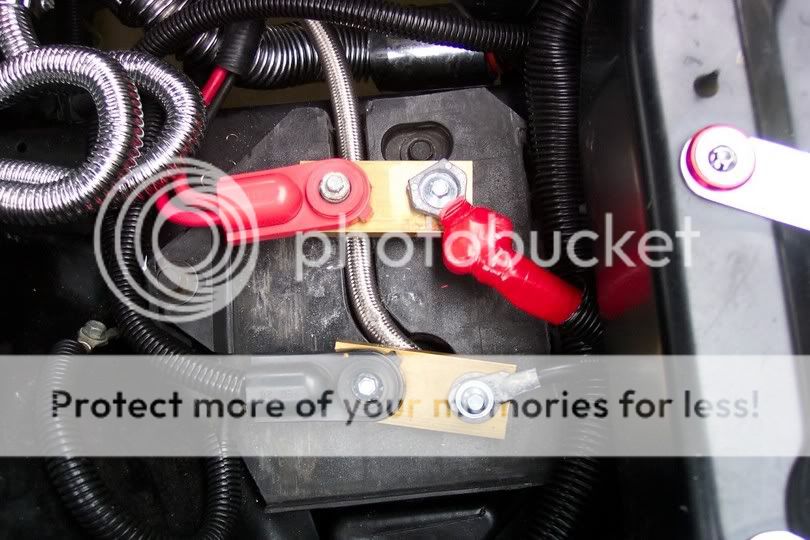
This was bit pricey due to the cost of brass. Got it from McMaster Carr I believe. 12" block was like $28. I used brass because it is a great conductor
and there was absolutely no voltage drop across the brass, to the best of my multimeter's accuracy.
This was a shot during assembly and test fitting. There is now a piece of plexiglass under the brass distribution blocks so they can be mounted and I've fabbed up a cover for the entire area out of carbon fiber.
Bryan
 10-31-2005, 06:29 AM
#10
Restricted User
iTrader: (35)

Join Date: Dec 2004
Location: Hanover PA
Posts: 548
Likes: 0
Received 0 Likes
on
0 Posts
https://ls1tech.com/forums/appearance-detailing/402261-battery-relocation-pics.html
This is in my 98 TA
This is in my 98 TA
Last edited by 76LS1BIRD; 10-31-2005 at 08:10 PM.