
***Introducing Blackbird Lighting Solutions 98+ Firebird Proj. Headlight Retro GP***
 03-30-2010 | 11:30 PM
#281
I don't see a problem using one and it may work well. If you source one that works well I can look to incorporate it in future kits if it proves to be useful. The third long bolt is not an active member of the headlight adjustment same as the original spring for the bucket provided no active adjustment.
03-31-2010 | 12:16 AM
#282

Joined: Aug 2005
Posts: 153
Likes: 0
From: Frisco/Plano, TX (formerly LUZ_2_A6)
I ended up putting the adjusters in without the springs on them and then putting the stock spring back in where the long bolt is supposed to be and i was able to get them adjusted to a decent place for now. I'm going to try to find a slightly looser spring and put it in instead.
I don't think i understand the way we are supposed to be installing the long bolt, but i had the adjusters in with the springs loose and as tight as they would get and me lights were loose as well...but like i said, stock spring and adjusters without the springs and it's good till i can find a different spring. I'll jack with it later this week and come back with my findings.
p.s. These lights are amazing, just like i knew they would be...it's so weird to be in my firebird and actually be able to see the road.
Here are a couple before the adjustments, i'll get some more later when i find out how to control the shutter speed on the camera.

 03-31-2010 | 06:09 AM
#287

I ended up putting the adjusters in without the springs on them and then putting the stock spring back in where the long bolt is supposed to be and i was able to get them adjusted to a decent place for now. I'm going to try to find a slightly looser spring and put it in instead.
I don't think i understand the way we are supposed to be installing the long bolt, but i had the adjusters in with the springs loose and as tight as they would get and me lights were loose as well...but like i said, stock spring and adjusters without the springs and it's good till i can find a different spring. I'll jack with it later this week and come back with my findings.
p.s. These lights are amazing, just like i knew they would be...it's so weird to be in my firebird and actually be able to see the road.
Here are a couple before the adjustments, i'll get some more later when i find out how to control the shutter speed on the camera.

With that said, re-using the stock spring in the lower corner was a thought but I was concerned with the tension being too much for the aluminum plate even though it is pretty beefy. Let me know how the final adjustments look and please take pics!
My next GP will be starting soon but orders filled from the first GP will obviously be filled first. The timeframe of the next GP will likely be a week and I am stocking up (as much as I can) on the projectors so some orders will be ready to ship shortly after payment. Hella is stepping up with production in the coming months so the wait time should be cut down significantly.
I called and yelled at Hella yesterday as my high beam projectors should have been at my doorstep already. Your package is literally sitting right behind me just waiting for those two high beam projectors.

The low beam 60mm's are still scheduled to arrive the middle of April per my notice with them "hopefully" being in my hands the week after so I can fill all the orders for the first GP. To say I am frustrated is an understatement as I want these to get out there!
The timeframe of the next GP will be likely a week and I may have some ready to ship as soon as payment is received.
03-31-2010 | 06:39 PM
#289

I hope you don't mind me posting these, but here's the problem I figured out I'm having...
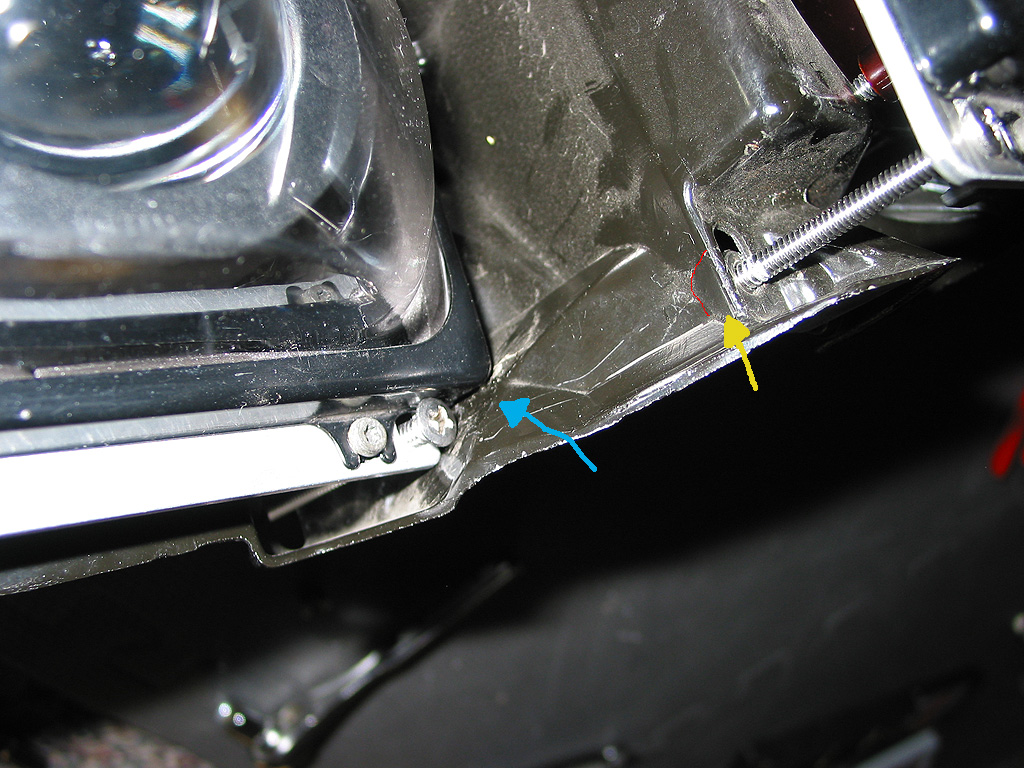
In this picture the blue arrow (yes the crudely drawn arrow from my laptop touchpad) is the problem area. It sticks out and the aluminum bracket gets caught on it. If it's outside of it (to the left in the picture) then the bolt is not long enough and the bracket rests against the bump. If the aluminum bracket is inside it (moving to the right looking at the picture) then the bolt is super long out the back and I can pinch the alumimum bracket and mounting "bucket" and make the headlight easily moves.

This shows the bump (blue arrow) and the problem with the screw and the obvious amount of "length" that needs dealt with (yellow arrow).

Again this shows the bump (blue arrow) and how the bracket is resting on it and I can move it to either "behind" or closer to the back or over "infront" more towards the front of the car. The yellow arrow is pointing to the high beam's locking nut which fits perfectly in little alcove there and when tightened "holds" the high beams perfectly without it moving. Alcove is marked with the red line.
So what I'm trying to figure out is why my low beams aluminum bracket is hitting and causing the issue. I have the Vertical and Horizontal adjustment bolts in the groves properly and completely against the "black cover bracket" of the headlight.
I don't remember, but I believe the aluminum brackets were all completely identical (not saying I got two different size ones). This is correct right? I'm pretty sure this would be the case.
So now I just need some help figuring out how to get this worked out.
Brian, you might be right that once it's on the car and I can place the shroud over them and see how it all fits, I'll get a better idea what I need to do. Good news is the epoxy is all sealed on the headlight motors and they are SOOO much better, smooth and actually quiet! But that's another for another thread.
I'm off Friday so I should be able to work on these all day and have everything ready to go (then will just need to work the adjustments to aim them).
Kwiker isn't helping the fact that that I can't work on them quicker. HOLY CRAP is that some AMAZING lighting! I think those picture are close to pr0n!!!! lol
Trans Am in the 21st century!! Amazing what lights can do!
In this picture the blue arrow (yes the crudely drawn arrow from my laptop touchpad) is the problem area. It sticks out and the aluminum bracket gets caught on it. If it's outside of it (to the left in the picture) then the bolt is not long enough and the bracket rests against the bump. If the aluminum bracket is inside it (moving to the right looking at the picture) then the bolt is super long out the back and I can pinch the alumimum bracket and mounting "bucket" and make the headlight easily moves.
This shows the bump (blue arrow) and the problem with the screw and the obvious amount of "length" that needs dealt with (yellow arrow).
Again this shows the bump (blue arrow) and how the bracket is resting on it and I can move it to either "behind" or closer to the back or over "infront" more towards the front of the car. The yellow arrow is pointing to the high beam's locking nut which fits perfectly in little alcove there and when tightened "holds" the high beams perfectly without it moving. Alcove is marked with the red line.
So what I'm trying to figure out is why my low beams aluminum bracket is hitting and causing the issue. I have the Vertical and Horizontal adjustment bolts in the groves properly and completely against the "black cover bracket" of the headlight.
I don't remember, but I believe the aluminum brackets were all completely identical (not saying I got two different size ones). This is correct right? I'm pretty sure this would be the case.
So now I just need some help figuring out how to get this worked out.
Brian, you might be right that once it's on the car and I can place the shroud over them and see how it all fits, I'll get a better idea what I need to do. Good news is the epoxy is all sealed on the headlight motors and they are SOOO much better, smooth and actually quiet! But that's another for another thread.
I'm off Friday so I should be able to work on these all day and have everything ready to go (then will just need to work the adjustments to aim them).
Kwiker isn't helping the fact that that I can't work on them quicker. HOLY CRAP is that some AMAZING lighting! I think those picture are close to pr0n!!!! lol
Trans Am in the 21st century!! Amazing what lights can do!
03-31-2010 | 07:21 PM
#290
Starfire - I certainly wish you were closer, otherwise I would simply build this for you but I'll do my best to walk you through your issues.
The low and high beam mounting plates are different. The low beam has a notch cut out of the corner to allow for clearance of the bump you have referred to in your picture. I'm assuming you already know this and I'll move on.
Next, you mentioned you had the adjusters all the way against the black bracket " I have the Vertical and Horizontal adjustment bolts in the groves properly and completely against the "black cover bracket" of the headlight."
Do you mean to say they are bottomed out? If thats the case, you will want to have everything backed off before tightening everything up for final adjustment. The third mounting point with the screw you have described is there to support rotation once everything is put together. Once the shroud goes on, you will see that it will press against the black metal trim holding the lens on and restricting movement forward and back. If you recall, the metal trim piece holding the lens on does not fit inside the shroud but sits right behind it.
I confirmed all of the plates that went out are identical so there should not be any machine work variance from plate to plate.
I'd be happy to make some time and talk this through with you over the phone if that helps any.
Glad to hear the epoxy has all set and your headlights are operating smoothly. All we have to do now is get the kit installed so you can really see down the road!
03-31-2010 | 11:29 PM
#291
Joined: Aug 2005
Posts: 153
Likes: 0
From: Frisco/Plano, TX (formerly LUZ_2_A6)
Drove my car again tonight and i just can't get over how great these are, i had to post again.
edit: Oh, the pictures i posted are not an accurate representation of how much light is put out. It will have similar light output to normal hid lights, i just let the camera take an automatic non-flash picture and it left the shutter open for a bit and it looks insanely bright. But, they really do pump out a lot of light, i'll take the z06 out this weekend and i'll be able to compare them better, but i am pretty sure the light on the road is brighter than a new vette with the hid/projector setup...but it has been a month since i had it out so i can't be sure.
edit: Oh, the pictures i posted are not an accurate representation of how much light is put out. It will have similar light output to normal hid lights, i just let the camera take an automatic non-flash picture and it left the shutter open for a bit and it looks insanely bright. But, they really do pump out a lot of light, i'll take the z06 out this weekend and i'll be able to compare them better, but i am pretty sure the light on the road is brighter than a new vette with the hid/projector setup...but it has been a month since i had it out so i can't be sure.
04-01-2010 | 05:49 AM
#292
Drove my car again tonight and i just can't get over how great these are, i had to post again.
edit: Oh, the pictures i posted are not an accurate representation of how much light is put out. It will have similar light output to normal hid lights, i just let the camera take an automatic non-flash picture and it left the shutter open for a bit and it looks insanely bright. But, they really do pump out a lot of light, i'll take the z06 out this weekend and i'll be able to compare them better, but i am pretty sure the light on the road is brighter than a new vette with the hid/projector setup...but it has been a month since i had it out so i can't be sure.
edit: Oh, the pictures i posted are not an accurate representation of how much light is put out. It will have similar light output to normal hid lights, i just let the camera take an automatic non-flash picture and it left the shutter open for a bit and it looks insanely bright. But, they really do pump out a lot of light, i'll take the z06 out this weekend and i'll be able to compare them better, but i am pretty sure the light on the road is brighter than a new vette with the hid/projector setup...but it has been a month since i had it out so i can't be sure.
04-01-2010 | 05:29 PM
#294
Joined: Aug 2005
Posts: 153
Likes: 0
From: Frisco/Plano, TX (formerly LUZ_2_A6)
04-02-2010 | 06:05 AM
#296
Regarding using the factory spring, there is a ton of tension it will create on the corner of the mounting plate. Granted, the mounting plate is thick but the spring might put a little bit too much tension which may or may not bend the plate.
I may have a couple kit installations coming up soon from local NJ residents and I will look into a potentially different way to do this. As of now, I haven't received any feedback of the kit moving around or appearing loose in adjustment once everything is installed and buttoned up.
Once these are adjusted, you should not need to touch these any further unless you make alterations to the car which would affect the vehicles rake/stance/ride height etc.
04-02-2010 | 08:01 AM
#297

I'd like to give props to Brian--there were a few issues with my kit but he addressed them in about the quickest ways humanly possible. I kid you not--I sent an e-mail and less than 2 minutes later he called my cell and hashed out the details of a fix...fix arrived 2 days later. A great product speaks well of a vendor, but I think customer service speaks even more.
Trader rating + 1!
Trader rating + 1!
04-02-2010 | 09:07 AM
#298
Also remember that we got this kit at a pretty good price. A little beta testing is a small price to pay for a great product. I know he probably isn't making much with these GP prices.