Painted my LS6 intake today...thoughts?
 02-21-2011, 06:03 PM
#1
I just pulled the hurt LS1 out of my 2001 WS.6 and have an LQ4 build going in, and I thought this was as good a time as any to do some detailing and painting on my new engine and engine bay to make it a little unique. If you're interested in following my build thread, it can be found here...
https://ls1tech.com/forums/generatio...s-debacle.html
First order of business was to start on my LS6 intake. I really want a FAST, but I'm short on the cash right now, so I decided to paint the intake to liven things up a little. I'm really pleased with the way it came out, especially for a rattle can job. I've painted a couple cars before, so I was anxious to see how well I could do on the intake.
I started by sanding with 180 grit to get rid of the part number casting and also the circular marks on top of each runner. I then went to 400 grit for the rest of the intake, going over it a couple of times at least.

I then masked off all the bolt holes, the map sensor, and the TB opening, and sprayed several coats of Duplicolor Adhesion Promotor, followed by Duplicolor high build primer. I was really pleased with the way the primer went on and filled in all the minor marks and scratches after a few layers...
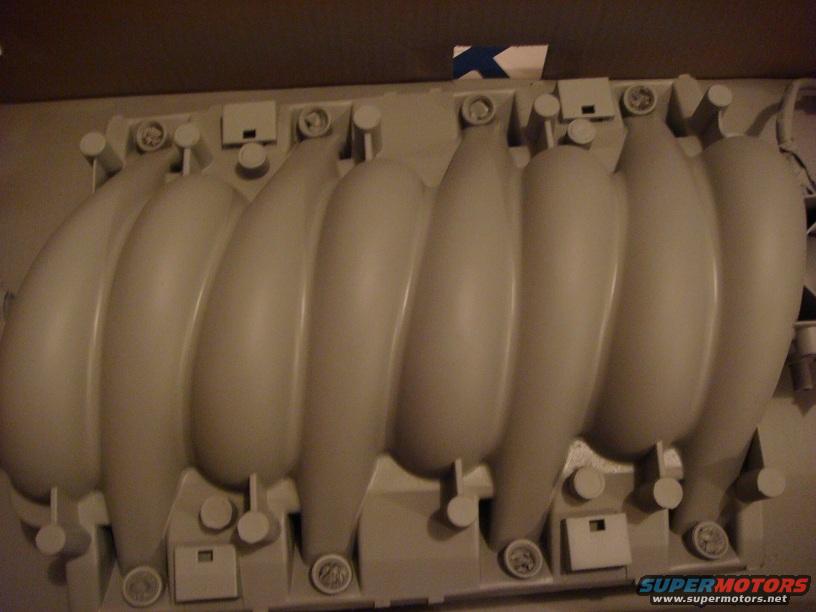
The primer laid down so well that I only had to make one pass with 600 grit and then another with 1000 grit and I was ready for base color. I was tempted to just grap a Sharpie, write "F.A.S.T" on the front and call it good, but alas, I pressed on. One last pic before the color goes on...

I decided to go with a metallic charcoal gray, and I was happy I did. I laid down four base coats, with the first one being a light dusting and each one getting progressively heavier. Here it is after the final base coat...

Time for clear now, which was Duplicolor as well. As with the base coat, the first coat was very light and each following coat was progressively heavier. I actually went a little heavy on the last coat and got some light white pooling, but thank God it dried out and looked great.
I originally planned to wetsand and polish, but I don't think I'm even going to bother with it now. The clear came out awesome, and I'm happy as is. Here are the final pics:


I know this has been done a thousand times, but I was happy with my effort and thought I'd share.
https://ls1tech.com/forums/generatio...s-debacle.html
First order of business was to start on my LS6 intake. I really want a FAST, but I'm short on the cash right now, so I decided to paint the intake to liven things up a little. I'm really pleased with the way it came out, especially for a rattle can job. I've painted a couple cars before, so I was anxious to see how well I could do on the intake.
I started by sanding with 180 grit to get rid of the part number casting and also the circular marks on top of each runner. I then went to 400 grit for the rest of the intake, going over it a couple of times at least.
I then masked off all the bolt holes, the map sensor, and the TB opening, and sprayed several coats of Duplicolor Adhesion Promotor, followed by Duplicolor high build primer. I was really pleased with the way the primer went on and filled in all the minor marks and scratches after a few layers...
The primer laid down so well that I only had to make one pass with 600 grit and then another with 1000 grit and I was ready for base color. I was tempted to just grap a Sharpie, write "F.A.S.T" on the front and call it good, but alas, I pressed on. One last pic before the color goes on...
I decided to go with a metallic charcoal gray, and I was happy I did. I laid down four base coats, with the first one being a light dusting and each one getting progressively heavier. Here it is after the final base coat...
Time for clear now, which was Duplicolor as well. As with the base coat, the first coat was very light and each following coat was progressively heavier. I actually went a little heavy on the last coat and got some light white pooling, but thank God it dried out and looked great.
I originally planned to wetsand and polish, but I don't think I'm even going to bother with it now. The clear came out awesome, and I'm happy as is. Here are the final pics:
I know this has been done a thousand times, but I was happy with my effort and thought I'd share.


Trending Topics
02-21-2011, 06:50 PM
#8
Launching!

Join Date: Sep 2009
Location: SOUTH CAROLINA
Posts: 260
Likes: 0
Received 0 Likes
on
0 Posts
 Hi,
Hi,you are very talented to say the least. The hard work and effort shows in the finished product...........best of luck ----------- have a blessed evening.........
Captain jim
02-21-2011, 07:09 PM
#10
To the OP: Nice work! very nicely done. All the sanding had to be done by hand or did you use any power tools?
02-21-2011, 07:34 PM
#11
Everyone knocks the rattle can, but if used right and for the right items, it'll look just as good as spraying; all without the hassle of set-up and cleaning the gun.
To the OP: Nice work! very nicely done. All the sanding had to be done by hand or did you use any power tools?
To the OP: Nice work! very nicely done. All the sanding had to be done by hand or did you use any power tools?
02-21-2011, 09:44 PM
#13
TECH Resident
iTrader: (32)

Join Date: Nov 2005
Location: Chicago, IL
Posts: 905
Likes: 0
Received 0 Likes
on
0 Posts

Looks good man. That's the same process I use when it comes to rattle canning things and let me tell you ... most people if not all of them can't even tell it was bombed. I plan on doing the same with mine but I'm going with a gloss black. I'm going to try and do it to where I won't have to wet sand like you had done. I ******* hate wet sanding with a passion lol.

