Sunoco Hood Fitment

 03-11-2012, 04:20 PM
#22

Bob I bought the hood struts that VFN recommends with their hoods.

 04-02-2012, 11:22 AM
#30
On The Tree
Join Date: Aug 2011
Location: Lakeland, Fl
Posts: 131
Likes: 0
Received 0 Likes
on
0 Posts

 04-02-2012, 04:04 PM
#31
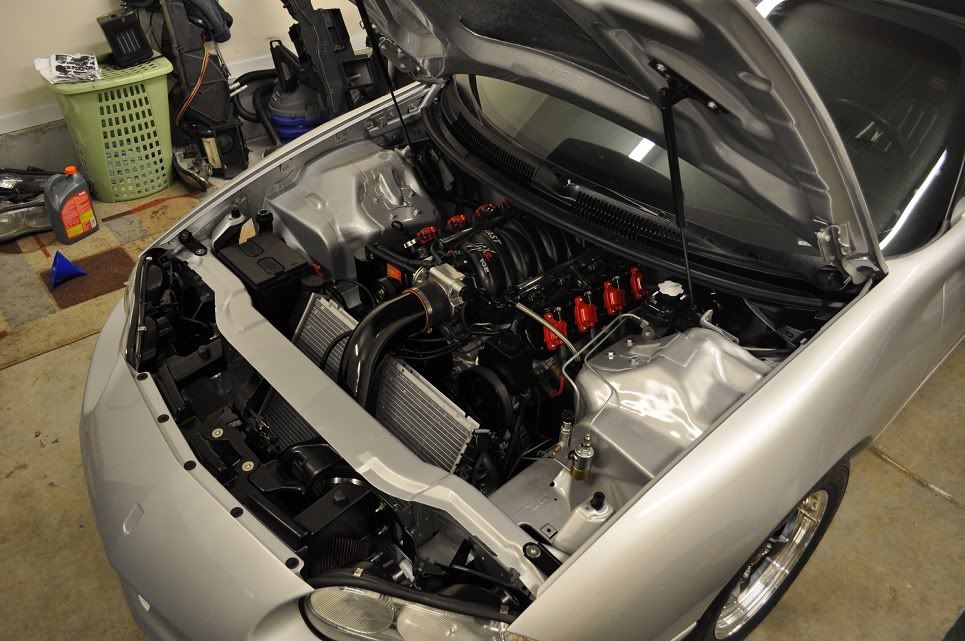
All of my wires are hidden and re-routed under the fender wells on both sides. There's still a lot that's visible such as the maf, iat, alternator, injectors etc but there is no way to really hide any of that.
Thanks for the compliments fellas.. it was a lot of work but well worth it
Thanks for the compliments fellas.. it was a lot of work but well worth it
04-02-2012, 04:20 PM
#34
Here is the write up I already made on the driver side. Keep in mind I have no ABS so I didn't need to figure out how to make that work. The only way I can see it working is to extend the wires of the abs module connector or to keep the fuse boxes in the stock location with the wires under the fenderwell and hopefully it'd be long enough to reach the abs module.
It is pretty simple to do. You unplug all the connectors from your headlights, fog lights, horn, windshield washer reservoir, abs block, brake master cylinder, undo the strap from the fuse blocks etc and basically get the harness completely undone on the engine bay side.
After it is completely undone on the engine bay side, take a 7mm socket and unscrew the bolt on the firewall at the top of that black connector to the right of the brake master cylinder. Don't try pulling this connector away from the firewall as it has to be pushed into the engine bay from inside the cabin.
Open the driver door and remove the access panels with a 7mm socket and a tool to help remove the push pins. Use a flash light and find the connector on the firewall at the top left. There are two small plastic pins on each side to hold in and push the connector into the engine bay. Follow that same harness/connector that you just pushed into the engine bay from the firewall into the cabin and undo all the connectors it is connected too. Find the largest black/grey connector like the one you just pushed into the engine bay. It is attached to a metal bracket. You don't need to remove it from the bracket but look on the front of it in between the wires. You will see a bolt that needs undoing. Use a thin wall 7mm socket to undo the bolt and get the connector to separate into two pieces. There are plastic retainer clips that you have to remove from this as well to get it undone I think I can't remember. Now after separating this connector there are 2 connectors on the top of the steering column that will be a bitch to get to if you don't drop the column. There are a few connectors attached to the pedals, and some to the left side near the kick panel. I want to say there are 8-9 total including the large one you separated. Once all these connectors are undone, go ahead and maneuver the connectors through the hole in the firewall where that connector was that you held the plastic pins in and pushed through to the engine bay side.
I'm not sure how big of a hole saw bit he used but I'd say you need at least 2-2 1/4" for the largest connector to fit through. The rest is pretty self explanatory as far as routing the harness back into the engine bay and to the passenger side etc. I'm not sure if the ABS connector will be long enough to reach the module itself as I removed my ABS. Once I get my car back from paint I can do a step by step process of this but the harness will already have been removed. Hope this helps clarify a few things.