


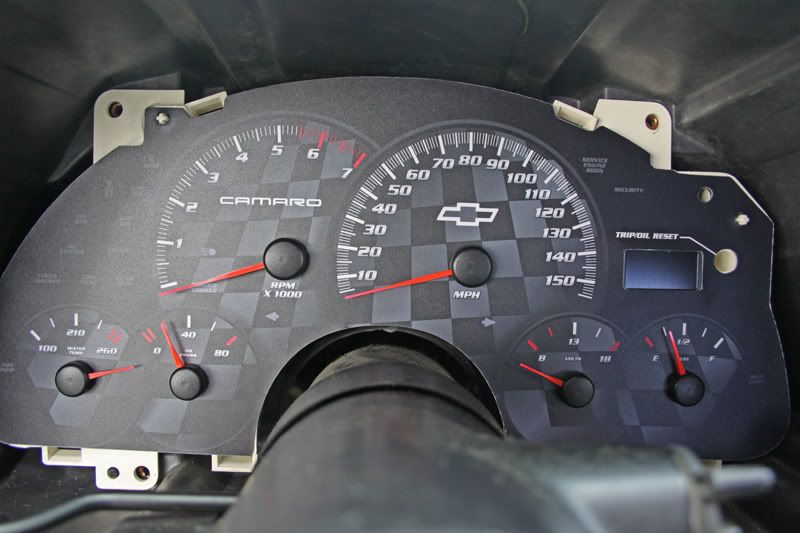
Installing Gauge Overlay and LEDs
Well folks, I got my 6LE Overlay a couple weeks ago and my LEDs about a week ago. I had white needles on order, but got to thinking that the stock orange would look good and so far I like them. If I want I can change them later on down the road so no biggie. Anyways, I decided to do the swap the other day and also decided to take pics of the process to hopefully answer some of the questions that people have on doing this project.
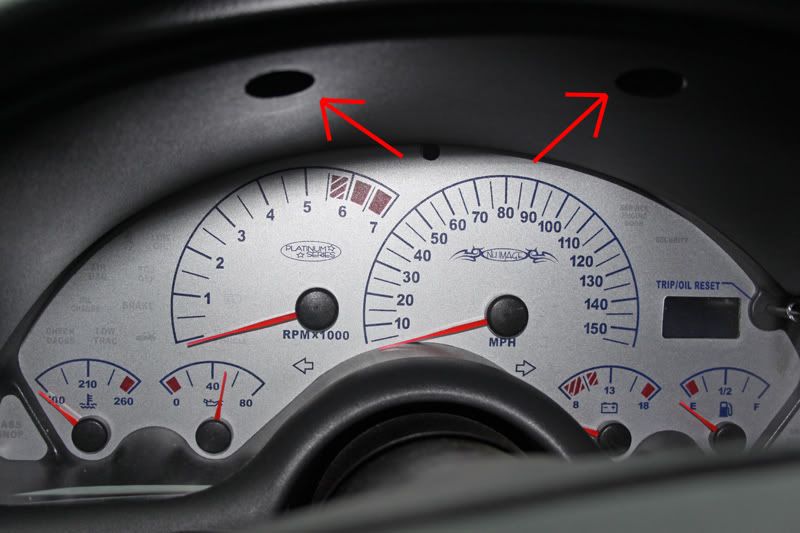
First make sure you get the steering wheel set to its lowest level. Then get a 7mm socket and remove the two screws on the top of the gauge cover(Dont know the exact name that its called).
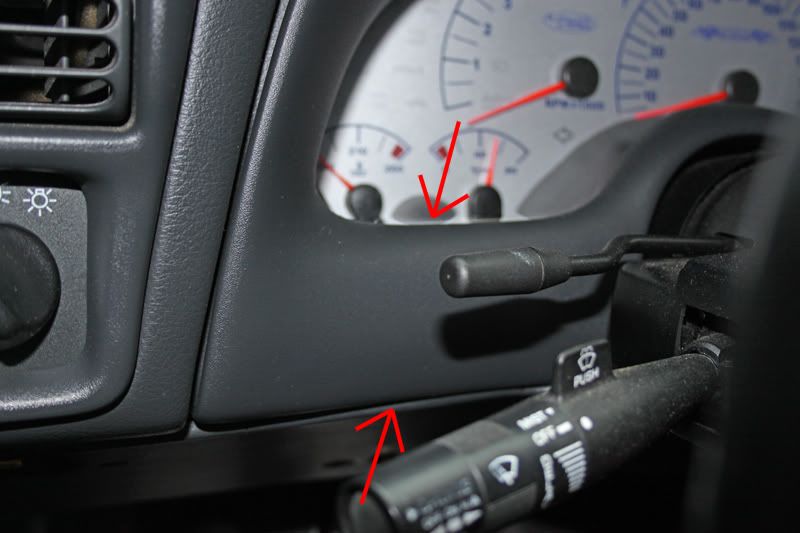
Once they're out proceed to the bottom of the cover and grab the top and bottom on both the left and right side. It's held in by 4 clips, 2 on each side. It just pops out. Now what I do that is different is I wedge my fingers in the back and unscrew the clips so it makes that whole piece just pop out that much easier. Be careful not to drop them, though keep a pen magnet handy if you do. The reason I did it this way is cause I didn't want to risk breaking the clips.
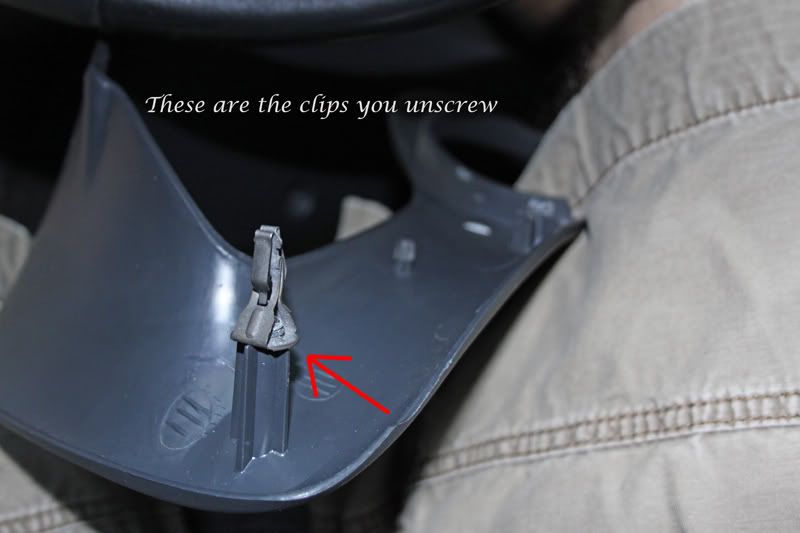
Here's one clip so you can see how it looks on the piece. Like I said they just unscrew.
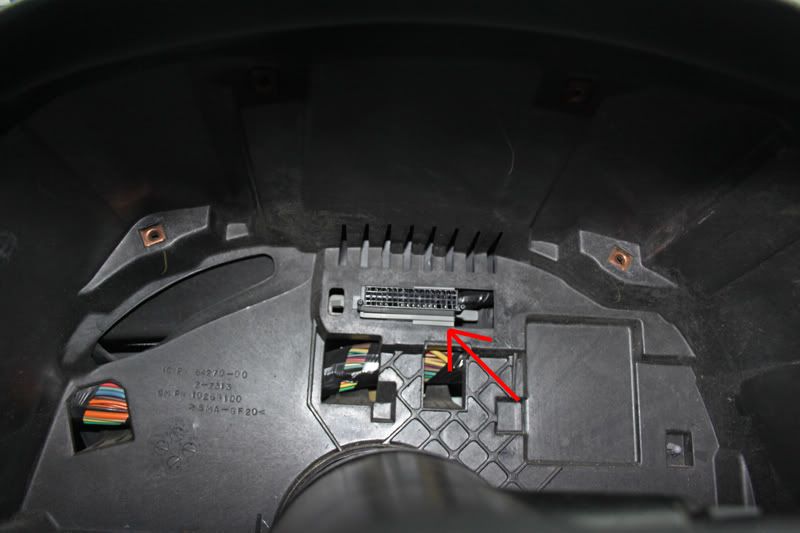
Once off there are four more 7mm screws that need to be removed. Two on top and two on bottom. When you have them out all you have to do is push down on top of the cluster where the clear plastic meets. It's two pressure type clips. You push them down and and push towards you. It should pop off and then carefully remove it. The odometer/trip stick will be accessible and you can pull it off too.

Now all that is left is to grab the cluster on both sides and pull towards you. It's gonna take some pressure, but it just pops out. Now its free and this is what you should see and you can see what was only holding it at that point.
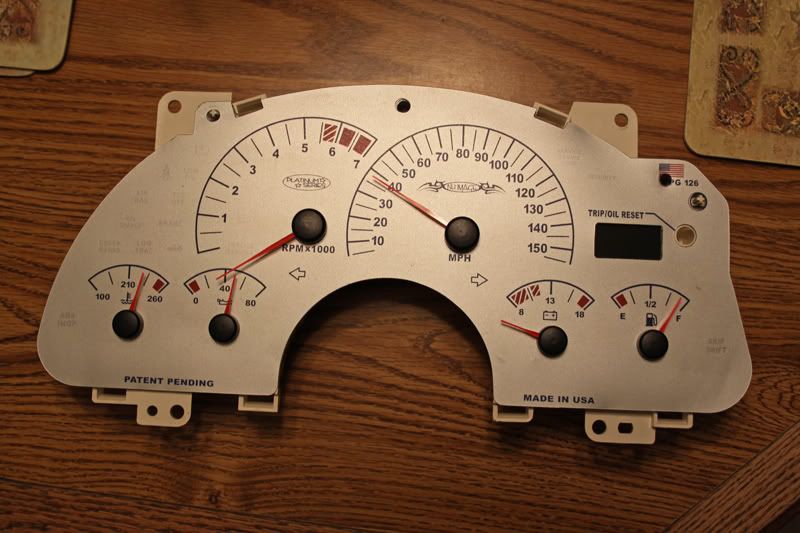
Here she lays.
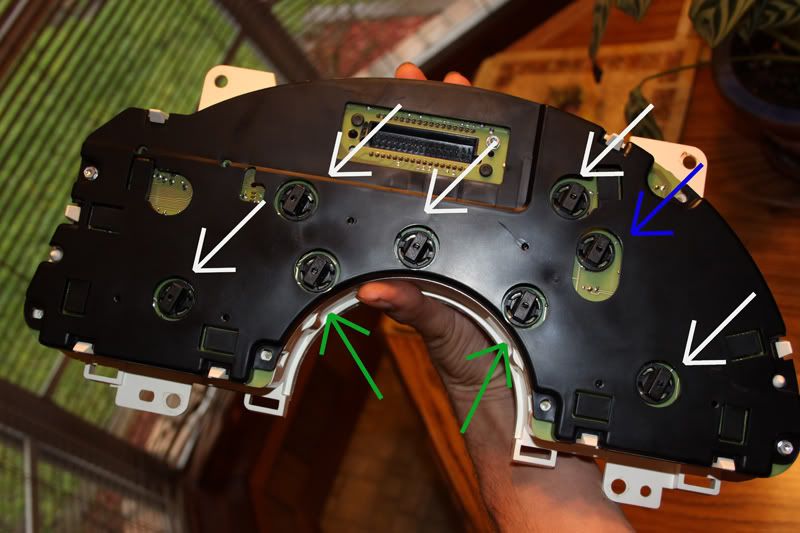
Here's the backside for the lighting. They're just twist sockets and they're nice and tight too. I got a small pair of channel locks and gently twisted them off. Is that the right tool? No, but if used lightly and correctly you wont tear anything up or even leave the slightest mark. Just use the very tip of them where it's square and smooth. With the channel locks it doesn't take much force. I've also labeled the lights. Green are the blinkers, the blue is the high beam indicator, and the white are the actual illumination of the rest of the cluster(whatever color you may choose, mine was cool white).
Here is the halogen.
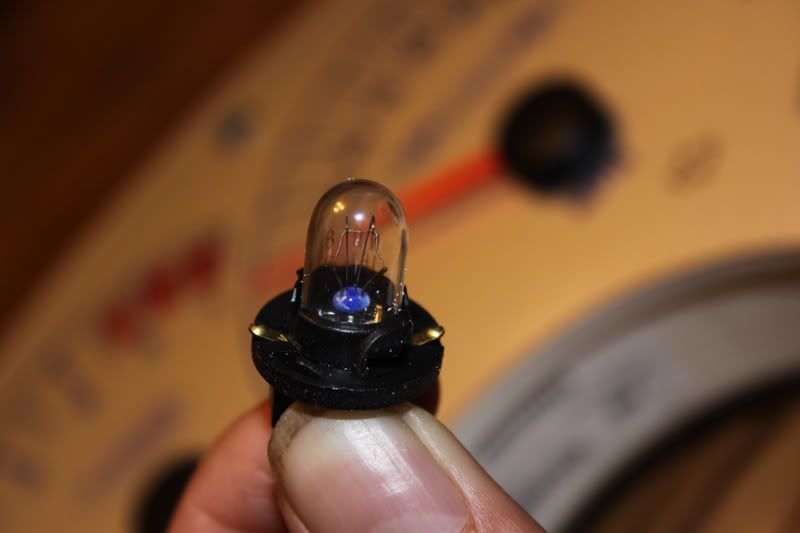
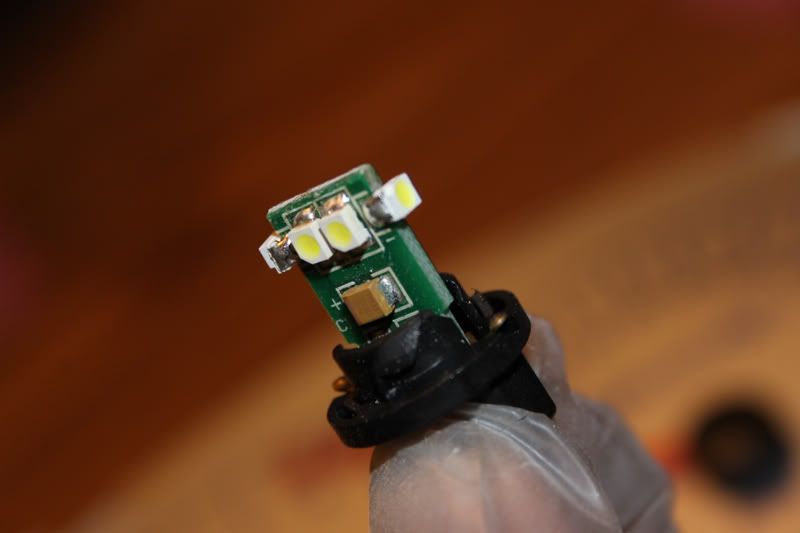
Just gently pull it out and swap with the LED. It's really easy, just be gentle and push directly from the top on the board itself into the housing. I wore latex gloves as to not get oils on the bulb, board or anything.
Now that they're all switched it's time to pull off the needles. Take pics, measurements, whatever you need to help you remember the needle positions. Some people use a needle removal tool or a fork, but I used my fingernails and gently pulled the needles off. When you pull, pull them straight up. Here's how it will look.
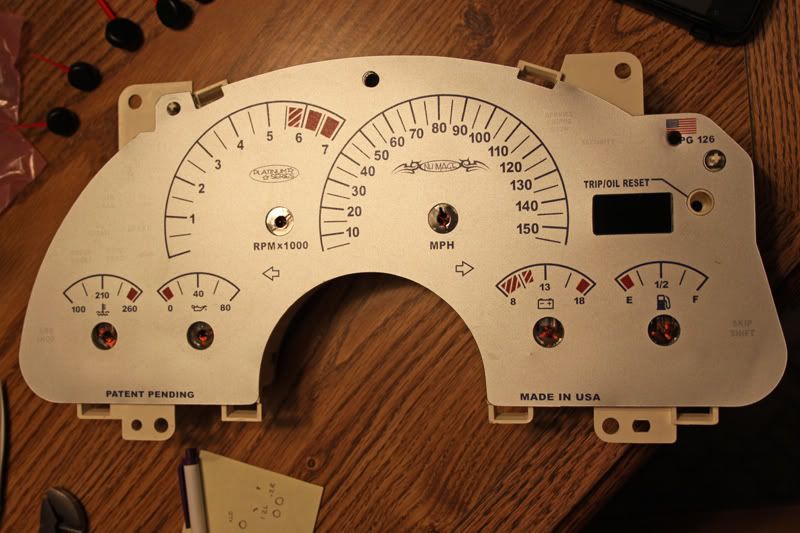
Now that they're off you can pull your old overlay off. That's one sticky SOB but it comes off. This is what it will look like.
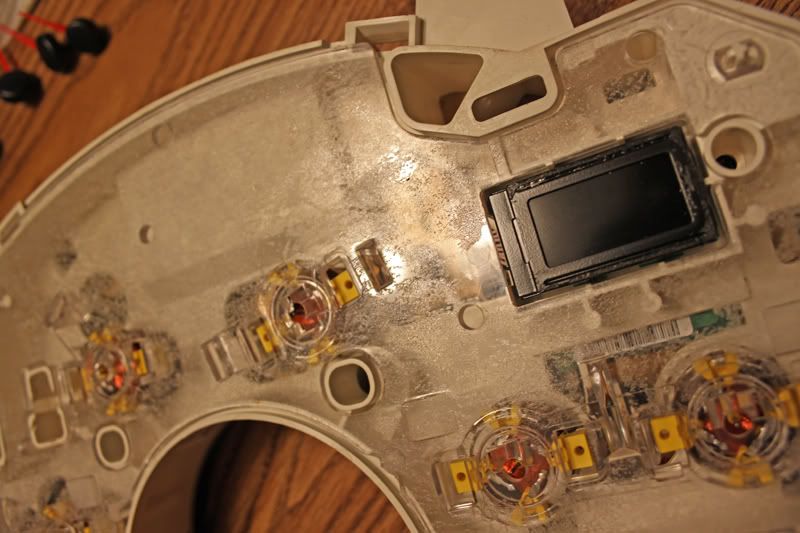
I used some goo-gone and a rag to get the residue of the sticky material off. Once it was off I got some isopropyl alcohol to get the oil from the goo-gone off. Now it should be nice and clean.
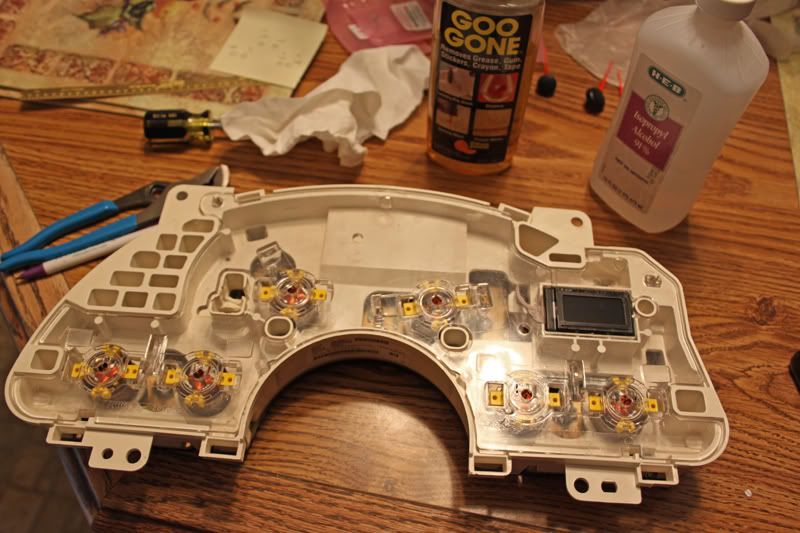
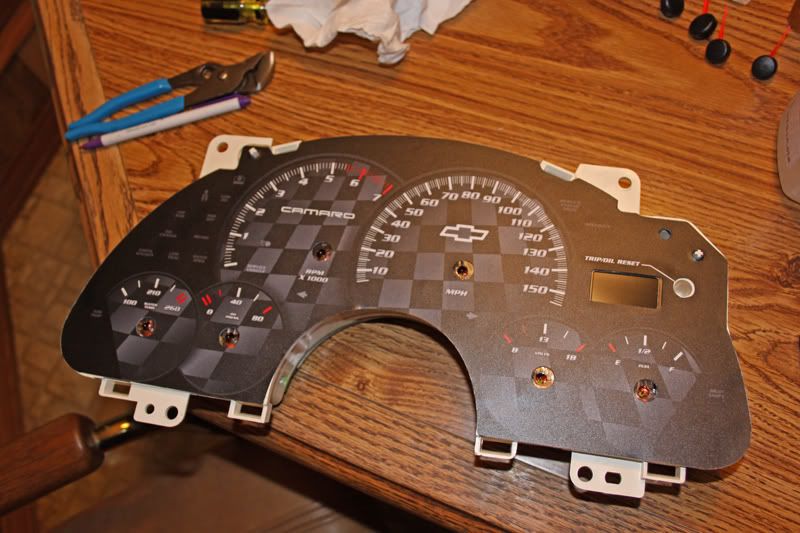
Once you're comfortable with how clean it is get ready for your new 6LE Overlay. Do a test fit to see how its gonna look. When you're comfortable peel the backing and stick it on there. Make sure you have it where you want it cause once it sticks, it sticks.
Stick your needles back on and plug it back into your dash.
Do a check to make sure all your lights work. Put a couple screws in, one on each corner and start the car. Check all your needles. Most likely a couple will be slightly off. I made sure the car was filled up for the fuel needle so that made it easier to check. The temp needle was good, Oil PSI was good, and the Volts were reading good. My only problem was the RPM and MPH. When the car was idling the RPM showed 2000 lol. That was a quick fix. It may take a couple shut down and restarts, but you'll get it. For the MPH you can check by having someone go alongside you to check speed. I used an app on my phone called SpeedView and it works awesome. Really accurate for me. Make sure you get up to 60 or so at least to get it as accurate as possible. You don't want a surprise pull over cause it reads a little off.
Now put it all back together the same way you took it apart and there you have it. Hope this helps anyone wanting to tackle this.
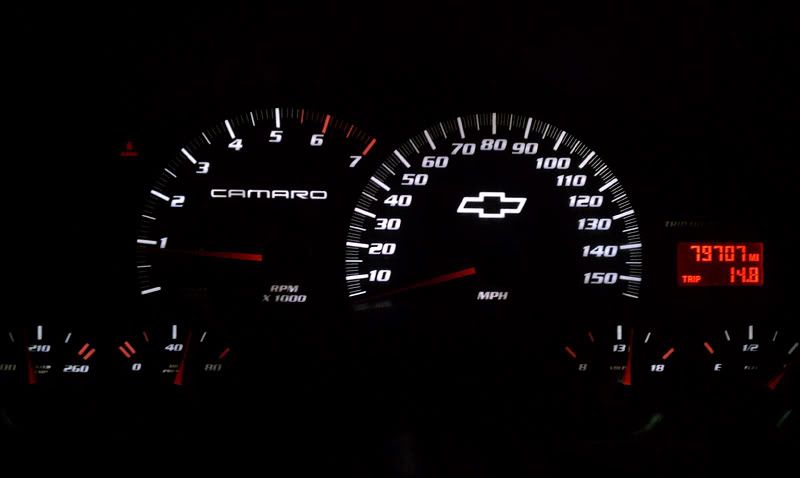
Here's mine at night with the LEDs
First make sure you get the steering wheel set to its lowest level. Then get a 7mm socket and remove the two screws on the top of the gauge cover(Dont know the exact name that its called).
Once they're out proceed to the bottom of the cover and grab the top and bottom on both the left and right side. It's held in by 4 clips, 2 on each side. It just pops out. Now what I do that is different is I wedge my fingers in the back and unscrew the clips so it makes that whole piece just pop out that much easier. Be careful not to drop them, though keep a pen magnet handy if you do. The reason I did it this way is cause I didn't want to risk breaking the clips.
Here's one clip so you can see how it looks on the piece. Like I said they just unscrew.
Once off there are four more 7mm screws that need to be removed. Two on top and two on bottom. When you have them out all you have to do is push down on top of the cluster where the clear plastic meets. It's two pressure type clips. You push them down and and push towards you. It should pop off and then carefully remove it. The odometer/trip stick will be accessible and you can pull it off too.
Now all that is left is to grab the cluster on both sides and pull towards you. It's gonna take some pressure, but it just pops out. Now its free and this is what you should see and you can see what was only holding it at that point.
Here she lays.
Here's the backside for the lighting. They're just twist sockets and they're nice and tight too. I got a small pair of channel locks and gently twisted them off. Is that the right tool? No, but if used lightly and correctly you wont tear anything up or even leave the slightest mark. Just use the very tip of them where it's square and smooth. With the channel locks it doesn't take much force. I've also labeled the lights. Green are the blinkers, the blue is the high beam indicator, and the white are the actual illumination of the rest of the cluster(whatever color you may choose, mine was cool white).
Here is the halogen.
Just gently pull it out and swap with the LED. It's really easy, just be gentle and push directly from the top on the board itself into the housing. I wore latex gloves as to not get oils on the bulb, board or anything.
Now that they're all switched it's time to pull off the needles. Take pics, measurements, whatever you need to help you remember the needle positions. Some people use a needle removal tool or a fork, but I used my fingernails and gently pulled the needles off. When you pull, pull them straight up. Here's how it will look.
Now that they're off you can pull your old overlay off. That's one sticky SOB but it comes off. This is what it will look like.
I used some goo-gone and a rag to get the residue of the sticky material off. Once it was off I got some isopropyl alcohol to get the oil from the goo-gone off. Now it should be nice and clean.
Once you're comfortable with how clean it is get ready for your new 6LE Overlay. Do a test fit to see how its gonna look. When you're comfortable peel the backing and stick it on there. Make sure you have it where you want it cause once it sticks, it sticks.
Stick your needles back on and plug it back into your dash.
Do a check to make sure all your lights work. Put a couple screws in, one on each corner and start the car. Check all your needles. Most likely a couple will be slightly off. I made sure the car was filled up for the fuel needle so that made it easier to check. The temp needle was good, Oil PSI was good, and the Volts were reading good. My only problem was the RPM and MPH. When the car was idling the RPM showed 2000 lol. That was a quick fix. It may take a couple shut down and restarts, but you'll get it. For the MPH you can check by having someone go alongside you to check speed. I used an app on my phone called SpeedView and it works awesome. Really accurate for me. Make sure you get up to 60 or so at least to get it as accurate as possible. You don't want a surprise pull over cause it reads a little off.
Now put it all back together the same way you took it apart and there you have it. Hope this helps anyone wanting to tackle this.
Here's mine at night with the LEDs
Stick your needles back on and plug it back into your dash.
Do a check to make sure all your lights work. Put a couple screws in, one on each corner and start the car. Check all your needles. Most likely a couple will be slightly off. I made sure the car was filled up for the fuel needle so that made it easier to check. The temp needle was good, Oil PSI was good, and the Volts were reading good. My only problem was the RPM and MPH. When the car was idling the RPM showed 2000 lol. That was a quick fix. It may take a couple shut down and restarts, but you'll get it. For the MPH you can check by having someone go alongside you to check speed. I used an app on my phone called SpeedView and it works awesome. Really accurate for me. Make sure you get up to 60 or so at least to get it as accurate as possible. You don't want a surprise pull over cause it reads a little off.
The more accurate way to do this is to take pictures of each of your gauges with the ignition in the ON position (not start) when cold (coolant temp at 0). The RPM DOES move to 0 with the car on and not started. Set the coolant needle at 0, set the oil pressure needle at 0, set the voltage around 12 (where you photographed it at) and set the fuel level where you photographed it at. Set the tach needle so when it falls, it goes to 0 and wait for the drive to set the speedometer needle.
Another tip, use medical gloves when you're setting your new needles! OEM gauge faces retain the oils in your hands, making shiny spots. I haven't tested a 6LE gauge with this skin oil issue, because I avoided the issue by using gloves.
Good job on your detailed write up, and that's a nice tip about unscrewing the bezel retainer clips at the bottom!
Trending Topics
Themealonwheels, that is some good advice. That is another way to do it. There's a couple ways to do it, just as you proved. I'm lucky to have a pretty steady hand so everything was pretty much spot on except for the RPM and MPH(I wasn't too worried about these cause they're easiest for me to adjust). That's why I did it that way and described doing it that way. Also thanks for the compliments on the write-up.
One more thing I forgot to add last night were the LEDs I used, which are WLED-xHP6(360 degree beam) from superbrightleds.com.
One more thing I forgot to add last night were the LEDs I used, which are WLED-xHP6(360 degree beam) from superbrightleds.com.
LS1 Tech Stories
The Best V8 Stories One Small Block at Time

6 Common C5 Corvette Failures and What's Involved In Repairing Them
Pouria Savadkouei
Retro Modern Bandit Pontiac Trans AM Comes With Burt Reynolds' Autograph
Verdad Gallardo
Top 10 Greatest Cadillac V Series Performance Models Ever, Ranked
Pouria Savadkouei
Top 10 Most Powerful Chevy Trucks Ever Made!

Hennessey's New Supercharged Silverado ZR2 Has 700 HP
Verdad Gallardo
Coachbuilt N2A Anteros Is an LS2-Powered C6 Corvette In Italian Clothes
Verdad Gallardo
Awesome K5 Blazer Restomod Comes With C7 Corvette Power
Verdad Gallardo
10 Camaros You Should Never Buy

10 LS Engine Myths That Refuse to Die
Verdad Gallardo Nice write up....
I'm waiting for the needles!
I also heard to take the 2 screws out that hold up the steering wheel column and let it drop down. It will give you more wiggle room.
I'm waiting for the needles!
I also heard to take the 2 screws out that hold up the steering wheel column and let it drop down. It will give you more wiggle room.
Last edited by DaRReLL; Apr 8, 2012 at 07:15 AM.

Teching In
Joined: Mar 2012
Posts: 46
Likes: 0
From: 601
just to make sure...
http://www.superbrightleds.com/cgi-b...Fwled-whp6.htm
these are what you used correct?thanks
http://www.superbrightleds.com/cgi-b...Fwled-whp6.htm
these are what you used correct?thanks
Super-bat, yea I ordered the white needles. I like the look of the stock orange now though. Whenever I get them in I'll decide on exactly what I'll do. Then again, I can just keep them for whenever I wanna change it up. So who knows lol
Cam, those are it!
Cam, those are it!
I always take off the cover for the blinker stalk and unscrew the steering wheel tilt lever once it's in the down position. No need to unscrew the clips that way.
Also, do exactly what "themeanonwheels" said to do. He's 100% right.
I'm waiting on my blue needles that I have no clue when they are going to show up. I ordered them over a month ago and still no word.
Also, do exactly what "themeanonwheels" said to do. He's 100% right.
I'm waiting on my blue needles that I have no clue when they are going to show up. I ordered them over a month ago and still no word.


1st off, OP, GREAT write up and pics! 
I love it, and you explained almost like we do! I send out my write up on needle placement when a set is ordered, but here's the way "WE say to do it" (which is still yet, just another version, lol)...
We say to let the car warm up, and THEN take the pictures. We say this because then you know it's a "running constant". Literally. Give the car 5 mins. or so, take a pic (not a shitty phone pic, but something better for detail) then start the cluster removal. After it's all ready to go back together pop it all back in and like Meals said, dont put the needles on BEFORE you install the cluster. You need the power to get it all lined up.... and if you drive a '98, the car won't even start without the cluster. Anyway, put the cluster in, start the car and let it warm up again for 5 mins. then lightly place the needles where they were when you took the pictures. Not you'll know a constant/correct reading, rather than a zero reading. This will work for all the gauges. For the speedo, I suggest using a garmin or other navigation device, get up to 80mph, hit the cruise control and set the needle. Voila, you're all done. And dont forget to use gloves. You dont want oily fingers all over your pretty new gauges.
Darrell.... they all shipped today, brotha! You're gonna love them!
Like I told Darrell, they all shipped today! You'll see them this week...FINALLY!
Hit me up, we can take care of you.
Here's where I disagree with your procedure. The needles are not held to any particular position when the cluster is disconnected from the harness and ignition is off. If you try to reinstall the needles on the cluster out of the car, you'll get random readings.
The more accurate way to do this is to take pictures of each of your gauges with the ignition in the ON position (not start) when cold (coolant temp at 0). The RPM DOES move to 0 with the car on and not started. Set the coolant needle at 0, set the oil pressure needle at 0, set the voltage around 12 (where you photographed it at) and set the fuel level where you photographed it at. Set the tach needle so when it falls, it goes to 0 and wait for the drive to set the speedometer needle.
Another tip, use medical gloves when you're setting your new needles! OEM gauge faces retain the oils in your hands, making shiny spots. I haven't tested a 6LE gauge with this skin oil issue, because I avoided the issue by using gloves.
Good job on your detailed write up, and that's a nice tip about unscrewing the bezel retainer clips at the bottom!
We say to let the car warm up, and THEN take the pictures. We say this because then you know it's a "running constant". Literally. Give the car 5 mins. or so, take a pic (not a shitty phone pic, but something better for detail) then start the cluster removal. After it's all ready to go back together pop it all back in and like Meals said, dont put the needles on BEFORE you install the cluster. You need the power to get it all lined up.... and if you drive a '98, the car won't even start without the cluster. Anyway, put the cluster in, start the car and let it warm up again for 5 mins. then lightly place the needles where they were when you took the pictures. Not you'll know a constant/correct reading, rather than a zero reading. This will work for all the gauges. For the speedo, I suggest using a garmin or other navigation device, get up to 80mph, hit the cruise control and set the needle. Voila, you're all done. And dont forget to use gloves. You dont want oily fingers all over your pretty new gauges.
I always take off the cover for the blinker stalk and unscrew the steering wheel tilt lever once it's in the down position. No need to unscrew the clips that way.
Also, do exactly what "themeanonwheels" said to do. He's 100% right.
I'm waiting on my blue needles that I have no clue when they are going to show up. I ordered them over a month ago and still no word.
Also, do exactly what "themeanonwheels" said to do. He's 100% right.
I'm waiting on my blue needles that I have no clue when they are going to show up. I ordered them over a month ago and still no word.
Hit me up, we can take care of you.