
99-02 odo, swapped OEM smd leds with white smd leds, +converting odo to OLED screen


 05-13-2014, 08:10 PM
#24

Thanks
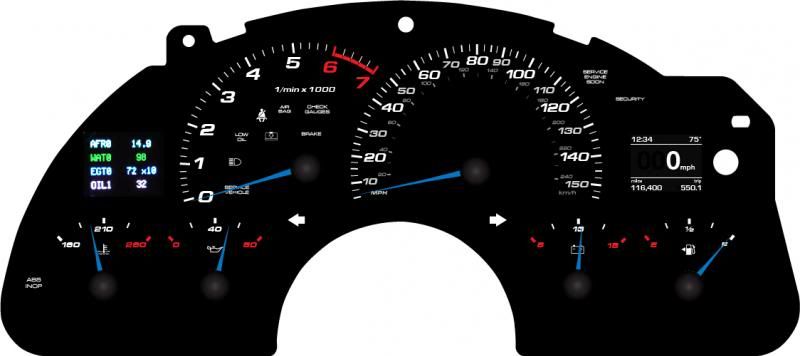
Atrus_SS - I was thinking about how to go about it. We'll have to see once the programming is done. Theres a couple problems, 1 problem I think is going to be interest. I don't see many wanting to spend the money for something like this. Its pretty cool, but is it $50-60 cool? I think alot of people would say hell no to that. 2nd problem is size. My module is bigger, requiring minor mods to the cluster housing and a custom gauge face. So to sell something like this it would almost have to be a near drop in install that works in the OEM lcd nest and gauge face opening. There is really only 1 oled module on the market virtually identical to the stock odometer size and its fairly cheap @ $11. Its not full color, its only available black/white, black/light blue or black/yellow. I will likely buy one to play with and "if" I can put together a plug and play module that could be sold for less than $40ish, I will hit Mark@ 6LE up and see if he would be interested in selling it. I could maybe see interest there, as it'd be an accessory item to the gauge faces like the needles and bezel options. If a condition like that didnt exist, theres no chance of me selling as I am just a hobbyist, not a business and vendor fees for a forum like this are not a practical expense for someone like me.
Atrus_SS - I was thinking about how to go about it. We'll have to see once the programming is done. Theres a couple problems, 1 problem I think is going to be interest. I don't see many wanting to spend the money for something like this. Its pretty cool, but is it $50-60 cool? I think alot of people would say hell no to that. 2nd problem is size. My module is bigger, requiring minor mods to the cluster housing and a custom gauge face. So to sell something like this it would almost have to be a near drop in install that works in the OEM lcd nest and gauge face opening. There is really only 1 oled module on the market virtually identical to the stock odometer size and its fairly cheap @ $11. Its not full color, its only available black/white, black/light blue or black/yellow. I will likely buy one to play with and "if" I can put together a plug and play module that could be sold for less than $40ish, I will hit Mark@ 6LE up and see if he would be interested in selling it. I could maybe see interest there, as it'd be an accessory item to the gauge faces like the needles and bezel options. If a condition like that didnt exist, theres no chance of me selling as I am just a hobbyist, not a business and vendor fees for a forum like this are not a practical expense for someone like me.
Last edited by LT4vert; 05-13-2014 at 10:27 PM.


 05-14-2014, 09:56 AM
#29
Agreed - I'd be interested, but it depends on how much "modification" is needed. I've already hacked up a spare cluster quite extensively to clear the blue tint and retrofit with LEDs, so a little modification isn't out of the question. Something massive, I'd be a little leery.
05-14-2014, 10:54 AM
#31
Atrus- the larger screen I am using won't take too much modification, trying to make the circuit board small enough to sit in the stock nest actually. The gauge face and the clear plastic piece it sticks to will need most of the mods for the custom size. Also there is a smaller circuit board about the size of a pack of cigarettes that will have to be mounted under the dash for the time and temp inputs. The scan gauge screen on the other side of the cluster will take extensive mods to the housing, making a nest for it to sit in and relocating the warning lights I want to keep withing the tach. Well see when the module is fully functional how everything shakes out. At this point im making educated guesses going off datasheet dimesions and paper prototypes to scale.
 05-14-2014, 12:29 PM
#33
Staging Lane

Join Date: Feb 2014
Posts: 92
Likes: 0
Received 0 Likes
on
0 Posts
I did this project with just a cheap autozone sod tool non adj range had no problems
05-14-2014, 01:35 PM
#34
Cool and thanks! Just dont keep the solder gun on the leds for too long not knowing the set temp. Surface mount leds are much more sensitive to heat than the normal hole through leds. If they get too hot it will destroy them. Just be quick. Dont worry about making a solder mess, the green solder resist film on the circuit board will keep the solder on the copper pad.
Last edited by LT4vert; 05-14-2014 at 04:02 PM.
 05-16-2014, 01:48 AM
#36
Staging Lane
iTrader: (1)

Join Date: Jun 2005
Location: Las Vegas
Posts: 76
Likes: 0
Received 0 Likes
on
0 Posts

I just finished mine using two through hole LEDs wired in series using only the first and last contacts on the PCB. It lights up and the LCD works, but it only shows all 8s for the mileage and trip. Anybody have an idea why? Is it necessary to use all the LED contacts?
Edit: Also, when the odometer is connected, all the warning lights illuminate and don't turn off. Weird...
Edit: Also, when the odometer is connected, all the warning lights illuminate and don't turn off. Weird...
Last edited by MC Ray; 05-16-2014 at 02:38 AM.
05-16-2014, 06:53 AM
#37
Thanks. Modernizing is whole goal. I would still rather drive my 14 year old Camaro than a new one so I dont mind sinking some money in the interior which I have to look at more than anything.
Atrus- the larger screen I am using won't take too much modification, trying to make the circuit board small enough to sit in the stock nest actually. The gauge face and the clear plastic piece it sticks to will need most of the mods for the custom size. Also there is a smaller circuit board about the size of a pack of cigarettes that will have to be mounted under the dash for the time and temp inputs. The scan gauge screen on the other side of the cluster will take extensive mods to the housing, making a nest for it to sit in and relocating the warning lights I want to keep withing the tach. Well see when the module is fully functional how everything shakes out. At this point im making educated guesses going off datasheet dimesions and paper prototypes to scale.
Atrus- the larger screen I am using won't take too much modification, trying to make the circuit board small enough to sit in the stock nest actually. The gauge face and the clear plastic piece it sticks to will need most of the mods for the custom size. Also there is a smaller circuit board about the size of a pack of cigarettes that will have to be mounted under the dash for the time and temp inputs. The scan gauge screen on the other side of the cluster will take extensive mods to the housing, making a nest for it to sit in and relocating the warning lights I want to keep withing the tach. Well see when the module is fully functional how everything shakes out. At this point im making educated guesses going off datasheet dimesions and paper prototypes to scale.
The smaller circuit board is no biggie to me either - easy enough to stash that somewhere under the dash.
I'll be keeping an eye out on your progress. Please keep us updated!
05-16-2014, 10:19 AM
#38
Sure thing man. The oled screens I ordered are back ordered and wont ship for a week or so, then I have to ship one of them to Germany so my friend helping me program has one, so I would say a good month before they even get turned on for the first time. You never want the process to go slow, but thats how the custom stuff always seems to end up.
MC Ray- It sounds like you have something else going on with the warning lights and the 8's. Did you jumper the center un used led pad, if not 6LE has a tutorial, I would think you did that, otherwise the lights wouldnt work. When you reassembled the odometer module did you orient the grey and clear zebra strips the same way it was before removed? Grey/black strip transfers all the input signals to the etched strips on lcd glass. The clear strip does nothing but act as a mount for the bottom of the lcd glass. Unless you are 100% sure, I would take the module back apart. Make sure the zebra strips are correct, clean the contact surfaces with alcohol, make sure the connectors are plugged in correctly, and make sure the tabs on the black frame are touching the grounding pads on the back when everything is reassembled.
MC Ray- It sounds like you have something else going on with the warning lights and the 8's. Did you jumper the center un used led pad, if not 6LE has a tutorial, I would think you did that, otherwise the lights wouldnt work. When you reassembled the odometer module did you orient the grey and clear zebra strips the same way it was before removed? Grey/black strip transfers all the input signals to the etched strips on lcd glass. The clear strip does nothing but act as a mount for the bottom of the lcd glass. Unless you are 100% sure, I would take the module back apart. Make sure the zebra strips are correct, clean the contact surfaces with alcohol, make sure the connectors are plugged in correctly, and make sure the tabs on the black frame are touching the grounding pads on the back when everything is reassembled.
05-20-2014, 12:24 PM
#39
I just wanted to pop in and say thanks to LT4Vert for the write-up! I was able to take out the cluster, swap the lights and put it all back together on both of my cars before dinner thanks to the tips. Looks just like the pictures, amazing!
The packaging for the LEDs freaked me out! It was humidity and static controlled, had a sticker on it indicating they had a 12 month shelf life... hell, they even had a humidity indicator card in the package!
I also didn't control the temperature on the soldering gun. I was freaked out and sure I had screwed it up after doing the first board, but I decided to reassemble and try anyway... and it worked without an issue! So I did the next one and it worked without an issue with a lot less stress!
Thanks again!