
99-02 odo, swapped OEM smd leds with white smd leds, +converting odo to OLED screen
 10-03-2014 | 03:30 PM
#161
Thread Starter
TECH Fanatic
iTrader: (3)
Joined: Feb 2002
Posts: 1,843
Likes: 30
From: South Bend , IN
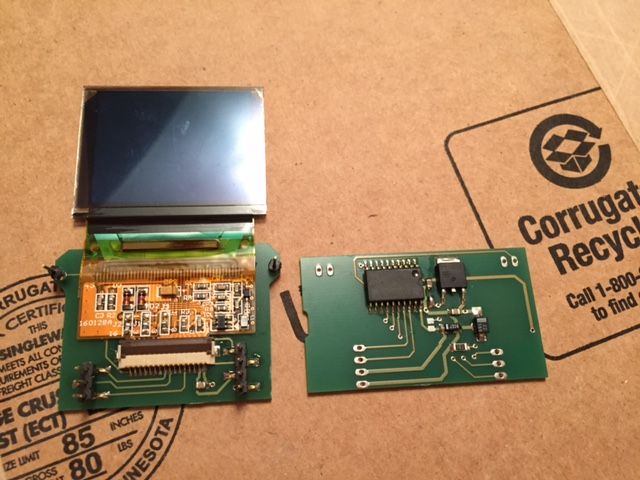
The top right is solely a mounting solution for the oled screen, there are no components on it. Top left is the 16 pin connector for the oled. The bottom 2 are cpu, power supply and level shifters, the bottom left houses the oem female odometer connector as we are using the short oem wiring harness that used to plug into the stock odometer to plug into the new oled.
10-03-2014 | 05:52 PM
#162
Staging Lane
Joined: Oct 2012
Posts: 54
Likes: 0
From: Midland, VA
The top right is solely a mounting solution for the oled screen, there are no components on it. Top left is the 16 pin connector for the oled. The bottom 2 are cpu, power supply and level shifters, the bottom left houses the oem female odometer connector as we are using the short oem wiring harness that used to plug into the stock odometer to plug into the new oled.
10-03-2014 | 06:21 PM
#163
Thread Starter
TECH Fanatic
iTrader: (3)
Joined: Feb 2002
Posts: 1,843
Likes: 30
From: South Bend , IN
Yes thats all worked out. Thankfully Oliver already had those imputs figured out from one of his prior projects and is well versed with class 2 serial data. Getting the boards made and the programming sorted is whats taking the most time to sort out.

 10-13-2014 | 11:44 PM
#166
Thread Starter
TECH Fanatic
iTrader: (3)
Joined: Feb 2002
Posts: 1,843
Likes: 30
From: South Bend , IN
99ss - I'm afraid not yet. A revision had to be made on one of the boards, so currently waiting for them to come back again from the pcb house. Hopefully no more revision need to be made. Designing and building something like this from nothing has proven to be a pretty lengthy adventure.
 10-14-2014 | 06:40 PM
#168

I need the needles and gauge set up on the worse way! Once this is done this will be thee best 4th gen gauge displays out there. Awesome job. I can see purple Venture needles in my future.

 11-18-2014 | 11:59 AM
#173
Thread Starter
TECH Fanatic
iTrader: (3)
Joined: Feb 2002
Posts: 1,843
Likes: 30
From: South Bend , IN
I have a couple baby updates, got the all the cpu issues worked out and got the finished boards back and starting to assemble. Just waiting on a few more parts and a solution for the compass.
Not major but getting closer. Possibly will have a powered up image within a week or 2.
Not major but getting closer. Possibly will have a powered up image within a week or 2.


 11-19-2014 | 06:00 PM
#175

On The Tree
Joined: Nov 2013
Posts: 101
Likes: 1
Holy ****. I just found/read this. Holy ****. This is amazing work! Im having an overlay done for my cluster right now and Im kinda hoping you figure this out before its too late for me to make some revisions and adjust for something like this. Absolutely incredible work!
I have a question about need illumination. Obviously the full needle illum is badass, but what would be a good way to get that little bit of a glow from the base of the needle onto the overlay? Is there any good way to do it? Its something I really like and would love to find a way. Not going too excessive, but more so than factory and kind of like the way the cluster youre modeling yours after looks.
I have a question about need illumination. Obviously the full needle illum is badass, but what would be a good way to get that little bit of a glow from the base of the needle onto the overlay? Is there any good way to do it? Its something I really like and would love to find a way. Not going too excessive, but more so than factory and kind of like the way the cluster youre modeling yours after looks.
11-19-2014 | 06:51 PM
#176
Thread Starter
TECH Fanatic
iTrader: (3)
Joined: Feb 2002
Posts: 1,843
Likes: 30
From: South Bend , IN
Holy ****. I just found/read this. Holy ****. This is amazing work! Im having an overlay done for my cluster right now and Im kinda hoping you figure this out before its too late for me to make some revisions and adjust for something like this. Absolutely incredible work!
I have a question about need illumination. Obviously the full needle illum is badass, but what would be a good way to get that little bit of a glow from the base of the needle onto the overlay? Is there any good way to do it? Its something I really like and would love to find a way. Not going too excessive, but more so than factory and kind of like the way the cluster youre modeling yours after looks.
I have a question about need illumination. Obviously the full needle illum is badass, but what would be a good way to get that little bit of a glow from the base of the needle onto the overlay? Is there any good way to do it? Its something I really like and would love to find a way. Not going too excessive, but more so than factory and kind of like the way the cluster youre modeling yours after looks.
If im understanding the glow part, the particular R8 cluster that I think your referring to on page 1 has very light grey gauge faces. Couple the grey faces and the fact a picture is going to make the glow look more prominent. If it had black faces, it the glow would look less dramatic. The fcar faces have alot of light spill over at the base of the needles, so all you really need is brighter led lighting and you will get the same effect. Im going the other way. When I finalize the needle lighting, Im going to fab a short circular wall to block the light spill over at the base of the needle.
11-19-2014 | 07:09 PM
#177
On The Tree
Joined: Nov 2013
Posts: 101
Likes: 1
I cant wait to see it done and how much modification will be needed. Its just too cool of a project. I love stuff like this.
Im wondering if maybe getting my overlawy done if I shouldnt have the needle base done in a light color for bleed through maybe? Have you ever seen 05/06 GTO gaugse illuminated? It has the effect Im thinking of. Like how the stock ones are on fbodies, but seemingly more prominent and perhaps more intentional?
Im wondering if maybe getting my overlawy done if I shouldnt have the needle base done in a light color for bleed through maybe? Have you ever seen 05/06 GTO gaugse illuminated? It has the effect Im thinking of. Like how the stock ones are on fbodies, but seemingly more prominent and perhaps more intentional?
11-24-2014 | 03:12 PM
#178
Thread Starter
TECH Fanatic
iTrader: (3)
Joined: Feb 2002
Posts: 1,843
Likes: 30
From: South Bend , IN
I think just going brighter bulbs is going to give you the effect you want. Maybe when you have the gauge face made have the needle holes slightly larger, like .75mm to 1mm max.
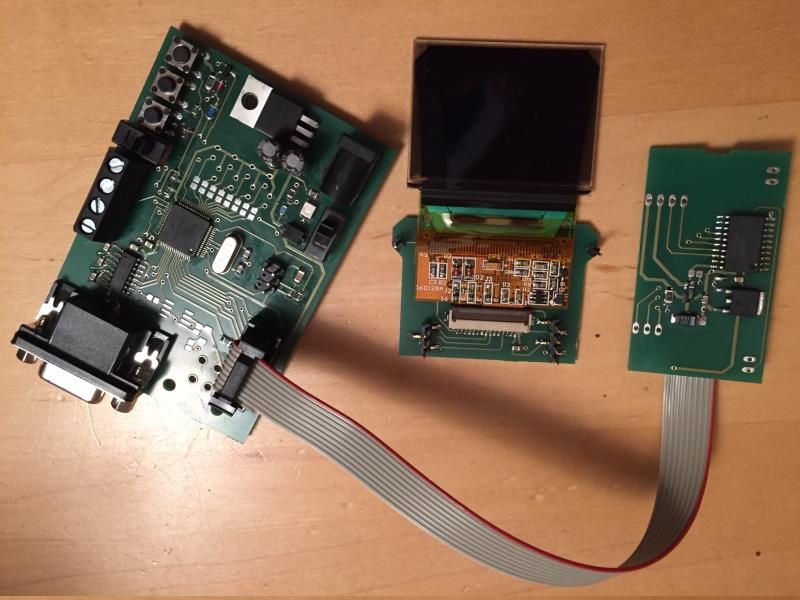
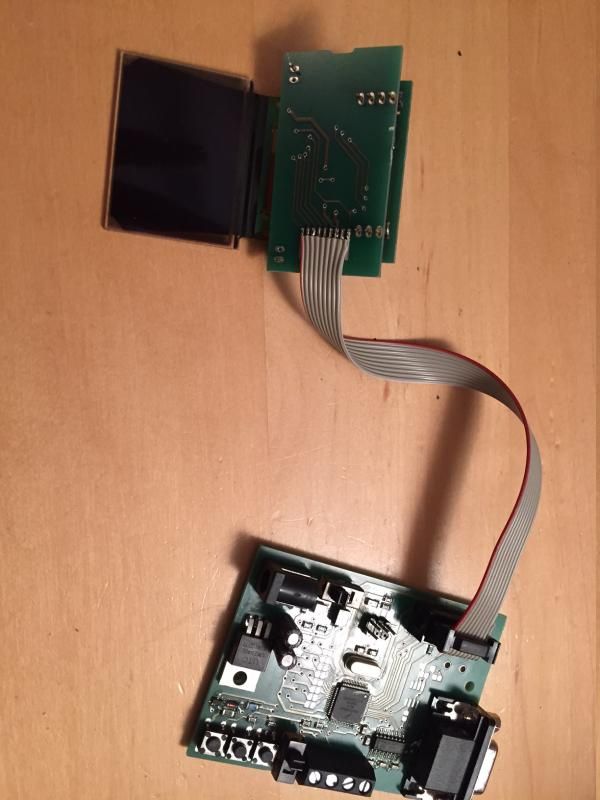
Another small update for those following. Heres all the boards complete. The large board is where the inputs for the speed sensor, c5 corvette air temp sensor, the main power and programming port are. It all is working out quite nicely. Ran a short test to make sure the boot loader program works, it does. Next is to test a short string of text and few color bars then onto getting this thing functioning.

.... More later.
Another small update for those following. Heres all the boards complete. The large board is where the inputs for the speed sensor, c5 corvette air temp sensor, the main power and programming port are. It all is working out quite nicely. Ran a short test to make sure the boot loader program works, it does. Next is to test a short string of text and few color bars then onto getting this thing functioning.


.... More later.

