ARTICLE: Good Pictures (Technique, Equipment, Etc)


 05-03-2007, 12:07 AM
#83
Sold The Fun Stuff :(
Thread Starter
iTrader: (1)
Join Date: Nov 2001
Location: Nashville, TN
Posts: 2,371
Likes: 0
Received 0 Likes
on
0 Posts

bastien, I cant find it in this thread but I thought you posted a link to another forum that had a photography section where we could all get some more CC. Care to link to that again for everyone and I'll add it into the original post as well for more information and resources to everyone reading this.
 05-03-2007, 10:04 AM
#84
12 Second Club
iTrader: (1)
Join Date: Jan 2005
Location: Orlando, FL / UCF / Brussels, Belgium
Posts: 1,050
Likes: 0
Received 0 Likes
on
0 Posts
Originally Posted by josh99ta
bastien, I cant find it in this thread but I thought you posted a link to another forum that had a photography section where we could all get some more CC. Care to link to that again for everyone and I'll add it into the original post as well for more information and resources to everyone reading this.
These 2 are for MAJOR CC. If your pictures are ok, don't bother posting. They have some really harsh members on there, lol.
http://forums.dieselstation.com/
http://www.accessphoto.com/forum/
don't ask for CC on this one:
http://www.photoshoptechniques.com/forum/index.php
05-03-2007, 07:44 PM
#85
Sold The Fun Stuff :(
Thread Starter
iTrader: (1)
Join Date: Nov 2001
Location: Nashville, TN
Posts: 2,371
Likes: 0
Received 0 Likes
on
0 Posts
Good deal bastien. I'm going to go ahead and get on Dieselstation as well as Access photo (although access photo is acting very weird on my computer).
05-03-2007, 11:52 PM
#86
12 Second Club
iTrader: (1)
Join Date: Jan 2005
Location: Orlando, FL / UCF / Brussels, Belgium
Posts: 1,050
Likes: 0
Received 0 Likes
on
0 Posts
Originally Posted by josh99ta
Good deal bastien. I'm going to go ahead and get on Dieselstation as well as Access photo (although access photo is acting very weird on my computer).
05-04-2007, 12:38 AM
#87
Sold The Fun Stuff :(
Thread Starter
iTrader: (1)
Join Date: Nov 2001
Location: Nashville, TN
Posts: 2,371
Likes: 0
Received 0 Likes
on
0 Posts
Access photo is being uberghey on my computer but I'm over on Dieselstation and have a thread up in Users Rides and the Photography forum. Looking forward to some quality C&C on my photos I put up over there.
05-05-2007, 03:31 PM
#88
TECH Addict
iTrader: (3)
Join Date: Nov 2005
Location: Lincoln, NE
Posts: 2,869
Likes: 0
Received 0 Likes
on
0 Posts
Ok I see where the jaggies are coming from. They are there from the beginning - the sharpening just exaggerates them.
Josh, can you explain what you mean by "check levels" and "check curves"? What am I looking for? And what is the difference between setting the black point in Levels vs Curves? It looks pretty much the same to me.
My camera (Canon S3) by default can't shoot in RAW mode, however there is a modified firmware "hack" that enables RAW shooting that I may try. The only problem is since the files are so large I can't do any bracketing or continuous shooting like that. It saves both a RAW and a JPEG with every shot.
I also found the .3 pixel radius to be too much for my pictures and brings out a whole bunch of noise. It probably isn't a problem on your camera though. I have to tone it down to .2
Last edited by BlackHawk T/A; 05-05-2007 at 04:31 PM.
05-05-2007, 04:17 PM
#89
TECH Addict
iTrader: (3)
Join Date: Nov 2005
Location: Lincoln, NE
Posts: 2,869
Likes: 0
Received 0 Likes
on
0 Posts
We should talk about noise while we are here.
If you have "speckles" in your image we refer to that as noise. Processes such as sharpening can exaggerate the noise and it can make for bad results.
There are programs out there that are better at removing this than the built-in tools in Photoshop. I have found the three main programs recommended among photographers are:
Imagenomic Noiseware
PictureCode Noise Ninja
Neat Image
I am playing with them now to find which one I like best. I find that my Canon S3 tends to produce some noisy images even in daylight at ISO 100 which is disappointing . Nothing like Josh's big-sensor dSLR to produce those clean images.
If you have "speckles" in your image we refer to that as noise. Processes such as sharpening can exaggerate the noise and it can make for bad results.
There are programs out there that are better at removing this than the built-in tools in Photoshop. I have found the three main programs recommended among photographers are:
Imagenomic Noiseware
PictureCode Noise Ninja
Neat Image
I am playing with them now to find which one I like best. I find that my Canon S3 tends to produce some noisy images even in daylight at ISO 100 which is disappointing
. Nothing like Josh's big-sensor dSLR to produce those clean images. Last edited by BlackHawk T/A; 05-06-2007 at 12:09 AM.
05-05-2007, 04:32 PM
#90
12 Second Club
iTrader: (1)
Join Date: Jan 2005
Location: Orlando, FL / UCF / Brussels, Belgium
Posts: 1,050
Likes: 0
Received 0 Likes
on
0 Posts
Originally Posted by BlackHawk T/A
We should talk about noise while we are here.
If you have "speckles" in your image we refer to that as noise. Processes such as sharpening can exaggerate the noise and it can make for bad results.
There are programs out there that are better at removing this than the built-in tools in Photoshop. I have found Noiseware works pretty good and is recommended among photographers.
You can try their free Community Version at Imagenomic.
The only problem with this is, it can have a "smoothing" effect on your image and you can lose a small amount of detail or sharpness. It is a compromise but you can play with it to get better results.
05-06-2007, 01:34 AM
#91
Sold The Fun Stuff :(
Thread Starter
iTrader: (1)
Join Date: Nov 2001
Location: Nashville, TN
Posts: 2,371
Likes: 0
Received 0 Likes
on
0 Posts
Noise Ninja ForTheWin! (when did that get censored!?) Seriously folks, its money but its so worth it. I dont currently use it but I need to get on the ball.
As far as check levels and curves if you look at the original post in this thread it talks about reading a histogram and correcting the levels via the histogram which is what I usually do (within reason), then I go to curves and choose the black "dropper" and use it in an "absolute black" area of the photo to make sure everything is good to go there. Then after that I go to Shadows/Highlights and then add in the sharpening as well as the borders and text.
As far as check levels and curves if you look at the original post in this thread it talks about reading a histogram and correcting the levels via the histogram which is what I usually do (within reason), then I go to curves and choose the black "dropper" and use it in an "absolute black" area of the photo to make sure everything is good to go there. Then after that I go to Shadows/Highlights and then add in the sharpening as well as the borders and text.
Last edited by josh99ta; 05-06-2007 at 07:08 PM.
05-06-2007, 11:03 AM
#93
TECH Addict
iTrader: (3)
Join Date: Nov 2005
Location: Lincoln, NE
Posts: 2,869
Likes: 0
Received 0 Likes
on
0 Posts
I started playing with Noise Ninja last night, and I really like it but its a little harder to get started than Noiseware. I edited my post above and linked to the 3 most popular noise reduction programs.
I checked the link to the basic photo adjustments and noticed he was moving the sliders to where the histogram starts. That's funny because that's what I ended up doing last night, so I guess I assumed right.
I checked the link to the basic photo adjustments and noticed he was moving the sliders to where the histogram starts. That's funny because that's what I ended up doing last night, so I guess I assumed right.
Last edited by BlackHawk T/A; 05-06-2007 at 11:56 AM.
05-06-2007, 10:37 PM
#94
Sold The Fun Stuff :(
Thread Starter
iTrader: (1)
Join Date: Nov 2001
Location: Nashville, TN
Posts: 2,371
Likes: 0
Received 0 Likes
on
0 Posts
More sharpening stuff...
I posted my basic starting points for sharpening (Unsharp Mask in LAB mode). Another starting point is 400-500%, 0.2 pixel radius, 0 threshold. If you're worried about oversharpening and you already have a pretty crisp picture to begin with these basic settings can really enhance the picture without overdoing it. Its the values I'll be using from now on in all my work.
EDITED: I took the other technique out. It grossly oversharpened any and every picture I tried it on. And I was recommended that technique from someone who generally knows what they're doing. Goes to show you that you just have to get out there, experiment with things, and see what works best for you.
Last edited by josh99ta; 05-08-2007 at 12:04 AM.
05-07-2007, 07:46 PM
#95
TECH Addict
iTrader: (3)
Join Date: Nov 2005
Location: Lincoln, NE
Posts: 2,869
Likes: 0
Received 0 Likes
on
0 Posts
I found that once you hit .25 it tends to over-sharpen the picture. The reason is, its rounding up to .30. If you use .24 it rounds down to .20.
I have had good success so far with 400% at a .2 radius.
Last night I got pretty fast at using the Lab Color -> Ctrl+1, Unsharp Mask - > Back to RGB, so thanks for that tip
Anyone have any tips for Noise Ninja? The batch processing is VERY useful and really makes it a non-issue for your workflow. You can even save in TIFF but since it makes the files so large I just prefer JPEG at 100% (minimal, if any compression). They still end up larger than the original by a small amount but they look so much better.
Last edited by BlackHawk T/A; 05-08-2007 at 08:53 AM.
05-08-2007, 01:41 PM
#96
TECH Addict
iTrader: (3)
Join Date: Nov 2005
Location: Lincoln, NE
Posts: 2,869
Likes: 0
Received 0 Likes
on
0 Posts
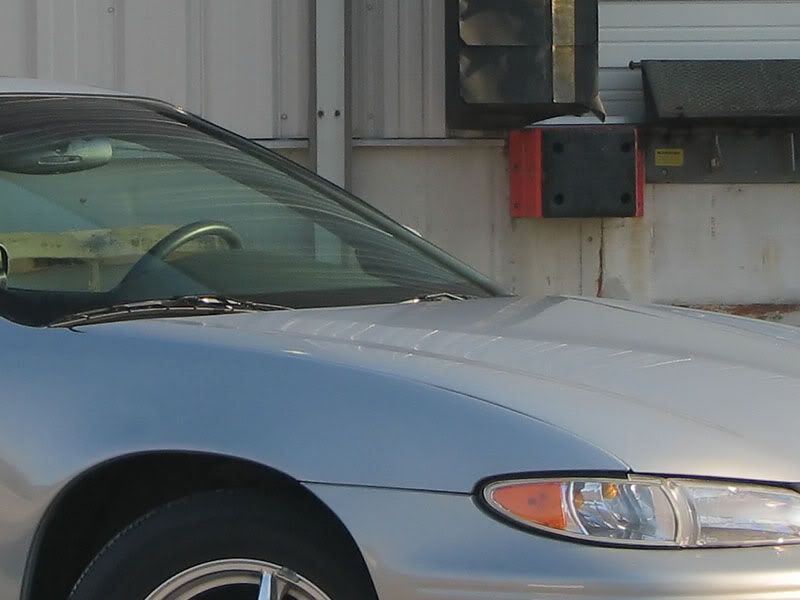
Here are a couple comparisons I made.
Original:
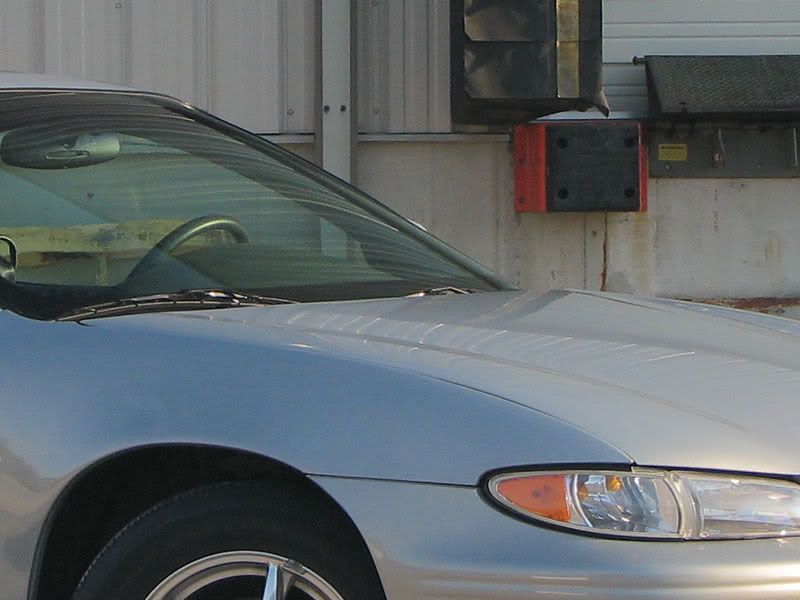
After Noise Ninja: (if you can't see the difference, look at the speckles all over the last picture, then get glasses)
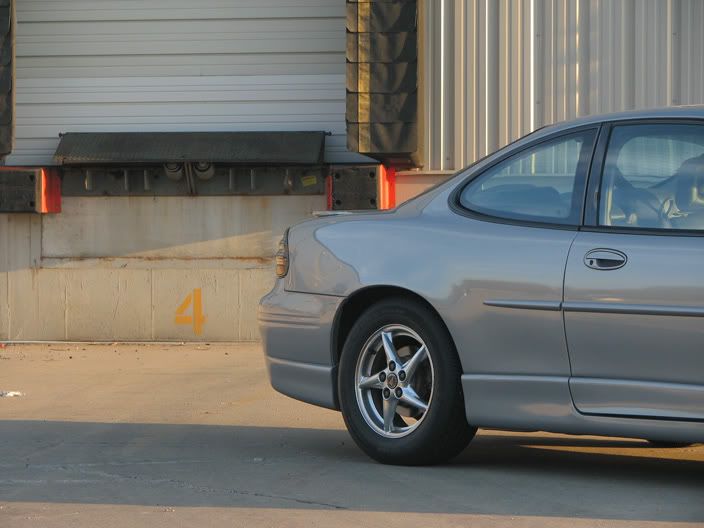
And before post-processing:
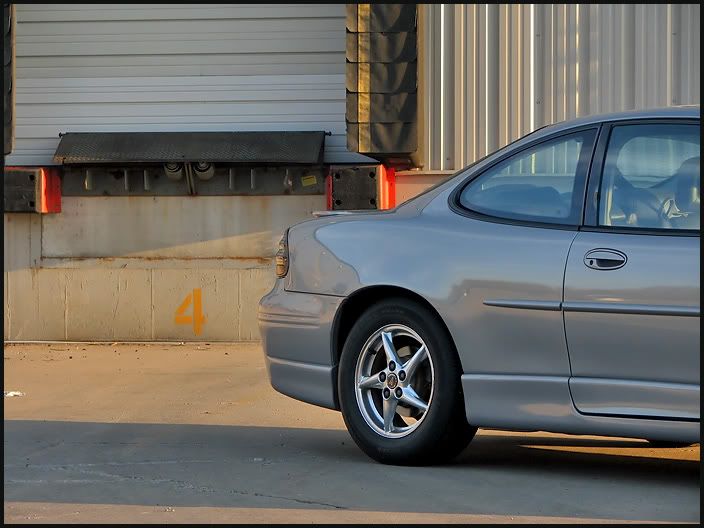
After:
Just a note, I used the "Set Black Point" tool within Levels and without changing to CMYK. I found that changing to CMYK color and doing it there was giving me some weird results. Also when setting the black point within Levels, it overrides any changes you made to the histogram - you can only do one or the other. Still experimenting with that but I have had good results doing it this way so far.
Original:
After Noise Ninja: (if you can't see the difference, look at the speckles all over the last picture, then get glasses)
And before post-processing:
After:
Just a note, I used the "Set Black Point" tool within Levels and without changing to CMYK. I found that changing to CMYK color and doing it there was giving me some weird results. Also when setting the black point within Levels, it overrides any changes you made to the histogram - you can only do one or the other. Still experimenting with that but I have had good results doing it this way so far.
Last edited by BlackHawk T/A; 05-08-2007 at 01:47 PM.
05-08-2007, 07:52 PM
#99
Sold The Fun Stuff :(
Thread Starter
iTrader: (1)
Join Date: Nov 2001
Location: Nashville, TN
Posts: 2,371
Likes: 0
Received 0 Likes
on
0 Posts
I've also abandoned editing in CMYK currently until I can figure out some better methods. I know I have a friend who is a professional graphic designer and she does alot of work in CMYK but I haven't gotten with her yet to figure out how to work with it to get the best results. I've currently been going into levels, "unclipping" the histogram by moving the left and right sliders to the beginning of the histogram, then just opening up curves and setting the black point with the dropper.
Where in that picture did you set the black point? The wheel well?
Where in that picture did you set the black point? The wheel well?
05-08-2007, 08:47 PM
#100
TECH Addict
iTrader: (3)
Join Date: Nov 2005
Location: Lincoln, NE
Posts: 2,869
Likes: 0
Received 0 Likes
on
0 Posts
Yeah 9/10 times the wheel well has been the best place for me.
bastien: It doesn't look over-sharpened to me? I stay away from .3 pixel radius because to me that is too much, but .2 looks great.
bastien: It doesn't look over-sharpened to me? I stay away from .3 pixel radius because to me that is too much, but .2 looks great.