
And my 4L80E swap begins
 02-03-2012, 11:03 PM
#21

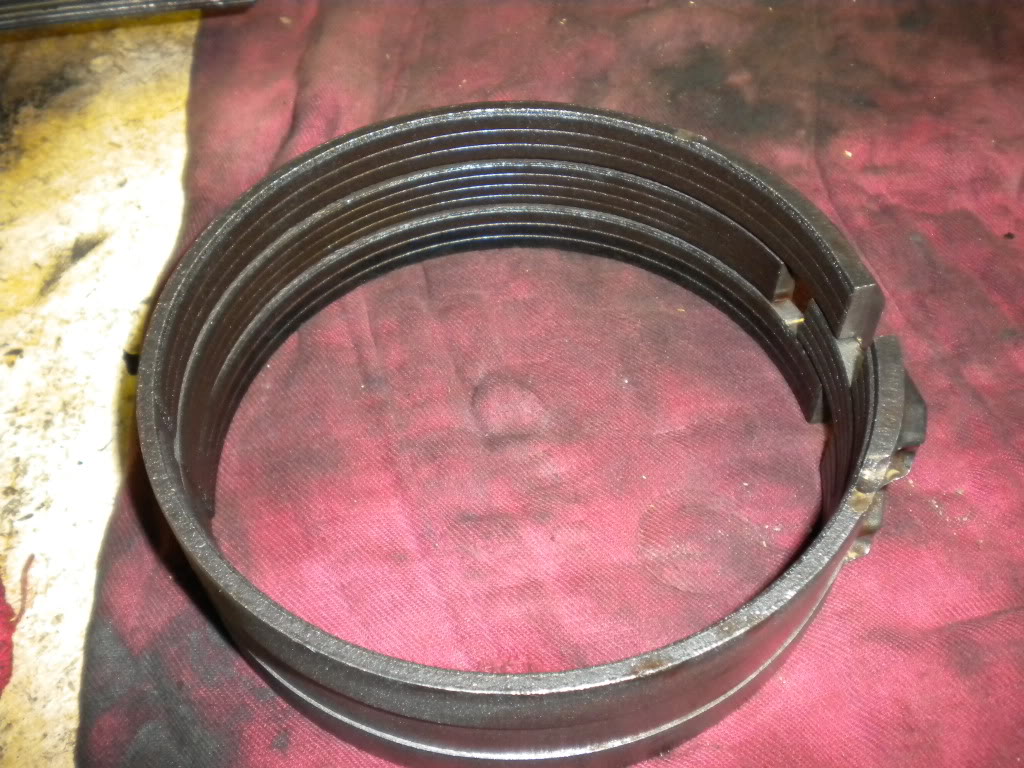
Finally I removed the reverse band assembly.
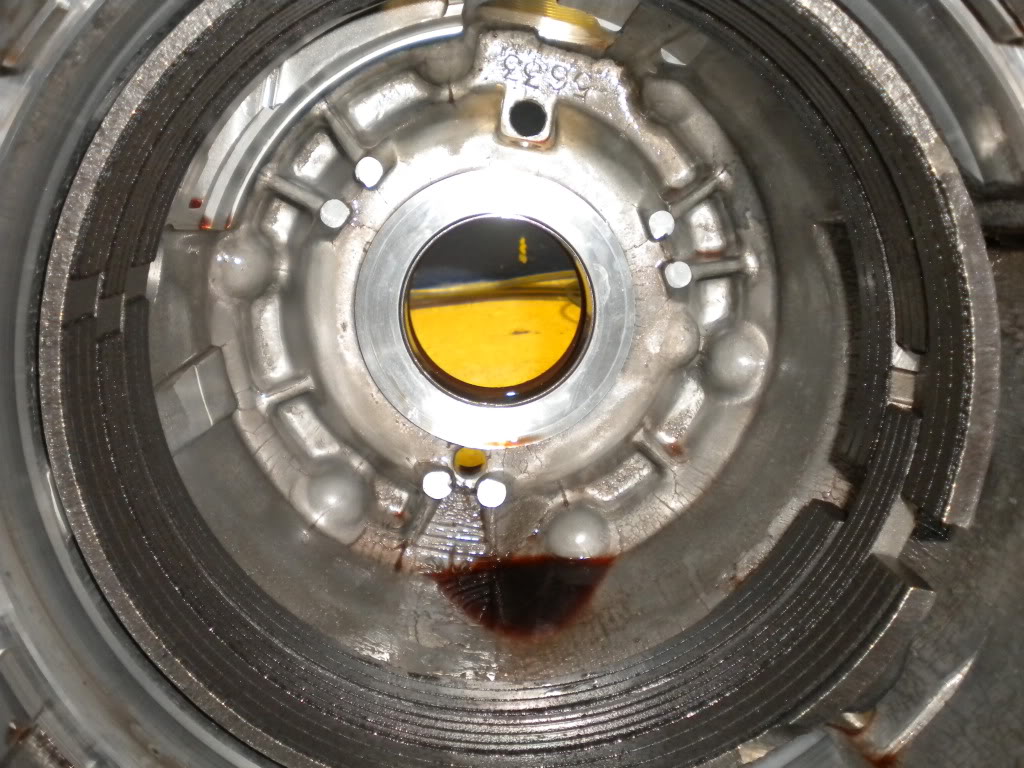
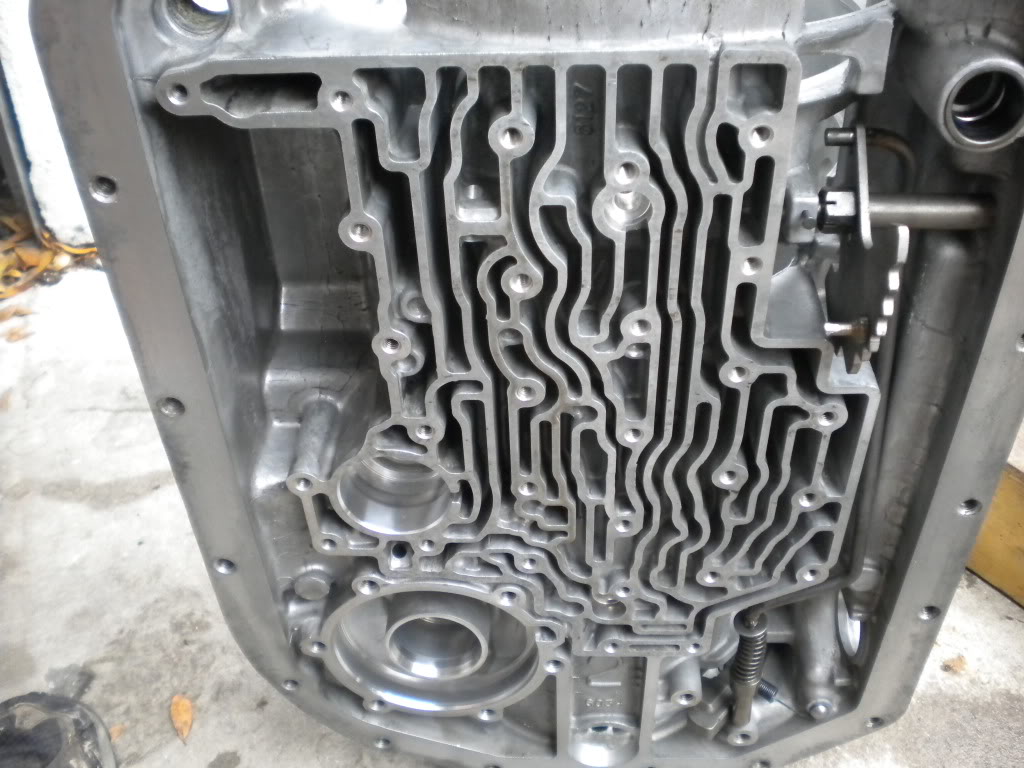
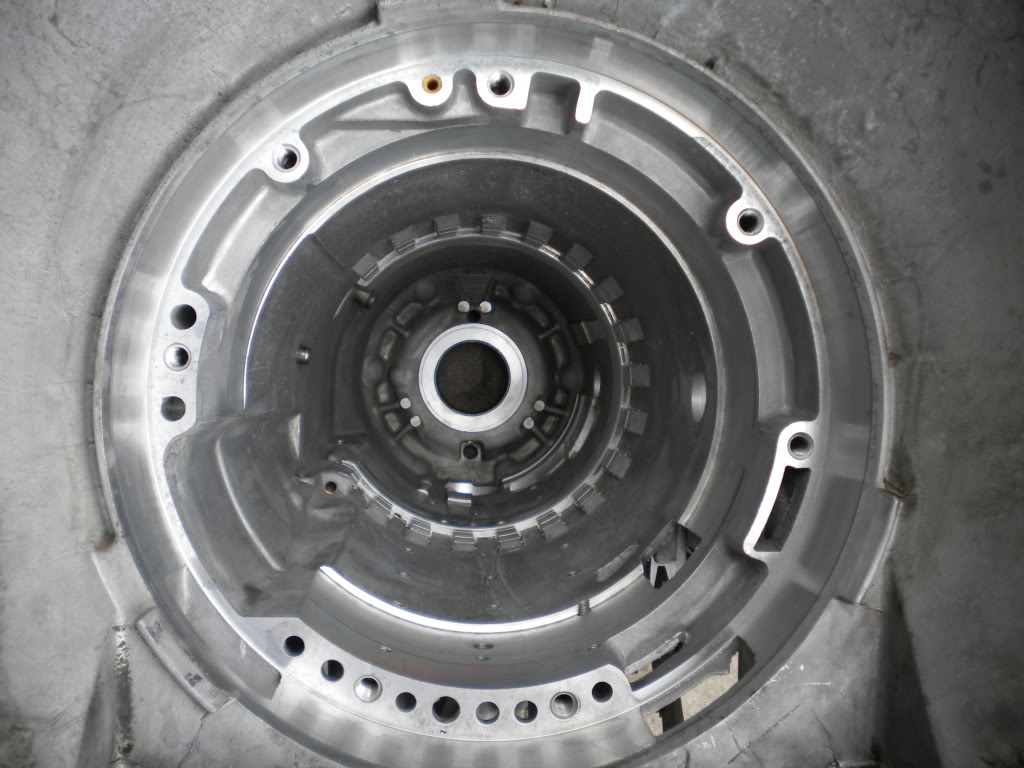
And there you go, an empty case!
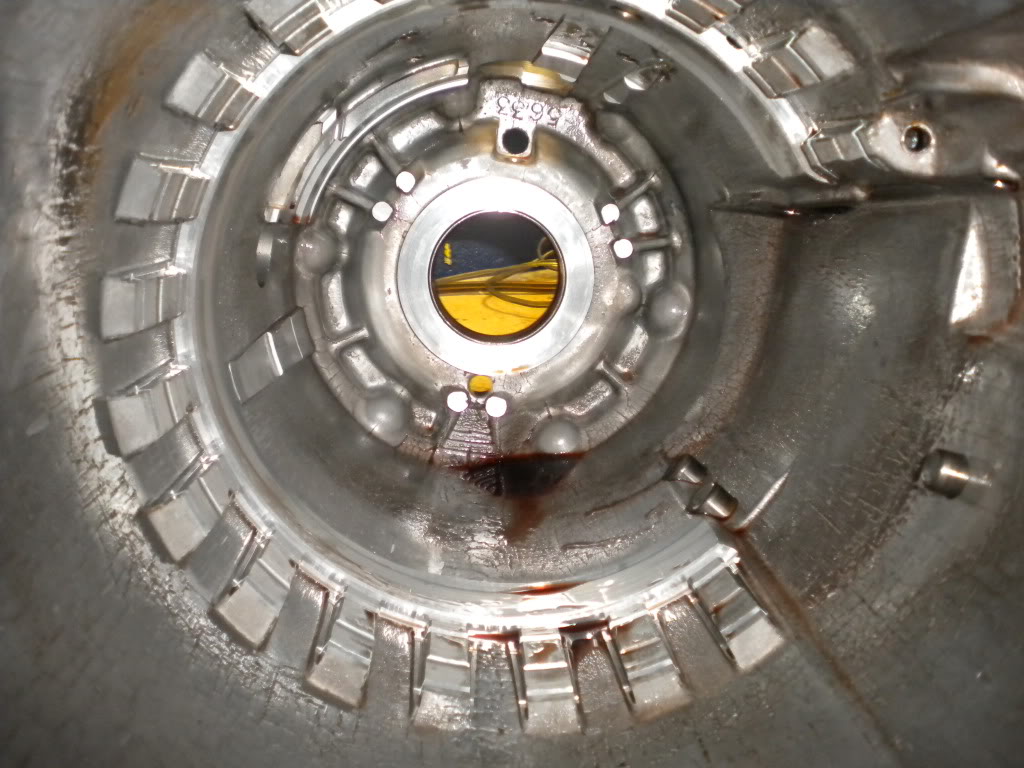
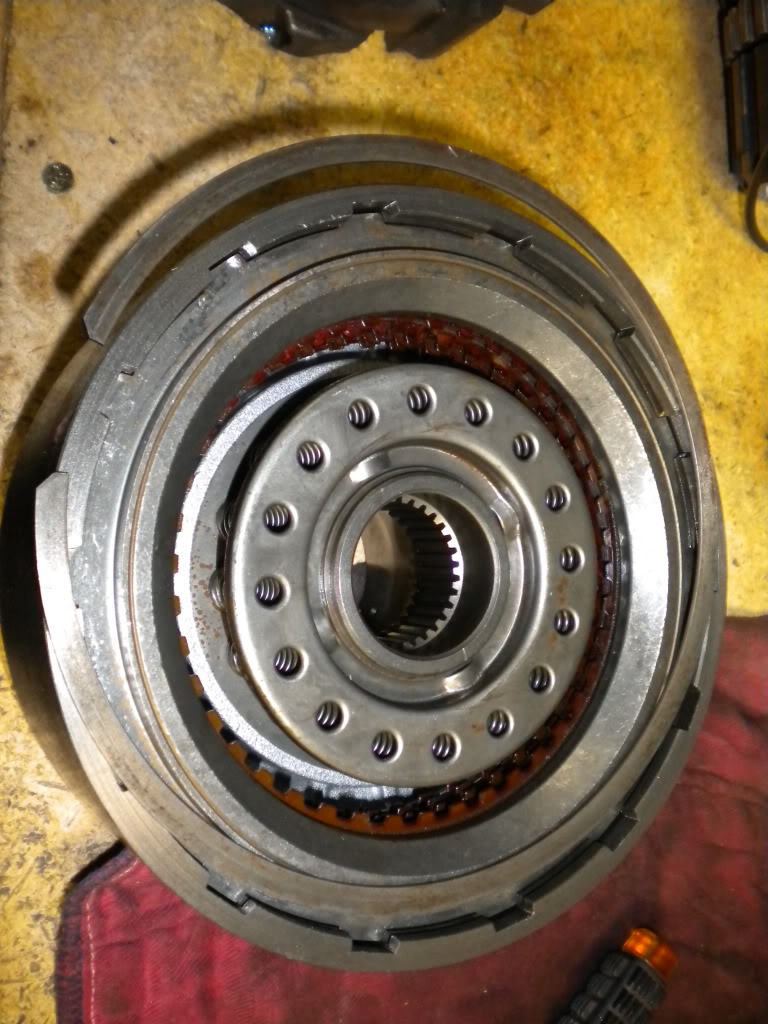
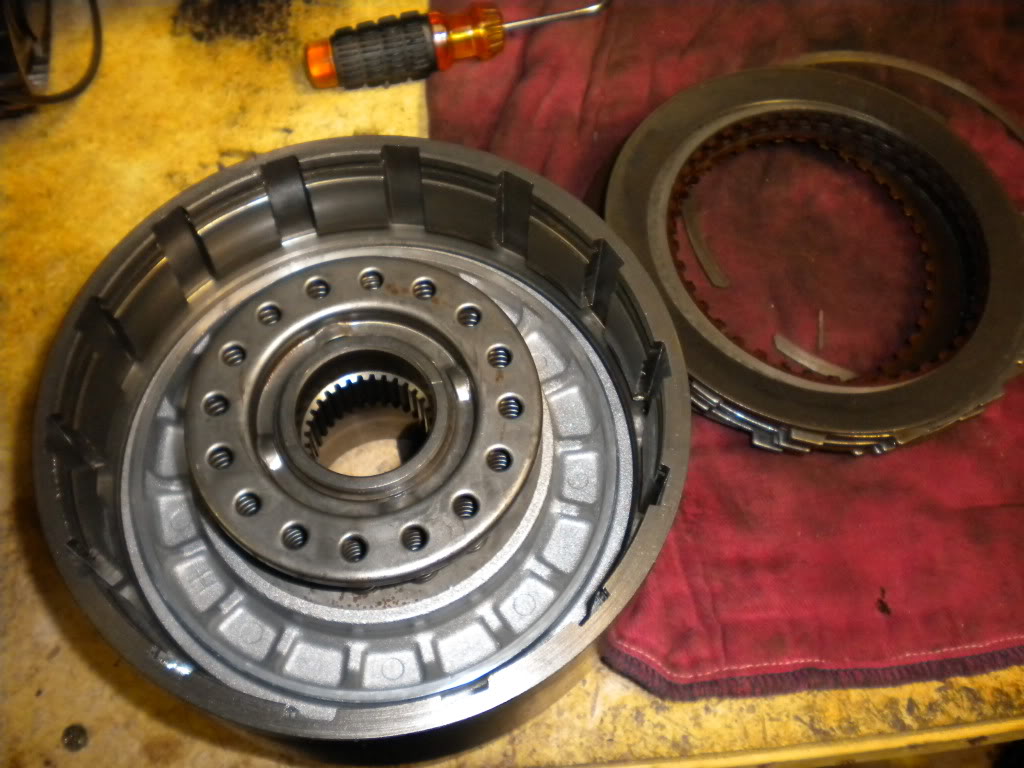
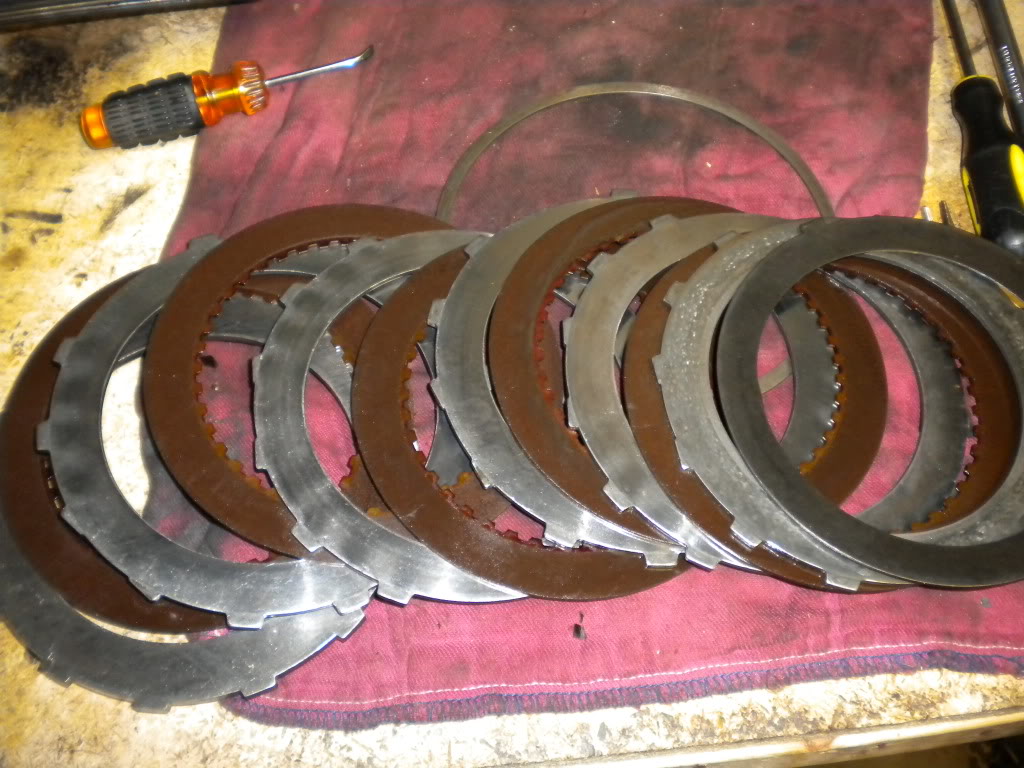
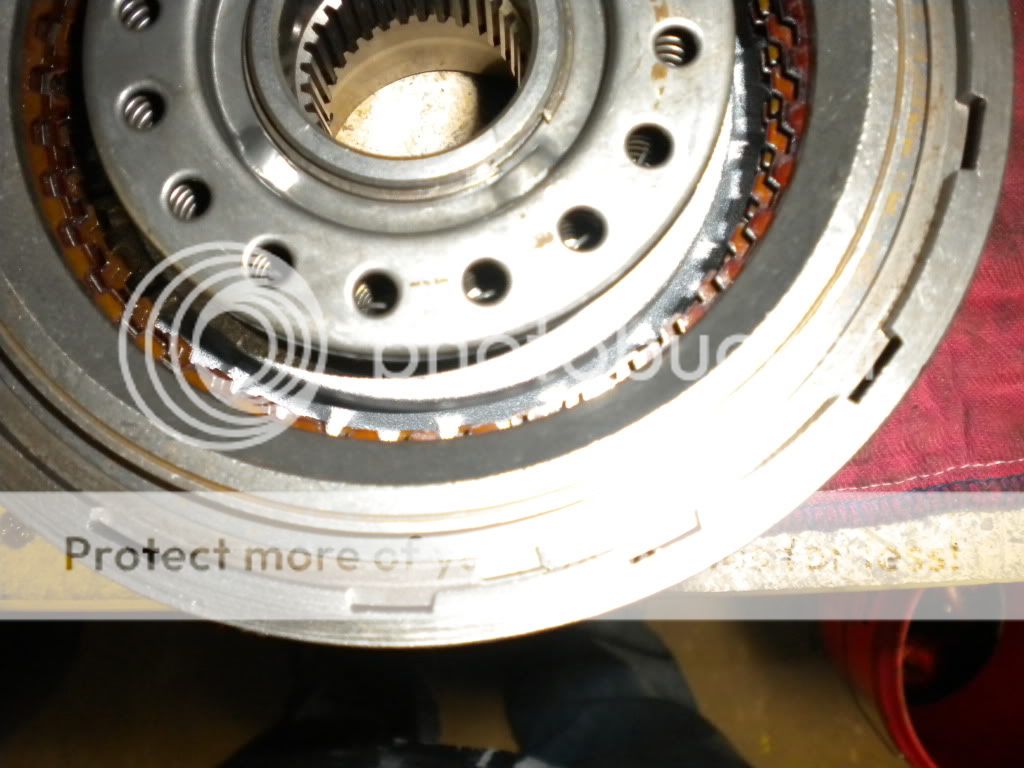
I still had a little time so I went ahead took out the clutches from the direct, forward, and 4th housings. They are held in by snap rings that I removed with a screw driver and simply pulled the clutches out. All the clutches and plates look in really good condition, as if this thing just had a recent rebuild!


And there you go, an empty case!
I still had a little time so I went ahead took out the clutches from the direct, forward, and 4th housings. They are held in by snap rings that I removed with a screw driver and simply pulled the clutches out. All the clutches and plates look in really good condition, as if this thing just had a recent rebuild!
 02-04-2012, 01:32 AM
#22
Great thread man! Word of advice for future reference, removing the parking pawl is not necessary, it's perfectly fine to just keep it in there, it's much less of a hassle that way.
Also, for removing the pump, instead of having to use two pry bars on both sides of it to get it out it comes out quite easily with one pry bar if you use it behind the pump, by sticking it down in the case from behind. There's a little bit of a gap that's perfect for it. Look at the bottom of your picture, just a little down and to the right of that bottom oil pan bolt hole.
Please, please, please, don't call it a turbine shaft lol, I don't know why, but I just hate it when it's called that for some reason. It bugs me every time I read it like that
For the gasket **** that you used a razor blade on. One thing you can do if available to you is put in a really hot parts washer and let it do it's thing. That alone won't really take it off, but once you let it dry, it becomes much easier.
I recommend buying a pumice stone, 2-3 cans of brake cleaner, fine grit sandpaper and some rubber gloves. If you plan to paint the case to make it look really nice (which I would recommend just because) then clean it very well with brake cleaner and a wire scrubber. An air hose is VERY handy to have for that, but not necessary. Use brake cleaner and the pumice stone in nice, even, but firm, strokes on the case valve body. It smoothes the surface, and a practice used by professional transmission builders Once it's all nice and clean, let it wait for about a day, then paint that case, nice and evenly. Be careful with the inside of the bellhousing, and try not to get it inside the case.
Once the case is dry, take the sandpaper and sand around the edges of the case, and any excess paint that may be on there will come right off. The edges I'm referring to are like this

All around the edges where the oil pan gasket goes, then go up and do the front facing edges of the bellhousing and what not, know what I mean?
Once you've done that, BLOW THE **** OUT OF THAT CASE. If you can, or if you know someone who has a compressor, air hose the hell out of that case, inside and out. Be sure to spray brake cleaner in the inside as well and then blow stuff out of it. It may seem like some annoying prep work but you will have a spotless prepared case that would keep up with or outdo many professional builders. A lot of normal general transmission repair shops don't give a damn, some won't even change your seals on transmissions of yours that they're rebuilding. It's the little things that set it apart.
I also recommend using the brake cleaner on the pump and the valve body. Not sure how thorough your kit is for the rebuild, but it should come with new seals and bushings. Once you've taken your pump apart, use a chisel and a hammer (or a flat head and a hammer) and take the seal off the pump face. Since this is a budget build I assume you don't want to buy a seal puller lol. For removing and replacing the bushings, the only method I can recommend with confidence is buying (and then returning ) a bushing driver. Some people might tell you to use the hammer and chisel again to remove the bushing, I say avoid that because you risk damaging the pump bore.
If you don't know, this is a bushing driver kit Basically it's these little metal pieces that look like donuts with a lip on the out part of them. They come in different sizes depending on the bushing size, and the sizes are marked on each "donut". You can tell the proper size by seeing which one perfectly catches the lip of the old bushing and doesn't really give any play. Put the driver into the "donut" and hammer it out. Spray inside the bore with brake cleaner. Once it dries (should be pretty quick) carefully line up your new bushing and double check your driver size. Hammer it in, make sure that you don't go so far the lip of the bushing stick into the pump AT ALL. It would really suck hard if the pump gears caught onto the bushing lip. There's a slightly beveled edge on the inner face of the pump bore if you're looking at it with the inside facing up towards you. Make the bushing is even and is a hair lower than where the bevel ends. I can try to snag you a photo next week of what I mean.
Spray the insides of both of the pump halves and use the pumice stone on them again, same deal. Use the pumice stone on the valve body as well, the back side as well. Recommend using an air compressor if you can to clean it. Pretty much an air compressor is the best damn thing you can have to clean and dry transmission parts.
Once you've cleaned all of your parts, (do this as thoroughly as you can, gonna need more brake fluid cleaner since you don't have a cleaning area with chemicals and brushes and what not. Brake cleaner is VERY strong though and can do **** most transmission cleaner can't, so it's quite good. Once your parts are all cleaned, and your case is ready, I highly recommend stacking the transmission.
Basically, take a vice clamp and tightly secure your yoke. Build your transmission like that, starting with the output shaft, low ring gear, intermediate shaft, low gearset, snap right etc. Build it all the way up to the pump. It takes a little more time, but it does 2 things
1) You have a better idea of how it's all going to go in the case and it's a nice little bit of practice
2) It helps you look at everything and make sure you didn't leave something out, it's easy to forget something like a thrust washer or a bearing etc. Stacking ensures you got all of your **** straight before actually putting it in the case. Use plenty of Transgel and be careful seating the pistons! Don't chew up the lips! You might also want to buy a feeler gauge (they're dirt cheap, like a couple of bucks) to check your clutch pack clearances, among other things. You're also going to need to find a way to compress the springs that you pulled from things like the direct drum etc.
I can tell you those are damn near impossible to put back on without some kind of spring compressor. The big spring on the overdrive basket is put on by hand. I'm pretty tired at the moment, but I forgot to ask and I just suddenly wondered if you did or did not remove those springs? You should if you can, since you need to remove the piston to fully clean everything and replace seals. Be sure to keep track of all of your parts as best as you can, it sucks losing something, would suck worse losing something and you don't even know it.
There's probably more I could chime in, but this post is really really long and I'm really really tired, so I'll just let it be for now. Any questions, maybe I could answer, and if not I know someone else will be able to.
Also, for removing the pump, instead of having to use two pry bars on both sides of it to get it out it comes out quite easily with one pry bar if you use it behind the pump, by sticking it down in the case from behind. There's a little bit of a gap that's perfect for it. Look at the bottom of your picture, just a little down and to the right of that bottom oil pan bolt hole.
Please, please, please, don't call it a turbine shaft lol, I don't know why, but I just hate it when it's called that for some reason. It bugs me every time I read it like that
For the gasket **** that you used a razor blade on. One thing you can do if available to you is put in a really hot parts washer and let it do it's thing. That alone won't really take it off, but once you let it dry, it becomes much easier.
I recommend buying a pumice stone, 2-3 cans of brake cleaner, fine grit sandpaper and some rubber gloves. If you plan to paint the case to make it look really nice (which I would recommend just because) then clean it very well with brake cleaner and a wire scrubber. An air hose is VERY handy to have for that, but not necessary. Use brake cleaner and the pumice stone in nice, even, but firm, strokes on the case valve body. It smoothes the surface, and a practice used by professional transmission builders
Once it's all nice and clean, let it wait for about a day, then paint that case, nice and evenly. Be careful with the inside of the bellhousing, and try not to get it inside the case.Once the case is dry, take the sandpaper and sand around the edges of the case, and any excess paint that may be on there will come right off. The edges I'm referring to are like this
All around the edges where the oil pan gasket goes, then go up and do the front facing edges of the bellhousing and what not, know what I mean?
Once you've done that, BLOW THE **** OUT OF THAT CASE. If you can, or if you know someone who has a compressor, air hose the hell out of that case, inside and out. Be sure to spray brake cleaner in the inside as well and then blow stuff out of it. It may seem like some annoying prep work but you will have a spotless prepared case that would keep up with or outdo many professional builders. A lot of normal general transmission repair shops don't give a damn, some won't even change your seals on transmissions of yours that they're rebuilding. It's the little things that set it apart.
I also recommend using the brake cleaner on the pump and the valve body. Not sure how thorough your kit is for the rebuild, but it should come with new seals and bushings. Once you've taken your pump apart, use a chisel and a hammer (or a flat head and a hammer) and take the seal off the pump face. Since this is a budget build I assume you don't want to buy a seal puller lol. For removing and replacing the bushings, the only method I can recommend with confidence is buying (and then returning
) a bushing driver. Some people might tell you to use the hammer and chisel again to remove the bushing, I say avoid that because you risk damaging the pump bore.If you don't know, this is a bushing driver kit
Basically it's these little metal pieces that look like donuts with a lip on the out part of them. They come in different sizes depending on the bushing size, and the sizes are marked on each "donut". You can tell the proper size by seeing which one perfectly catches the lip of the old bushing and doesn't really give any play. Put the driver into the "donut" and hammer it out. Spray inside the bore with brake cleaner. Once it dries (should be pretty quick) carefully line up your new bushing and double check your driver size. Hammer it in, make sure that you don't go so far the lip of the bushing stick into the pump AT ALL. It would really suck hard if the pump gears caught onto the bushing lip. There's a slightly beveled edge on the inner face of the pump bore if you're looking at it with the inside facing up towards you. Make the bushing is even and is a hair lower than where the bevel ends. I can try to snag you a photo next week of what I mean.Spray the insides of both of the pump halves and use the pumice stone on them again, same deal. Use the pumice stone on the valve body as well, the back side as well. Recommend using an air compressor if you can to clean it. Pretty much an air compressor is the best damn thing you can have to clean and dry transmission parts.
Once you've cleaned all of your parts, (do this as thoroughly as you can, gonna need more brake fluid cleaner since you don't have a cleaning area with chemicals and brushes and what not. Brake cleaner is VERY strong though and can do **** most transmission cleaner can't, so it's quite good. Once your parts are all cleaned, and your case is ready, I highly recommend stacking the transmission.
Basically, take a vice clamp and tightly secure your yoke. Build your transmission like that, starting with the output shaft, low ring gear, intermediate shaft, low gearset, snap right etc. Build it all the way up to the pump. It takes a little more time, but it does 2 things
1) You have a better idea of how it's all going to go in the case and it's a nice little bit of practice
2) It helps you look at everything and make sure you didn't leave something out, it's easy to forget something like a thrust washer or a bearing etc. Stacking ensures you got all of your **** straight before actually putting it in the case. Use plenty of Transgel and be careful seating the pistons! Don't chew up the lips! You might also want to buy a feeler gauge (they're dirt cheap, like a couple of bucks) to check your clutch pack clearances, among other things. You're also going to need to find a way to compress the springs that you pulled from things like the direct drum etc.
I can tell you those are damn near impossible to put back on without some kind of spring compressor. The big spring on the overdrive basket is put on by hand. I'm pretty tired at the moment, but I forgot to ask and I just suddenly wondered if you did or did not remove those springs? You should if you can, since you need to remove the piston to fully clean everything and replace seals. Be sure to keep track of all of your parts as best as you can, it sucks losing something, would suck worse losing something and you don't even know it.
There's probably more I could chime in, but this post is really really long and I'm really really tired, so I'll just let it be for now. Any questions, maybe I could answer, and if not I know someone else will be able to.
02-04-2012, 07:39 AM
#24
A lot of good info there elite! I didn't remove the whole prawl, just the bracket. And yes a full cleaning of the case is in order. Luckily I just bought a case of brake cleaner last week when advance auto had a bogo free sale. And my shop has a 6hp/80 gallon compressor :-) .
Keeping the budget aspect in mind. I wasn't planning on a full rebuild unless I needed it. The main reason for opening it up was to instal the transbrake and check for obvious wear/damage. That being said, would it be necessary to replace the bushings if they are in good shape? I haven't bought a rebuild kit yet, as I was waiting to see the condition first. Would I be ok with just a basic kit that replaces just mostly the seals?
Keeping the budget aspect in mind. I wasn't planning on a full rebuild unless I needed it. The main reason for opening it up was to instal the transbrake and check for obvious wear/damage. That being said, would it be necessary to replace the bushings if they are in good shape? I haven't bought a rebuild kit yet, as I was waiting to see the condition first. Would I be ok with just a basic kit that replaces just mostly the seals?
02-04-2012, 11:55 AM
#25
A lot of good info there elite! I didn't remove the whole prawl, just the bracket. And yes a full cleaning of the case is in order. Luckily I just bought a case of brake cleaner last week when advance auto had a bogo free sale. And my shop has a 6hp/80 gallon compressor :-) .
Keeping the budget aspect in mind. I wasn't planning on a full rebuild unless I needed it. The main reason for opening it up was to instal the transbrake and check for obvious wear/damage. That being said, would it be necessary to replace the bushings if they are in good shape? I haven't bought a rebuild kit yet, as I was waiting to see the condition first. Would I be ok with just a basic kit that replaces just mostly the seals?
Keeping the budget aspect in mind. I wasn't planning on a full rebuild unless I needed it. The main reason for opening it up was to instal the transbrake and check for obvious wear/damage. That being said, would it be necessary to replace the bushings if they are in good shape? I haven't bought a rebuild kit yet, as I was waiting to see the condition first. Would I be ok with just a basic kit that replaces just mostly the seals?
It wouldn't be necessary but it can't hurt. A lot of rebuild kits will come with bushings, and if it were me, I'd buy a kit that has all new seals, clutch packs (highly recommended High Energy OEM packs, not Red Altos), new steels, bushings, and gaskets. It might be an extra couple hundred dollars but it is highly recommended, as this will extend the life of your transmission and enable it to hold more power than it could with the old stuff.
You said you bought Jake's Transbrake right? If so, you're going to need to do a few hydraulic modifications for it, which will also benefit your transmission. Read all this -> http://jakesperformance.com/4L80_T-b...struction.html
I know I know I know it sucks *** to go over what the budget originally intended and it may seem like paying more money for more hassle, but it really truly is worth knowing that your transmission will easily outlast your engine.
 02-04-2012, 03:29 PM
#27
I'm really debating on just leaving this as is. Just do the modifications I need for the transbrake, putting in the new direct clutch pack, and just putting it back together. It really looks like this thing was gone through just before it was taken out of the vehicle it came from. I can snap pictures next time I'm out there and show everyone. The thrust bearings looked great and the clutches barely looked used with no hotspots.
Labor is not a problem for me. I have a "shop" with a couple friends where we have a tranny jack and lift. Wouldn't take but a couple hours to pull it out if I needed to do a proper rebuild. I know it'll be easier to do it now, but it looks fresh as is. I compare it to tearing down a 2,000 mile engine, but replacing everything in it since it's open anyways (I know that's not a direct comparison since there are parts/bolts that can't be reused during assembly).
Labor is not a problem for me. I have a "shop" with a couple friends where we have a tranny jack and lift. Wouldn't take but a couple hours to pull it out if I needed to do a proper rebuild. I know it'll be easier to do it now, but it looks fresh as is. I compare it to tearing down a 2,000 mile engine, but replacing everything in it since it's open anyways (I know that's not a direct comparison since there are parts/bolts that can't be reused during assembly).
02-04-2012, 03:54 PM
#28
Just found this little gem, http://mattw2.dyndns.org:81/pics/Clo...wTo/index.html
Nice little writeup on rebuilding it. I do have one question though. Looks like he was able to do everything without special tools, except for the 4th clutch lip seal installer. Is there a way to install the 4th piston and roller clutch without tearing up the seals?
Nice little writeup on rebuilding it. I do have one question though. Looks like he was able to do everything without special tools, except for the 4th clutch lip seal installer. Is there a way to install the 4th piston and roller clutch without tearing up the seals?
02-06-2012, 08:11 PM
#30
Just found this little gem, http://mattw2.dyndns.org:81/pics/Clo...wTo/index.html
Nice little writeup on rebuilding it. I do have one question though. Looks like he was able to do everything without special tools, except for the 4th clutch lip seal installer. Is there a way to install the 4th piston and roller clutch without tearing up the seals?
Nice little writeup on rebuilding it. I do have one question though. Looks like he was able to do everything without special tools, except for the 4th clutch lip seal installer. Is there a way to install the 4th piston and roller clutch without tearing up the seals?
Not sure what you mean about installing the low roller clutch without tearing up the seals. It just drops into place in the reaction carrier, very simple and no seals to worry about
I haven't read the whole guide but there are two things the guy does I highly do not recommend.
#1 Don't twist the pistons into place and "use the lip sealer tool if necessary" that's a good easy way to damage the seals, trust me. If it could be done like that, there would be no need for lip seal installers. The seals could easily catch on the walls of the drum and tear.
#2 Don't bother taking apart the springs, since I'm guessing you are not using the Transgo kit.
I notice he does a few things I differently, but that's on him I suppose. Definitely gives you a pretty good idea of what's what and what to do.
02-06-2012, 08:47 PM
#31
You definitely don't need special tools. The only things I can think of right now are a special device to compress the springs on the direct drum and forward drum so you can take the snap ring off and put the snap ring back on. You do need a lip seal installer for the pistons. There is more than one piston that needs to be installed, all of them have seals. You MUST use some kind of lube, either transmission fluid or Trans-Gel, and use the lip seal installer to properly seat them. It can be tricky, especially for your first time and you can damage seals fairly easily if you're not careful. Always start with the lip seal installer on the inner seal of the piston, then outer.
Not sure what you mean about installing the low roller clutch without tearing up the seals. It just drops into place in the reaction carrier, very simple and no seals to worry about
I haven't read the whole guide but there are two things the guy does I highly do not recommend.
#1 Don't twist the pistons into place and "use the lip sealer tool if necessary" that's a good easy way to damage the seals, trust me. If it could be done like that, there would be no need for lip seal installers. The seals could easily catch on the walls of the drum and tear.
#2 Don't bother taking apart the springs, since I'm guessing you are not using the Transgo kit.
I notice he does a few things I differently, but that's on him I suppose. Definitely gives you a pretty good idea of what's what and what to do.
02-06-2012, 08:53 PM
#32
I've had this thread bookmarked for a while now:
http://helpwrench.com/forums/showthr...amp-pictures-1
Lots of info in there as well
http://helpwrench.com/forums/showthr...amp-pictures-1
Lots of info in there as well
02-07-2012, 04:13 PM
#33
Ok, got a little work done today, got some parts in the mail, and found a problem.
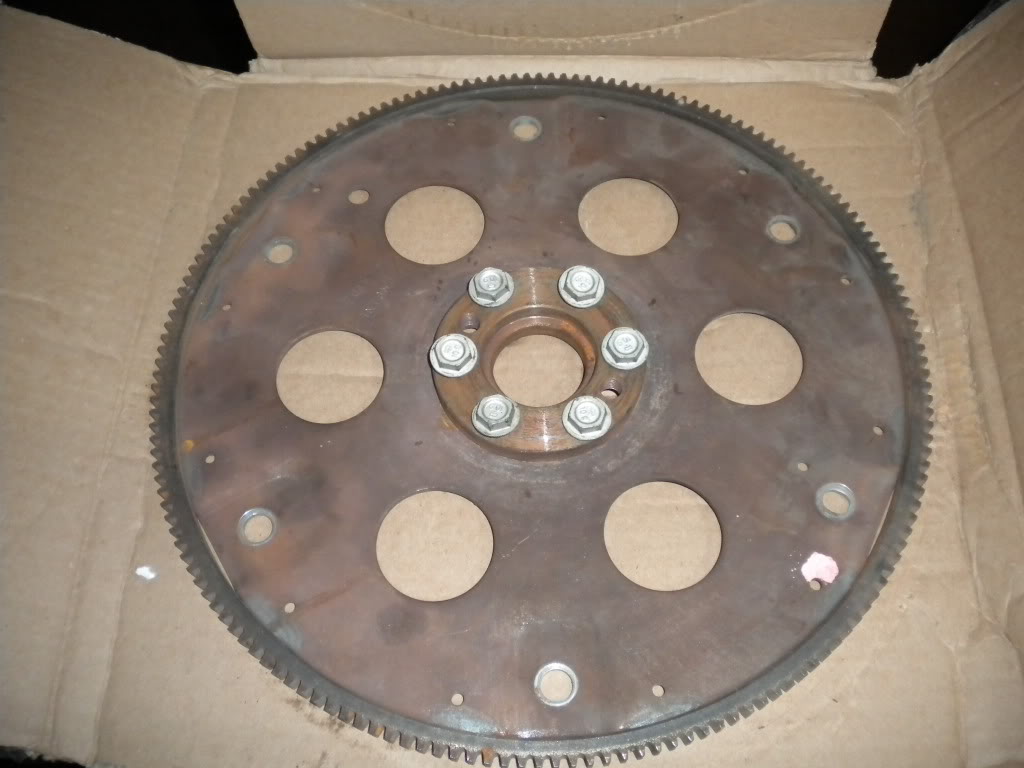
First up, new parts! Got the flexplate, spacer, and bolts.
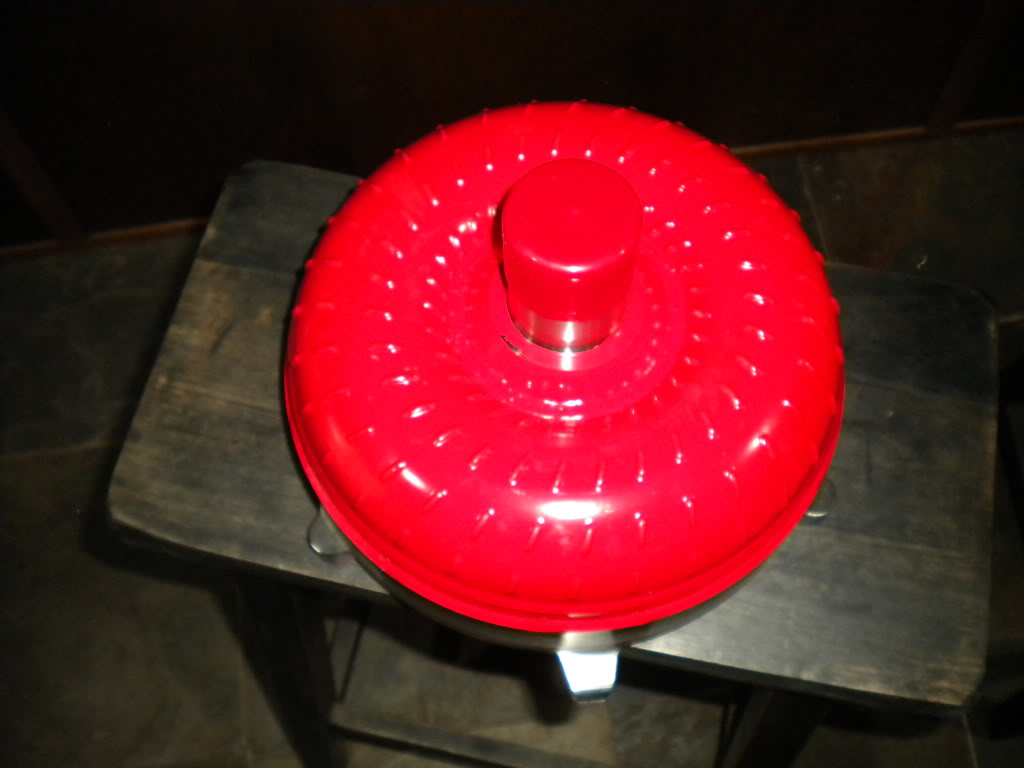
And...my Revmaxx converter
Got a couple hours to head up to the shop and do a little bit of work. Clean the inside of the case with some brake cleaner and compressed air.
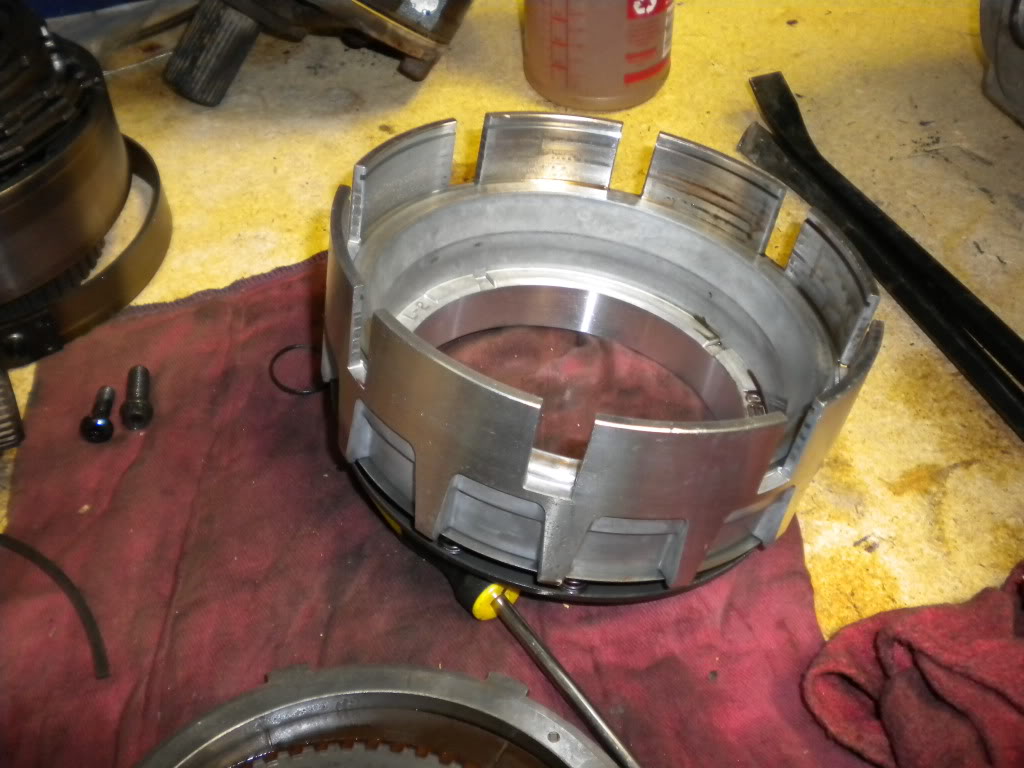
Then I got to tearing down the direct drum. First up was to compress the springs. Like the link I posted above, I used some clamps to do this
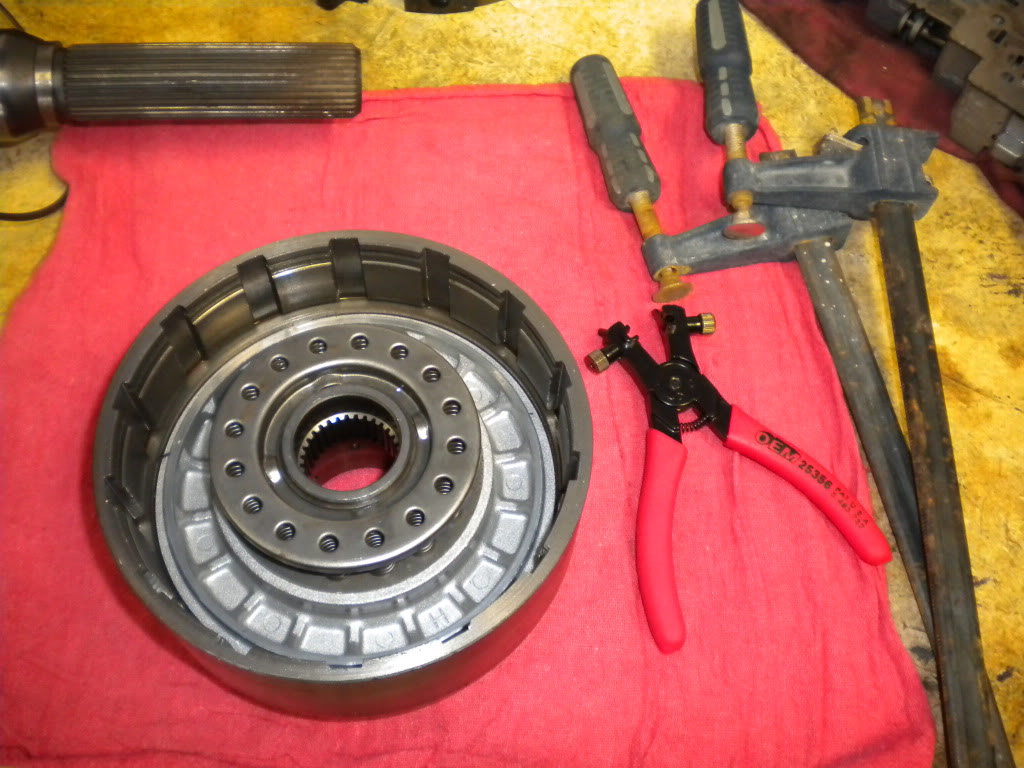
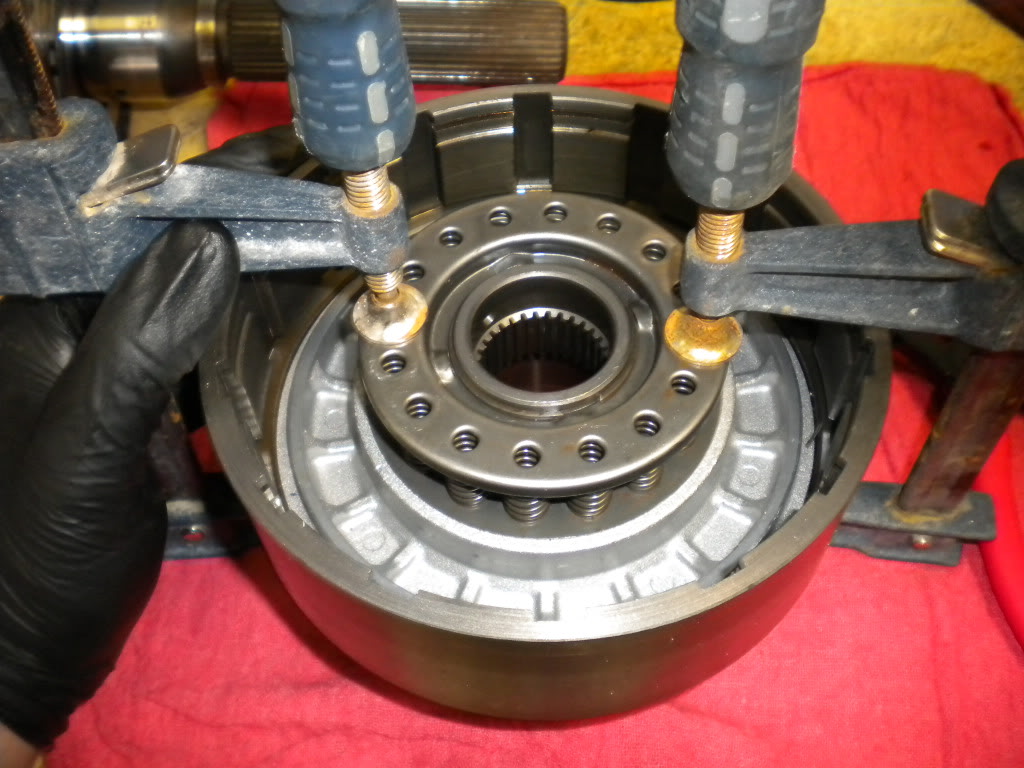
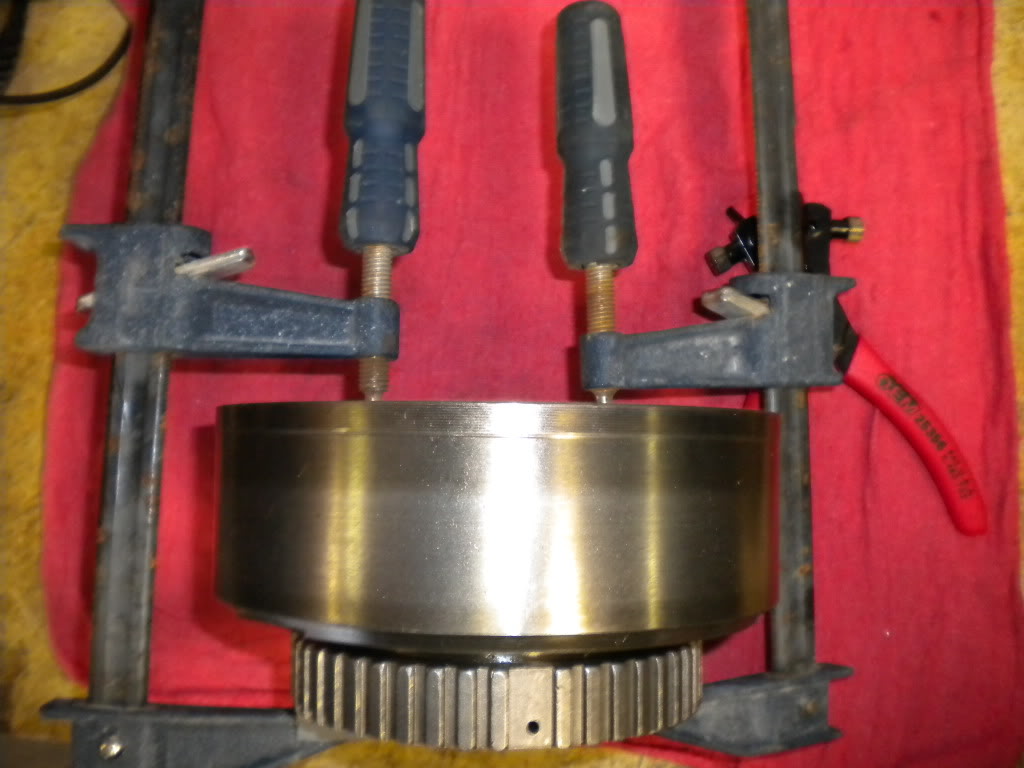
With it compressed, I removed the snap ring and took off the spring assembly

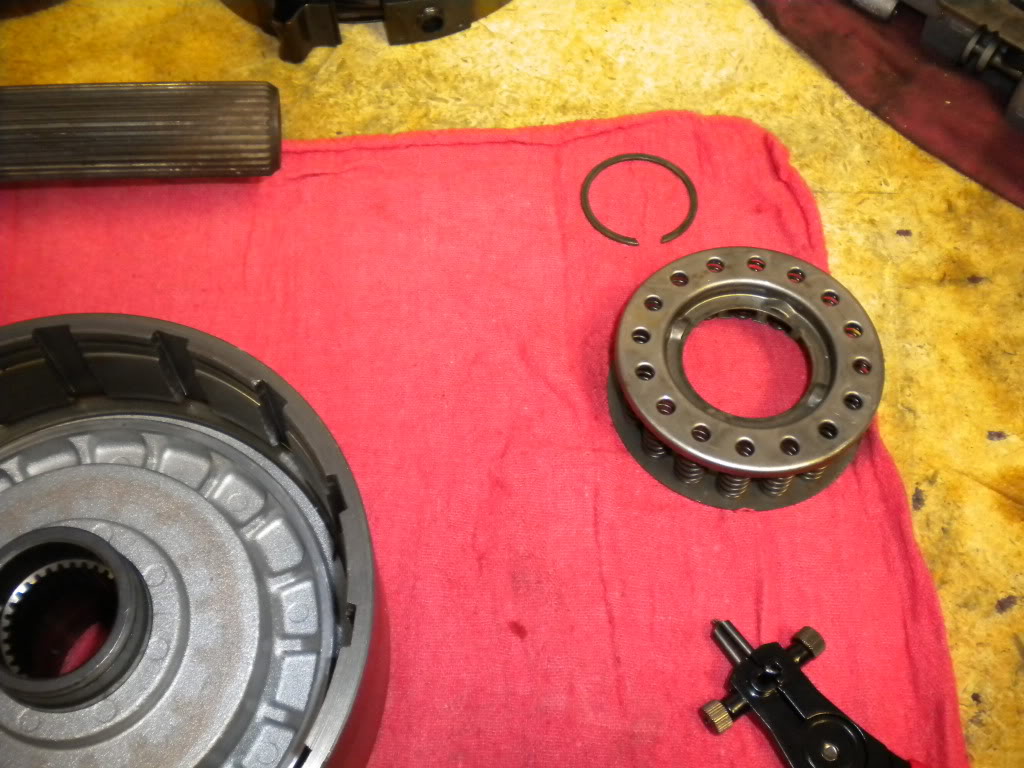
Then I pulled out the piston
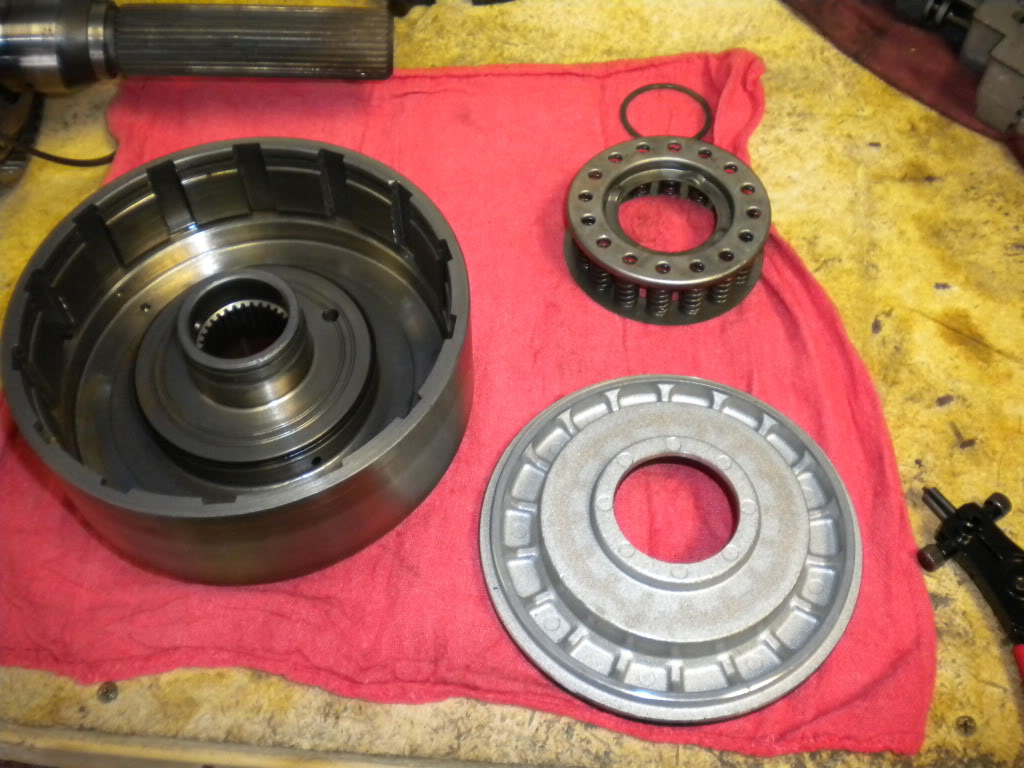
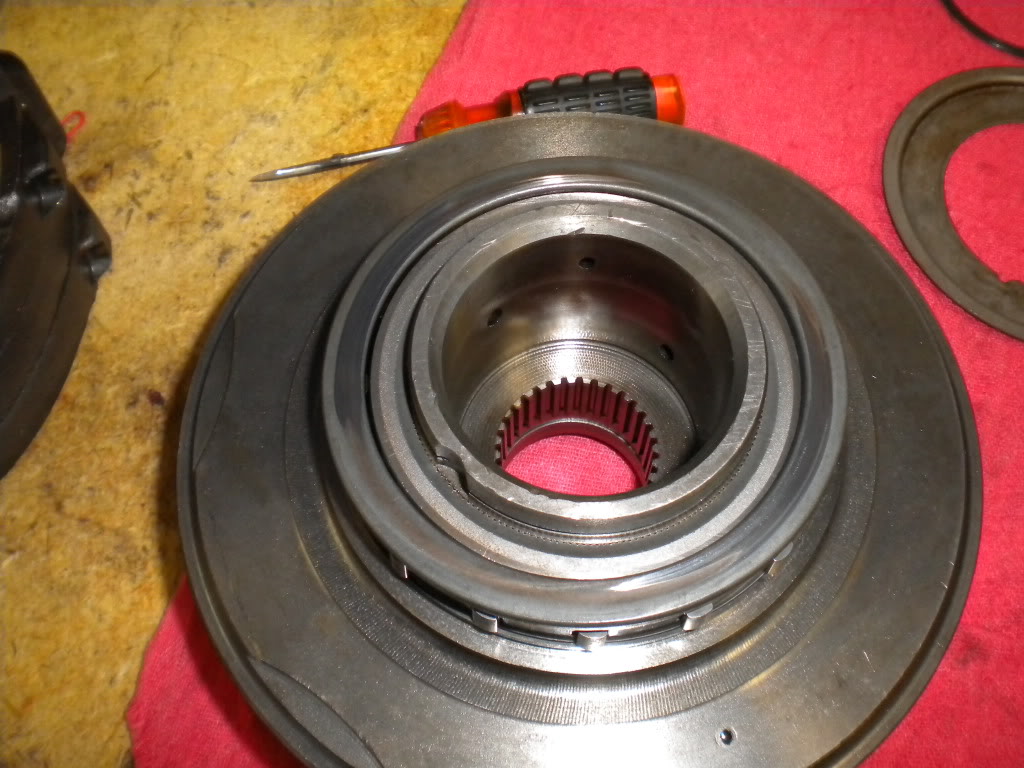
Then I turned the drum over to get to the sprag. I first removed the spiral lock ring. I did this by taking a small screwdriver, lining up the area that locks on the ring with one of the notches in the drum, and pulled up on it to unlock it.

Then I removed the retainer
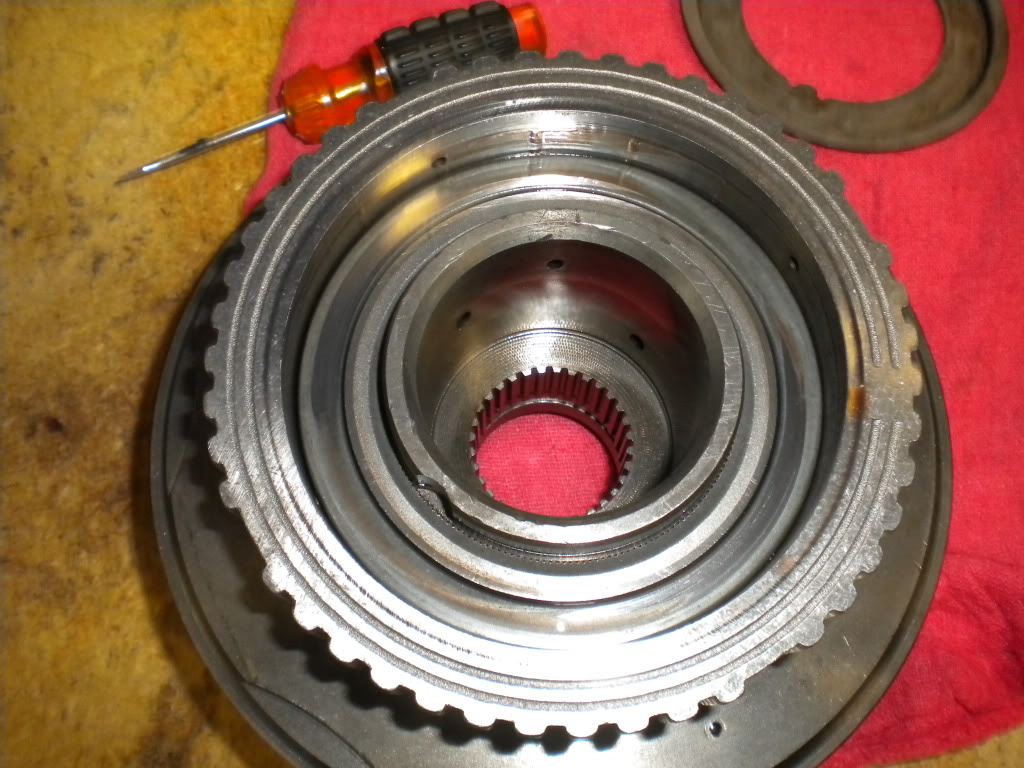
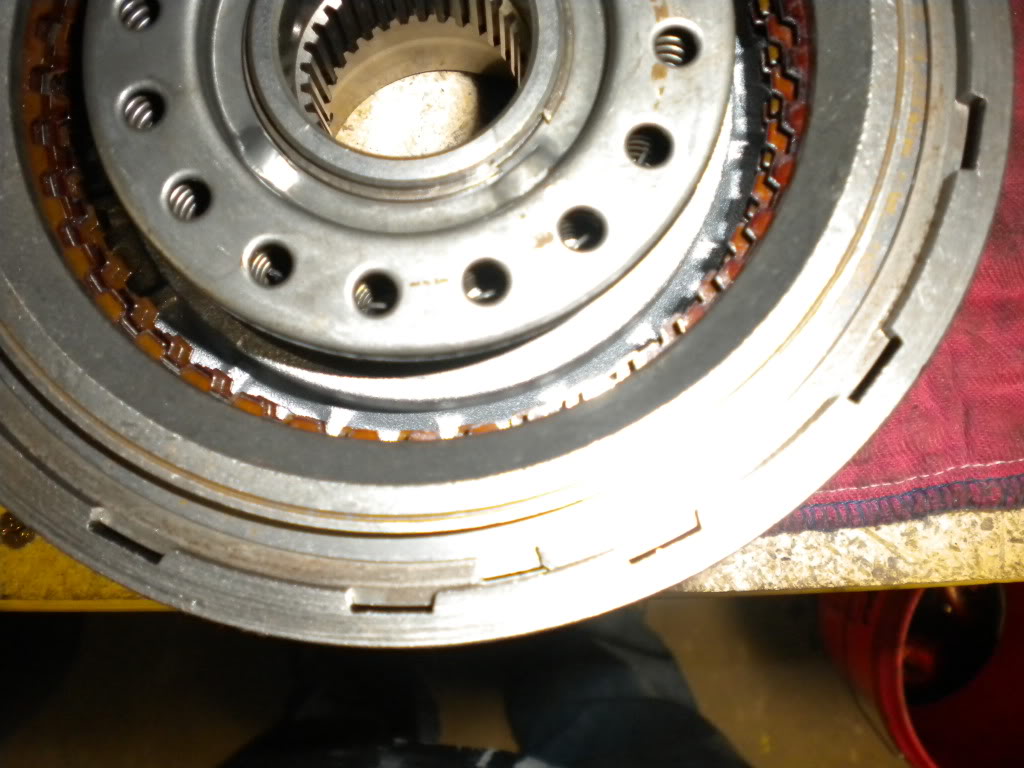
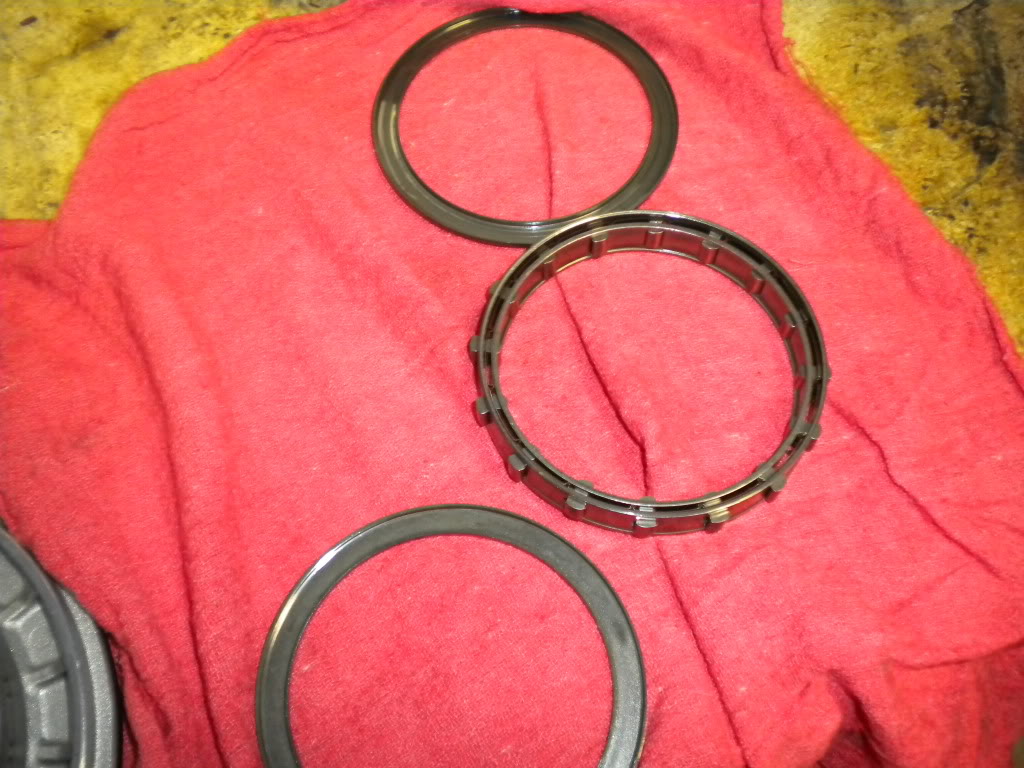
Then I removed the sprag. I discovered that it is a 17 element sprag....so time to upgrade to a 34 element one!
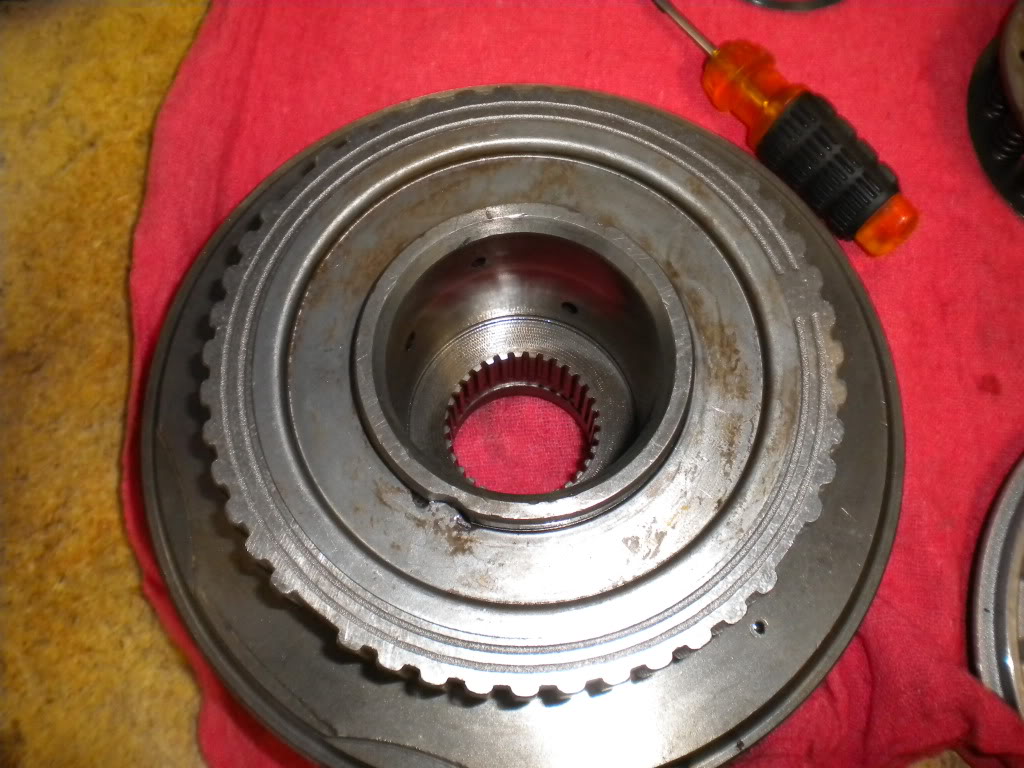
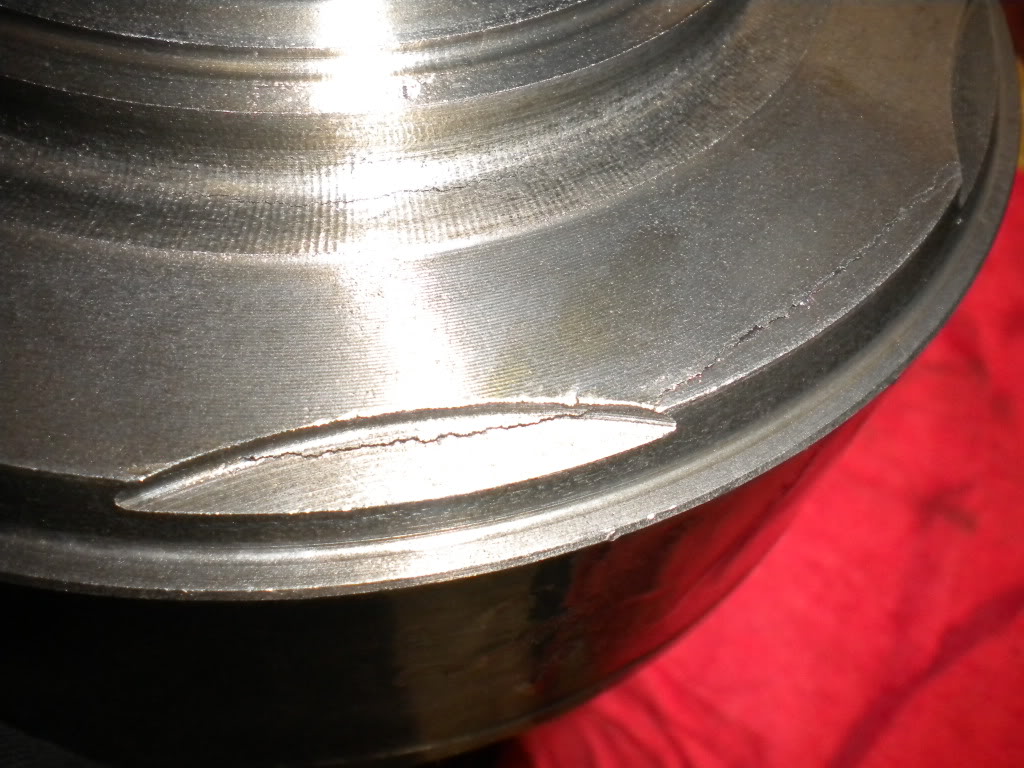
Then I began inspecting the drum since I have to drill a hole in it for the transbrake. By doing so I discovered the reason this tranny was only $200. I saw a nice big crack!

I already called up Jake and got a used one on it's way for $90. I also talked to them about the interior condition of the tranny. They advised that if I think everything looks good, just replace what's need and bolt it back up. They did recommend a new reverse band, and I agree as it's a little worn. So I'm just gonna get a new reverse band, 34 element sprag, pump gasket, valve body gasket, replace the direct clutches with the ones Jake gave me, and a rear seal. After that I'm just gonna bolt it up.
First up, new parts! Got the flexplate, spacer, and bolts.
And...my Revmaxx converter
Got a couple hours to head up to the shop and do a little bit of work. Clean the inside of the case with some brake cleaner and compressed air.
Then I got to tearing down the direct drum. First up was to compress the springs. Like the link I posted above, I used some clamps to do this
With it compressed, I removed the snap ring and took off the spring assembly
Then I pulled out the piston
Then I turned the drum over to get to the sprag. I first removed the spiral lock ring. I did this by taking a small screwdriver, lining up the area that locks on the ring with one of the notches in the drum, and pulled up on it to unlock it.
Then I removed the retainer
Then I removed the sprag. I discovered that it is a 17 element sprag....so time to upgrade to a 34 element one!
Then I began inspecting the drum since I have to drill a hole in it for the transbrake. By doing so I discovered the reason this tranny was only $200. I saw a nice big crack!
I already called up Jake and got a used one on it's way for $90. I also talked to them about the interior condition of the tranny. They advised that if I think everything looks good, just replace what's need and bolt it back up. They did recommend a new reverse band, and I agree as it's a little worn. So I'm just gonna get a new reverse band, 34 element sprag, pump gasket, valve body gasket, replace the direct clutches with the ones Jake gave me, and a rear seal. After that I'm just gonna bolt it up.
02-07-2012, 04:20 PM
#34
Also, I'm stuck on a decision on what to do for the cooler. I got a couple offers in the air right now to buy some used coolers, then having to fab up my own lines and fittings for the tranny. Or, there's an all in one kit on Jeg's website that includes a nice B&M cooler and AN lines/fittings.
http://www.jegs.com/i/B-M/130/70266K...rentProductId=
I'd probably spend about $75-100 on a used cooler, fittings, and hose to make it work, but it won't be AN lines like the kit above. I think it's almost worth the extra bucks just to have the nice cooling with the secure lines.
http://www.jegs.com/i/B-M/130/70266K...rentProductId=
I'd probably spend about $75-100 on a used cooler, fittings, and hose to make it work, but it won't be AN lines like the kit above. I think it's almost worth the extra bucks just to have the nice cooling with the secure lines.
02-07-2012, 09:53 PM
#35
Case looks super clean man! I was going to come in here and chime in that I would also recommend a 34 element sprag, but it looks like you already beat me to it! lol.
One thing to remember when putting the race back on the drum after you've installed the sprag, the race must NOT be able to turn counter clockwise. IT should only be able to spin clockwise. That mean you put the race on backwards, so if that happens just take it off and flip it over and try again
Again, be super careful with the piston installation! Can you see how the walls of that direct drum would just love to **** with you and tear up your lip seals? Make sure your lip seals are facing the correct way as well!
02-08-2012, 09:55 AM
#36
Errgghhh. I'm still Torn on what to do about the cooler. I know the case is 1/4 NPS thread. However, there is a consensus that 1/4 NPT will work as long as you don't gorilla torque it down and crack the case. That being said, I can pick up a 11x6x1 1/2 B&M cooler and some hose for $30, then I'd just need some more hose, 1/4 NPT to barb fittings, and some hose clamps to make it work. That might be close to around $50. OR I can just get a kit like the one I posted above but spend about $170. I don't think the cost is worth it for the 1% chance I have that a cooler line could pop off. I'd double clamp the fittings as well. Any input from anyone?
02-08-2012, 10:08 AM
#37
I'm going all out on my cooler.....
(1) 11x11 B&M bar/plate cooler w/ 1/2 NPT female connections
http://www.summitracing.com/parts/BMM-70274/
(1) Flex-A-Lite 10" fan
http://www.summitracing.com/parts/FLX-390/
(2) 1/2 NPT to 6AN fittings
http://www.summitracing.com/parts/SUM-220649/
(4) 6AN hose ends
http://www.summitracing.com/parts/SUM-220690/
(15') 6AN hose
http://www.summitracing.com/parts/SUM-230615/
(1) 4L80e rear trans cooler fitting- w/ 3/8 NPT
http://www.transmissionpartsusa.com/...-00046340a.htm
(1) 6AN to 3/8NPT steel fitting, 90 degree, welded to above (after clocked)
http://www.summitracing.com/parts/AER-FBM2620/
(1) 4L80e front trans cooler fitting
http://www.transmissionpartsusa.com/...-00035340b.htm
(1) 6AN to 1/4NPT steel fitting, 90 or 45 degree (not sure yet), welded to above
http://www.summitracing.com/parts/FRA-582206/
So basically its a 6AN hose, converting to 1/2NPT at the cooler. The trans fittings apply to the later model 4L80's with the trans cooler holes further apart. The older style case has the trans cooler holes kind of right next to one another. When using the newer style case, you really need to fab this 90 degree fitting to have enough room. Some have tried to bend a steel tube and it makes me cringe. Looking at your pics, it appears you have the older style trans case and will not need to purchase those 90 degree steel fitting and weld them. You should just be able to grab a 2nd set of AN to NPT fittings to plug into the trans case.
If I'm spending all this money on a 4L80 conversion, might as well do the cooler right since it will keep the trans alive.
ETA: Mightymouse thought of the rear fitting idea a while ago....
https://ls1tech.com/forums/automatic...r-fitting.html
And his build thread:
https://ls1tech.com/forums/automatic...onversion.html
Last edited by White.Lightning; 02-08-2012 at 10:14 AM.
02-08-2012, 10:16 AM
#39
BTW, looking at your list, I think this will make life easier
http://www.sweetperformance.com/prod...&productId=496
That'll get rid of some of the complications of adapting the cooler fittings to AN lines.
http://www.sweetperformance.com/prod...&productId=496
That'll get rid of some of the complications of adapting the cooler fittings to AN lines.
02-08-2012, 10:18 AM
#40
^^^^ Sweet! Thanks for the link. I just need to make sure a 90 degree hose end will have enough room to be installed.
ETA: A reliable source said there is NOT enough room to run those adapters and a 90 degree hose end. Oh well. Back to Mightymouse's proven method!
ETA: A reliable source said there is NOT enough room to run those adapters and a 90 degree hose end. Oh well. Back to Mightymouse's proven method!