
Need advice on Escalade Transmission rebuild
 01-10-2013, 10:59 AM
#21

With that wider band that is in that kit you need to replace the reverse input drum or you will only be using the outer edges of the band becuase where the original band was is going to be worn. Even if it looks perfect It still needs to be replaced.
Also I would put a corvette servo in at the very least if not a sonnax super servo 2nd (the superior one is too much for your application). Also a super servo 4th wouldnt be a horrible idea but for that one on your application I would use the superior super 4th as the sonnax one is a bit overkill for your application on this unit. Either way for sure do something with the 2nd servo at the very least if you are towing, especially in a caddilac..
Also I would put a corvette servo in at the very least if not a sonnax super servo 2nd (the superior one is too much for your application). Also a super servo 4th wouldnt be a horrible idea but for that one on your application I would use the superior super 4th as the sonnax one is a bit overkill for your application on this unit. Either way for sure do something with the 2nd servo at the very least if you are towing, especially in a caddilac..
 01-10-2013, 11:10 AM
#22
Moderator

Carsonauto: He bought a new reverse drum; I'm sure Jeff at TrueTechTrans suggested it for a wider band, just as you explained.
The Corvette servo is only $15; for towing I would recommend that and a HD 4th servo. You might already have the Corvette servo.
The Corvette servo is only $15; for towing I would recommend that and a HD 4th servo. You might already have the Corvette servo.
 01-10-2013, 12:28 PM
#23
It just dawned on me that the superior fairbanks powertow kit PT4l60E comes with exactly everything that I would add to that kit that you bought. Boost valve, accumulator pistons, both the servos that are the correct ratios (2nd servo is redesigned for that kit specifically) and 3 different levels of calibrations that you can choose from. Its not a cheap cheesy kit though. It's sorta spendy but it has everything you need in one shot including the best instructions I have ever seen in a shift recalibration kit.
Depending upon what pump your trans has the boost valve in that kit may not be correct. Im guessing if you asked nicely any decent supplier would swap out the one in the kit for the newer style if thats indeed what you need. I know I wouldnt have an issue swapping them out..
01-10-2013, 12:33 PM
#24
In a caddilac I'm 99.9% certain they never even considered putting a corvette servo in from the factory. They try to get caddilacs to shift like they have a CVT and thats not real doable with a vette servo. possibly added by someone since it was new but who knows. not extremely likely....
01-10-2013, 12:50 PM
#25

I do as you say tend to over-think things but it usually keeps me from making as many mistakes as if I had just dove in so to speak. I do like to be well informed before I jump. Maybe I do beat the horse unnecessarily. lol
I did get the book you suggested but have not read it as I just got it yesterday. Scanning it though it seems like a very useful book. Thanks fo rthe suggestion.
Do you know if any of the replacable internal parts for the pump are included in the kit or are they normally purchased separately as needed ? Never having doen a transmission rebuild before I am not familiar with the typical contents of the rebuild kits and what I should be looking to get in addition to the kit. Thanks a lot fo\r the help.
01-10-2013, 01:23 PM
#26
Everything that you need for the pump will be included in the kit unless there is damage to the pump body, rotor, veins etc. The rotor and veins are almost never damaged unless the whole pump grenades.
The pump bodies on the other hand are more common to have wear that deems them unuseable. A lot of times the pump half thats flat and has the stator support pressed into it has wear from the rotor and veins.
"Hitting" it with a longboard can clean up very minor wear but if it has gouges you either need to replace at least that pump body half (carefully as there are a few versions and it must be correct), the whole pump or have the stator support pressed out and the pump half resurfaced.
Also make sure you inspect the splines on the stator support for wear. Anything more than very minor wear in the spline area is reason to replace the support with a new one. I replace them if I can catch my fingernail on the ridge where the wear stops.
01-10-2013, 02:04 PM
#27
I was told by a mechanic a while back that the transmission had definately been replaced in this Escalade when he had it up on the lift. He called me in and showed me that the unit was practically new compared to the rest of the underbody appearance. I seem to remember him saying that it was a Jasper unit. That would have been about 40k-50k miles ago I think.
01-10-2013, 02:31 PM
#28
Moderator
Most of the transmissions that people like Carsonauto rebuild are 10-15 years old with 150,000+ miles and therefore have worn out parts. I doubt that your 6 year old pump will have any significant wear.
If in doubt, post good pictures here for us to look at.
BTW - I suspect you will find one of the Stator shaft teflon rings to be the source of your no-reverse problem. They can be tricky to install without damage; i have a local shop install rings for me because I don't have the expensive tools. It takes a shop barely five minutes with the right tools.
01-13-2013, 05:52 PM
#29
Well I built ramps for the project today and have the Escalade up on them and creeped around under the beast to see what I needed to reemove to get the trans droped out and found that the driver side exhaust transitions across to the passenger side right under the transmission pan. It has to go. Passenger side doesnt appear to be a problem at all. It has a doughnut if you needed to remove it. But the one I need to remove doesnt have a doughnut. It does at the manifold but after it crosses under the trans pan and turns back to the rear it goes straight to the muffler with no doughnut. It does however have a band around the pipe which appears to have a nut on the top that could release the band. Can that possibly be a joint in the pipe that I can break or am I going to have to cut the pipe and have a muffler shop put it back together? Otherewise it looks like I will have to remove the driveshaft and remove the transmission cross support and disconnect the transfer case and slide it back enough to get room to slide the trans back and drop it out. Or does the transfer case have to come all the way out? I dont have a problem cutting the exhaust pipe but I am not sure what my options are to get it back together. I know a shop here that can do anything I need with exhaust systems though. Any advice? Thanks!
01-13-2013, 07:21 PM
#30
dont cut the exhaust!!!! That band is indeed where you need to seperate the exhaust. It's usually fairly easy to get the band loose and get the pipe out just watch the oxygen sensors, they are easy to break if you are not careful. Might be a good plan just to remove them to be safe as long as they will come out. I am not sure if the tranfer case can somehow be supported in the vehicle and hang out there I have never tried it that way. Im guessing it would be pretty tight. We always just take them out. They are not very heavy, one guy can fairly easily remove and replace it without any trouble. Just make sure you unplug everything, it really sucks when its half way out and you find out more wires are still connected...
01-15-2013, 10:14 AM
#31
Thanks carlsonauto. I determined that I need a persuader bar to get the manifold doughnut bolts loose and the bolts holding the crossmember transmission support so I can let the pipe drop enough to get a wrench on the band clamp. The nut is on the up side and right against the floor with not enough space to get a socket on it. Hope it will drop enough to get a socket on it once the other end is off. I suppose they assembled it off the car and then put the whole thing up on the hangers.
I have read somewhere about resizing the teflon shaft bushings with a plastic sleeve wraped around them and a hose clamp. Is that feasible to do? Any suggestions?
I have read somewhere about resizing the teflon shaft bushings with a plastic sleeve wraped around them and a hose clamp. Is that feasible to do? Any suggestions?
01-15-2013, 05:24 PM
#32
The ones that are on the back of the stator support can be resized with a new bushing for the reverse input drum. Just make sure you do them one at a time starting with the one closest to the pump then after its resized you can put the other one on and resize it. Otherwise you can get the bushing stuck on the support between the rings.
They can be a pain to get into the appropriate makeshift resizers but if you are careful and patient its doable. When I have done it I used a hook shaped o-ring pick and just used the ruonded back part opposite of the hook to work around the teflon ring and finesse it into the bushing or support.
01-15-2013, 05:59 PM
#33
Moderator
Then to keep the teflon rings sized correctly I have a spare stator shaft that I keep on on the input shaft. For the two larger (Reverse) teflon rings on the stator shaft I do use plastic sleeve and two hose clamps, but it is important to only have them snug, not tight. If you don't put anything on, the rings tend to expand over time and you then cannot install the reverse drum during final assembly.
ebay seller "Betperformance" sells the resizers for just $30 each; the installers are still much more.
01-16-2013, 07:39 AM
#34
Thanks to you bothe for the insights on this. I am understanding that these teflon seals are shrinkable but can be over shrunk? They also can expand to a larger size if not contained at some size by the stator they run in. If this is correct then how much time does it take for them to expand to the point that they are a problem to get the stator back on them after having removed it for a while?
01-16-2013, 08:17 AM
#35
Moderator
I have had the teflon rings on the input shaft "free" for days and my resizer (an old stator shaft) fit right on without much force.
However, the ATSG manual and my local rebuilder say to keep the resizer on the two larger teflon rings on the stator shaft until just minutes before final assembly. It seems to me that they will expand within an hour and catch the lip of the reverse drum as the reverse drum doesn't have much of a bevel for them to enter.
However, the ATSG manual and my local rebuilder say to keep the resizer on the two larger teflon rings on the stator shaft until just minutes before final assembly. It seems to me that they will expand within an hour and catch the lip of the reverse drum as the reverse drum doesn't have much of a bevel for them to enter.
01-17-2013, 10:30 AM
#36
I have had the teflon rings on the input shaft "free" for days and my resizer (an old stator shaft) fit right on without much force.
However, the ATSG manual and my local rebuilder say to keep the resizer on the two larger teflon rings on the stator shaft until just minutes before final assembly. It seems to me that they will expand within an hour and catch the lip of the reverse drum as the reverse drum doesn't have much of a bevel for them to enter.
However, the ATSG manual and my local rebuilder say to keep the resizer on the two larger teflon rings on the stator shaft until just minutes before final assembly. It seems to me that they will expand within an hour and catch the lip of the reverse drum as the reverse drum doesn't have much of a bevel for them to enter.
I have been shut down by the weather here on getting this transmission out of the car so I have been spending some time reading about the task in front of me and have some questions.
1. I saw somewhere that a rebuilder removed the check ball cap from inside the input shaft. They say that it smoothes out the converter lockup but creates heat and wear in the process. After removal the effect is more like the overdrive lockup is like a gear change instead of going into lockup. I dont know what to think of this, Any thoughts on this?
2. Im not real sure what I should be thinking about doing with the valve body. Should I just be removing all the solenoids and valvs in there for inspection and thorough cleaning and reassembling? Is it recommended to replace the TCC valve? I have had issues prior to the reverse going out that was a shudder when the transmission was in overdrive at low speeds and I had to give it light acceleration but not enough to kick it down to 3rd. I did notice that the shudder would quit when the break was taped lightly. I think that disengages the overdrive? I dont know if replacing the TCC is warrented due to this or not. Any thoughts?
3. I did not order a torque converter to replace the one I have. Should I do that or just flush the one I have out real good? In regards to the the previous shudder I mentioned I decided to replace the filter and fluid with a high grade synthetic and that was the end of the shudder. Is that indicative of anything? I have no idea if the TC was replaced when this rebuilt transmission was put into this Escalade so I dont know the milage on it. The shuddr was the only problem I had prior to the reverse failure.
Any help on what air checks I can run before I slap the unit back in or as I am rebuilding the unit? I have run across some checks in my research but dont know if my knowledge is comprehensive. I do not have the ATSG Manual but do have the GM Builders and Swappers guide. I dont htink these air checks are in the guide i have though.
Thanks in advance is in order here I am sure! Jim
01-17-2013, 08:49 PM
#37
Moderator
An old reverse drum certainly can be used to keep the teflon rings "resized", but doesn't have much bevel to compress brand new, just-installed rings. Plastic and hose clamps would probably work better. The stator does have more bevel and you might be able to resize new rings on the input shaft that way. Not sure though.
My last build used a billet input shaft and its hole wasn't big enough for a check ball. Honestly, I could not feel any difference in the TCC engagement. I do always run the Transgo TCC on/off valve (not the stock PWM valve) and therefore can feel the TCC engage like a gear shift. I don't know if it causes extra hear or wear. Anyone know this?
Your valve body is only 6 years old; it should be just fine. If you don't mind a firmer TCC engagement replace the stock PWM-style TCC valve with an on/off-style from Transgo, or this one:
http://www.ebay.com/itm/TECHPAK-FITZ...-/181059582004
Or from another vendor:
http://www.transmissionpartsusa.com/...-0a74741qa.htm
I suspect that shudder was caused by the TCC trying to gradually engage.
I suspect your stock torque converter will be just fine; assuming there are no metal shavings inside your trans. I don't know if it even needs "flushing"; in any case you can't clean it thoroughly yourself.
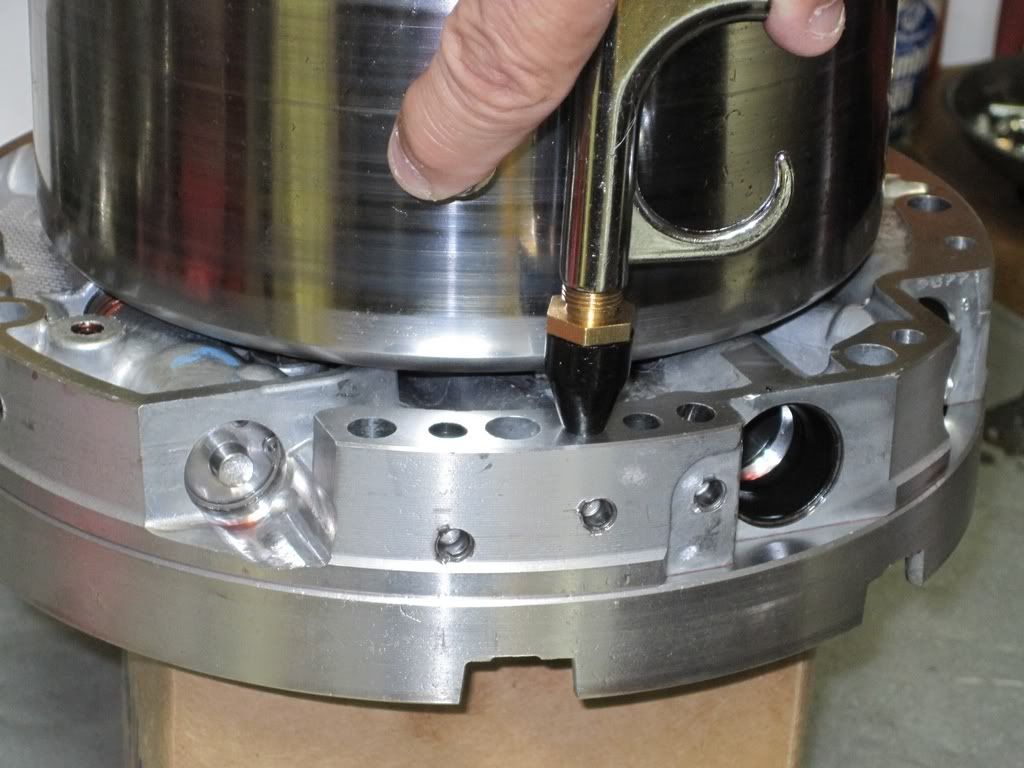
You should air check the input drum after assembly - forward, overrun and 3-4 clutch. Then install the assembled input and reverse drums into the pump, identify the holes and test all the clutches:
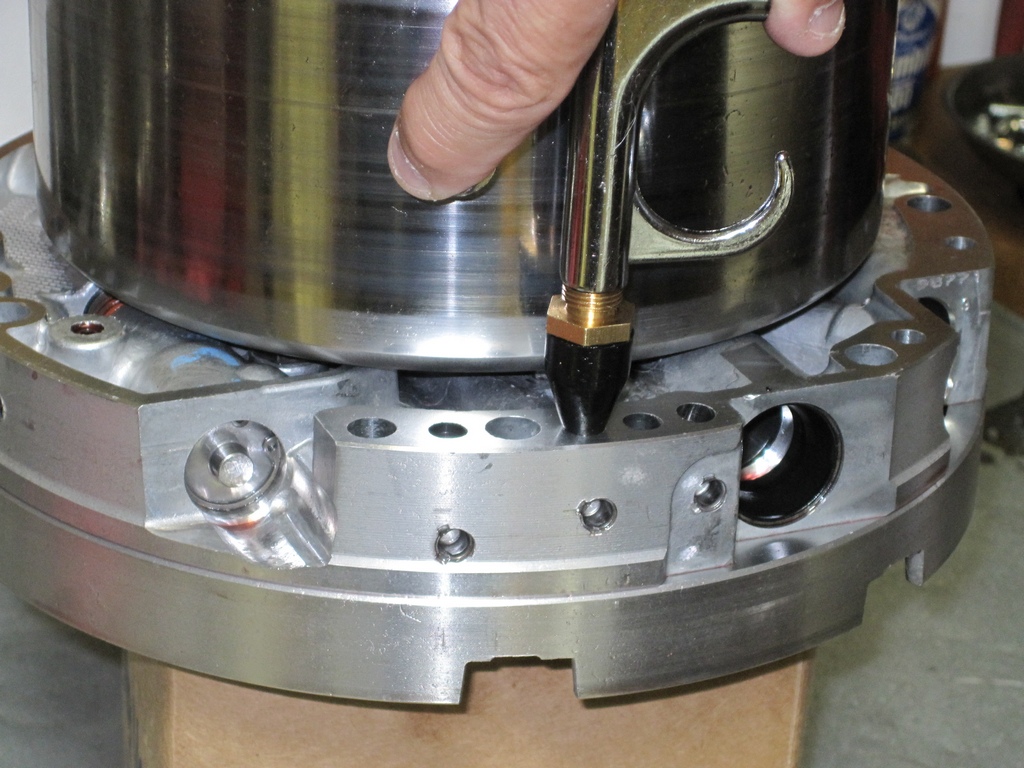
BTW - That is the newer style pump from my 2010 trans; I think that started around 2007 when the Input Speed Sensor was added.
My last build used a billet input shaft and its hole wasn't big enough for a check ball. Honestly, I could not feel any difference in the TCC engagement. I do always run the Transgo TCC on/off valve (not the stock PWM valve) and therefore can feel the TCC engage like a gear shift. I don't know if it causes extra hear or wear. Anyone know this?
Your valve body is only 6 years old; it should be just fine. If you don't mind a firmer TCC engagement replace the stock PWM-style TCC valve with an on/off-style from Transgo, or this one:
http://www.ebay.com/itm/TECHPAK-FITZ...-/181059582004
Or from another vendor:
http://www.transmissionpartsusa.com/...-0a74741qa.htm
I suspect that shudder was caused by the TCC trying to gradually engage.
I suspect your stock torque converter will be just fine; assuming there are no metal shavings inside your trans. I don't know if it even needs "flushing"; in any case you can't clean it thoroughly yourself.
You should air check the input drum after assembly - forward, overrun and 3-4 clutch. Then install the assembled input and reverse drums into the pump, identify the holes and test all the clutches:
BTW - That is the newer style pump from my 2010 trans; I think that started around 2007 when the Input Speed Sensor was added.
01-18-2013, 12:35 PM
#38
An old reverse drum certainly can be used to keep the teflon rings "resized", but doesn't have much bevel to compress brand new, just-installed rings. Plastic and hose clamps would probably work better. The stator does have more bevel and you might be able to resize new rings on the input shaft that way. Not sure though.
My last build used a billet input shaft and its hole wasn't big enough for a check ball. Honestly, I could not feel any difference in the TCC engagement. I do always run the Transgo TCC on/off valve (not the stock PWM valve) and therefore can feel the TCC engage like a gear shift. I don't know if it causes extra hear or wear. Anyone know this?
Your valve body is only 6 years old; it should be just fine. If you don't mind a firmer TCC engagement replace the stock PWM-style TCC valve with an on/off-style from Transgo, or this one:
http://www.ebay.com/itm/TECHPAK-FITZ...-/181059582004
Or from another vendor:
http://www.transmissionpartsusa.com/...-0a74741qa.htm
I suspect that shudder was caused by the TCC trying to gradually engage.
I suspect your stock torque converter will be just fine; assuming there are no metal shavings inside your trans. I don't know if it even needs "flushing"; in any case you can't clean it thoroughly yourself.
You should air check the input drum after assembly - forward, overrun and 3-4 clutch. Then install the assembled input and reverse drums into the pump, identify the holes and test all the clutches:
BTW - That is the newer style pump from my 2010 trans; I think that started around 2007 when the Input Speed Sensor was added.
01-18-2013, 12:54 PM
#40
Thanks a lot for the help. I was looking at a DVD that does not have the manual available but I saw on Ebay that they do show an ATSG book and MAnual together. I do have the GM Automatic Transmission Builders and Swappers Guide.