

Need advice on Escalade Transmission rebuild
 01-21-2013, 01:50 PM
#61
Moderator

After reading this thread, I suggest not trying a plain old T50 as it can strip a bolt:
http://www.hotrodders.com/forum/4l60...ts-179348.html
Also see #6 about how to mod a plain T50 if you are desperate:
https://ls1tech.com/forums/automatic...l#post14414324
While the torque specs say to only tighten them to 45 ft/lbs (or so), I recall they are always extra tight from the factory. My 150 ft/lb battery impact wrench did not loosen them; had to use my air wrench. Even though they are Torx, you need to put a lot of body weight into it so that the bit doesn't jump out.
Around 2007 GM switched to an even more unusual type bolt requiring a "Kent-Moore DT-49037-A Driver, Mortorq Spiral Fastener".
 01-22-2013, 07:16 AM
#62

Thanks for the info. I am sure someone around here must have it on the shelf. If not I guess I can do a next day off the web. That will probably be a $OUCH$. I did speak to ORileys Auto Parts and they SAID they had it but I will not believe it till I see it. Is there a written designation "Plus" on the item or something to insure it is the real deal? The auto stores that dont know any better say they have never heard of it.
01-22-2013, 09:09 AM
#64
Yea I just called them again and when asked pointedly if it was the PLUS bit they studdered and came back with it was not. So Im still looking. I wonder if that grinding down trick will work?
Anywho I am wondering what I should do about the converter. Found one which is a standard OEM equivalent (GM-92 was the O'Reiley part number they gave me) for $149 but I dont know if that is what I should do. Maybe an upgraded unit? Or not?
Anywho I am wondering what I should do about the converter. Found one which is a standard OEM equivalent (GM-92 was the O'Reiley part number they gave me) for $149 but I dont know if that is what I should do. Maybe an upgraded unit? Or not?
01-22-2013, 09:50 AM
#65
Moderator
I looked at my bit and it says "TP50", when I google that I get a lot more hits. AdvancedAuto lists it for $8.29 (probably special order). Or Google "OTC 6191". Another number is "J-45737" from Kent Moore.
I'm going to recommend you get the right tool and seriously consider a good air impact wrench.
I don't know enough about converters to help you. Personally if the trans doesn't show metal shavings, I would reuse the old one as it is only 6 years old. 10 years or 100,000 miles old, I would get a new one.
Anyone have suggestions for a stock-like converter?
01-22-2013, 11:06 AM
#66
[QUOTE=mrvedit;17081005]I looked at my bit and it says "TP50", when I google that I get a lot more hits. AdvancedAuto lists it for $8.29 (probably special order). Or Google "OTC 6191". Another number is "J-45737" from Kent Moore.
I'm going to recommend you get the right tool and seriously consider a good air impact wrench.
Well I found a set available from Car Quest and they said that it would be here today! I have looked everywhere for this thing.
I'm going to recommend you get the right tool and seriously consider a good air impact wrench.
Well I found a set available from Car Quest and they said that it would be here today! I have looked everywhere for this thing.
Last edited by fishcrazy; 01-22-2013 at 11:53 AM.
01-22-2013, 11:17 AM
#67
Moderator
Good! Perhaps one of my other part numbers helped.
I built a simple work stand for my first trans like this; it also has casters:
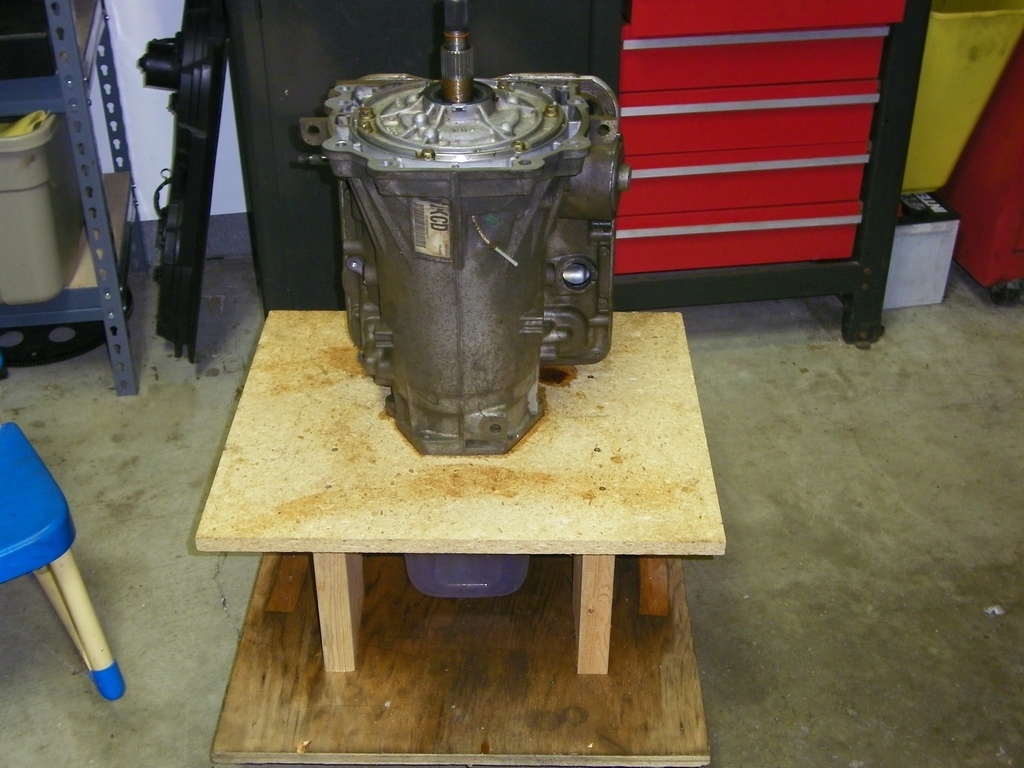
This will let you push down hard when untorquing the bolts. Do you have an air wrench? If not a helper will have to firmly hold the trans case.
I built a simple work stand for my first trans like this; it also has casters:
This will let you push down hard when untorquing the bolts. Do you have an air wrench? If not a helper will have to firmly hold the trans case.
01-22-2013, 11:51 AM
#68
That looks handy. Strangly enough I already have the bottom part of that constructed for other general purposes. It could easily be made into that. Thanks for the idea.
Air wrench would be nice to have and probably would require a good compressor. Have not looked into them but was tempted to look at battery powered ones by your previous comments.
Air wrench would be nice to have and probably would require a good compressor. Have not looked into them but was tempted to look at battery powered ones by your previous comments.
01-22-2013, 01:06 PM
#69
Moderator
Yeah, I had previously used the bottom part of mine for a differential stand. (That's why the bottom is dirty and top clean.)
I have a Ryobi 1/2" impact wrench claiming 200 ft/lbs. It will take off 100 ft/lb wheel lug nuts, but IIRC, it couldn't loosen the bell housing bolts.
I considered the DeWalt 1/2" impact wrench, but it has a two-way trigger switch for forward/reverse, which scares me - press tighten when you mean loosen and you might strip off a bolt. I suspect the DeWalt is realistically closer to its claimed 300 ft/lbs, which should be plenty.
A bit off topic, my most used tool is a Ryobi 3/8" impact wrench which is good for about 30 ft/lbs. I also have a very small Craftsman NEXTEC impact wrench which is good for about 10 ft/lbs, but enough to drop the oil pan and valve body in a few minutes.
01-22-2013, 02:25 PM
#70
Well I just hope I can get these bell housing bolts out without too much trouble. Unike the exhaust bolts which I had to give up on. I have read that heat is a help here also. We shall soon see. At east I have the TP50 bit now.
01-22-2013, 08:18 PM
#71
TECH Senior Member

Before trying to break loose those bolts, give each bolt head a medium sharp hit straight-on (perpendicular) with a hammer and drift... and then proceed with breaker/extension/TP50.
01-23-2013, 05:22 AM
#72
Joecar thanks for the info. I will give that a shot. I have read that there is some Loctite applied to these bolts when installed and that some heat applied to the outer housing is helpfule. Any truth to that?
01-24-2013, 10:25 AM
#74
I was reading the ATSG manual last night and saw that they recommend that you remove and discard the 3-4 Load Release spring assemblies in all models for a much improved 2-3 shift! I guess this is recommended. I was a little surprised by this because I have been looking at all manner of rebuild video and picture rebuild articles and have actually seen some tell you to not forget to reinstall them. I guess they were not professionals but just someone making a video for you tube.
Also in the TCC Ball Capsule Replacemant procedure they state that the ball may be left out of the capsule on heavy duty applications only, for firmer TCC apply. But to always reinstall the capsule. I dont know if heavy duty applies to me or not. I tow a 24 ft deck boat occasionally but that is about it. What do you think? Take it out or leave it in. And does it usually require any attention/replacement or is it normally ok if it is moving free?
The other thing I am curious about is how is the proper way to clean the tranny housing and is it recommended to compleatly disassemble the valve body to clean all the internal parts? What is recommended as far as blowing out the passages when cleaning?
Thanks for any tips.
01-24-2013, 11:04 AM
#75
Moderator
One thing to remember when following the ATSG manual is that it is oriented toward STOCK rebuilds, which means super-smooth gear shifts that are barely noticeable.
So, given the rather small stock 3rd gear feed hole (in separator plate), the likelihood of some leakage in the circuit, some builders might want to reduce the return-spring pressure on the 3-4 clutch by not installing the 3-4 clutch release springs. However, most of the builder I have spoken to prefer to use them even in stock rebuilds.
Once you install a shift kit, or at least a boost valve and drill the 3rd gear feed hole a bit bigger, IMO this becomes less of an issue.
The theoretical purpose for the 3-4 clutch release springs is to reduce residual friction in the clutch when it is not applied. This is probably less of an issue when using "stock" frictions or even Hi-Energy friction as the friction material is pretty hard. However, when using softer Red or Blue frictions, IMHO it become more important that they spin free when the clutch is not applied, and the 3-4 clutch release springs are therefore desirable.
In my estimate, the 3-4 clutch return springs apply less than 10 lbs of force; I don't think anyone could ever feel the difference in shift quality, but they might increase the life of the frictions. I don't have my numbers in front of me, but IIRC, the stock return spring exerts about 60 lbs of force and the clutch piston can exert 400 to 800 lbs of clamping force. I suggest you leave them in.
For the TCC Ball Capsule, I've tried it all in, only the capsule in, and no capsule, and I cannot honestly feel the difference. I do run a TCC on/off valve and can also feel a firm engagement. I would suggest you just leave it in.
Again, I'm no expert, but this is what I have learned from my own experience and speaking to a bunch of experienced builders.
01-24-2013, 01:34 PM
#76
One thing to remember when following the ATSG manual is that it is oriented toward STOCK rebuilds, which means super-smooth gear shifts that are barely noticeable.
So, given the rather small stock 3rd gear feed hole (in separator plate), the likelihood of some leakage in the circuit, some builders might want to reduce the return-spring pressure on the 3-4 clutch by not installing the 3-4 clutch release springs. However, most of the builder I have spoken to prefer to use them even in stock rebuilds.
Once you install a shift kit, or at least a boost valve and drill the 3rd gear feed hole a bit bigger, IMO this becomes less of an issue.
The theoretical purpose for the 3-4 clutch release springs is to reduce residual friction in the clutch when it is not applied. This is probably less of an issue when using "stock" frictions or even Hi-Energy friction as the friction material is pretty hard. However, when using softer Red or Blue frictions, IMHO it become more important that they spin free when the clutch is not applied, and the 3-4 clutch release springs are therefore desirable.
In my estimate, the 3-4 clutch return springs apply less than 10 lbs of force; I don't think anyone could ever feel the difference in shift quality, but they might increase the life of the frictions. I don't have my numbers in front of me, but IIRC, the stock return spring exerts about 60 lbs of force and the clutch piston can exert 400 to 800 lbs of clamping force. I suggest you leave them in.
For the TCC Ball Capsule, I've tried it all in, only the capsule in, and no capsule, and I cannot honestly feel the difference. I do run a TCC on/off valve and can also feel a firm engagement. I would suggest you just leave it in.
Again, I'm no expert, but this is what I have learned from my own experience and speaking to a bunch of experienced builders.
So, given the rather small stock 3rd gear feed hole (in separator plate), the likelihood of some leakage in the circuit, some builders might want to reduce the return-spring pressure on the 3-4 clutch by not installing the 3-4 clutch release springs. However, most of the builder I have spoken to prefer to use them even in stock rebuilds.
Once you install a shift kit, or at least a boost valve and drill the 3rd gear feed hole a bit bigger, IMO this becomes less of an issue.
The theoretical purpose for the 3-4 clutch release springs is to reduce residual friction in the clutch when it is not applied. This is probably less of an issue when using "stock" frictions or even Hi-Energy friction as the friction material is pretty hard. However, when using softer Red or Blue frictions, IMHO it become more important that they spin free when the clutch is not applied, and the 3-4 clutch release springs are therefore desirable.
In my estimate, the 3-4 clutch return springs apply less than 10 lbs of force; I don't think anyone could ever feel the difference in shift quality, but they might increase the life of the frictions. I don't have my numbers in front of me, but IIRC, the stock return spring exerts about 60 lbs of force and the clutch piston can exert 400 to 800 lbs of clamping force. I suggest you leave them in.
For the TCC Ball Capsule, I've tried it all in, only the capsule in, and no capsule, and I cannot honestly feel the difference. I do run a TCC on/off valve and can also feel a firm engagement. I would suggest you just leave it in.
Again, I'm no expert, but this is what I have learned from my own experience and speaking to a bunch of experienced builders.
01-24-2013, 01:46 PM
#77
I have heard some say that you can take the housing to the car wash and blast it with the high pressure to clean it after you have all the guts out of it, but I hesitate to do that. Is that something you would recommend. Would you use soap or just water? Or would a solvent cleaner be the only thing you would use?
01-24-2013, 02:46 PM
#78
Moderator
My local friendly trans shop puts my cases in their hot-water washer and it comes out decent. I would think the car wash blast would work too. I've had them media blasted too, but that is much more involved as the internal needs to be protected.
I encourage anyone rebuilding their own trans to establish a relationship with a local (non-chain) trans shop. Pay them a few dollars to clean your case, install the teflon rings and they might be willing to help examine parts and give advice. They can also order any part you need for next day pickup.
Whatever you do, DO NOT put it in your dishwasher; it seems that at least some dishwasher detergent etches the aluminum.
01-24-2013, 03:12 PM
#79
Thanks for the info. Im currently trying to wrassel the trans out of the truck now and cant seem to get the upper part of the bell housing to release. Bottom is separated and the top just seems stuck! Is there a trick to this? I know I have all the bolts ouot.
01-24-2013, 03:40 PM
#80
Moderator
There are two dowels - at 3 and 9 O'Clock. The steel dowels can electrically bond to the aluminum a bit and require some persuasion to release.
I would suggest putting some of the bolts back again with 1/2" play so that the trans doesn't drop. The use some persuasion and twisting at tail housing. You might consider a chisel between the engine block and bell housing right by the dowels.
I would suggest putting some of the bolts back again with 1/2" play so that the trans doesn't drop. The use some persuasion and twisting at tail housing. You might consider a chisel between the engine block and bell housing right by the dowels.