

Need advice on Escalade Transmission rebuild
 01-29-2013, 10:17 AM
#101

Well I called a transmission shop and they said on that transmission they do not try to press the shaft into the pump because it causes a crack in the pump most of the time. he suggested I buy a new pump. He said he would put the teflon rings on the shafts for me though. Does that sound right to you or should I just keep on looking.
 01-29-2013, 11:10 AM
#102
Moderator

I run a computer business, not a trans shop and cannot answer that.
Perhaps someone else can.
I recently modified a 2010 pump to work with an older (non speed sensor) input shaft. My local trans shop first installed the Sonnax stator shaft
and I later had to remove it, mod it to work and reinstall it. The trick is to put the new stator shaft into the freezer for a while; it basically
slips right in then. However removing the old shaft can be a bitch and can potentially bend or crack the pump.
So, your trans shop has a valid concern. However unless they think the crack might be invisible, what is the harm in trying? Like I said, if
they freeze the new one, it goes in relatively easily. Let them press out the old one and carefully examine the pump-half.
You could ask them for the price for a new pump, and compare that with what is available on ebay. I see good looking ones on ebay for $100.
Ebay seller "powertrainpartsplus" is a good source for big parts that I have been happy with.
Last edited by mrvedit; 01-30-2013 at 12:38 PM. Reason: Typo
01-29-2013, 02:00 PM
#103
I suppose by the time I buy the shaft and have it shipped then pay someone to put it in the pump at the site you gave me is looking real fine. Im talking to them to find out if their pump will work. Thanks for the tip.
01-30-2013, 11:13 AM
#104

I am not going to say that you cant crack the pump while pressing them together but... Thats how I do them, if you press it together carefully and make sure everything is straight and MAKE SURE THE PUMP BODY IS SUPPORTED there really isnt an issue with them cracking.
I have cracked a few of them but I would say that it is less than 5% of the ones I do end up cracked. Every on that has cracked has been an error of some nature on my part.
I have been cautious and put the support in the freezer and pump body in the parts washer (180 deg) then hurried up and put em together but it really doesnt matter. Either way works if you are careful and pay attention to what you are doing.
01-30-2013, 11:15 AM
#105
Also when you do end up cracking the pump it is quite obvious that you did. A loud pop is heard and then it presses together very easiy usually right after it bound up from being crooked... Also when its finished the crack is visible...
01-30-2013, 11:20 AM
#106
The following users liked this post:
james28909 (07-13-2020)
01-30-2013, 12:42 PM
#107
Moderator
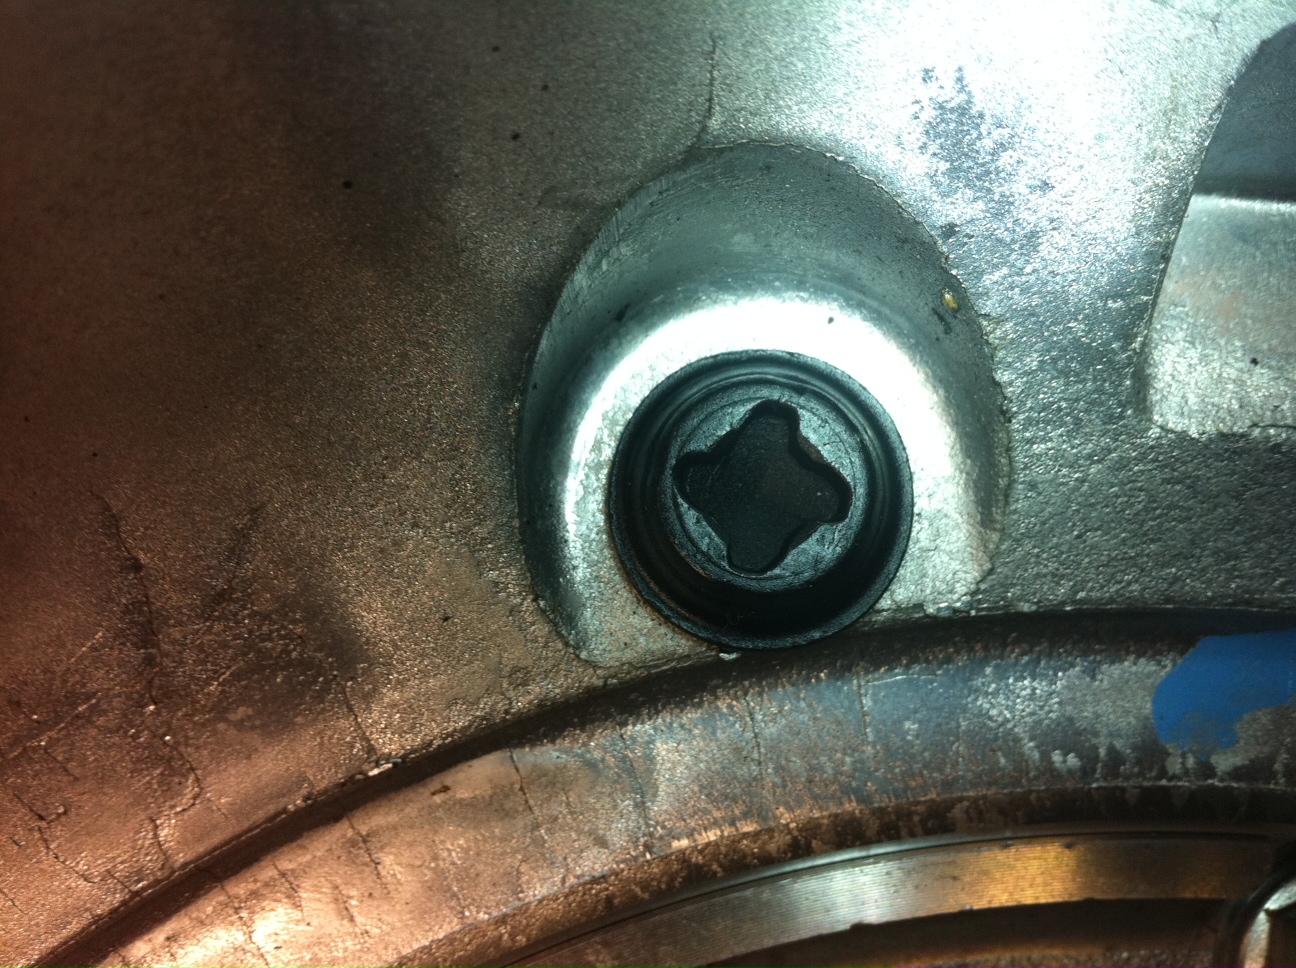
BTW - The bit to remove/install is called a "MorTorq", Kent-Moore part number DT-49037, Snap-On # PFMTS4E.
Here is the Snap-On description: http://image.snapon.com/internationa...fmts4e_npa.pdf
Last edited by mrvedit; 01-30-2013 at 07:45 PM. Reason: Added tool part numbers

The following users liked this post:
james28909 (07-13-2020)
01-30-2013, 06:30 PM
#109
I have a few names for him as well. I could not figure why some of the bolts I heated slowly broke and others just stripped the head out. I did invent some new 4 letters on those 2 bolts though.
01-30-2013, 06:42 PM
#110
I am not going to say that you cant crack the pump while pressing them together but... Thats how I do them, if you press it together carefully and make sure everything is straight and MAKE SURE THE PUMP BODY IS SUPPORTED there really isnt an issue with them cracking.
I have cracked a few of them but I would say that it is less than 5% of the ones I do end up cracked. Every on that has cracked has been an error of some nature on my part.
I have been cautious and put the support in the freezer and pump body in the parts washer (180 deg) then hurried up and put em together but it really doesnt matter. Either way works if you are careful and pay attention to what you are doing.
I have cracked a few of them but I would say that it is less than 5% of the ones I do end up cracked. Every on that has cracked has been an error of some nature on my part.
I have been cautious and put the support in the freezer and pump body in the parts washer (180 deg) then hurried up and put em together but it really doesnt matter. Either way works if you are careful and pay attention to what you are doing.
02-02-2013, 07:05 AM
#111
I run a computer business, not a trans shop and cannot answer that.
Perhaps someone else can.
I recently modified a 2010 pump to work with an older (non speed sensor) input shaft. My local trans shop first installed the Sonnax stator shaft
and I later had to remove it, mod it to work and reinstall it. The trick is to put the new stator shaft into the freezer for a while; it basically
slips right in then. However removing the old shaft can be a bitch and can potentially bend or crack the pump.
So, your trans shop has a valid concern. However unless they think the crack might be invisible, what is the harm in trying? Like I said, if
they freeze the new one, it goes in relatively easily. Let them press out the old one and carefully examine the pump-half.
You could ask them for the price for a new pump, and compare that with what is available on ebay. I see good looking ones on ebay for $100.
Ebay seller "powertrainpartsplus" is a good source for big parts that I have been happy with.
Perhaps someone else can.
I recently modified a 2010 pump to work with an older (non speed sensor) input shaft. My local trans shop first installed the Sonnax stator shaft
and I later had to remove it, mod it to work and reinstall it. The trick is to put the new stator shaft into the freezer for a while; it basically
slips right in then. However removing the old shaft can be a bitch and can potentially bend or crack the pump.
So, your trans shop has a valid concern. However unless they think the crack might be invisible, what is the harm in trying? Like I said, if
they freeze the new one, it goes in relatively easily. Let them press out the old one and carefully examine the pump-half.
You could ask them for the price for a new pump, and compare that with what is available on ebay. I see good looking ones on ebay for $100.
Ebay seller "powertrainpartsplus" is a good source for big parts that I have been happy with.
I finished the input drum and reverse housing and have the Transmission case cleaned up and ready to start rebuilding that part. Then all I have to do is figure out what to do with the pump before I deem it totally worthy to be pronounced good to go and determine how much work I should do on the valve body. I am thinking about a total didassembly of the valve body to give it a good cleaning but dont know if that is necessary or not.
I am a bit concerned as to what caused the reverse drum failure in the first palce as I sure dont want that to happen again. I am at a loss as to the reason for that other than it was just the first thing to wear out and just became progressivly worse then suddenly could not hold pressure any longer. Who knows.
Any suggestions would be welcomed.
Thanks for all the excellent guidance.
Jim
02-02-2013, 10:05 AM
#112
Moderator
Glad to hear that the pump looks like-new; I have been very impressed with powertrainpartsplus; I don't know where they find such good parts, I even bought a brand new still-in-plastic valve body from them.
All the different parts can be intimidating, but once you finish your first rebuild, you will know what they all are. Some might also be alternate parts for older models or even 700R4.
For the pump, your rebuild kit should have a new o-ring inside the "slide" (which the rotor spins in) and perhaps a few other parts. If it looks pristine, I wouldn't bother replacing the rotor or vanes (which are probably not in your rebuild kit).
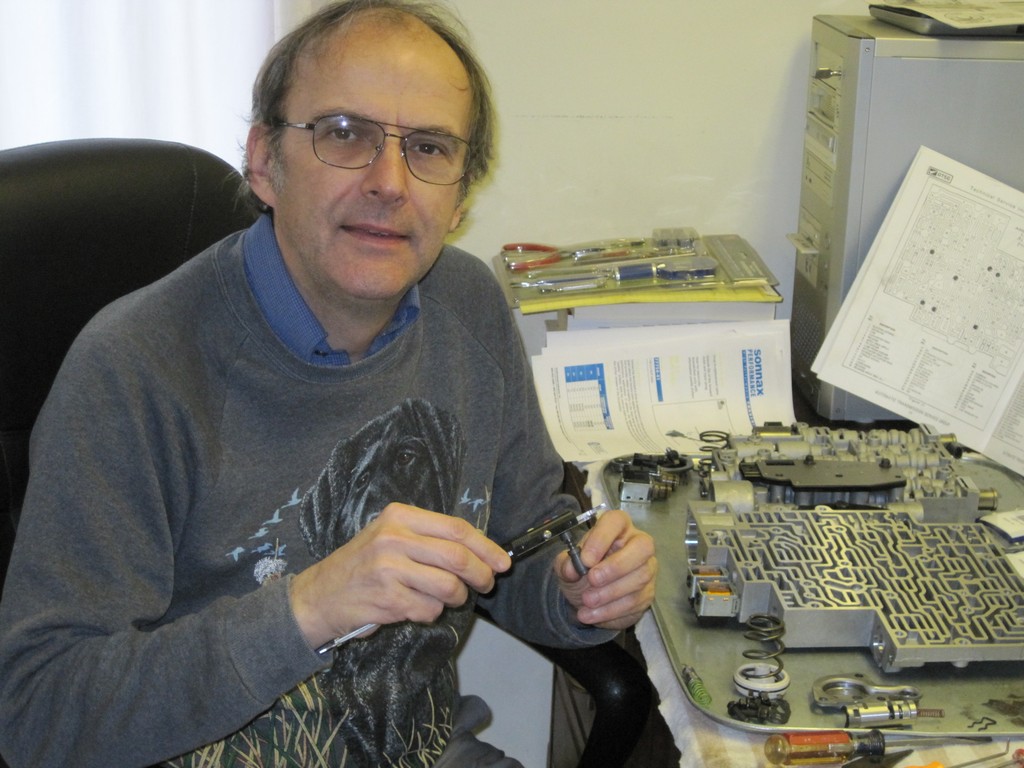
I would not attempt to take the entire valve body apart. For one thing some valves are very difficult to get out and I am sure are not worth the effort. Again, most rebuilders are working on 10 to 15 year old transmissions in which everything is worn. Yours is only 6 years old and I doubt there is much valve body wear. In the following picture I disassembled a very-used 2001, a brand new 2006 and a nearly new 2010 VB to compare them and make measurements:
Even the very-used 2001 was in good condition, only the accumulator valve and sleeve were a bit sticky compared to the newer VBs.
Also, you would be comfortable dropping the VB in the future if ever needed.
I don't have the experience to answer your "what caused the failure" question, but I regularly see 4L60E for sale on CL listed as "no reverse" (for about $100 or so). Therefore, I suspect this is just a design weakness, but I don't know that. I thnk you were just unlucky. (Or lucky to get the opportunity to take this adventure.)
Is your local trans shop going to install the teflon rings; I suggest that.
You might later take your input drum, reverse drum and pump to them for the air tests; maybe they would let you watch.
You have my cell # and are encouraged to call. If I don't know the answer, I have several trans experts on my phone list.
Good luck!
Ted.
All the different parts can be intimidating, but once you finish your first rebuild, you will know what they all are. Some might also be alternate parts for older models or even 700R4.
For the pump, your rebuild kit should have a new o-ring inside the "slide" (which the rotor spins in) and perhaps a few other parts. If it looks pristine, I wouldn't bother replacing the rotor or vanes (which are probably not in your rebuild kit).
I would not attempt to take the entire valve body apart. For one thing some valves are very difficult to get out and I am sure are not worth the effort. Again, most rebuilders are working on 10 to 15 year old transmissions in which everything is worn. Yours is only 6 years old and I doubt there is much valve body wear. In the following picture I disassembled a very-used 2001, a brand new 2006 and a nearly new 2010 VB to compare them and make measurements:
Even the very-used 2001 was in good condition, only the accumulator valve and sleeve were a bit sticky compared to the newer VBs.
Also, you would be comfortable dropping the VB in the future if ever needed.
I don't have the experience to answer your "what caused the failure" question, but I regularly see 4L60E for sale on CL listed as "no reverse" (for about $100 or so). Therefore, I suspect this is just a design weakness, but I don't know that. I thnk you were just unlucky. (Or lucky to get the opportunity to take this adventure.)
Is your local trans shop going to install the teflon rings; I suggest that.
You might later take your input drum, reverse drum and pump to them for the air tests; maybe they would let you watch.
You have my cell # and are encouraged to call. If I don't know the answer, I have several trans experts on my phone list.
Good luck!
Ted.
Last edited by mrvedit; 02-15-2013 at 08:40 AM. Reason: Originally wrote "rotor", meant "slide"
02-04-2013, 11:11 AM
#113
Glad to hear that the pump looks like-new; I have been very impressed with powertrainpartsplus; I don't know where they find such good parts, I even bought a brand new still-in-plastic valve body from them.
All the different parts can be intimidating, but once you finish your first rebuild, you will know what they all are. Some might also be alternate parts for older models or even 700R4.
For the pump, your rebuild kit should have a new o-ring inside the rotor and perhaps a few other parts. If it looks pristine, I wouldn't bother replacing the rotor or vanes (which are probably not in your rebuild kit).
I did inspect the rotor and veins and they both looked fine. I did turn the veins around from the way they were installed when I took them out but dont think that made any difference since they were as new looking.
I would not attempt to take the entire valve body apart. For one thing some valves are very difficult to get out and I am sure are not worth the effort. Again, most rebuilders are working on 10 to 15 year old transmissions in which everything is worn. Yours is only 6 years old and I doubt there is much valve body wear. In the following picture I disassembled a very-used 2001, a brand new 2006 and a nearly new 2010 VB to compare them and make measurements:

Even the very-used 2001 was in good condition, only the accumulator valve and sleeve were a bit sticky compared to the newer VBs.
Also, you would be comfortable dropping the VB in the future if ever needed.
I decided to not completely take the valve body apart but did clean it well and moved the valves that I did not remove to make sure they were not stuck. I believe i would have had some other problem though if one was stuck.
I don't have the experience to answer your "what caused the failure" question, but I regularly see 4L60E for sale on CL listed as "no reverse" (for about $100 or so). Therefore, I suspect this is just a design weakness, but I don't know that. I thnk you were just unlucky. (Or lucky to get the opportunity to take this adventure.)
I was doing this as a means of learning and all the while thinking I may be a bit insane doing it myself. I feel much better having gotten through it to this point though even though not yet having it installed I am still a bit warry of counting my eggs here. I guess that comes somewhat from reading some posts of others who did this and the unit malfunctioned when they reinstalled it. I consider myself lucky that I did not get stranded the transmission failed and we made the remaining 500 miles to home.
Is your local trans shop going to install the teflon rings; I suggest that.
You might later take your input drum, reverse drum and pump to them for the air tests; maybe they would let you watch.
I did find the info on where to air test the clutches in the ATSG manual so that is fine. As for the guy that would not install the pump stator shaft I dont know if I will go to him to get the teflon rings installed or not. In light of what Carlsonauto said I dont think I want to take it to him but may find someone else though.
You have my cell # and are encouraged to call. If I don't know the answer, I have several trans experts on my phone list.
Good luck!
Ted.
All the different parts can be intimidating, but once you finish your first rebuild, you will know what they all are. Some might also be alternate parts for older models or even 700R4.
For the pump, your rebuild kit should have a new o-ring inside the rotor and perhaps a few other parts. If it looks pristine, I wouldn't bother replacing the rotor or vanes (which are probably not in your rebuild kit).
I did inspect the rotor and veins and they both looked fine. I did turn the veins around from the way they were installed when I took them out but dont think that made any difference since they were as new looking.
I would not attempt to take the entire valve body apart. For one thing some valves are very difficult to get out and I am sure are not worth the effort. Again, most rebuilders are working on 10 to 15 year old transmissions in which everything is worn. Yours is only 6 years old and I doubt there is much valve body wear. In the following picture I disassembled a very-used 2001, a brand new 2006 and a nearly new 2010 VB to compare them and make measurements:
Even the very-used 2001 was in good condition, only the accumulator valve and sleeve were a bit sticky compared to the newer VBs.
Also, you would be comfortable dropping the VB in the future if ever needed.
I decided to not completely take the valve body apart but did clean it well and moved the valves that I did not remove to make sure they were not stuck. I believe i would have had some other problem though if one was stuck.
I don't have the experience to answer your "what caused the failure" question, but I regularly see 4L60E for sale on CL listed as "no reverse" (for about $100 or so). Therefore, I suspect this is just a design weakness, but I don't know that. I thnk you were just unlucky. (Or lucky to get the opportunity to take this adventure.)
I was doing this as a means of learning and all the while thinking I may be a bit insane doing it myself. I feel much better having gotten through it to this point though even though not yet having it installed I am still a bit warry of counting my eggs here. I guess that comes somewhat from reading some posts of others who did this and the unit malfunctioned when they reinstalled it. I consider myself lucky that I did not get stranded the transmission failed and we made the remaining 500 miles to home.
Is your local trans shop going to install the teflon rings; I suggest that.
You might later take your input drum, reverse drum and pump to them for the air tests; maybe they would let you watch.
I did find the info on where to air test the clutches in the ATSG manual so that is fine. As for the guy that would not install the pump stator shaft I dont know if I will go to him to get the teflon rings installed or not. In light of what Carlsonauto said I dont think I want to take it to him but may find someone else though.
You have my cell # and are encouraged to call. If I don't know the answer, I have several trans experts on my phone list.
Good luck!
Ted.
One thing i am wondering about is the valve body spacer plate. I did not get a new one with the kit but i did get 2 gaskets for it. The plate came off the valve body clean and the gaskets appear to be stuck to the separator plate. I have not tried to remove the gaskets from the separator plate yet from fear of damaging the plate. It all looks fine and quite reusable but I defer to someon elses judgement on this as I dont know if I should reuse this as is or try to put the new gaskets in place risking the plate being damaged.
Thanks for the advice.
Jim
02-04-2013, 11:29 AM
#114
Moderator
First you, didn't have to include my picture in your quote; I'm not that vain. 
What you really want are "Lock Ring pliers"; I grind the tips down a bit to fit.
Its called the "Separator plate". In my 2010, the gaskets were clearly glued to the plate as one piece; the little filters are flat and also glued into place. I don't know when this change was made, but I suspect it was around 2008. I would expect your 2006 to have a normal plate and separate gaskets; if you have little snap-in filters you certainly have a normal plate and gaskets.
I think it is risky to reuse gaskets that are 6 years old. You already went to a local trans shop; why not let them advise. They probably carry the Transgo universal separator plate too, if needed.
02-04-2013, 11:49 AM
#115
First you, didn't have to include my picture in your quote; I'm not that vain.
What you really want are "Lock Ring pliers"; I grind the tips down a bit to fit.
Its called the "Separator plate". In my 2010, the gaskets were clearly glued to the plate as one piece; the little filters are flat and also glued into place. I don't know when this change was made, but I suspect it was around 2008. I would expect your 2006 to have a normal plate and separate gaskets; if you have little snap-in filters you certainly have a normal plate and gaskets.
I think it is risky to reuse gaskets that are 6 years old. You already went to a local trans shop; why not let them advise. They probably carry the Transgo universal separator plate too, if needed.
02-04-2013, 12:36 PM
#116
Moderator
My filters are flat as you describe as well. So I am hearing you say that you would replace the plate and use the gaskets that came with the kit? I have not checked with the transmission shop about the separator plate. Maybe they have it in stock. Do you think my gaskets are glued to the plate?
You may have to go to the dealer for this.
You might be able to use the Transgo universal, but would have to compare the holes carefully. Do you have a 3-2 downshift solenoid in the corner of the VB by the shift linkage, or is it unfinished as in this picture:
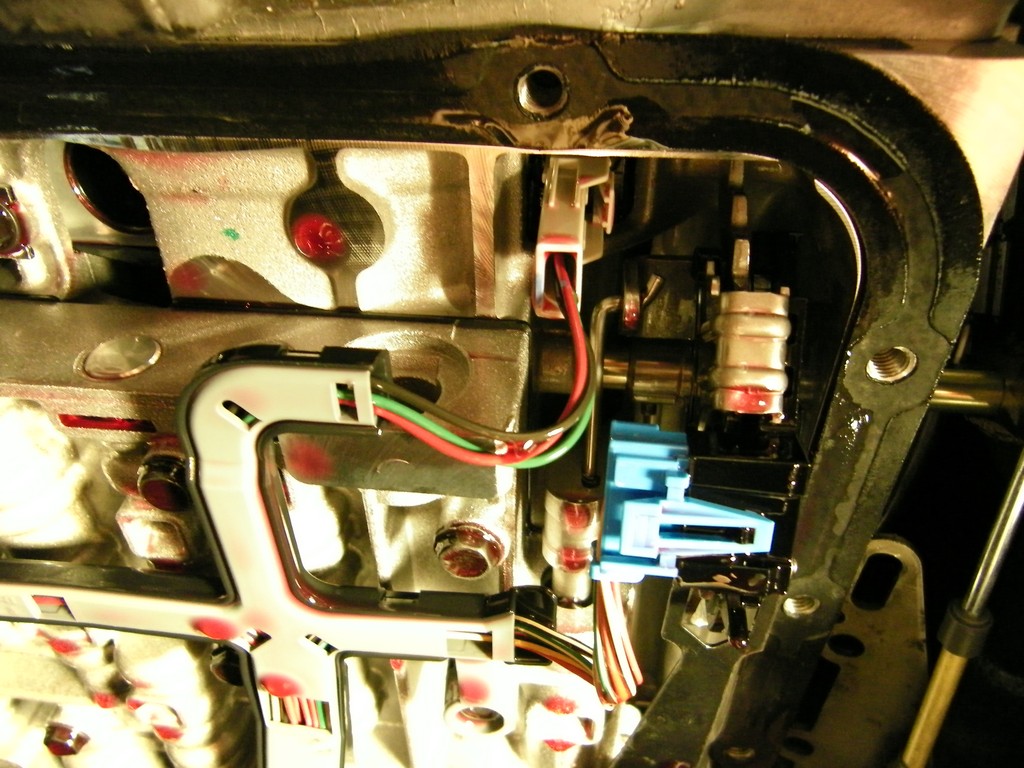
If you don't have a 3-2 downshift solenoid, I don't think the Transgo Universal plate will work.
02-04-2013, 10:42 PM
#117
TECH Senior Member
In Ted's pic you will notice some important characteristics for working on trans:
using documents, organized space, clean tray/tools/parts/hands...
and there probably is a beer somewhere
using documents, organized space, clean tray/tools/parts/hands...
and there probably is a beer somewhere
02-05-2013, 07:11 AM
#118
Im sure there must be a beer somewhere. I got one and I didnt even drink before I started this rebuild!
The following users liked this post:
james28909 (07-13-2020)
02-05-2013, 07:31 AM
#119
No, you have a newer style separator plate which has flat filters and gaskets glued into place. The gaskets are not removable, at least not easily. And I don't think replacement gaskets are even available.
You may have to go to the dealer for this.
You might be able to use the Transgo universal, but would have to compare the holes carefully. Do you have a 3-2 downshift solenoid in the corner of the VB by the shift linkage, or is it unfinished as in this picture:

If you don't have a 3-2 downshift solenoid, I don't think the Transgo Universal plate will work.
You may have to go to the dealer for this.
You might be able to use the Transgo universal, but would have to compare the holes carefully. Do you have a 3-2 downshift solenoid in the corner of the VB by the shift linkage, or is it unfinished as in this picture:
If you don't have a 3-2 downshift solenoid, I don't think the Transgo Universal plate will work.
They clame it is thicker and has some modifications to the hole sizes to alter flow and make for better shift. What I dont know is if the gaskets in my kit art going to work with it. Do I need larger check ***** for their modified holes? Is it worth going the non OEM route here or is this a thing for racing setup. I think but I am not sure that I can get another bonded type plate from the dealer here. One dealer did not have it in stock and was very uninformative about the type that they could order and if it was bonded or not.
I did find scant info on the web that indicated that you could use a special gasket they make to replace the bonded gasket but you must install the snap in filters onto the plate. That is all well and good to know but they dont venture to tell you whether or not to remove the bonded gasket or how to do so. But they are very proud of the fact that they have a gasket to replace the bonded type gasket and show you where to put the snap in filters. These gaskets came with my kit as well as the snap in filters. I just wonder if I should upgrade the plate to the TransGo or get the OEM one.
02-05-2013, 07:47 AM
#120
Well that solves that! Just called the other Caddi dealer and they got one on the way in about an hour. I going to see how well that gasket will scrape off the old plate though after the other one is installed and working. I dont know if it is the bonded type plate or not yet but if it isnt do you guys use anything to bond the gasket to the plate during install?