


Bad need of some 4l60e HELP !

Thread Starter
Teching In
Joined: May 2015
Posts: 38
Likes: 1
Hey everybody i'm new here to the ls1 page. I found this when i was trying to google a problem i'm having with my first automatic trans rebuild. I rebuilt this trans using a nothing special kit from my local trans parts supplier, a "corvette" servo and a transgo shift kit. Also on the reccomendation of the parts supplier i upgraded to the later model bonded pistons because i messed up the outter lipseal on the forward clutch piston. Anyway i got it running a week or so ago and 3rd gear wont hold. If i baby it it shifts fine, but if i go into a 2nd kickdown situation or really get on it at all it shifts 3rd but wont hold, it jus slips. All other gears work fine, it'll do 3rd gear kickdown fine and 3rd is fine in manual but for some reason it just wont hold on an upshift. I pulled it back apart and found 1 loose bolt in the accumulator, and changed the force motor. Put it back together and no change still wont hold 3rd gear. Im wondering if there is another part i should change along with the pistons or if i should just go back to the stock 1s. Any help would be greatly appreciated. I have no idea what to check next. Thanks, Ken
Moderator


Joined: Aug 2010
Posts: 7,323
Likes: 529
From: Ann Arbor, MI
From your description, I think you have a major leak in the 3/4 clutch circuit.
Unfortunately you will have to remove the trans and open it to find it.
Before you do that, there could be a leak in the servo on the 2nd servo piston. A leaking "3rd accumulator check ball" is another possibility.
If you end up opening the trans, don't disassemble too much before you perform an air test with the input drum inserted into the pump (the reverse drum can be left off). Hold the pump upside down through a hole in your work take, with a 6-8" square cardboard box or in a vice. Place the input drum into the pump. The pump has feed holes for each clutch. Using a rubber tipped blow gun test each clutch in the input drum. IIRC the 3/4 clutch feed hole in the pump is slightly angled.
While there will be a moderate amount of air leakage when testing through the pump, each clutch should still apply.
BTW - The above is a good test after assembling the input drum.
Most important is doing an air test of just the input drum. The following threads document that:
https://ls1tech.com/forums/automatic...-problems.html
https://ls1tech.com/forums/automatic...092-4l60e.html
I suspect you will find a leak in the process, perhaps a torn lip seal on the 3/4 piston.
Thread Starter
Teching In
Joined: May 2015
Posts: 38
Likes: 1
I already pulled it back down 1 time. I checked the pistons and everything. Seals on input shaft are fine. I switched to the later model pistons with the rubber bonded to them. I was wondering if there was another part i should have changed along with the pistons, thinking maybe they were the reason it wasn't holding. I did air check the drum itself through the holes in the input shaft. Everything seemed fine there. Clearance on the 3-4 clutches was at about .036
Moderator
Joined: Aug 2010
Posts: 7,323
Likes: 529
From: Ann Arbor, MI
OK, good to hear that you air tested everything. Next I would check the servo and the 3rd accumulator check ball.
If the trans is currently installed, put a pressure gauge on it and make sure the pressure rises to 200+ psi when you blip the throttle.
Tell me again - is the trans currently installed or is it apart?
If the trans is currently installed, put a pressure gauge on it and make sure the pressure rises to 200+ psi when you blip the throttle.
Tell me again - is the trans currently installed or is it apart?
Thread Starter
Teching In
Joined: May 2015
Posts: 38
Likes: 1
I'm sitting here thinking about all this and i bought the truck with a bad trans intending to either build it myself or have it built. It's obvious which way i decided to go...anyway the problem with it originally was a burned up forward clutch. I mean burned to the point that all friction material was gone, all steels were completely black and blue as if someone had thrown them into a fire. The clutch actually broke, the sprag seized, and i cant even get some of the steels and frictions off of it. Im wondering if there isnt trash in the 3rd check ball you mentioned. I may just go ahead and change that completely.
Trending Topics
Moderator
Joined: Aug 2010
Posts: 7,323
Likes: 529
From: Ann Arbor, MI
A pressure gauge is critical for debugging trans problems. If your pressure is low, the 3/4 clutch will slip on even moderate throttle shifts and quickly wear out the frictions.
Search Amazon for "ATD 5550"; the pressure gauge is only $34.
The 3rd accumulator check ball can be removed with the trans in the car after removing the valve body, although I have never tried it that way. Look it up - I think a tap is screwed into it and it is then pulling out. It can be installed with the proper size punch.
Based on your last post, I also suspect damage to the input drum. Or a tiny piece of metal has cut your 3/4 piston seal. How thorough were you cleaning the trans case and parts?
LS1 Tech Stories
The Best V8 Stories One Small Block at Time

6 Common C5 Corvette Failures and What's Involved In Repairing Them
Pouria Savadkouei
Retro Modern Bandit Pontiac Trans AM Comes With Burt Reynolds' Autograph
Verdad Gallardo
Top 10 Greatest Cadillac V Series Performance Models Ever, Ranked
Pouria Savadkouei
Top 10 Most Powerful Chevy Trucks Ever Made!

Hennessey's New Supercharged Silverado ZR2 Has 700 HP
Verdad Gallardo
Coachbuilt N2A Anteros Is an LS2-Powered C6 Corvette In Italian Clothes
Verdad Gallardo
Awesome K5 Blazer Restomod Comes With C7 Corvette Power
Verdad Gallardo
10 Camaros You Should Never Buy

10 LS Engine Myths That Refuse to Die
Verdad Gallardo Thread Starter
Teching In
Joined: May 2015
Posts: 38
Likes: 1
I did all i could do to clean it. I used oven cleaner on the outside and foamy engine degreaser on the inside. Hosed everything off good. And blew it out with an air hose. I had the drum apart friday because of this issue. All of the pistons were upgraded to the later model style with the bonded rubber seals. I dont have the older lip seal type in it anymore.
Thread Starter
Teching In
Joined: May 2015
Posts: 38
Likes: 1
I just ordered the pressure gauge you suggested. I tried to find 1 locally but the only 1 i cud find was $102...so i kept putting it off. This 1 will be here on wednesday. It is very tight with the trans in the vehicle so i cant really do anything until i run the pressure check. I will let you know what i find. Is it ok to do a pressure check while driving it ?....i noticed in my atsg manual that it says to not do a check procedure for more than 2 minutes as it could burn the trans up....
Moderator
Joined: Aug 2010
Posts: 7,323
Likes: 529
From: Ann Arbor, MI
The pressure gauge comes with a long hose so that you can hang it from e.g. the outside mirror and monitor it while driving.
Just check the pressure in Park/Neutral, Reverse and while blipping the throttle is generally enough to determine if there is a problem.
The pressure gauge puts no strain on the trans, no idea what the ATSG manual is referring to.
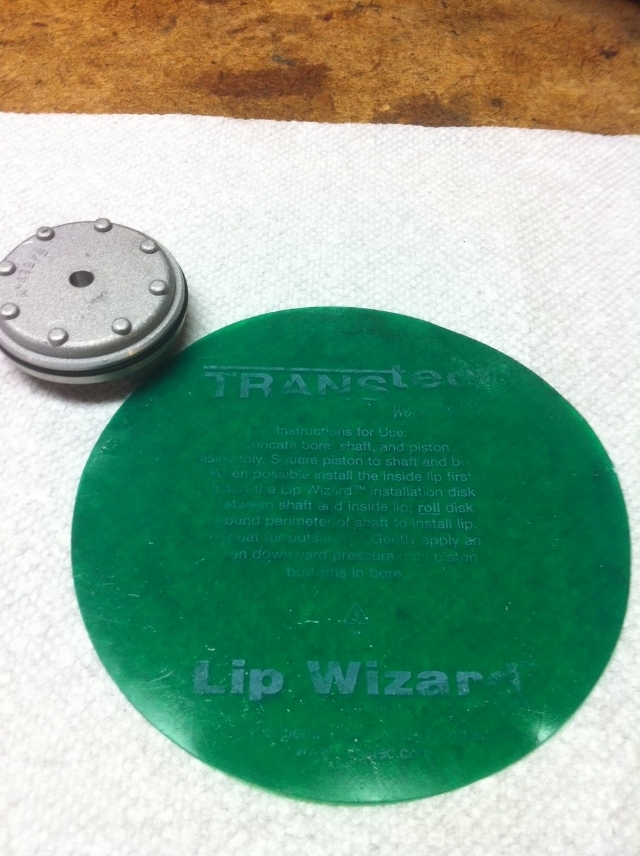
You keep referring to the upgraded bonded steel pistons, but those are only for the forward and overrun pistons. (Correction: the 3/4 piston is also a bonded steel piston.) Some rebuild kits come with a free "lip wizard" for installing piston seals. A local trans shop might have one for you, in case you have to open the trans again.
Just check the pressure in Park/Neutral, Reverse and while blipping the throttle is generally enough to determine if there is a problem.
The pressure gauge puts no strain on the trans, no idea what the ATSG manual is referring to.
You keep referring to the upgraded bonded steel pistons, but those are only for the forward and overrun pistons. (Correction: the 3/4 piston is also a bonded steel piston.) Some rebuild kits come with a free "lip wizard" for installing piston seals. A local trans shop might have one for you, in case you have to open the trans again.
Last edited by mrvedit; May 25, 2015 at 11:41 PM.
Thread Starter
Teching In
Joined: May 2015
Posts: 38
Likes: 1
Well if that's true then there's my problem. He sold me a set of 3 pistons and the 3-4 piston was bonded on the bottom side with no provision for a lip seal. After i do the pressure check, if i have to open it up again i'll take a pic of it.
Moderator
Joined: Aug 2010
Posts: 7,323
Likes: 529
From: Ann Arbor, MI
Sorry for the confusion; every 3/4 clutch piston I have ever used was the "steel bonded" style. I have not personally rebuilt a pre '98 trans and therefore don't know what type of 3-4 piston they may have had. I have built the input drum with a wide range of different, custom and billet overrun and forward pistons and sometimes forget what is stock. I am not aware of any variations of the 3/4 piston. Sorry again - I corrected my earlier post.
Thread Starter
Teching In
Joined: May 2015
Posts: 38
Likes: 1
It was just a cast aluminum piston with machined grooves for the inner and outer lip seals. I am curious as to whether or not i can change just the pistons or if there was another part that had to be changed as well.
Moderator
Joined: Aug 2010
Posts: 7,323
Likes: 529
From: Ann Arbor, MI
You should use the bonded 3/4 piston; no other changes are needed.
Use Transgel (or Vaseline) to lubricate the seals. There is a plastic install tool (just a sleeve) available to guide the inner seal into place, but it won't work if you have the Sonnax reinforcement ring installed. Something like the "Lip Lizard" above can be very helpful.
Use Transgel (or Vaseline) to lubricate the seals. There is a plastic install tool (just a sleeve) available to guide the inner seal into place, but it won't work if you have the Sonnax reinforcement ring installed. Something like the "Lip Lizard" above can be very helpful.
Thread Starter
Teching In
Joined: May 2015
Posts: 38
Likes: 1
I guess i should have mentioned in my original post that it is a 94 model trans. I used all 3 98+ pistons in it. I have a good 98 model trans and i don't know if you would know or not, but would it be possible to switch the VB and SP and just use the 98 until i get this figured out ?

Random question, when you updated to the new style pistons did you also update to the new style overrun spring cage? The stock overrun spring cage isn't compatible with the new bonded steel pistons.
I ask because I recently rebuilt a '96 4l60e and ran into that problem. Had to wait for the new one to arrive in the mail. Since the overrun clutches are in the input drum along with the 3-4 clutches, was wondering (if you didn't update the spring cage) if that could potentially interfere with the 3-4 clutches.
Post 34 of my rebuild thread has pictures of the old and new style
https://ls1tech.com/forums/automatic...-thread-2.html
Moderator
Joined: Aug 2010
Posts: 7,323
Likes: 529
From: Ann Arbor, MI
A '98 VB will not work with a '94 PCM.
The '94 is non-PWM and the '98 is PWM, plus the 3-2 downshift solenoid is different.
I don't know if you can switch the '94 VB to work with a '98 case; maybe, but not sure.
You would also have to move your non-PWM pump to the '98 case; again not sure.
What is "SP"?
I have swapped parts between different years, including between ISS and non-ISS, but only for '98 and later. Swapping parts between '94 and '98 would be very adventurous.
Cory has a good build thread, including his mention that the spring case has to be updated to work with the newer style molded-steel pistons.
I'm sitting here thinking about all this and i bought the truck with a bad trans intending to either build it myself or have it built. It's obvious which way i decided to go...anyway the problem with it originally was a burned up forward clutch. I mean burned to the point that all friction material was gone, all steels were completely black and blue as if someone had thrown them into a fire. The clutch actually broke, the sprag seized, and i cant even get some of the steels and frictions off of it. Im wondering if there isnt trash in the 3rd check ball you mentioned. I may just go ahead and change that completely.