When you click on links to various merchants on this site and make a purchase, this can result in this site earning a commission. Affiliate programs and affiliations include, but are not limited to, the eBay Partner Network.
I'm in the process of rebuilding my trans, I've pretty much finished the case and clutches and now it's time for the valve body. I bought the kit from Dana but some valves and parts aren't labeled whatsoever. So I'd appreciate it if someone told me their names and where should I install them.
I do realize that the parts on the right are for the forward and reverse abuse, but looking at Sonnax's website I can only use this kit in either the reverse or forward (as I need another similar kit to do both), so which should I use it for, the reverse or the forward? The problem with the tranny was 3-4 as usual.
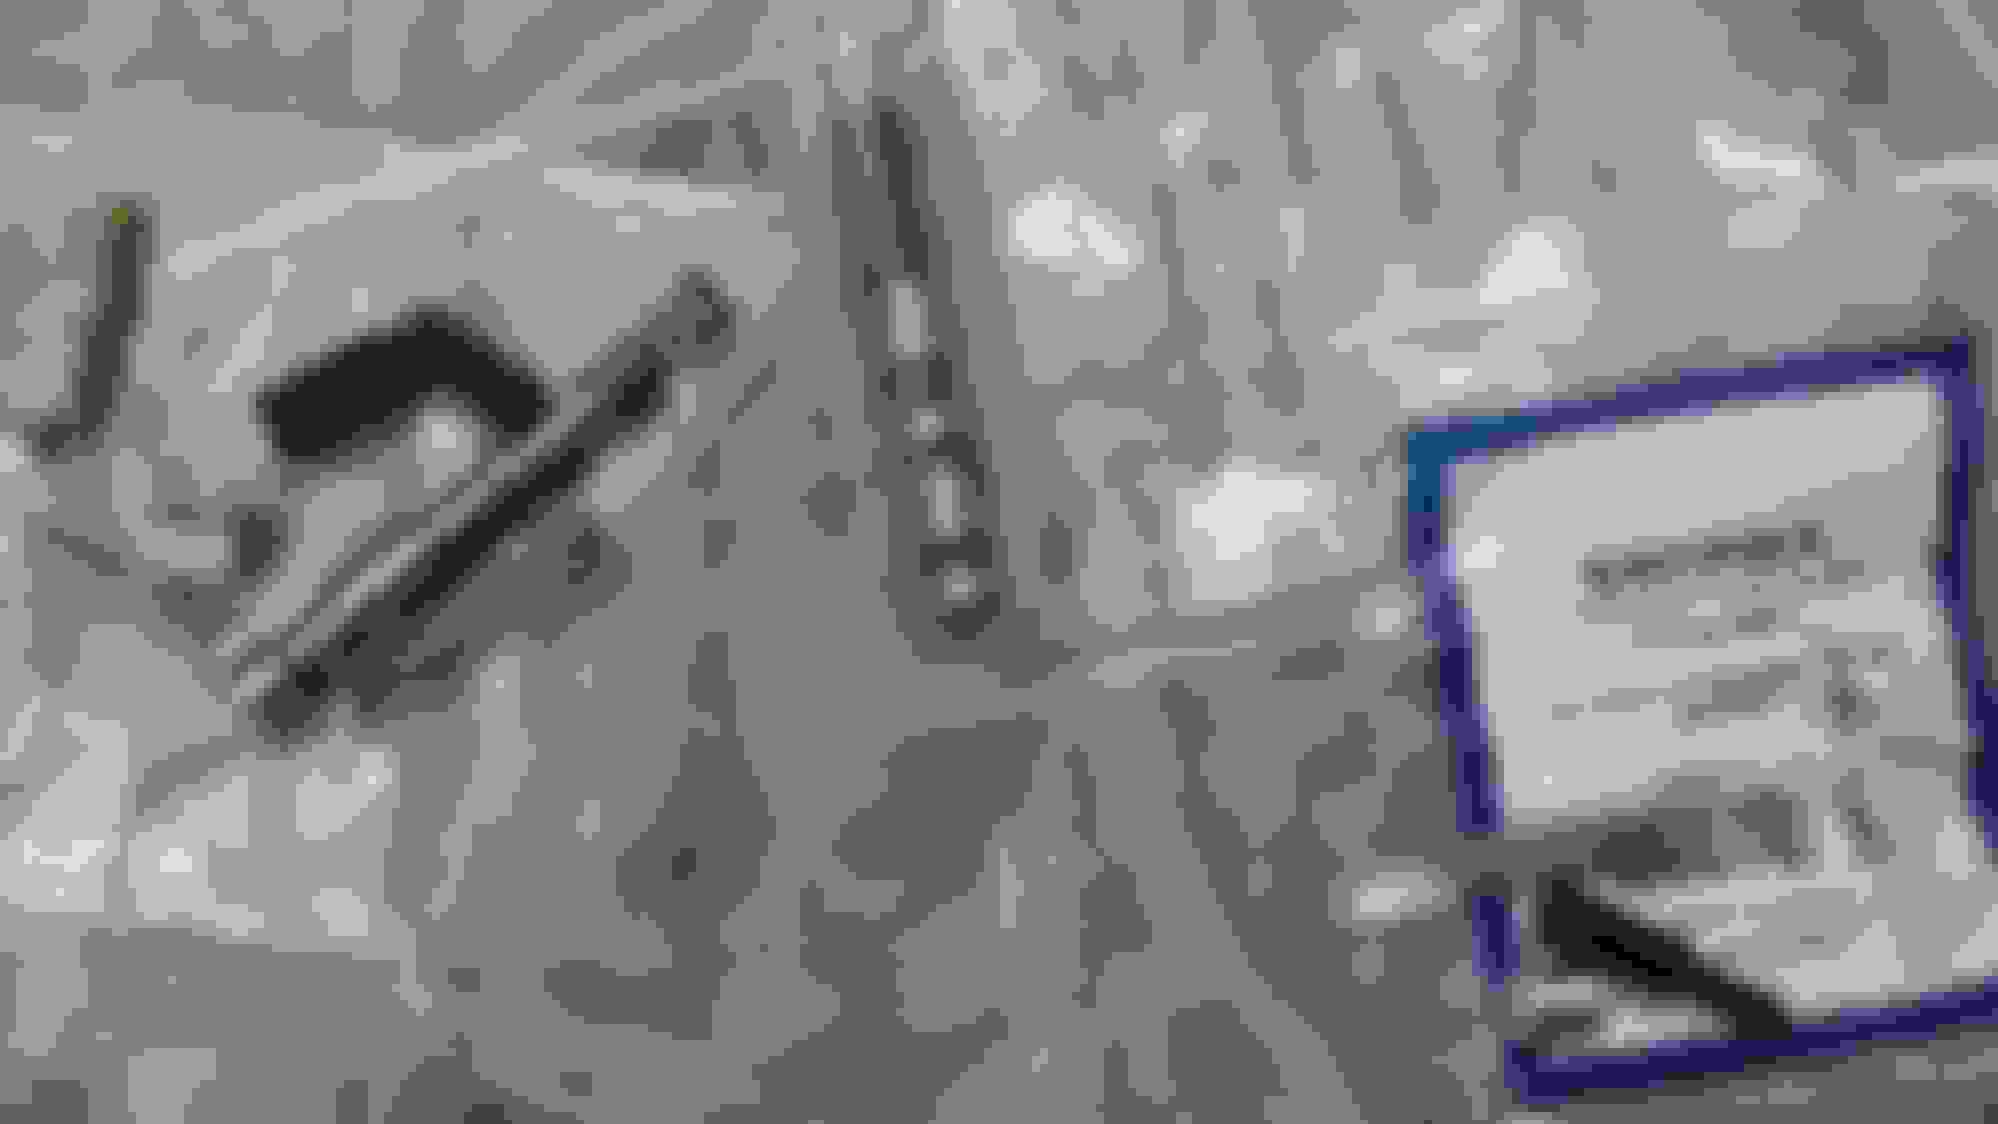
These are the valves and the parts that are with it
Also, I'd like to confirm what each spring is for, as they aren't labeled either.
Three springs a washer
Edit: now I know that the washer, blue, and orange springs go into the 1-2 accumulator housing, but what of the yellow spring?
This is my first time ever meddling in a transmission, so excuse my ignorance.
Last edited by Nemesis_Dawn; Jun 25, 2017 at 12:49 PM.
Go to Transgo's Website and bring up the instructions for the HD-2 Kit, it will have detailed instructons with pictures that will show the location for everything except the Sonnax Stuff.
---The (8x) Torlon Check ***** should be self explanatory, Transgo's HD-2 Kit instructions will list all their locations.
---The 3/4" Tall Solid Aluminum Pin in the top picture on the left appears to be the 2-4 Band Anchor for the case.
---The Valve in the top picture on the left is the Transgo 1-2 Shift valve. Their should also be a small gold/silver metal ball that fits inside the hole in the valve, then the small spring (Transgo Lists it as Green) goes inside after that. *Transgo's instructions shows the location and order of how it goes in*.
---The middle valve is the ISO-CONV Valve as Transgo Calls it (AKA Converter Clutch Regulator), and is located in the valve body. *Transgo's instructions shows the location*.
---The Gold Spring in the top picture is to be used inside the Separator Plate Screen/Filter to keep it from collapsing and restricting the flow. They also recommend to drill (2x) 1/16" holes or (4x) .040-.047 holes on the top of the screen. *Transgo's instructions shows the location and were to drill*.
---The Sonnax Forward and Reverse Abuse Valves can be used in either location and are identical. You will need 2 of those kits to do both the forward and reverse abuse valve locations.
---The middle valve is the ISO-CONV Valve as Transgo Calls it (AKA Converter Clutch Regulator), and is located in the valve body. *Transgo's instructions shows the location*.
---The Blue and Orange spring, as well as the spring seat (Washer in picture) are to be used inside the 2nd accumulator and the piston must be facing a certain direction. The Yellow Spring is for the 4th accumulator piston and the piston must facing a certain direction. *Transgo's instructions shows the location and placement of the springs and pistons direction*.
Hopefully I have helped you out with this, the first time messing with the valve body can be confusion as all heck. You can also Google "4L60E Valve Body Diagram" and under images their should be a valve body with everything laid out around it in the corresponding locations if you run into any trouble identifying any stock parts and/or locations.
Last edited by 07NBSChevy; Jun 24, 2017 at 07:34 PM.
The Sonnax Forward and Reverse Abuse Valves can be used in either location and are identical. You will need 2 of those kits to do both the forward and reverse abuse valve locations.
The middle valve is the ISO-CONV Valve (Combined Isolator and Converter Valves into one valve), as Transgo Calls it, and is located in the valve body. *Go to Transgo's webiste for the HD-2 kit and bring up the instructions to show location.
The Blue and Orange spring, as well as the spring seat (Washer in picture) are to be used inside the 2nd accumulator. The Yellow Spring is for the 4th accumulator piston.
You can bring up Transgo's instructions on their website for the HD-2 Kit to show you the correct locations for everything.
Thanks. That cleared up quite a bit. But what about the valve and the other stuff that are on the left? What are their names and where should I use them? (Other than the check *****, of course, that's obvious).
---The Valve in the top picture on the left is the Transgo 1-2 Shift valve. Their should also be a small gold/silver metal ball that fits inside the hole in the valve, then the small spring (Transgo Lists it as Green) goes inside after that. *Transgo's instructions shows the location and order of how it goes in*.
---The 3/4" Tall Solid Aluminum Pin in the top picture on the left appears to be the 2-4 Band Anchor for the case.
Install the Abuse Valve & Bore Plug in the Reverse location, The Bore Plug can leak 3-4 Clutch Oil, The Abuse Valve can help with the reverse input clutch life. I'm not speaking for Dana....Just my 2 cents.
The 3-2 Down Shift Valve needs to be blocked "Inboard", Seals up yet again another 3-4 Clutch leak, I'm guessing one of those tight wound springs does that. The Bore Plug clip will barely fit when the valve is correctly blocked, Been a long time since I installed a HD2.
Another thing I would use, if possible and able to get, is the O-Ringed End Plugs Sonnax Makes for all possible locations to prevent any leaks. I do try to use those when I rebuild any 4L60E's if I have them on hand.
---The Valve in the top picture on the left is the Transgo 1-2 Shift valve. Their should also be a small gold/silver metal ball that fits inside the hole in the valve, then the small spring (Transgo Lists it as Green) goes inside after that. *Transgo's instructions shows the location and order of how it goes in*.
---The 3/4" Tall Solid Aluminum Pin in the top picture on the left appears to be the 2-4 Band Anchor for the case.
Thank you so much for your help. I found the instructions I needed and everything has been cleared up. Now if only the tear down goes smoothly, but I guess it won't.
Install the Abuse Valve & Bore Plug in the Reverse location, The Bore Plug can leak 3-4 Clutch Oil, The Abuse Valve can help with the reverse input clutch life. I'm not speaking for Dana....Just my 2 cents.
The 3-2 Down Shift Valve needs to be blocked "Inboard", Seals up yet again another 3-4 Clutch leak, I'm guessing one of those tight wound springs does that. The Bore Plug clip will barely fit when the valve is correctly blocked, Been a long time since I installed a HD2.
Yes, it's the black spring. Dana mentioned it in his instructions.
I followed your advice and chose the reverse abuse valve, only problem is, I can't get the damn original bore plug out of the valve body. It's just stuck in place. And yes, I removed the roll pin. The plug is barely moving and I can't seem to reach and push from behind it anymore
It's probably cocked it the bore, Use a flat head screwdriver in the slot of the plug, You have to get it squared up & it will come out of the bore, EASY! you don't want to scar up the bore!
It's probably cocked it the bore, Use a flat head screwdriver in the slot of the plug, You have to get it squared up & it will come out of the bore, EASY! you don't want to scar up the bore!
Tried doing so, but this is as far it gets. I even tried putting some ATF to help it getting lubricated but no luck. It's even hard to push back in too, but not impossible.
What frustrates me is that I've searched all over the internet with someone that had the same problem as mine but couldn't find anyone. It's either that the bore is uneven, or the plug was severely damaged to begin with. According to Sonnax's website, the plug may cause delayed reverse, 3-4, low/reverse clutches, and band burn up. All of which are symptoms I've had.
6 Common C5 Corvette Failures and What's Involved In Repairing Them
Slideshow: From wobbling harmonic balancers to failed EBCMs, these are the issues that define long-term C5 ownership and what repairs typically involve.
Retro Modern Bandit Pontiac Trans AM Comes With Burt Reynolds' Autograph
Slideshow: A modern Camaro transformed into a retro icon, this limited-run "Bandit" build blends nostalgia with brute force in a way few revivals manage.
Top 10 Greatest Cadillac V Series Performance Models Ever, Ranked
Slideshow: Cadillac didn't just crash the high-performance luxury vehicle party, it showed up loud, supercharged, and occasionally a little unhinged...
Coachbuilt N2A Anteros Is an LS2-Powered C6 Corvette In Italian Clothes
Slideshow: A one-off sports car that looks like a vintage Italian exotic-but hides a C6 Corvette underneath-just sold for the price of a new mid-engine Corvette.