When you click on links to various merchants on this site and make a purchase, this can result in this site earning a commission. Affiliate programs and affiliations include, but are not limited to, the eBay Partner Network.
When the stock 4-Pinion Planets are good for 1,200 HP to the ground... Yes!
I have one Unit that is about to finally go from the Run-Stand to some Track-Testing...
It is powered by a 540 Big-Block Chevrolet with a Twin-Screw Supercharger, making just shy of 1,450 HP.
I am trying to find the power limit of the Planets...
and this Engine makes enough Torque to do some serious damage!
I can't wait!!!
I have added this thread to the Sticky "Stickies are in here". I know - I should probably create a top-level sticky about rebuilding threads; maybe give me some other thread suggestions for rebuilding a 4L60E.
The reverse-input clutch return spring-cage snap-ring can too easily be opened too far (almost over expanded/ bent open too far) and not stay in place well enough.
Also many DIY builders fail to align the opening in the snap-ring with one of four matching positions on the top of the spring-cage...
This causes the spring-cage to push the snap-ring off.
The image below is after a reverse input clutch failure... The snap-ring is almost in the correct position... slightly off.
The opening in the snap-ring can not be over a retention-tang:
I personally never tach-weld the snap-ring to the drum... but I would recommend it to a DIY builder that is not experienced enough to secure the snap-ring otherwise.
With stock return springs (no Trans-brake or stiffer springs), I make sure to use a new or near perfect snap-ring.
With stiffer springs, I use a heavy-duty replacement snap-ring... similar to this:
So, after spending hours trying to remove a similar ring on a low-reverse piston nearly at the back of the case using lock ring pliers only to find out the lock ring pliers had to be ground down to fit in the groove, then to find the maximum jaw opening after all that wouldn't expand the ring enough to remove it, I laid a royal ***-whooping on that ring with multiple screwdrivers, picks and prying devices in just 5 minutes to make it look like it had more zig & zag than a wave plate to learn this:
At under $10, ACDELCO24248064 is your friend!
You get all these:
Package Includes Torque Converter Clutch Valve Ring, Overrun Clutch Hub Ring, Low and Reverse Clutch Spring Ring, Output Shaft Ring, Overrun Clutch Spring Retaining Ring, Boost Valve Ring, and Reverse Input Clutch Spring Retaining Ring...
(https://www.rockauto.com/en/moreinfo.php?pk=1262791)
But please clarify the placement of the gap! Should the entire gap be between two of those "bumps", or should one "bump" be between the ring's ends/gap? THANKS FOR YOUR CLARIFICATION!
The rest of the parts showed up yesterday so I got everything out, organized, and started to assemble sub assemblies. Im only waiting on one part for the valve body which should be here today. Once I get that and installed, ill finish my vacuum testing and post the results.
Got all the frictions soaking
Got the rest of the pump stator half together. When I finish vacuum testing the valve body ill post the results of the pump stator half also
Lets start with the other half of the pump. I did run a straight edge over the surface with the rotor in and also slide to make sure all was flat and it was
Dumped some fluid over the assembly and all rotates free.
Low/Roller HD sprag and Sonnax inner race
If anyone is curious about the Sonnax Smartshell here is a close up of the different inner race compared to the factory.
Forward sprag. Again, I checked for chatter marks, grooving, ect on the inner and outer races and all were smooth. I lightly buffed the surfaces with scotchbrite and assembled with a little ATF
2nd accumulator housing with modified piston and new hardened pin. Hit is also with a little scotchbrite. TransGo blue spring, then piston, then orange spring. This allows for smooth part throttle shifts and firm and quick WOT shifts
Servos are next. I can say, there are seals and o-rings all over this setup! Pretty impressive
Originally Posted by 2BFAST
@vorteciroc Yes I know I have the Sonnax tube. I havnt had the chance to get pictures of the carrier and bearing but im 99% positive I have the 07 & later carrier and the no lip bearing thats 2.540 OD, 1.680 ID, and .140" thick which this bearing came with the reaction tube.
With that said, the 2007 and later carrier I can either run the no lip bearing or the bearing with the lip. According to the instructions the no lip is .140" thick with a .030" shim which would total .170" thick. I CANT get my snap ring on the output shaft with this stack up. If I take the .030" shim out, I CAN get the snap ring on the output shaft. I called Sonnax to confirm this is ok and they did confirm its ok?
If I would run the bearing with the lip im going to have a thicker stack up as the bearing with the lip will be thicker than the bearing with no lip and shim. So im going backwards here and I def wouldnt be able to get the snap ring on the output shaft.
With the 2007 and later carrier I can run either bearing and shim, or bearing with lip.
I thought the '07 & later used the smaller diameter bearing, but it has the lip... no? The earlier bearing doesn't fit the '07 & later reaction shaft... or did Sonnax machine it's recess larger?
He is saying that if you are not running the Sonnax billet input shaft, that you will break the stock input shaft before you will the 4 pinion carrier. Lack of lubrication or failed thrust bearings is what kills plant pinions, not hp.
you still won't break the pinion by overpowering it.
A 5 pinion will still be a downgrade
Thanks. So is everybody replacing their 5's like in 65's & 70's with 4's? I read an old thread somewhere, I think an Impala SS forum, from 2012 maybe, that the GM ones weren't the problematic ones, the aftermarket ones were trouble. I own both GM 4 & 5's and the front GM 5 looks like it's in much better condition than the 4 I have. Are there any mods that can make a 5-pinion last?
Depends on customer preference for me
if I get a 65 or 70 through the shop with 5 pinions, they might get reused, they might get replaced with a set of 4 pinions
I let the customer choose after I express my feelings about both.
the 5 pinions will last, they just need lube. Lube lube lube.
The window area on them is closed off, so its best to lube them from the inside out rather than try to use splash/spray lube for them from the outside in.
Right.
I'm saying it should be fine
I just don't see the benefit?
I see it being a possible downside should someone read this thread, see the mod, and do it without properly matching orifice sizing to their parts combo
Wait--what did I just do after searching for Monster's tips? I better check twice, drill once!
Depends on customer preference for me
if I get a 65 or 70 through the shop with 5 pinions, they might get reused, they might get replaced with a set of 4 pinions
I let the customer choose after I express my feelings about both.
the 5 pinions will last, they just need lube. Lube lube lube. The window area on them is closed off, so its best to lube them from the inside out rather than try to use splash/spray lube for them from the outside in.
Wow, perfect timing! I thought I asked you about this. I may have to run 1 of each. How do you lube them from the inside out?
I was not happy with the diagrams that I posted earlier in this thread.
So here is an updated diagram of the same circuits... the sections in PURPLE are essentially the paths that are blocked-off when both the 3-2 downshift and 3-2 control valves are blocked in.
Vortec, does the Sonnax HD 2-3 valve change anything in this diagram? Likewise if the capsule is removed and Superior K0136 installed...Thanks.
So, I just got this car up and going and some miles on it. Long story, which I wont get into. But I have about 100-200 miles on it.
Really liking this setup. Firm, quick up and down. As usual, part throttle 2nd apply is a little soft at first but getting firmer the more time is on it which takes a little time for the band to seat in the drum. I have done a 2-3 rip and 3rd shift is awesome. Very quick, firm, and crisp. Iv also done a 1-2 rip from a dig and just like 2-3 its quick and firm but not harsh at all. Really smooth.
One thing I did change on this car that I had different on the other is the shifter gate on the factory horseshoe shifter. I had a "brand A" gate on the other car which 2-3 and 3-2 shift was odd as you had to lift up and push/pull. When doing a 2nd gear pull, having to pull up, push forward, and make sure you get over the gate to get to 3rd detent was uncomfortable all while making a run and trying to keep it between the white lines. Not only that, but running from a dig, add 1-2, then 2-3 in. I would rather have to concentrate on keep it in control.
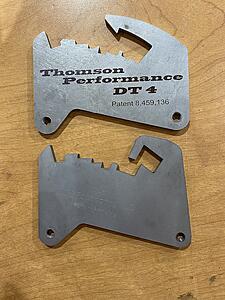
That said, a local gentleman and I were talking one night at a car meet and he asked me what shifter gate I had in it. I told him "brand A" gate. He mentioned he has his own patent on various GM shifter gates he redesigned and invited me to check them out. He had the solution to the issue I had above
As you can see, the top is the "brand A" gate, and below is "brand B". For "brand A", you push forward for 1-2, then pull up and push for 2-3. This I didnt like. For "brand B, you push forward and the cross bar hits the stop and drops down, then for 2-3 you simply push forward against the stop again. All you do is keep pushing forward. Then, if you want to go 3-2 you just pull back instead of having to pull up and back. Just MUCH more superior of a design.
I dont want to drop names of each on here as either brands arent sponsors so if your want more info please drop me a PM
The more miles I get on this unit, the better it gets. I love it. 1-2 part throttle is coming around the more the band seats in the drum. And this 4L79 drum is no joke. WOT 2-3 shift is awesome. Firm, quick, and just gets it.
As noted before for the power im currently making, this unit is def way over built. But I do that with all my builds and not just regarding transmissions. If I can do it, im going to do it. I couldnt be more happier.
BIG thanks and shout out to MaroonMonsterLS1, Vorteciroc, Dana, and everyone else that chimed in on my build. I know a lot tend to try and take advantage of the time you have put into these units, but its respected on this end. Thank you
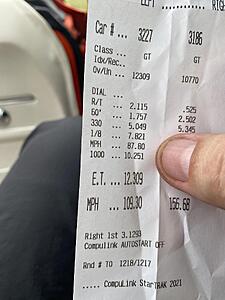
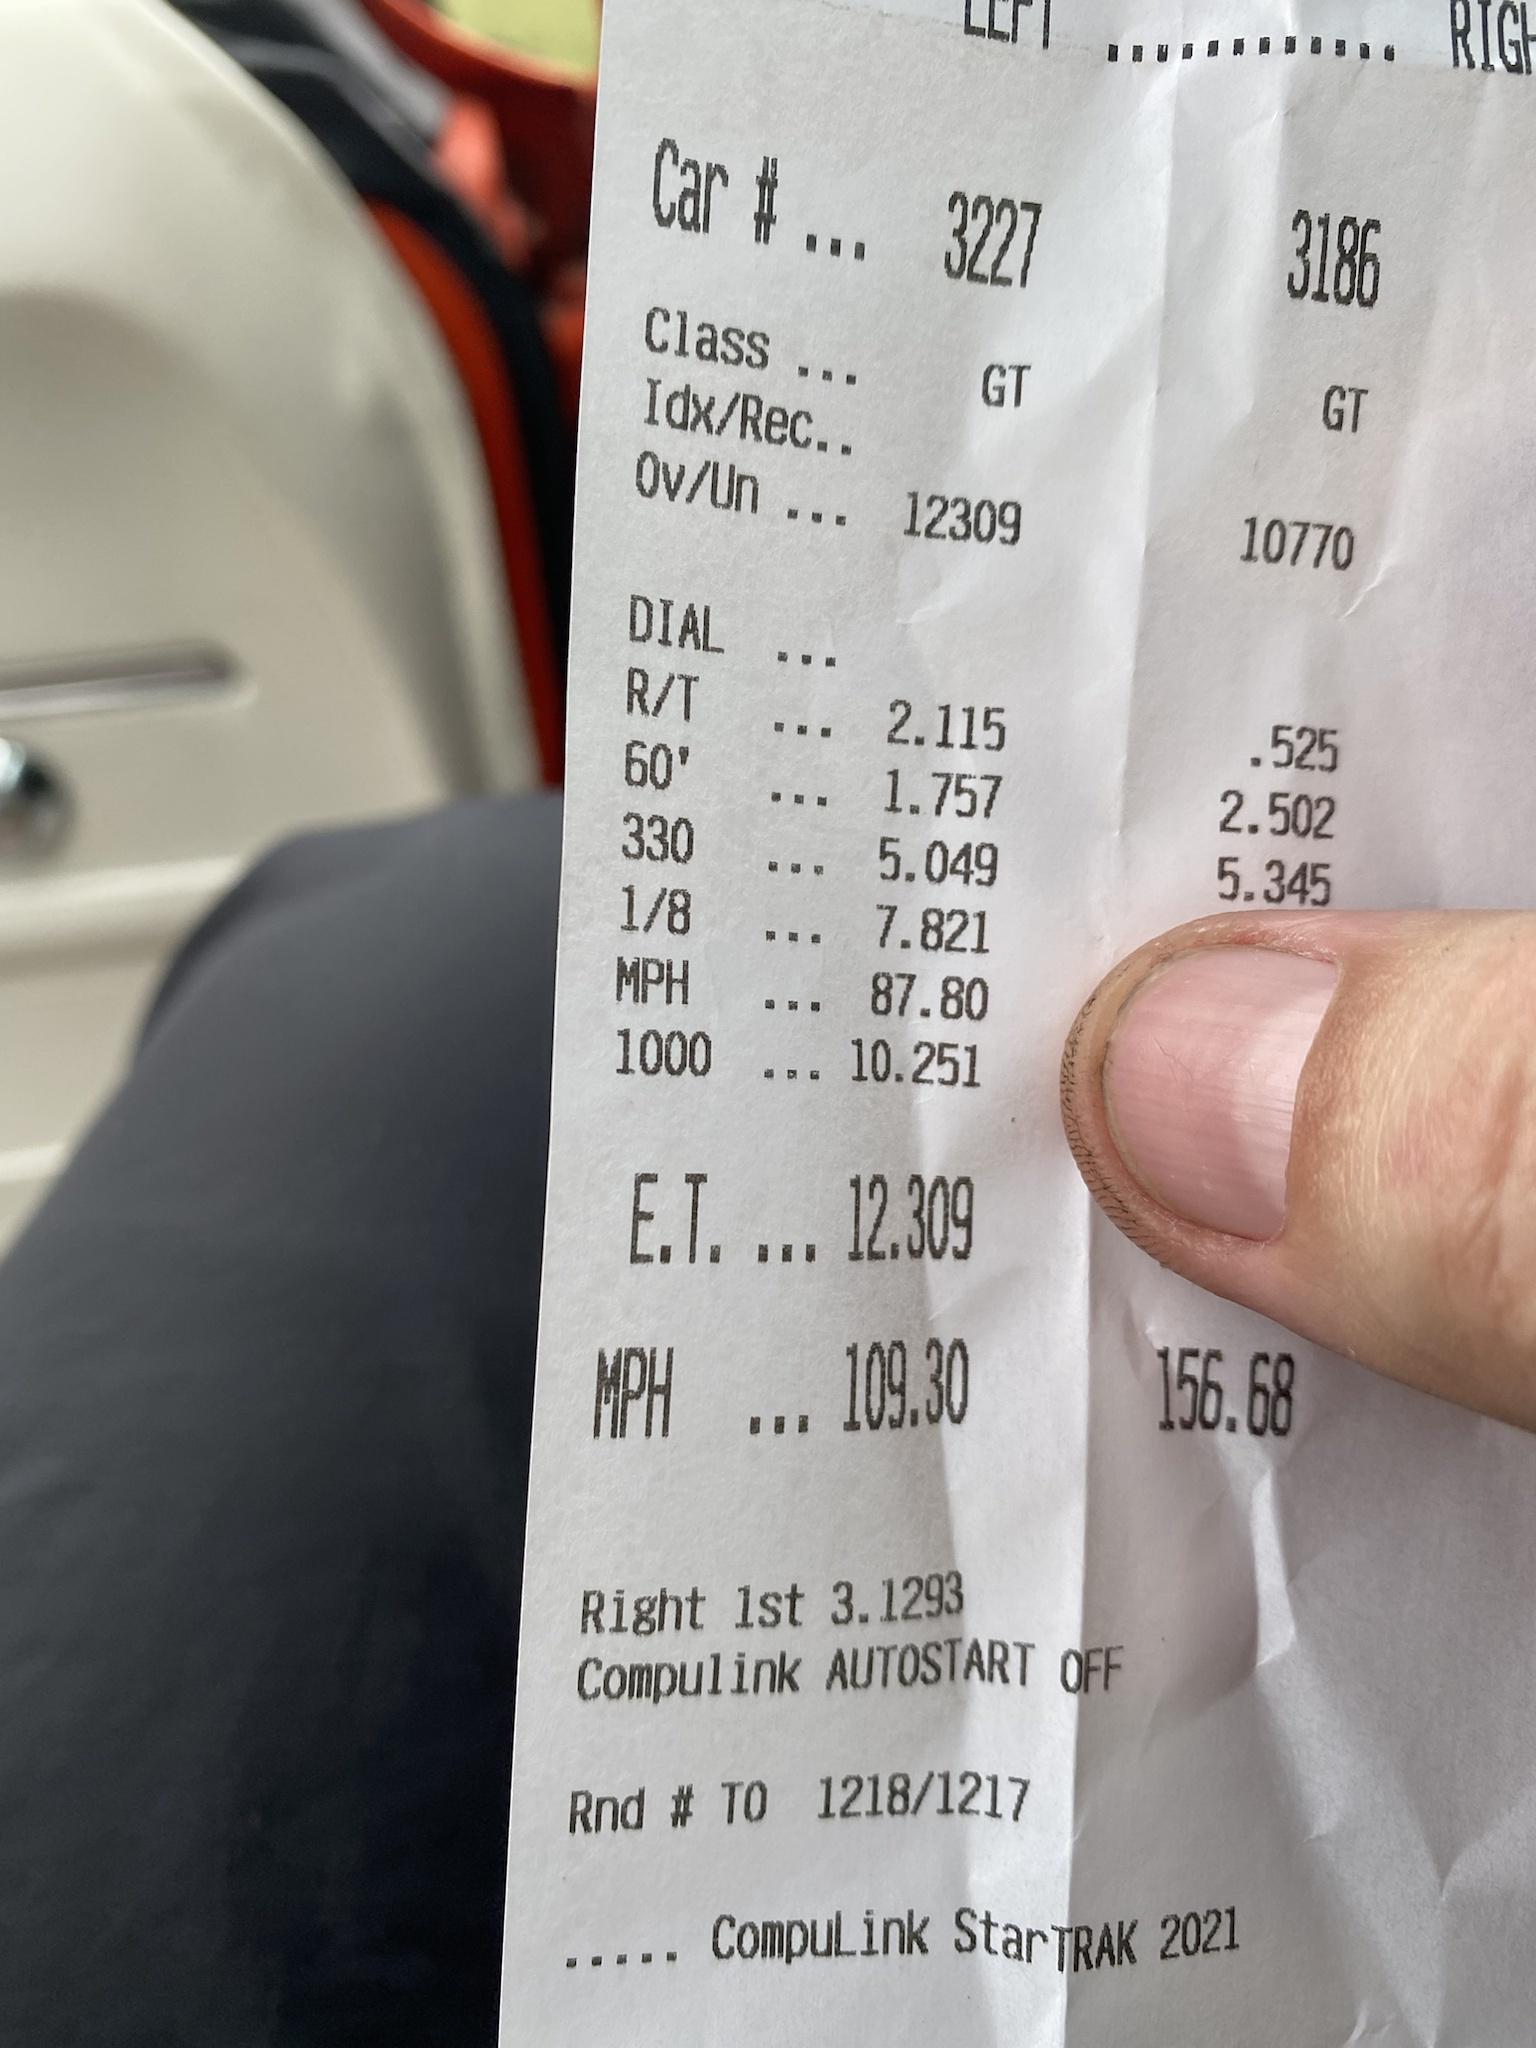
Took the car to LS Fest East in Kentucky last month. Got several runs in and picked off a pretty respectable time slip for basically a cam only truck engine.......
Now the real test is coming.......
LSA blower, pulleys, forged pistons, H beam rods, dry nitrous, Holley Terminator, beadlocks w/ slicks, ect.
As I left off last year I mentioned the real test is coming with a new build. Have several more miles on this and still clicking along even with the new build highlighted as follows:
4.00" Bore 6.0 Iron Block
Factory LQ4 Crank
Texas Speed H Beam Rods w/ ARP L19 Rod Bolts
JE Forged Pistons
Precision Race CNC Ported LS3 Heads
Brian Tooley Stage II PDS Camshaft
Kong Race X CNC Ported LSA Blower
Synergy Motorsports Billet LS9 Style Lid
C&R Racing LS9 Style Cooling Bricks
102MM Throttle Body
Bosch 210# Injectors
Dual Aeromotive 450LPH Fuel Pumps
-8 Feed & Return
10 Rib 2.55 Upper Pulley
10 Rib 8.69 Lower Pulley
100 Shot Dry Nitrous
Holley Terminator X Max
Circle D Billet Converter
Setup made 717 to the wheels on MS109 fuel only making 15lbs of boost no nitrous. We are still working on drive ability here and there and tuning the suspension but the test hits I have made on the street this unit hasnt missed a beat. I am hoping to be adding a trans brake sometime this year and work to tune the suspension for that also. Will update more as the year progresses.....
I've carved out dedicated time for this...your hope will come true
I'll be doing most of the beta testing on my own camaro but you'll have one of the first in the real world...hopefully late july/early august
I've carved out dedicated time for this...your hope will come true
I'll be doing most of the beta testing on my own camaro but you'll have one of the first in the real world...hopefully late july/early august

 06-11-2021, 08:35 PM