What did you do to your V today?


The following users liked this post:
Byron (05-26-2021)


 05-27-2021, 07:33 PM
#3124
When I first bought the car the lights were covered with oxidation.
I was in a rush to drive it, so a couple of years ago I removed the oxidation but never gave the lights a proper refinishing they were left hazy.
Well yesterday I made sure that was no longer the case.


The finished product, as good as new.

I was in a rush to drive it, so a couple of years ago I removed the oxidation but never gave the lights a proper refinishing they were left hazy.
Well yesterday I made sure that was no longer the case.
The finished product, as good as new.
The following users liked this post:
azn2dmax (05-28-2021)
05-27-2021, 08:15 PM
#3125
When I first bought the car the lights were covered with oxidation.
I was in a rush to drive it, so a couple of years ago I removed the oxidation but never gave the lights a proper refinishing they were left hazy.
Well yesterday I made sure that was no longer the case.
The finished product, as good as new.
I was in a rush to drive it, so a couple of years ago I removed the oxidation but never gave the lights a proper refinishing they were left hazy.
Well yesterday I made sure that was no longer the case.
The finished product, as good as new.
-Byron
05-27-2021, 08:37 PM
#3126
Yes PPF is a very good option. But after sanding compounding and polishing, I coated the headlights with Meguiar's Headlight Coating spray from the G2970 kit. I happened to have a kit in my garage and I have always wanted to try that spray.
The car is garaged most of the time and rarely gets parked in the sun. I think in my case this spray coating should be good for 2 years especially that it's not driven year round.
If it doesn't meet my expectations I will definitely consider PPF next.
The car is garaged most of the time and rarely gets parked in the sun. I think in my case this spray coating should be good for 2 years especially that it's not driven year round.
If it doesn't meet my expectations I will definitely consider PPF next.
05-28-2021, 12:02 AM
#3127
TECH Enthusiast
I used the Sylvania Restoration Kit on a different set of lights recently. It comes with 3 levels of sand paper, a UV remover, wipes, and a new self leveling UV coating in a small bottle for the final step. They turned out amazing and comes with a lifetime warranty. For $20, it's the best kit on the market and there is enough UV stuff for at least ~4 headlights depending on size. 2 headlights plus fogs for sure. I wouldn't use anything else. If you wanted to protect afterwards I'd use a ceramic coating like the turtle wax hybrid solutions.
05-28-2021, 10:02 AM
#3128
Good to know you're happy with the Sylvania kit.
What I did was use my own 3m sandpaper I had lying around.
I wet sanded with 320, 500, 600, 800, 1500, 3000. Excessive I know but the clarity was so worth it.
I then compounded with Meguiar's Ultimate Compound and polished with Meguiar's Ultimate Polish.
The final step was the UV coating spray from Meguiar's kit, again what I had lying around, gave it that beautiful glossy finish that you see.
I have used kits before to restore family member's cars (3M drill kit was the best) but after using my own material and seeing the results I don't think I will buy kits again.
05-28-2021, 10:05 PM
#3129
Good to know you're happy with the Sylvania kit.
What I did was use my own 3m sandpaper I had lying around.
I wet sanded with 320, 500, 600, 800, 1500, 3000. Excessive I know but the clarity was so worth it.
I then compounded with Meguiar's Ultimate Compound and polished with Meguiar's Ultimate Polish.
The final step was the UV coating spray from Meguiar's kit, again what I had lying around, gave it that beautiful glossy finish that you see.
I have used kits before to restore family member's cars (3M drill kit was the best) but after using my own material and seeing the results I don't think I will buy kits again.
What I did was use my own 3m sandpaper I had lying around.
I wet sanded with 320, 500, 600, 800, 1500, 3000. Excessive I know but the clarity was so worth it.
I then compounded with Meguiar's Ultimate Compound and polished with Meguiar's Ultimate Polish.
The final step was the UV coating spray from Meguiar's kit, again what I had lying around, gave it that beautiful glossy finish that you see.
I have used kits before to restore family member's cars (3M drill kit was the best) but after using my own material and seeing the results I don't think I will buy kits again.
https://www.amazon.com/Micro-Mesh-NC-78-1-Acrylic-Restoral-Kit/dp/B00EKLU5QY
-Byron
05-31-2021, 06:42 PM
#3130
Good to know you're happy with the Sylvania kit.
What I did was use my own 3m sandpaper I had lying around.
I wet sanded with 320, 500, 600, 800, 1500, 3000. Excessive I know but the clarity was so worth it.
I then compounded with Meguiar's Ultimate Compound and polished with Meguiar's Ultimate Polish.
The final step was the UV coating spray from Meguiar's kit, again what I had lying around, gave it that beautiful glossy finish that you see.
I have used kits before to restore family member's cars (3M drill kit was the best) but after using my own material and seeing the results I don't think I will buy kits again.
What I did was use my own 3m sandpaper I had lying around.
I wet sanded with 320, 500, 600, 800, 1500, 3000. Excessive I know but the clarity was so worth it.
I then compounded with Meguiar's Ultimate Compound and polished with Meguiar's Ultimate Polish.
The final step was the UV coating spray from Meguiar's kit, again what I had lying around, gave it that beautiful glossy finish that you see.
I have used kits before to restore family member's cars (3M drill kit was the best) but after using my own material and seeing the results I don't think I will buy kits again.
06-01-2021, 09:22 AM
#3131
Couple of weeks ago got a service airbag message on the DIC.
Hooked up my Tech2 discovered B0058 "" is active and B0059 "" passed but failed in history.

Something is wrong with the passenger pretensioner or its connections, so I investigated. Raised the seat and pushed it back as far as possible. Checked all the connections I could access while the seat was in place, only one of the two was easily accessible. cleaned connectors and reset the codes but they instantly came back. Also it was a good opportunity to vacuum under the passenger seat.
I was able to score a used replacement from a non-crashed low mileage vehicle I said lets try it if it doesn't work I can return it.
I removed the two Torx bolts in the back, one of them is under a beauty cover, then I tilted the seat back enough to be able to remove the old unit.
Space was a bit tight, a socket won't be able to fit on the pretensioner nut due to tightness, but a 21mm wrench does easily.

I tested the replacement before installation, I just hooked it up, I then reset the codes, they never came back, so I went ahead and put it in, put back Red Loctite on the pretensioner bolt and buttoned things up.


Thanks, yes I wet sanded for the most part, dry sanding is doable, but consistency becomes difficult and the lower grit marks you are trying to get rid with higher grit become more difficult to remove in addition to residue clogging. The downside of wet sanding, is that you should dry completely before moving on to the next stage so you can check that you really removed all the marks left by the prior sanding stage. But not a big inconvenience for the results you get. The only stage I did a bit dry sanding was 3000, just a few passed dry then I wet sanded for a few mins just to refine that last stage before compounding.
For example, I started by 320 wet sanding horizontally. Once all I could see was horizontal 320 scratches, I wet sanded again vertically with 320. Once they all became vertical 320 scartches I moved on to 500 wet sanding horizontally. Rinse and repeat till you get to the highest grit you have on hand, in my case that was 3000, and I probably would have done 5000 if I had it but really with headlights it's those lower grit scratches that bother you.
No one is trying to shove his eye an 1/8th" away to observe very light swirling that didn't get taken care of in wet sanding stage.
If I'm crouching by the bumper, my eyes are 6" away after the 3000 grit wet sand, and the headlight looks nearly scratch-less, then it's time to compound, polish clean and seal after that.
These lights came out as perfect as you can see from a few inches away, it was all done by hand, except for 320 which I only had one mesh disc which could velcro to my drill pad.
The polishing and compounding was done by drill. And I did not have the best compounding and polishing pads far from it, just used what I had in my garage.
Now after coating, you would have to really glue your eyes on with a dim LED in hand to observe a slight swirl in the corners. The more time and money you invest in the job the more pro it will look. If I had a tiny DA sander, and discs in all those grits I used to fit it, and proper compound and polishing pads, then even if you glue your eyes it would look mint.
But is it really worth it to go that far for something you do once in a blue moon? I didn't think so.
Hooked up my Tech2 discovered B0058 "" is active and B0059 "" passed but failed in history.
Something is wrong with the passenger pretensioner or its connections, so I investigated. Raised the seat and pushed it back as far as possible. Checked all the connections I could access while the seat was in place, only one of the two was easily accessible. cleaned connectors and reset the codes but they instantly came back. Also it was a good opportunity to vacuum under the passenger seat.
I was able to score a used replacement from a non-crashed low mileage vehicle I said lets try it if it doesn't work I can return it.
I removed the two Torx bolts in the back, one of them is under a beauty cover, then I tilted the seat back enough to be able to remove the old unit.
Space was a bit tight, a socket won't be able to fit on the pretensioner nut due to tightness, but a 21mm wrench does easily.
I tested the replacement before installation, I just hooked it up, I then reset the codes, they never came back, so I went ahead and put it in, put back Red Loctite on the pretensioner bolt and buttoned things up.
Thanks, yes I wet sanded for the most part, dry sanding is doable, but consistency becomes difficult and the lower grit marks you are trying to get rid with higher grit become more difficult to remove in addition to residue clogging. The downside of wet sanding, is that you should dry completely before moving on to the next stage so you can check that you really removed all the marks left by the prior sanding stage. But not a big inconvenience for the results you get. The only stage I did a bit dry sanding was 3000, just a few passed dry then I wet sanded for a few mins just to refine that last stage before compounding.
For example, I started by 320 wet sanding horizontally. Once all I could see was horizontal 320 scratches, I wet sanded again vertically with 320. Once they all became vertical 320 scartches I moved on to 500 wet sanding horizontally. Rinse and repeat till you get to the highest grit you have on hand, in my case that was 3000, and I probably would have done 5000 if I had it but really with headlights it's those lower grit scratches that bother you.
No one is trying to shove his eye an 1/8th" away to observe very light swirling that didn't get taken care of in wet sanding stage.
If I'm crouching by the bumper, my eyes are 6" away after the 3000 grit wet sand, and the headlight looks nearly scratch-less, then it's time to compound, polish clean and seal after that.
These lights came out as perfect as you can see from a few inches away, it was all done by hand, except for 320 which I only had one mesh disc which could velcro to my drill pad.
The polishing and compounding was done by drill. And I did not have the best compounding and polishing pads far from it, just used what I had in my garage.
Now after coating, you would have to really glue your eyes on with a dim LED in hand to observe a slight swirl in the corners. The more time and money you invest in the job the more pro it will look. If I had a tiny DA sander, and discs in all those grits I used to fit it, and proper compound and polishing pads, then even if you glue your eyes it would look mint.
But is it really worth it to go that far for something you do once in a blue moon? I didn't think so.
Last edited by CTSM; 06-01-2021 at 09:53 AM.
06-03-2021, 06:24 PM
#3132
Thanks, yes I wet sanded for the most part, dry sanding is doable, but consistency becomes difficult and the lower grit marks you are trying to get rid with higher grit become more difficult to remove in addition to residue clogging. The downside of wet sanding, is that you should dry completely before moving on to the next stage so you can check that you really removed all the marks left by the prior sanding stage. But not a big inconvenience for the results you get. The only stage I did a bit dry sanding was 3000, just a few passed dry then I wet sanded for a few mins just to refine that last stage before compounding.
For example, I started by 320 wet sanding horizontally. Once all I could see was horizontal 320 scratches, I wet sanded again vertically with 320. Once they all became vertical 320 scartches I moved on to 500 wet sanding horizontally. Rinse and repeat till you get to the highest grit you have on hand, in my case that was 3000, and I probably would have done 5000 if I had it but really with headlights it's those lower grit scratches that bother you.
No one is trying to shove his eye an 1/8th" away to observe very light swirling that didn't get taken care of in wet sanding stage.
If I'm crouching by the bumper, my eyes are 6" away after the 3000 grit wet sand, and the headlight looks nearly scratch-less, then it's time to compound, polish clean and seal after that.
These lights came out as perfect as you can see from a few inches away, it was all done by hand, except for 320 which I only had one mesh disc which could velcro to my drill pad.
The polishing and compounding was done by drill. And I did not have the best compounding and polishing pads far from it, just used what I had in my garage.
Now after coating, you would have to really glue your eyes on with a dim LED in hand to observe a slight swirl in the corners. The more time and money you invest in the job the more pro it will look. If I had a tiny DA sander, and discs in all those grits I used to fit it, and proper compound and polishing pads, then even if you glue your eyes it would look mint.
But is it really worth it to go that far for something you do once in a blue moon? I didn't think so.
06-07-2021, 12:38 PM
#3133
Like many CTS's and V's these buckles have been hit hard by UV over the years and are now an awful pale pink color.
Went ahead took the front seatbelt's buckles apart, cleaned, sanded, sprayed and clear coated the red plastic part.
I did not have to take the buckles out of the seats, in the first pic that's of my old passenger buckle which is out because I had replaced it a few weeks back for being defective.
Taking these buckles apart is not exactly the most straightforward thing.
If anyone wants me to make a how to on the whole process and materials used I can do that.
Last edited by CTSM; 06-07-2021 at 01:50 PM.
06-07-2021, 01:27 PM
#3134
TECH Addict
iTrader: (19)
Join Date: Aug 2007
Location: Where the Navy tells me to go
Posts: 2,403
Received 106 Likes
on
88 Posts

I've noticed mine are getting faded. Not as bad as the ones in my beater '96 Impreza (the buttons were sun-bleached to the point they were literally white), but definitely not the red they should be. I used Rustoleum "satin poppy red" on the Impreza's seat belts; what color did you use?
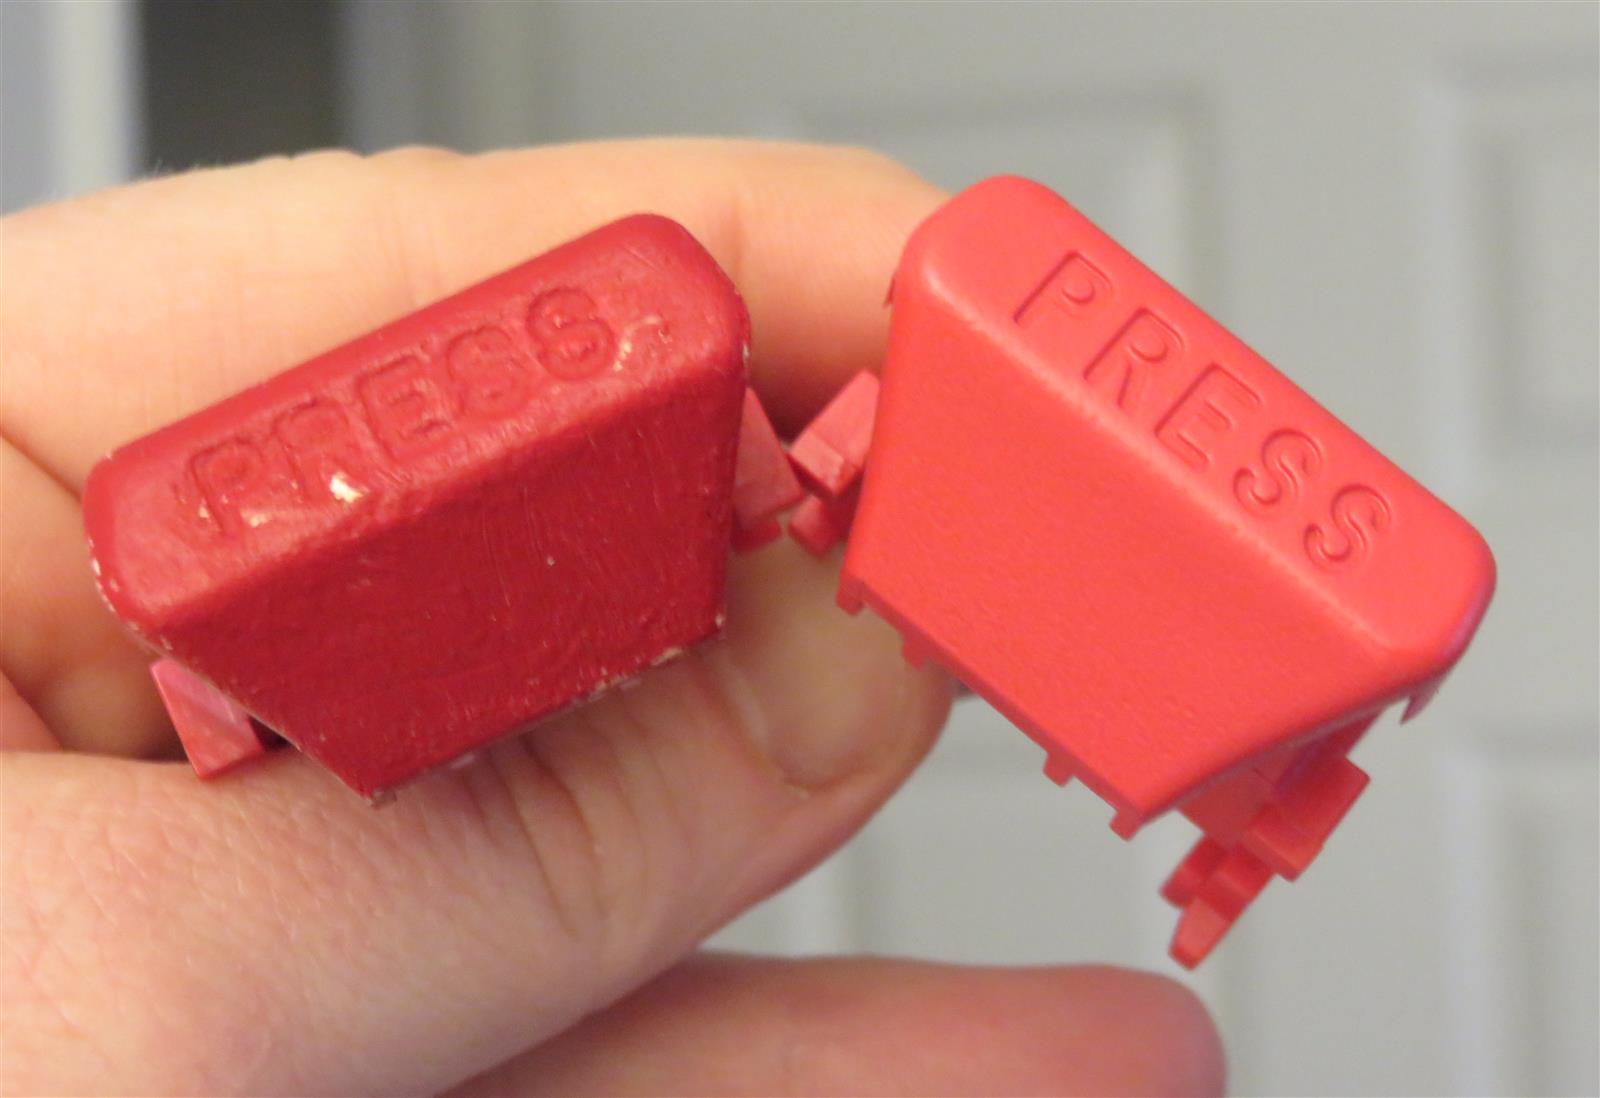
Initial, half-assed effort with a red paint pen on the left , much nicer-looking spray painted with satin poppy red on the right
I wasn't sure how well the Rustoleum would last, but I'm really happy with it - I painted the latches just over 3 years ago and the buttons still look great.
Initial, half-assed effort with a red paint pen on the left
I wasn't sure how well the Rustoleum would last, but I'm really happy with it - I painted the latches just over 3 years ago and the buttons still look great.
06-07-2021, 01:57 PM
#3135
I was at Home Depot, I spotted a BEHR spray paint that looked very close to the OEM red of the buckle, and I said if I take it home and it looks %99 right I'll use it.
Also it was a good opportunity to try BEHR spray as I have only used their paint for my deck, have pretty much only use Rustoleum sprays before.


After a couple of coats with the BEHR spray, I went ahead and gave it a couple of coats of clear coat I had lying around.
That would be DUPLICOLOR Perfect Match Clear Coat (which I used when I was repainting my bumper a couple of years ago).

Then I gave it a light polish by hand and that was that, just like new OEM ones.
Also it was a good opportunity to try BEHR spray as I have only used their paint for my deck, have pretty much only use Rustoleum sprays before.
After a couple of coats with the BEHR spray, I went ahead and gave it a couple of coats of clear coat I had lying around.
That would be DUPLICOLOR Perfect Match Clear Coat (which I used when I was repainting my bumper a couple of years ago).
Then I gave it a light polish by hand and that was that, just like new OEM ones.
06-09-2021, 12:40 PM
#3136
I have been known to break tools that usually don't break.
But when I was putting my car in reverse to leave a parking spot, to say the least I was surprised when my hand came back with a **** in it

OK to make lemonade out of lemons, overnight I had my nice neighbor who is a good welder, weld me a 3/8"-16 coupling nut on the shifter in return for a box of chocolate chip cookies not a bad trade if you ask me hehe.
Now I can use any length 3/8"-16 rod I want rather than be limited to the thread length of the shifter so that's sweet.

While I was messing around in the shifter area, here's the older shifter boot. It's not even a year old, nothing wrong with it at all.

But I did happen to have a nicer shifter boot on the shelf, which I decided to install.
So pulled an all nighter working with leather and what not till I got this, not too shabby I say.
As a bonus, I decided to coat the bezel to my taste in a satin finish, I like it.

But since I was pulling an all-nighter anyways, I decided to do something else I have always wanted to.
How about we have some fun with this last picture?
I want to see if there are any true CTS-V connoisseurs amongst us who will detect what no goodery I have been up to.
So let's make a riddle out of it: Something is apparent about it, the other isn't. But one thing for certain, it's surely pleasant.
Within 24 hours, if anyone catches my trickery fully, then let's say I will donate $10 to your favorite animal rescue.

But when I was putting my car in reverse to leave a parking spot, to say the least I was surprised when my hand came back with a **** in it
OK to make lemonade out of lemons, overnight I had my nice neighbor who is a good welder, weld me a 3/8"-16 coupling nut on the shifter in return for a box of chocolate chip cookies not a bad trade if you ask me hehe.
Now I can use any length 3/8"-16 rod I want rather than be limited to the thread length of the shifter so that's sweet.
While I was messing around in the shifter area, here's the older shifter boot. It's not even a year old, nothing wrong with it at all.
But I did happen to have a nicer shifter boot on the shelf, which I decided to install.
So pulled an all nighter working with leather and what not till I got this, not too shabby I say.
As a bonus, I decided to coat the bezel to my taste in a satin finish, I like it.
But since I was pulling an all-nighter anyways, I decided to do something else I have always wanted to.
How about we have some fun with this last picture?
I want to see if there are any true CTS-V connoisseurs amongst us who will detect what no goodery I have been up to.
So let's make a riddle out of it: Something is apparent about it, the other isn't. But one thing for certain, it's surely pleasant.
Within 24 hours, if anyone catches my trickery fully, then let's say I will donate $10 to your favorite animal rescue.
The following users liked this post:
Byron (06-09-2021)
The following users liked this post:
CTSM (06-10-2021)
06-09-2021, 07:45 PM
#3138
I have been known to break tools that usually don't break.
But when I was putting my car in reverse to leave a parking spot, to say the least I was surprised when my hand came back with a **** in it
OK to make lemonade out of lemons, overnight I had my nice neighbor who is a good welder, weld me a 3/8"-16 coupling nut on the shifter in return for a box of chocolate chip cookies not a bad trade if you ask me hehe.
Now I can use any length 3/8"-16 rod I want rather than be limited to the thread length of the shifter so that's sweet.
While I was messing around in the shifter area, here's the older shifter boot. It's not even a year old, nothing wrong with it at all.
But I did happen to have a nicer shifter boot on the shelf, which I decided to install.
So pulled an all nighter working with leather and what not till I got this, not too shabby I say.
As a bonus, I decided to coat the bezel to my taste in a satin finish, I like it.
But since I was pulling an all-nighter anyways, I decided to do something else I have always wanted to.
How about we have some fun with this last picture?
I want to see if there are any true CTS-V connoisseurs amongst us who will detect what no goodery I have been up to.
So let's make a riddle out of it: Something is apparent about it, the other isn't. But one thing for certain, it's surely pleasant.
Within 24 hours, if anyone catches my trickery fully, then let's say I will donate $10 to your favorite animal rescue.
The stitching on the boot looks great btw.
-Byron
The following users liked this post:
CTSM (06-10-2021)
06-10-2021, 12:36 PM
#3139

spent the weekend doing the LS7 clutch package swap. what a nightmare. my car is all original so i was the first one to separate the trans and nothing wanted to play nice. broke 3 out of the 4 exhaust studs so the car has to go into the shop to get those fixed. now that it's all back together i took it for a very exhaust leaky drive but i have to say what a difference. the clutch feels every so slightly heavier than the original which i like. i need to drive it more to get the clutch broke in but it seems to spin up faster and the engine just feels lighter if that makes sense. now i just have to sit here and look at it in the driveway until i can get it to the shop on monday.
The following users liked this post:
CTSM (06-10-2021)
06-10-2021, 03:07 PM
#3140
You were close, but it's not a cover.
You got the apparent part, but didn't catch on to what lies beneath...dun dun dun
I can see how you would think it's alcantara from that distance, but actually it's real leather.
Those are my custom Lloyd mats, but that's not new, I posted about them like a month ago in this thread, good try.
Thank you sir, I though so too enough to have my fingers go numb at night from how often I used scissors 
Well that was fun, maybe I made it difficult, maybe not, but I was hoping the apparent clue which was the texture changing, would help others close in on the size change.
Let's go to the reveal of what I worked on for so many hours to get right:
Go to the video link below to find out.


So yes, what I was doing the rest of the night was reupholstering a base CTS armrest with a real leather cover I custom ordered with matching white stitching.
And when I say base I mean base. My 07 V6 CTS has a leather arm rest, this one from a donor car had a vinyl armrest cover which I didn't even know GM made at some point.
but the armrest was complete with hardware and was in good condition so I got it.
Original vinyl cover on armrest, very ugly but very sturdy material.

Out with the old:

In with the new:


Granted that leather is fancier than anything in the car, but it's comfortable and the cushioning I added (firm semiconductor packaging lol) gives it a sturdy feel.
You got the apparent part, but didn't catch on to what lies beneath...dun dun dun
I can see how you would think it's alcantara from that distance, but actually it's real leather.
Also looks like you went with some new floor mats.
The stitching on the boot looks great btw.
-Byron
-Byron
Well that was fun, maybe I made it difficult, maybe not, but I was hoping the apparent clue which was the texture changing, would help others close in on the size change.
Let's go to the reveal of what I worked on for so many hours to get right:
Go to the video link below to find out.
So yes, what I was doing the rest of the night was reupholstering a base CTS armrest with a real leather cover I custom ordered with matching white stitching.
And when I say base I mean base. My 07 V6 CTS has a leather arm rest, this one from a donor car had a vinyl armrest cover which I didn't even know GM made at some point.
but the armrest was complete with hardware and was in good condition so I got it.
Original vinyl cover on armrest, very ugly but very sturdy material.
Out with the old:
In with the new:
Granted that leather is fancier than anything in the car, but it's comfortable and the cushioning I added (firm semiconductor packaging lol) gives it a sturdy feel.
Last edited by CTSM; 06-10-2021 at 04:35 PM.
The following users liked this post:
Byron (06-11-2021)