

kst8engineer - '71 Chevelle LS1/T56 build thread
 02-19-2011, 08:19 PM
#181
Registered User
Join Date: Feb 2011
Location: San Diego, Ca
Posts: 2
Likes: 0
Received 0 Likes
on
0 Posts
I just got done reading you're thread and I have to say you are my hero. Right now I am trying to figure out everything I need for my Chevelle before I even think about tearing her down. I am in the military(which means lack of time and garage) and trying to do a budget build also so that is why you're build is one of my favorites since you are taking all you can out of a Trans Am just like I am planning to doing with a Camaro.
You've been really helpful with all you're information and I was just curious if you could make a list of all the stuff you actually took out of the Trans Am and how much you've spend so far on the car to get her running.
Also, who did you drive shaft and how much was that?
-Bryan
You've been really helpful with all you're information and I was just curious if you could make a list of all the stuff you actually took out of the Trans Am and how much you've spend so far on the car to get her running.
Also, who did you drive shaft and how much was that?
-Bryan
 02-20-2011, 10:01 PM
#182
On The Tree
Thread Starter
iTrader: (6)

Join Date: Mar 2006
Location: Kansas
Posts: 192
Likes: 0
Received 0 Likes
on
0 Posts

Items used from the '99 T/A donor car:
LS1 engine
Engine/trans wiring harness
T56 transmission
Underhood fuse/relay box along with the relays
Front seats
Center console
Shifter
Possibly e-brake handle (haven't used it yet)
Gas/brake/clutch pedals
Power brake booster
Master cylinder
Front and rear disk brakes and rubber brake lines
Cruise control module
PCM
Fuel pump
Fuel filter
Aluminum fuel lines
Flexible/plastic fuel lines
Throttle cable
Rear view mirror
I salvaged/reused a lot of wiring and a number of electrical connectors from the other harnesses on the donor car as well.
Radiator
Electric fans
Radiator hoses
If I think of anything I left off, I'll come back and edit this post.
As for the driveshaft, I had a local driveshaft shop shorten it. I don't remember exactly, but it seems like it was ~$60 or so.
Last edited by kst8engineer; 02-20-2011 at 10:15 PM.
02-26-2011, 05:52 PM
#183
Registered User
Join Date: Feb 2011
Location: San Diego, Ca
Posts: 2
Likes: 0
Received 0 Likes
on
0 Posts
Thanks for the reply, seems like the donor was is the best way to go since it gives the most bang for the buck. Now I just need to start searching around for a wrecked Z28/WS6.
I just can't wait to make my chevelle more of a daily driver and gas efficient.
How mpg are you getting? And what type of rear end you running?
I was thinking about getting a 12 bolt and putting a detroit locker rear end in.
Or maybe just buy a 12 bolt posi.
I just can't wait to make my chevelle more of a daily driver and gas efficient.
How mpg are you getting? And what type of rear end you running?
I was thinking about getting a 12 bolt and putting a detroit locker rear end in.
Or maybe just buy a 12 bolt posi.
02-28-2011, 08:18 PM
#184
On The Tree
Thread Starter
iTrader: (6)
Join Date: Mar 2006
Location: Kansas
Posts: 192
Likes: 0
Received 0 Likes
on
0 Posts
If you're on a budget, I'd say without a doubt the donor vehicle is the best way to go. I'm anxious to see what I'm getting for fuel mileage, but I really don't know yet since I don't have a functional odometer. I believe other guys who have done this swap are in the 23 mpg ballpark.
The rear axle is a 12-bolt posi with 3.31 gears. I'm hoping to at least match the 23 mpg other guys have gotten with my current gears, but I may decide to switch to some 4.11's in the future to make better use of the 6-speed.
The rear axle is a 12-bolt posi with 3.31 gears. I'm hoping to at least match the 23 mpg other guys have gotten with my current gears, but I may decide to switch to some 4.11's in the future to make better use of the 6-speed.
Thanks for the reply, seems like the donor was is the best way to go since it gives the most bang for the buck. Now I just need to start searching around for a wrecked Z28/WS6.
I just can't wait to make my chevelle more of a daily driver and gas efficient.
How mpg are you getting? And what type of rear end you running?
I was thinking about getting a 12 bolt and putting a detroit locker rear end in.
Or maybe just buy a 12 bolt posi.
I just can't wait to make my chevelle more of a daily driver and gas efficient.
How mpg are you getting? And what type of rear end you running?
I was thinking about getting a 12 bolt and putting a detroit locker rear end in.
Or maybe just buy a 12 bolt posi.
 04-07-2011, 09:59 PM
#186
On The Tree
Thread Starter
iTrader: (6)
Join Date: Mar 2006
Location: Kansas
Posts: 192
Likes: 0
Received 0 Likes
on
0 Posts
I haven't worked out the parking brake setup yet, but it's on the agenda. I just bought some seats today, so I'm anxious to get them in. It'll take them a few days to get here, so hopefully I'll be seeing them one day next week.
It's been nice to have a few opportunities lately to get the Chevelle out and enjoy it. I've got the Chevelle running EFILive now, and I've been playing with idle tuning. I've got a smooth idle tune and a lope tune developed. In the near future I'll try to put together a video of the smooth and lope tunes and some updated photos. I've got the new tires and wheels installed and the exhaust finished as well.
I also installed a rear anti-roll bar and some UMI tubular lower control arms on the rear suspension. Between the two, it made a huge improvement in handling. I'm planning to replace the uppers as well in the near future.
04-07-2011, 10:57 PM
#187
Well maybe I can help I just did the LS1 brakes on my 66 GTO and hers is how I did it, I installed the LH backing plate and caliper to the RH side of my car and vice versa the RH backing plate and caliper to the LH side of the car so the caliper is towards the rear of the car if you are looking at it from the side of the car, that way the little hook arms that activate the emergency brake shoes inside the rotor will need to be pulled towards the front of the car like the original set up. I then cut the inner cable out of the original GTO ebrake cables and then I cut the inner cable out of the 1998-2002 ebrake cable because it has the correct eyelet at the end of the cable that will be attached to the hook on the backing plate and then I fed the cable through the original GTO ebrake cable housing and cut it to the same length as the original GTO ebrake cable length, both the GTO and 1998-2002 cables are 1/8 in size, and then I got some aluminum barrel stops from Lowes hardware store and crimped them on to to the end of the cable, I had to fabricate some mounts to hold the other end of the cable, I used some 1" angle iron to make them and mounted it to (2) of the backing plate bolts, I got the cable mounting bracket idea from another member on here under the name of c6matt in his thread page #9 you can see the brackets design that he came up with, I made them in about a hour with just a drill and angle grinder, the whole set up works very well.
Last edited by lizeec; 06-20-2011 at 10:43 PM.
05-16-2011, 12:03 AM
#188
On The Tree
Thread Starter
iTrader: (6)
Join Date: Mar 2006
Location: Kansas
Posts: 192
Likes: 0
Received 0 Likes
on
0 Posts
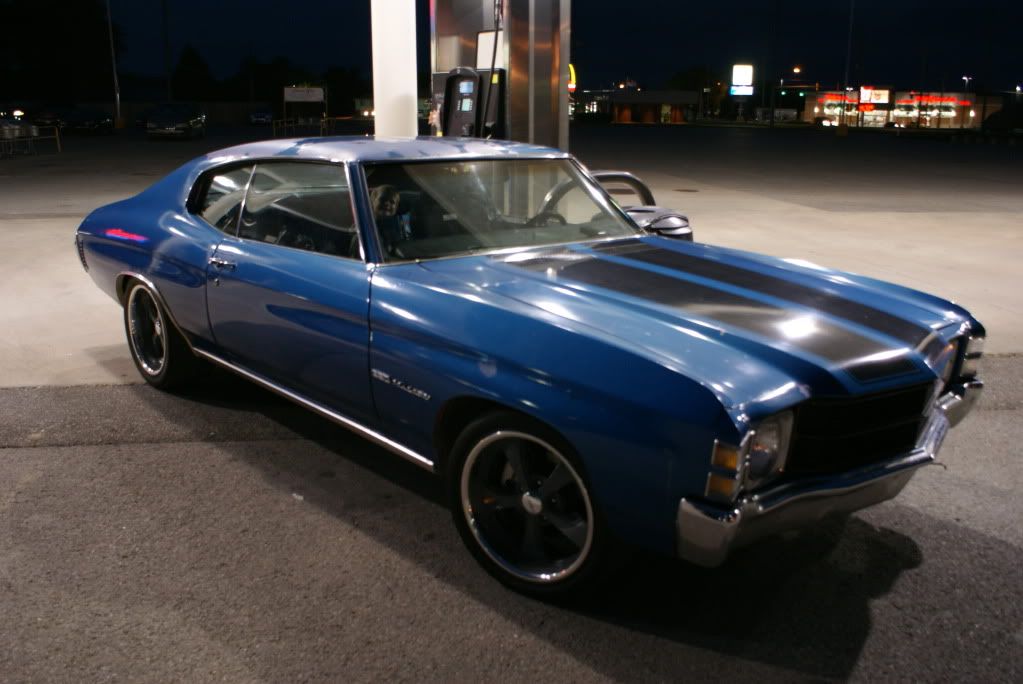
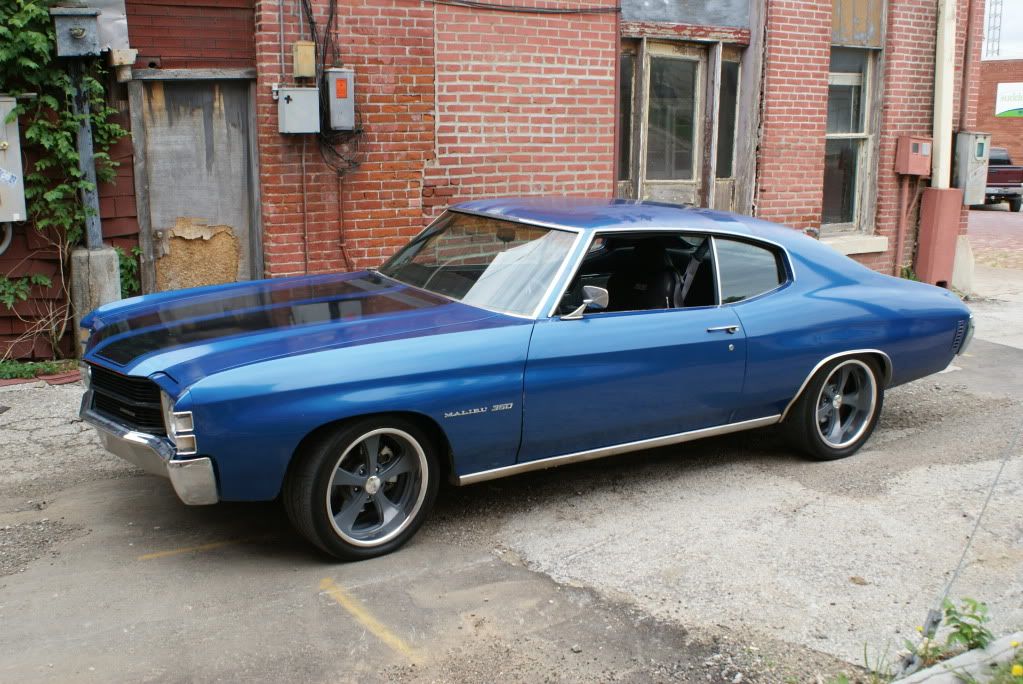
Time for an update. Over the past few months, I've gotten the new wheels and tires mounted, and I've been working on finalizing the exhaust system and beginning to piece together the new interior. First off, here are a few pics showing the new wheels and tires (pardon the rust and peeling clearcoat).
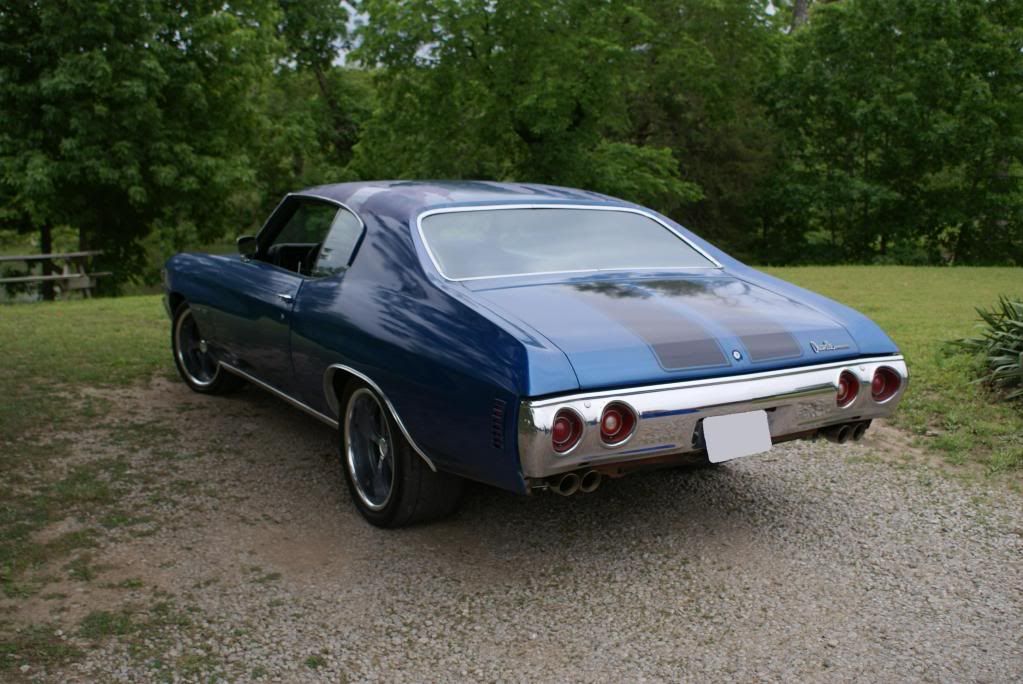
The exhaust was a big project in itself. For those that remember my exhaust layout experiment videos I did a while back, I ended up liking the sound of the exhaust best with the mufflers placed at the very back... Suffice it to say that trying to package a pair of 18" Hushpowers behind the rear axle in a Chevelle is easier said than done. To further complicate matters, I picked up a pair of stainless steel exhaust outlets from a C6 Corvette off of eBay a while back that I thought would look slick recessed into the valance panel of the Chevelle. The final result was that I ended up cutting as much length as I could off of the front and back ends of the Hushpowers and cutting the C6 tips as short as possible, then welding it all together. Luckily I have a wife that's (nearly) as crazy as me, and she actually approved of me taking the chop saw to new exhaust components to make it happen. I think the exhaust ended up working out nicely, and I really like the sound of it. My first attempt at notching the valance panel for clearance didn't work out, so I need to round up another one to start with and make a second attempt. In the meantime, here's a picture without the rear valance. I'll try to get an exhaust soundclip before long to share.
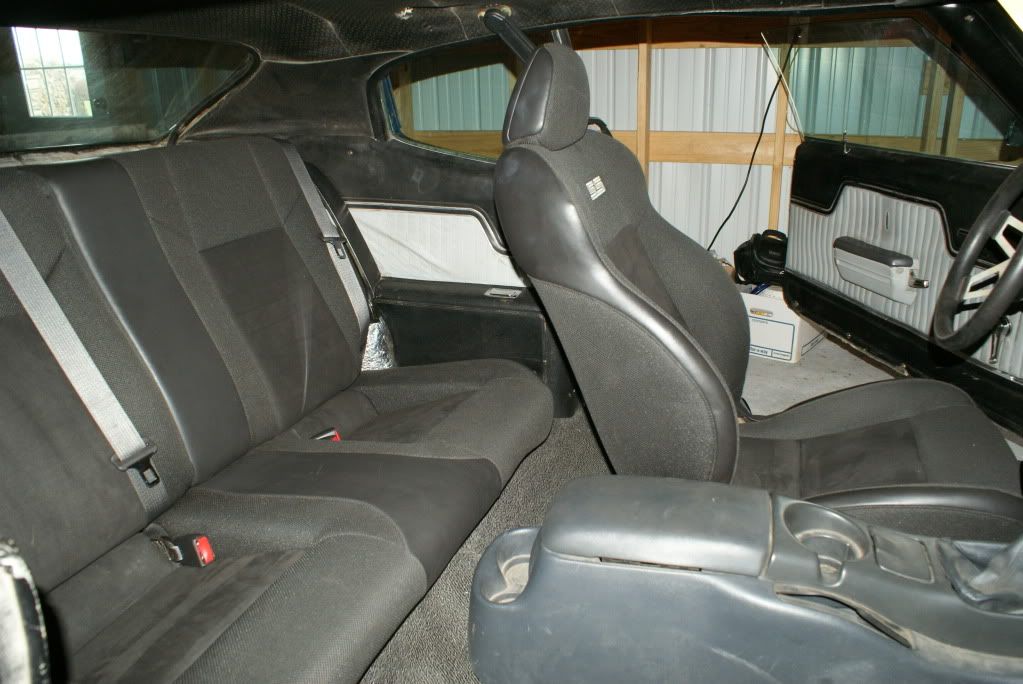
Most recently, I've been working on mounting the new seats and seat belts. I bought a set of seats and rear 3-pt retractable seat belts from a 2009 Cobalt SS, and I also picked up a set of aftermarket 3-pt retractable front belts. I'm really happy with the look and comfort of the Cobalt seats. They're a bit taller than the Trans Am buckets that were in the car previously, but I think they're still comparable to the factory bench in terms of seating height (or possibly a little lower, I'd have to take some measurements to know for sure). They're cloth seats with vinyl accents and a synthetic suede inset (it's called Ultralux I believe). The front seats have good adjustability, and they're not power-operated, which to me was a plus.
The back seat was a relatively easy swap. The front seats however were a completely different story. I had to cut 3 of the 4 mounting feet off of the rails of each front seat and fabricate new feet. I was able to reuse the front and rear outer mounting points for the front seats, and the inner two mounting points on each side were new. I haven't gotten the passenger's seat installed yet, but here are a few pictures of the way it is currently.
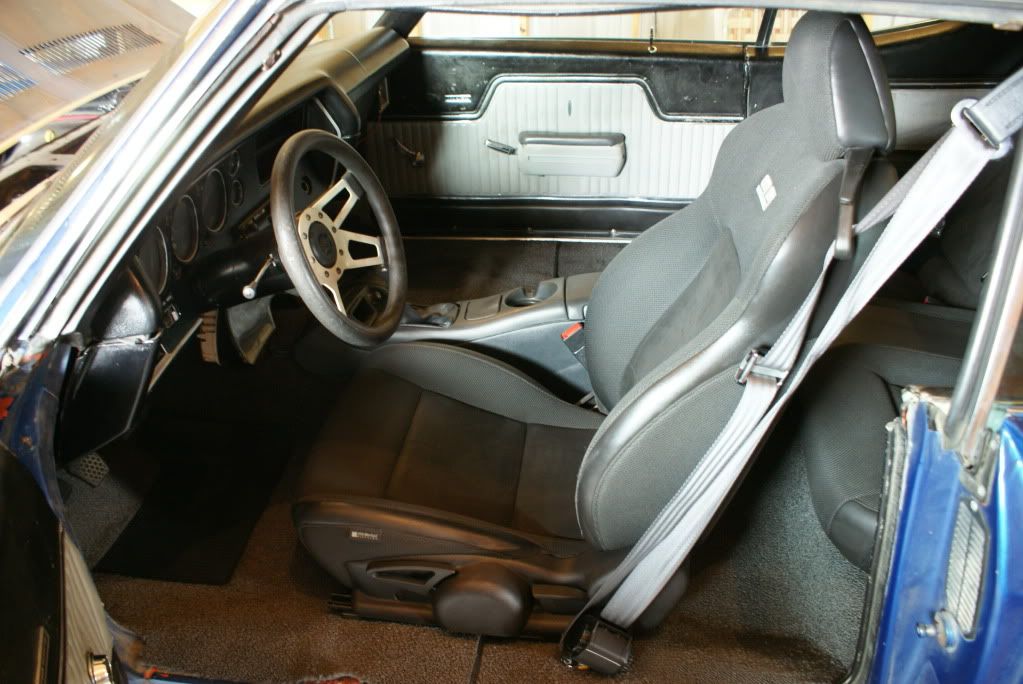
I'll need to fabricate some wider armrests or filler panels to make up for the fact that the Cobalt back seat was a few inches narrower than the stock Chevelle seat. New door panels and headliner are on the agenda soon. The console will be changing as well. Right now, the '99 T/A console is still sitting there, but it's really a little too wide to sit well in between the front seat belt mounting locations. I'll have to do some research as to what other options I have for the center console.
To celebrate the seat and seat belt installation, my boys and I took a road trip on Saturday (~200 miles), which is the longest drive the Chevelle has been on since the LS1/T56 swap. Since I don't have a working odometer, up until now, I hadn't been able to get a good indication of fuel mileage. I kept track of where we went this weekend and calculated the mileage, and I was very happy with the result. Conservatively estimating the miles we drove, it came out between 24-25 mpg. For a car that's this fun to drive, I sure can't argue with that.
The exhaust was a big project in itself. For those that remember my exhaust layout experiment videos I did a while back, I ended up liking the sound of the exhaust best with the mufflers placed at the very back... Suffice it to say that trying to package a pair of 18" Hushpowers behind the rear axle in a Chevelle is easier said than done. To further complicate matters, I picked up a pair of stainless steel exhaust outlets from a C6 Corvette off of eBay a while back that I thought would look slick recessed into the valance panel of the Chevelle. The final result was that I ended up cutting as much length as I could off of the front and back ends of the Hushpowers and cutting the C6 tips as short as possible, then welding it all together. Luckily I have a wife that's (nearly) as crazy as me, and she actually approved of me taking the chop saw to new exhaust components to make it happen. I think the exhaust ended up working out nicely, and I really like the sound of it. My first attempt at notching the valance panel for clearance didn't work out, so I need to round up another one to start with and make a second attempt. In the meantime, here's a picture without the rear valance. I'll try to get an exhaust soundclip before long to share.
Most recently, I've been working on mounting the new seats and seat belts. I bought a set of seats and rear 3-pt retractable seat belts from a 2009 Cobalt SS, and I also picked up a set of aftermarket 3-pt retractable front belts. I'm really happy with the look and comfort of the Cobalt seats. They're a bit taller than the Trans Am buckets that were in the car previously, but I think they're still comparable to the factory bench in terms of seating height (or possibly a little lower, I'd have to take some measurements to know for sure). They're cloth seats with vinyl accents and a synthetic suede inset (it's called Ultralux I believe). The front seats have good adjustability, and they're not power-operated, which to me was a plus.
The back seat was a relatively easy swap. The front seats however were a completely different story. I had to cut 3 of the 4 mounting feet off of the rails of each front seat and fabricate new feet. I was able to reuse the front and rear outer mounting points for the front seats, and the inner two mounting points on each side were new. I haven't gotten the passenger's seat installed yet, but here are a few pictures of the way it is currently.
I'll need to fabricate some wider armrests or filler panels to make up for the fact that the Cobalt back seat was a few inches narrower than the stock Chevelle seat. New door panels and headliner are on the agenda soon. The console will be changing as well. Right now, the '99 T/A console is still sitting there, but it's really a little too wide to sit well in between the front seat belt mounting locations. I'll have to do some research as to what other options I have for the center console.
To celebrate the seat and seat belt installation, my boys and I took a road trip on Saturday (~200 miles), which is the longest drive the Chevelle has been on since the LS1/T56 swap. Since I don't have a working odometer, up until now, I hadn't been able to get a good indication of fuel mileage. I kept track of where we went this weekend and calculated the mileage, and I was very happy with the result. Conservatively estimating the miles we drove, it came out between 24-25 mpg.
For a car that's this fun to drive, I sure can't argue with that.
05-16-2011, 01:21 AM
#190
You know I thought bout the cobalt seats for my Chevelle for a minute but dismissed it. Might have to revisit that idea those look really good. Can you get some pics of the gaps at the ends of the backseat.
06-21-2011, 09:36 PM
#192
On The Tree
Thread Starter
iTrader: (6)
Join Date: Mar 2006
Location: Kansas
Posts: 192
Likes: 0
Received 0 Likes
on
0 Posts
71Anticarb - I'll try to snap a picture of the gaps at the ends of the backseat when I get a chance.
Bczee - I still haven't gotten around to hooking up the e-brakes. I figured out I've got an annoying squeaking noise in the e-brake on the right side though, so I'll probably be looking into it fairly soon.
I'm working on the passenger seat and seat belt install this evening.
Bczee - I still haven't gotten around to hooking up the e-brakes. I figured out I've got an annoying squeaking noise in the e-brake on the right side though, so I'll probably be looking into it fairly soon.
I'm working on the passenger seat and seat belt install this evening.
 06-22-2011, 12:13 PM
#195
On The Tree
Thread Starter
iTrader: (6)
Join Date: Mar 2006
Location: Kansas
Posts: 192
Likes: 0
Received 0 Likes
on
0 Posts
You're right -- I've got the '99 T/A console in there right now, but it'll be coming out before long. In the process of mounting the receiver end of the front seat belts, I'm seeing that the T/A console is too wide by a few inches. I need to locate narrower console, so if you have any ideas, feel free to suggest something. As long as it has cupholders and an armrest, I'd consider it.
The F-body console could be trimmed to fit, but the trimming to accomodate the seat belt mounting points would be substantial.
The F-body console could be trimmed to fit, but the trimming to accomodate the seat belt mounting points would be substantial.
06-22-2011, 12:42 PM
#196
Could just mount the seat belts, them place the console over it.. with slots in the side to allow the belt to be fitted through them ?
Cut and reshape with Fiberglass to allow belts to have a channel to fit into ?
What about using a stock 70-72 console ?? what would be the fittement issue with that ?
Cut and reshape with Fiberglass to allow belts to have a channel to fit into ?
What about using a stock 70-72 console ?? what would be the fittement issue with that ?
06-23-2011, 05:28 PM
#198
On The Tree
Thread Starter
iTrader: (6)
Join Date: Mar 2006
Location: Kansas
Posts: 192
Likes: 0
Received 0 Likes
on
0 Posts
Could just mount the seat belts, them place the console over it.. with slots in the side to allow the belt to be fitted through them ?
Cut and reshape with Fiberglass to allow belts to have a channel to fit into ?
What about using a stock 70-72 console ?? what would be the fittement issue with that ?
Cut and reshape with Fiberglass to allow belts to have a channel to fit into ?
What about using a stock 70-72 console ?? what would be the fittement issue with that ?
I like the look of the stock consoles for a ''70-72, but the main drawback would be the fact that they don't have cupholders.
Keep me in mind if you come up with any good ideas!
06-24-2011, 10:42 AM
#199

what about a console from an 80's IROC? I was eyeing one at a swap meet and it looked like it would be a better fit then a newer F-body console.
I think I have a buddy with an IROC that I might be able to borrow the console and see how it fits in my Nova which has the same problem as your Chevelle....I will follow up if I stumble onto something usefull.
I think I have a buddy with an IROC that I might be able to borrow the console and see how it fits in my Nova which has the same problem as your Chevelle....I will follow up if I stumble onto something usefull.
06-24-2011, 09:32 PM
#200
On The Tree
Thread Starter
iTrader: (6)
Join Date: Mar 2006
Location: Kansas
Posts: 192
Likes: 0
Received 0 Likes
on
0 Posts
what about a console from an 80's IROC? I was eyeing one at a swap meet and it looked like it would be a better fit then a newer F-body console.
I think I have a buddy with an IROC that I might be able to borrow the console and see how it fits in my Nova which has the same problem as your Chevelle....I will follow up if I stumble onto something usefull.
I think I have a buddy with an IROC that I might be able to borrow the console and see how it fits in my Nova which has the same problem as your Chevelle....I will follow up if I stumble onto something usefull.
While looking for pics of a 3rd-gen Camaro console, I stumbled across this pic of a 2nd-gen Camaro console which is somewhat interesting. It also doesn't have cupholders, but I wonder if a guy could cut a hole in front of the shifter area and drop-in a pair of cupholders from another source. Another key would be how well it does or does not mate up to the bottom of the Chevelle dash.
