

kst8engineer - '71 Chevelle LS1/T56 build thread
 07-23-2010, 08:17 AM
#161
On The Tree
Thread Starter
iTrader: (6)

Join Date: Mar 2006
Location: Kansas
Posts: 192
Likes: 0
Received 0 Likes
on
0 Posts

you dont know how long i searched last night to find out if f body radiator could fit in an A body!!!! all i found were into first gen f body. i found a radiator and fan for 125 bucks but i dont know if its out of a vette or f body.do u have any pics of yours or how you got it to fit in there?
 07-23-2010, 10:16 PM
#162
On The Tree
Thread Starter
iTrader: (6)
Join Date: Mar 2006
Location: Kansas
Posts: 192
Likes: 0
Received 0 Likes
on
0 Posts
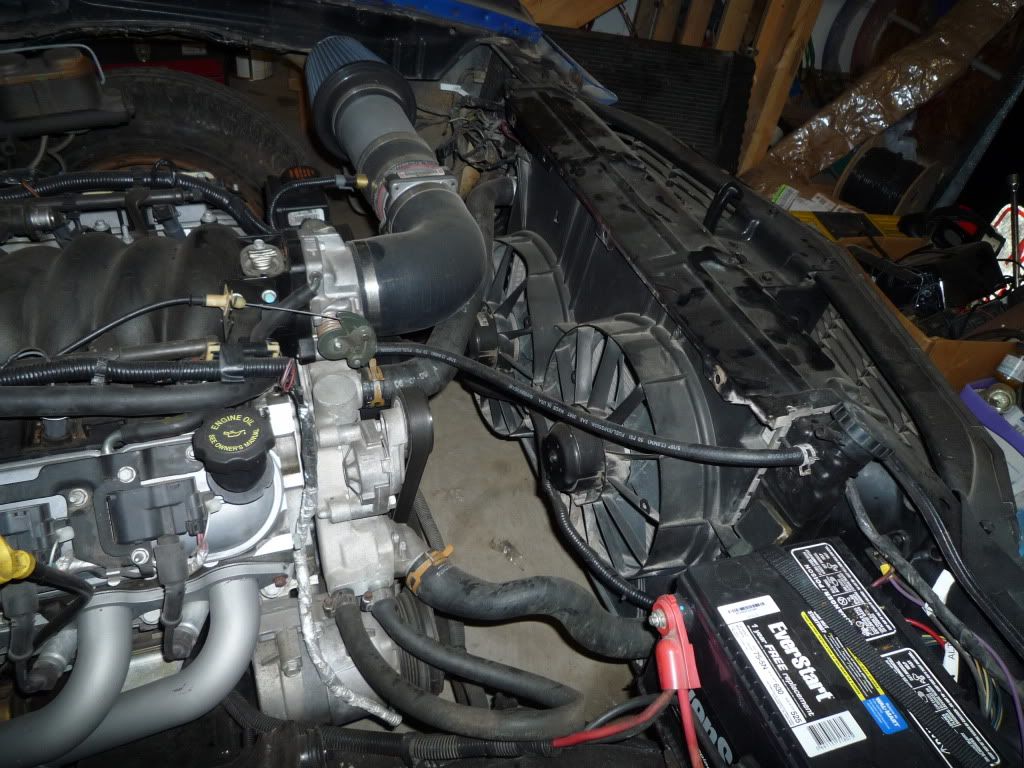
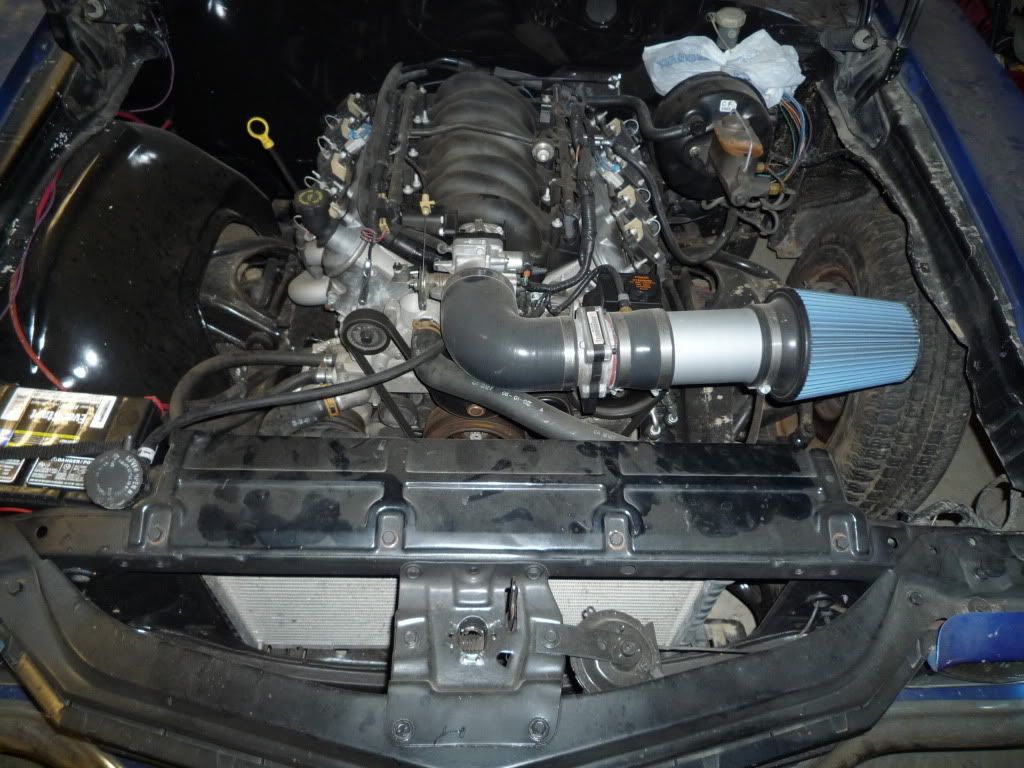
You'll have to excuse the thick layer of dust on everything. Hopefully these two pictures will help you out. You can see the F-body radiator doesn't quite fill up the opening in the radiator support, it left an open area to the driver's side of the radiator. My plan is to fabricate a cold air intake box that brings its air in through this open area.
07-23-2010, 11:55 PM
#163
TECH Regular
iTrader: (31)
Join Date: Feb 2007
Location: Fairfield, CA
Posts: 420
Likes: 0
Received 0 Likes
on
0 Posts
you dont know how long i searched last night to find out if f body radiator could fit in an A body!!!! all i found were into first gen f body. i found a radiator and fan for 125 bucks but i dont know if its out of a vette or f body.do u have any pics of yours or how you got it to fit in there?
07-26-2010, 12:37 PM
#164
TECH Regular
iTrader: (31)
Join Date: Feb 2007
Location: Fairfield, CA
Posts: 420
Likes: 0
Received 0 Likes
on
0 Posts
Thanks, hopefully this thread will help your swap go a little smoother. I've been working on building a new box for the trunk floor (fuel pump access), and the box is just about ready to weld in. I'll try to post some details of the box construction in the near future. I'm also close to finishing up the rear disc brake swap, so with any luck, it shouldn't be too long until I can get back to driving it again.
08-04-2010, 11:41 PM
#165
On The Tree
Thread Starter
iTrader: (6)
Join Date: Mar 2006
Location: Kansas
Posts: 192
Likes: 0
Received 0 Likes
on
0 Posts
I ended up dropping the fuel tank back out of the car in order to weld a new box into the trunk floor. I finally got the box welded in this evening, so hopefully before long I'll be able to post some updated pictures of that as well.
08-15-2010, 11:24 PM
#166
On The Tree
Thread Starter
iTrader: (6)
Join Date: Mar 2006
Location: Kansas
Posts: 192
Likes: 0
Received 0 Likes
on
0 Posts
I'm feeling good this evening, I was able to fire up the Chevelle for the first time in a few months. I finally finished the trunk floor rework and was able to reinstall the fuel tank and fire it up for a bit. I also finished the right rear disc brake install. Hopefully tomorrow evening I can finish up the left rear disc brake setup. After that, I need to get my wheel centers powder coated and buy some tires before I can get it back on the road. I'll post some update pics soon.
09-06-2010, 01:46 AM
#167
are your using the fbody master? im swapping rear discs on to mine and already have the front discs with a new a body master cylinder. (disc/drum) master i was debating on if i needed a old corvette master cylinder (disc/disc) or a distribution block or install an adjustable regulator for the rear brakes to slow the apply. ive done rear disc conversion on my truck with no regulator and it stops fine not any more rear wheel lock up than before with drums. are u using all the fbody distribution and regulators and plumming?
09-06-2010, 08:46 AM
#168
TECH Regular
iTrader: (31)
Join Date: Feb 2007
Location: Fairfield, CA
Posts: 420
Likes: 0
Received 0 Likes
on
0 Posts
All of the regulating on a stock newer camaro is done through the ABS block so unless your converting the ABS system aswell it will not work out. If your looking I have a master and booster from a 02 Camaro that Id be willing to sell.
09-06-2010, 04:57 PM
#169
On The Tree
Thread Starter
iTrader: (6)
Join Date: Mar 2006
Location: Kansas
Posts: 192
Likes: 0
Received 0 Likes
on
0 Posts
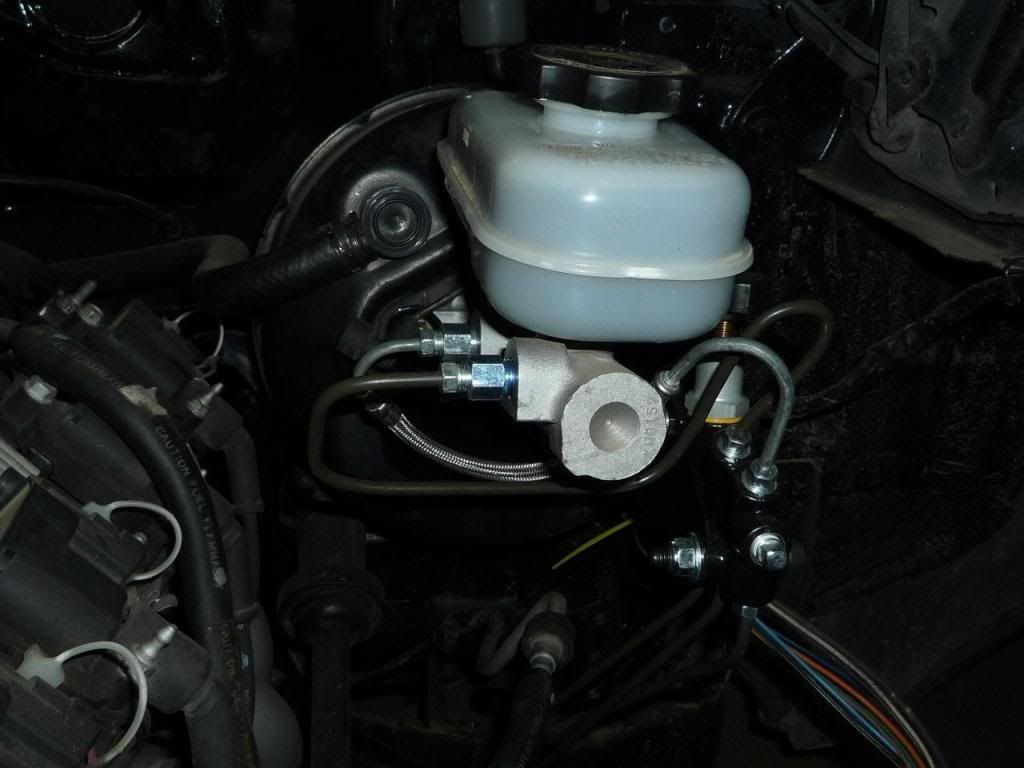
I believe Bullitt is right. I'm not using the ABS block. I'm using the 4th-gen F-body clutch/brake/gas pedals, brake booster, possibly master cylinder, and front and rear disk brakes. Between the master cylinder and the brakes, I'll be using a Wilwood adjustable proportioning valve. I also have an extra 4th-gen F-body master cylinder and brake booster if anyone is interested.
09-12-2010, 10:20 PM
#170
On The Tree
Thread Starter
iTrader: (6)
Join Date: Mar 2006
Location: Kansas
Posts: 192
Likes: 0
Received 0 Likes
on
0 Posts
No pictures to show yet, but I ended up installing the '99 Trans Am master cylinder along with a Wilwood adjustable proportioning valve / combination valve (p/n 260-11179). I fabbed a bracket and mounted the prop valve toward the driver's side of the master cylilnder. I bent up a new hard line from the prop valve to the LF brake, and I made hard line extensions to connect to the existing RF and rear brake lines. I'll try to post up a picture or two before long.
I'd to get the centers of my new wheels powder coated before installation. Any suggestions on powder coaters in the KS/MO/OK area? If so, send me a PM and let me know.
I'd to get the centers of my new wheels powder coated before installation. Any suggestions on powder coaters in the KS/MO/OK area? If so, send me a PM and let me know.
10-04-2010, 08:04 PM
#171
On The Tree
Thread Starter
iTrader: (6)
Join Date: Mar 2006
Location: Kansas
Posts: 192
Likes: 0
Received 0 Likes
on
0 Posts
Time for an update... As mentioned before, I installed the '98-'02 F-body master cylinder and booster, and I fabbed up a little bracket to mount a Wilwood adjustable proportioning valve. The valve also serves as a distribution block and splits the lines out into left front, right front, and rear.
Also, after a bit of caliper and rotor cleanup (although the rotors still don't look very nice), you can see the completed front and rear brake install in the pic below. The one detail I still need to work out is the emergency brake connections on the rear brakes.
Also, I got new wheels and had the wheel centers soda blasted to prep for powder coating. Here are the wheels prepped for blasting:

And here's one after soda blasting:
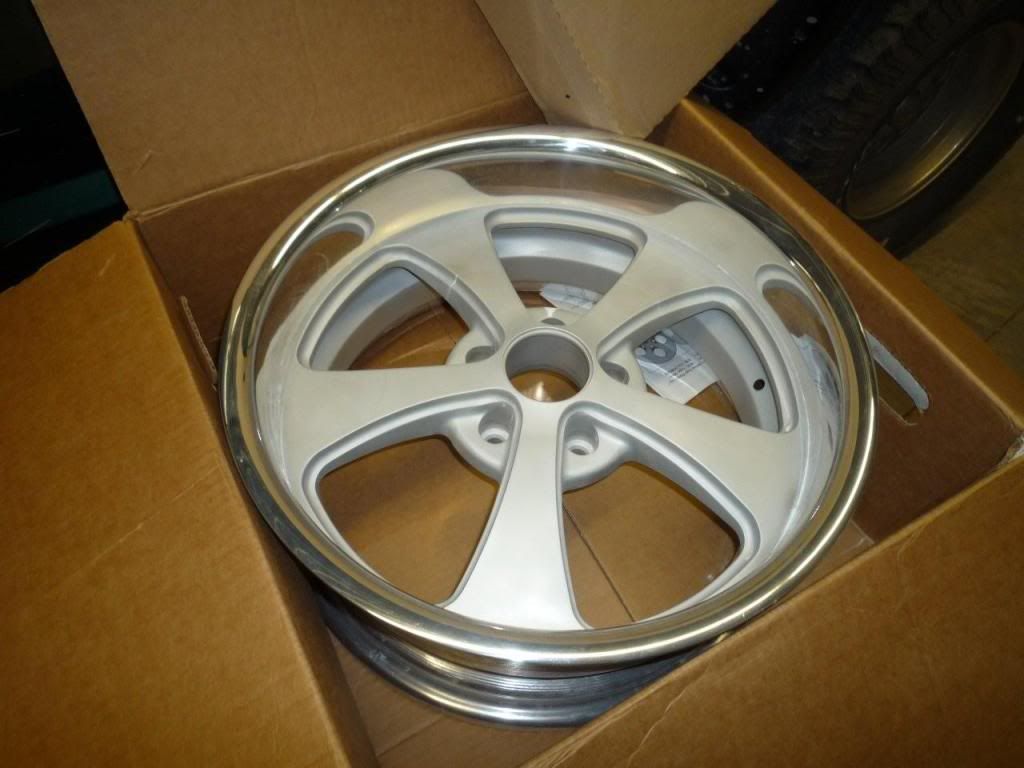
They're at the powder coater's place now, hopefully they'll be ready in the next week or so. I've got a new set of Nitto Invos on order that should be showing up soon. My original plan was for NT05's for the rear, but the size I needed was on backorder till sometime in November.
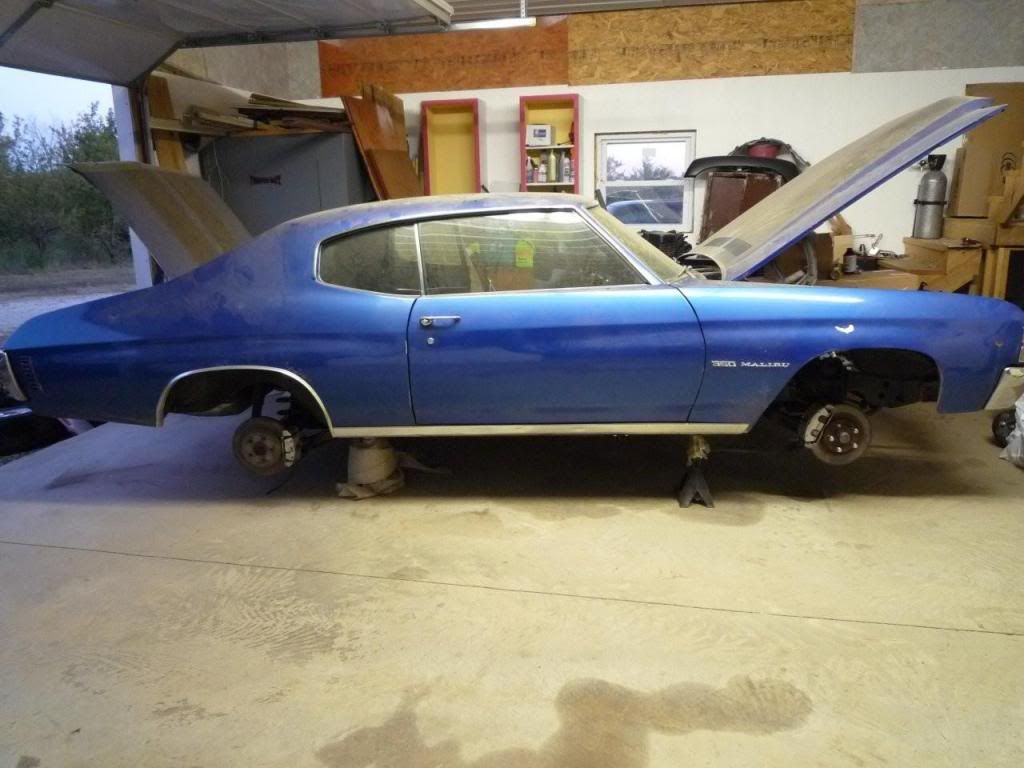
I gutted the interior over the weekend, and as soon as the new wheels and tires get here, I'll be able to roll the Chevelle out to clean up the floorplans and treat them with the KBS 3-step cleaning/convering/coating system. After that, it'll be time for the floorpan insulation and carpeting. With fall weather in full swing, I've got the itch to get this thing on the road.
Also, after a bit of caliper and rotor cleanup (although the rotors still don't look very nice), you can see the completed front and rear brake install in the pic below. The one detail I still need to work out is the emergency brake connections on the rear brakes.
Also, I got new wheels and had the wheel centers soda blasted to prep for powder coating. Here are the wheels prepped for blasting:
And here's one after soda blasting:
They're at the powder coater's place now, hopefully they'll be ready in the next week or so. I've got a new set of Nitto Invos on order that should be showing up soon. My original plan was for NT05's for the rear, but the size I needed was on backorder till sometime in November.
I gutted the interior over the weekend, and as soon as the new wheels and tires get here, I'll be able to roll the Chevelle out to clean up the floorplans and treat them with the KBS 3-step cleaning/convering/coating system. After that, it'll be time for the floorpan insulation and carpeting. With fall weather in full swing, I've got the itch to get this thing on the road.
10-19-2010, 11:29 PM
#172
On The Tree
Thread Starter
iTrader: (6)
Join Date: Mar 2006
Location: Kansas
Posts: 192
Likes: 0
Received 0 Likes
on
0 Posts
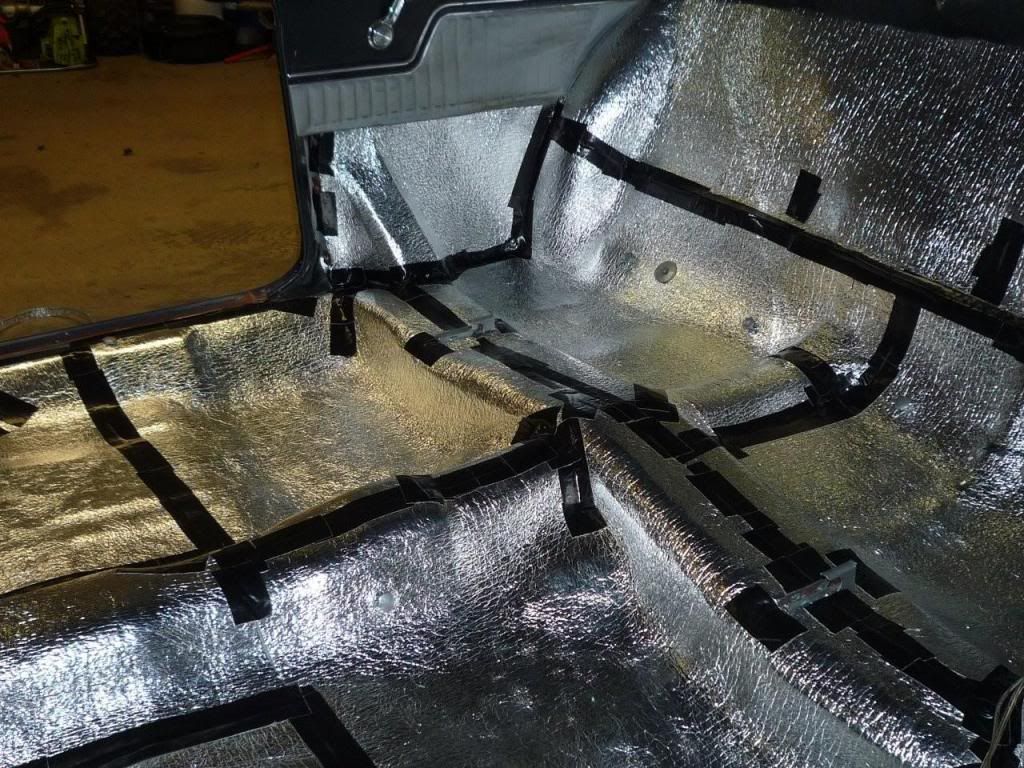
I just finished installing sound deadening / insulation on the Chevelle this evening. Hopefully tomorrow evening I can get started putting the new carpet in.
I also got the new wheels and tires mounted, so as soon as I get a layer of dirt washed off the car, I'll post a picture.
I also got the new wheels and tires mounted, so as soon as I get a layer of dirt washed off the car, I'll post a picture.
10-21-2010, 09:00 PM
#173
Teching In

Join Date: Oct 2008
Posts: 2
Likes: 0
Received 0 Likes
on
0 Posts
Hey kst, who are you working for? I'm just curious because I am currently a ME student at The University of Akron. The car is coming along nicely, have any plans for coil overs or tubulars for the suspension?
10-21-2010, 11:09 PM
#174
On The Tree
Thread Starter
iTrader: (6)
Join Date: Mar 2006
Location: Kansas
Posts: 192
Likes: 0
Received 0 Likes
on
0 Posts
I picked up a used set of UMI tubular lower control arms for the rear that'll allow me to also install the rear anti-roll bar I've had sitting around for a while. I don't have any current plans for replacing the front control arms, although I would like to upgrade the front anti-roll bar at some point. I've been told that a 2nd-gen Trans Am WS6 sway bar is a good upgrade for the front of a Chevelle.
 11-29-2010, 08:54 PM
#176
I've been following your thread lots of great info thanks. What kind of sealed did you use on your fuel tank. Did you coat the inside. I thought I seen where you said somewhere about the sealed you used on the welds but I can't seem to find it now. Thanks for the info. And very nice car.
11-29-2010, 10:53 PM
#177
On The Tree
Thread Starter
iTrader: (6)
Join Date: Mar 2006
Location: Kansas
Posts: 192
Likes: 0
Received 0 Likes
on
0 Posts
I've been following your thread lots of great info thanks. What kind of sealed did you use on your fuel tank. Did you coat the inside. I thought I seen where you said somewhere about the sealed you used on the welds but I can't seem to find it now. Thanks for the info. And very nice car.
As an alternative, I've heard a lot of good reports of another product called Red Kote. This may be the best solution. Red Kote
11-30-2010, 12:22 PM
#180
On The Tree
Thread Starter
iTrader: (6)
Join Date: Mar 2006
Location: Kansas
Posts: 192
Likes: 0
Received 0 Likes
on
0 Posts
I agree with Bczee that one of the pour-in sealers would probably be a good way to go. As I understand, that's the way Red Kote works as well. A friend used it recently on a Triumph TR4 gas tank that actually had pinholes in it, and it seems to have sealed up well.